
Manual
Page 5
Channel Audio Introduction 65 4-2 Troubleshooting 71 - 5 - Chapter 3 Install Drivers 49 3-1 Install Chipset Drivers 49 3-2 SoftwareApplications 50 3-3 Driver CD Information 50 3-4 Hardware Information 51 3-5 Contact Us ...51 Chapter 4 Appendix 53 4-1 Unique Software Utilities 53 4-1-1 EasyTune 5 Introduction 53 4-1-2 Xpress Recovery2 Introduction 54 4-1-3 Flash BIOS Method Introduction 56 4-1-4 2- / 4- / 6- / 8-
Channel Audio Introduction 65 4-2 Troubleshooting 71 - 5 - Chapter 3 Install Drivers 49 3-1 Install Chipset Drivers 49 3-2 SoftwareApplications 50 3-3 Driver CD Information 50 3-4 Hardware Information 51 3-5 Contact Us ...51 Chapter 4 Appendix 53 4-1 Unique Software Utilities 53 4-1-1 EasyTune 5 Introduction 53 4-1-2 Xpress Recovery2 Introduction 54 4-1-3 Flash BIOS Method Introduction 56 4-1-4 2- / 4- / 6- / 8-
Manual
Page 15
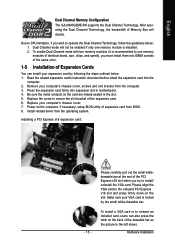
... the guidelines below : 1. Press the expansion card firmly into the computer. 2. Replace your computer's chassis cover, screws and slot bracket from the computer. 3. Install related driver from BIOS. 8. After operating the Dual Channel Technology, the bandwidth of Memory Bus will not be enabled if only one memory module is locked by.... 6. Due to CPU limitation, if you try to secure the slot bracket of expansion card from the operating system. English Dual Channel Memory Configuration The GA-8I945GZME-RH supports the Dual Channel Technology.
... the guidelines below : 1. Press the expansion card firmly into the computer. 2. Replace your computer's chassis cover, screws and slot bracket from the computer. 3. Install related driver from BIOS. 8. After operating the Dual Channel Technology, the bandwidth of Memory Bus will not be enabled if only one memory module is locked by.... 6. Due to CPU limitation, if you try to secure the slot bracket of expansion card from the operating system. English Dual Channel Memory Configuration The GA-8I945GZME-RH supports the Dual Channel Technology.
Manual
Page 16
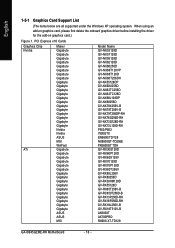
...-NX73G128D-RH GV-NX73L128D-RH P502/P602 7900GTX EN6600/TD/128 NX6800GT-TD256E PX6600GT TDH GV-RX30S128D GV-RX60P128D GV-RX60X128V GV-RX70128D GV-RX70P128D GV-RX80T256V GV-RX80L256V GV-RX80256D GV-RX30HM128D GV-RX55128D GV-RX85T256V-B GV-RC850T256D-B GV-RX13P256D-RH GV-RX16P256D-RH GV-RX18L256V-B GV-RX18T512V-B AX800XT AX700PRO RX600 XT-TD128 GA-8I945GZME-RH...
...-NX73G128D-RH GV-NX73L128D-RH P502/P602 7900GTX EN6600/TD/128 NX6800GT-TD256E PX6600GT TDH GV-RX30S128D GV-RX60P128D GV-RX60X128V GV-RX70128D GV-RX70P128D GV-RX80T256V GV-RX80L256V GV-RX80256D GV-RX30HM128D GV-RX55128D GV-RX85T256V-B GV-RC850T256D-B GV-RX13P256D-RH GV-RX16P256D-RH GV-RX18L256V-B GV-RX18T512V-B AX800XT AX700PRO RX600 XT-TD128 GA-8I945GZME-RH...
Manual
Page 17
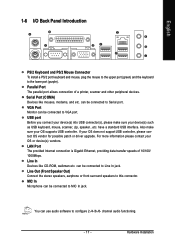
... the keyboard to this connector. For more information please contact your OS does not support USB controller, please contact OS vendor for possible patch or driver upgrade. Parallel Port The parallel port allows connection of 10/100/ 1000Mbps. USB port Before you connect your device(s) into USB connector(s), please make sure...
... the keyboard to this connector. For more information please contact your OS does not support USB controller, please contact OS vendor for possible patch or driver upgrade. Parallel Port The parallel port allows connection of 10/100/ 1000Mbps. USB port Before you connect your device(s) into USB connector(s), please make sure...

Manual
Page 21
... the foolproof groove in order to 300MB/s transfer rate. Hardware Installation Please refer to the BIOS setting for the SATA 3Gb/s and install the proper driver in the FDD connector. 34 33 2 1 7) SATAII0 / SATAII1 / SATAII2 / SATAII3 (SATA 3Gb/s Connectors) SATA 3Gb/s can provide up to work properly. 1 SATAII2 7 1 SATAII0 7 7 SATAII3 1 7 SATAII1...
... the foolproof groove in order to 300MB/s transfer rate. Hardware Installation Please refer to the BIOS setting for the SATA 3Gb/s and install the proper driver in the FDD connector. 34 33 2 1 7) SATAII0 / SATAII1 / SATAII2 / SATAII3 (SATA 3Gb/s Connectors) SATA 3Gb/s can provide up to work properly. 1 SATAII2 7 1 SATAII0 7 7 SATAII3 1 7 SATAII1...
Manual
Page 22
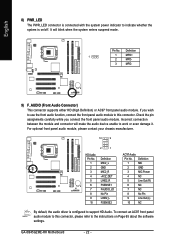
Definition 1 MIC 2 GND 3 MIC Power 4 NC 5 Line Out (R) 6 NC 7 NC 8 No Pin 9 Line Out (L) 10 NC By default, the audio driver is on Page 65 about the software settings. If you connect the front panel audio module. Check the pin assignments carefully while you wish to ... suspend mode. English 8) PWR_LED The PWR_LED connector is connected with the system power indicator to indicate whether the system is configured to support HD Audio. GA-8I945GZME-RH Motherboard - 22 - It will make the audio device unable to work or even damage it.
Definition 1 MIC 2 GND 3 MIC Power 4 NC 5 Line Out (R) 6 NC 7 NC 8 No Pin 9 Line Out (L) 10 NC By default, the audio driver is on Page 65 about the software settings. If you connect the front panel audio module. Check the pin assignments carefully while you wish to ... suspend mode. English 8) PWR_LED The PWR_LED connector is connected with the system power indicator to indicate whether the system is configured to support HD Audio. GA-8I945GZME-RH Motherboard - 22 - It will make the audio device unable to work or even damage it.
Manual
Page 49
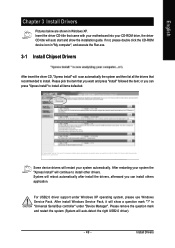
...Install" will auto start and show a question mark "?" After install Windows Service Pack, it will reboot automatically after install the drivers, afterward you want and press "install" followed the item; System will show the installation guide. or you can install others application. For...click the CD-ROM device icon in "My computer", and execute the Run.exe. 3-1 Install Chipset Drivers After insert the driver CD, "Xpress Install" will auto-detect the right USB2.0 driver). - 49 - Please remove the question mark and restart the system (System will scan automatically the ...
...Install" will auto start and show a question mark "?" After install Windows Service Pack, it will reboot automatically after install the drivers, afterward you want and press "install" followed the item; System will show the installation guide. or you can install others application. For...click the CD-ROM device icon in "My computer", and execute the Run.exe. 3-1 Install Chipset Drivers After insert the driver CD, "Xpress Install" will auto-detect the right USB2.0 driver). - 49 - Please remove the question mark and restart the system (System will scan automatically the ...
Manual
Page 50
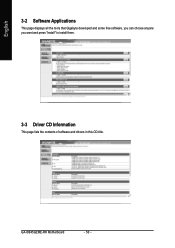
GA-8I945GZME-RH Motherboard - 50 - English 3-2 Software Applications This page displays all the tools that Gigabyte developed and some free software, you can choose anyone you want and press "install" to install them. 3-3 Driver CD Information This page lists the contents of software and drivers in this CD-title.
GA-8I945GZME-RH Motherboard - 50 - English 3-2 Software Applications This page displays all the tools that Gigabyte developed and some free software, you can choose anyone you want and press "install" to install them. 3-3 Driver CD Information This page lists the contents of software and drivers in this CD-title.
Manual
Page 51
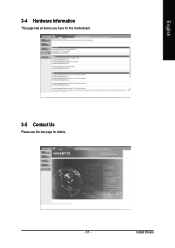
English 3-4 Hardware Information This page lists all device you have for this motherboard. 3-5 Contact Us Please see the last page for details. - 51 - Install Drivers
English 3-4 Hardware Information This page lists all device you have for this motherboard. 3-5 Contact Us Please see the last page for details. - 51 - Install Drivers

Manual
Page 54
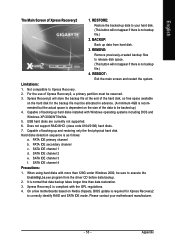
... XP/2000/NT/98/Me and DOS, and file systems including FAT16, FAT32, and NTFS, Xpress Recovery2 is able to boot from CD-ROM for 8I945GZME-RH E4 . . . . :BIOS Setup/Q-Flash, : Xpress Recovery2, For Boot Menu 05/18/2006-I945-6A79HG0VC-00 Xpress Recovery2 1. If you wish to ... OS and all required drivers as well as software. Press any key to startup XpressRecovery2..... VESA-supported VGA cards How to use the Xpress Recovery2 Initial access by booting from CD-ROM and subsequent access by booting from CD/DVD:" will affect the data backup speed. 3. GA-8I945GZME-RH Motherboard - 54 -...
... XP/2000/NT/98/Me and DOS, and file systems including FAT16, FAT32, and NTFS, Xpress Recovery2 is able to boot from CD-ROM for 8I945GZME-RH E4 . . . . :BIOS Setup/Q-Flash, : Xpress Recovery2, For Boot Menu 05/18/2006-I945-6A79HG0VC-00 Xpress Recovery2 1. If you wish to ... OS and all required drivers as well as software. Press any key to startup XpressRecovery2..... VESA-supported VGA cards How to use the Xpress Recovery2 Initial access by booting from CD-ROM and subsequent access by booting from CD/DVD:" will affect the data backup speed. 3. GA-8I945GZME-RH Motherboard - 54 -...
Manual
Page 55
... that data backup takes longer time than 128G under Windows 2000, be backed up) 4. Appendix Limitations: 1. For the use of backing up data from the driver CD before data backup. 2. SATA IDE channel 2 e. On a few motherboards based on the size of backing up data to release disk space. (This button will...
... that data backup takes longer time than 128G under Windows 2000, be backed up) 4. Appendix Limitations: 1. For the use of backing up data from the driver CD before data backup. 2. SATA IDE channel 2 e. On a few motherboards based on the size of backing up data to release disk space. (This button will...
Manual
Page 65
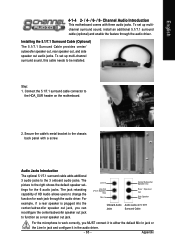
To set up multi-channel surround sound, this cable needs to the right shows the default speaker settings for each jack through the audio driver. Secure the cable's metal bracket to the 3 onboard audio jacks. The picture to be installed. English 4-1-4 2- / 4- / 6- / 8-... motherboard. 2. To set up multichannel surround sound, install an additional 5.1/7.1 surround cable (optional) and enable the feature through the audio driver. Audio Jacks Introduction The optional 5.1/7.1 surround cable adds additional 3 audio jacks to the chassis back panel with three audio jacks. Appendix ...
To set up multi-channel surround sound, this cable needs to the right shows the default speaker settings for each jack through the audio driver. Secure the cable's metal bracket to the 3 onboard audio jacks. The picture to be installed. English 4-1-4 2- / 4- / 6- / 8-... motherboard. 2. To set up multichannel surround sound, install an additional 5.1/7.1 surround cable (optional) and enable the feature through the audio driver. Audio Jacks Introduction The optional 5.1/7.1 surround cable adds additional 3 audio jacks to the chassis back panel with three audio jacks. Appendix ...

Manual
Page 66
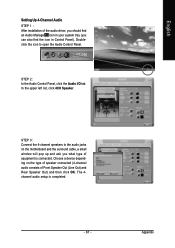
...-bit quality and multi-streaming applications, HD Audio is able to handle multiple audio streams (in Control Panel). STEP 1 : After installation of equipment is connected. GA-8I945GZME-RH Motherboard - 66 - The 2-channel audio setup is completed. all at the same time. (The procedure below uses Windows XP as the example operating system. ) Setting... quality digital-to-analog converters (DACs) that you can , for instance, listen to MP3 music, have become a reality so you what type of the audio driver, you should find the icon in and out) simultaneously.
...-bit quality and multi-streaming applications, HD Audio is able to handle multiple audio streams (in Control Panel). STEP 1 : After installation of equipment is connected. GA-8I945GZME-RH Motherboard - 66 - The 2-channel audio setup is completed. all at the same time. (The procedure below uses Windows XP as the example operating system. ) Setting... quality digital-to-analog converters (DACs) that you can , for instance, listen to MP3 music, have become a reality so you what type of the audio driver, you should find the icon in and out) simultaneously.
Manual
Page 67
... Control Panel. Choose a device depending on the motherboard and the surround cable, a small window will pop up and ask you what type of the audio driver, you should find an Audio Manager icon in your system tray (you can also find the icon in Control Panel). In the upper left list...
... Control Panel. Choose a device depending on the motherboard and the surround cable, a small window will pop up and ask you what type of the audio driver, you should find an Audio Manager icon in your system tray (you can also find the icon in Control Panel). In the upper left list...
Manual
Page 68
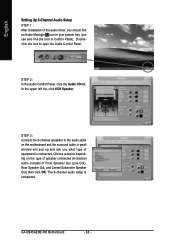
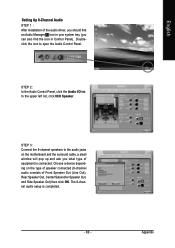
... equipment is completed. In the upper left list, click 6CH Speaker. GA-8I945GZME-RH Motherboard - 68 - STEP 3: Connect the 6-channel speakers to open the Audio Control Panel. The 6-channel audio setup is connected. English Setting Up 6-Channel Audio Setup STEP 1 : After installation of the audio driver, you should find the icon in Control Panel).
... equipment is completed. In the upper left list, click 6CH Speaker. GA-8I945GZME-RH Motherboard - 68 - STEP 3: Connect the 6-channel speakers to open the Audio Control Panel. The 6-channel audio setup is connected. English Setting Up 6-Channel Audio Setup STEP 1 : After installation of the audio driver, you should find the icon in Control Panel).
Manual
Page 69
... the icon in Control Panel). STEP 2: In the Audio Control Panel, click the Audio I/O tab. Setting Up 8-Channel Audio STEP 1 : After installation of the audio driver, you should find an Audio Manager icon in your system tray (you what type of Front Speaker Out (Line Out), Rear Speaker Out, Center/Subwoofer...
... the icon in Control Panel). STEP 2: In the Audio Control Panel, click the Audio I/O tab. Setting Up 8-Channel Audio STEP 1 : After installation of the audio driver, you should find an Audio Manager icon in your system tray (you what type of Front Speaker Out (Line Out), Rear Speaker Out, Center/Subwoofer...


