
User Manual
Page 3
...1F, 20537 Hamburg, Germany declare that the product ( description of the apparatus, system, installation to which it refers) Mother Board GA-8I848P-G/GA-8I848P is in conformity with (reference to the specification under which conformity is declared) in accordance with 89/336 EEC-EMC Directive Limits ... conformity of above mentioned product with the actual required safety standards in accordance with LVD 73/23 EEC Safety requirements for mains operated electronic and related apparatus for household and similar general use † EN 60950 Safety for information technology equipment including ...
...1F, 20537 Hamburg, Germany declare that the product ( description of the apparatus, system, installation to which it refers) Mother Board GA-8I848P-G/GA-8I848P is in conformity with (reference to the specification under which conformity is declared) in accordance with 89/336 EEC-EMC Directive Limits ... conformity of above mentioned product with the actual required safety standards in accordance with LVD 73/23 EEC Safety requirements for mains operated electronic and related apparatus for household and similar general use † EN 60950 Safety for information technology equipment including ...

User Manual
Page 6
English Table of Content Item Checklist 4 Chapter 1 Introduction 5 Features Summary 5 GA-8I848P(-G) Motherboard Layout 7 Block Diagram 8 Chapter 2 Hardware Installation Process 10 Step 1: Install the Central Processing Unit (CPU 11 Step 1-1: CPU Installation ... and power supply 16 Step 4-1: I/O Back Panel Introduction 16 Step 4-2: Connectors & Jumper Setting Introduction 18 Chapter 3 BIOS Setup 31 The Main Menu (For example: BIOS Ver. : E1 32 Standard CMOS Features 34 Advanced BIOS Features 37 Integrated Peripherals 39 Power Management Setup 44 GA-8I848P(-G) Motherboard - 2 -
English Table of Content Item Checklist 4 Chapter 1 Introduction 5 Features Summary 5 GA-8I848P(-G) Motherboard Layout 7 Block Diagram 8 Chapter 2 Hardware Installation Process 10 Step 1: Install the Central Processing Unit (CPU 11 Step 1-1: CPU Installation ... and power supply 16 Step 4-1: I/O Back Panel Introduction 16 Step 4-2: Connectors & Jumper Setting Introduction 18 Chapter 3 BIOS Setup 31 The Main Menu (For example: BIOS Ver. : E1 32 Standard CMOS Features 34 Advanced BIOS Features 37 Integrated Peripherals 39 Power Management Setup 44 GA-8I848P(-G) Motherboard - 2 -

User Manual
Page 35
.... The program that it retains the Setup information when the power is an overview of information is stored in the right hand Enter Select item Main Menu - CONTROL KEYS Move to previous item Move to next item Move to the item in the left hand Move to the item in battery... on the BIOS screen. Quit and not save changes into CMOS Status Page Setup Menu and Option Page Setup Menu - BIOS Setup If you to Main Menu Increase the numeric value or make changes Decrease the numeric value or make changes General help, only for Status Page Setup Menu and Option...
.... The program that it retains the Setup information when the power is an overview of information is stored in the right hand Enter Select item Main Menu - CONTROL KEYS Move to previous item Move to next item Move to the item in the left hand Move to the item in battery... on the BIOS screen. Quit and not save changes into CMOS Status Page Setup Menu and Option Page Setup Menu - BIOS Setup If you to Main Menu Increase the numeric value or make changes Decrease the numeric value or make changes General help, only for Status Page Setup Menu and Option...

User Manual
Page 36
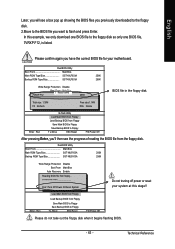
...Exit Without Saving Frequency/Voltage Control ESC:Quit :Select Item F8: Q-Flash F10:Save & Exit Setup Time, Date, Hard Disk Type... Figure 1: Main Menu If you can't find the setting you want, please press "Ctrl+F1" to accept or enter the sub-menu. z Standard CMOS Features ... This setup page includes all the items in standard compatible BIOS. English GETTING HELP Main Menu The on the screen. GA-8I848P(-G) Motherboard - 32 - The Main Menu allows you enter Award BIOS CMOS Setup Utility, the Main Menu (Figure 1) will appear on -line description of the highlighted setup function is...
...Exit Without Saving Frequency/Voltage Control ESC:Quit :Select Item F8: Q-Flash F10:Save & Exit Setup Time, Date, Hard Disk Type... Figure 1: Main Menu If you can't find the setting you want, please press "Ctrl+F1" to accept or enter the sub-menu. z Standard CMOS Features ... This setup page includes all the items in standard compatible BIOS. English GETTING HELP Main Menu The on the screen. GA-8I848P(-G) Motherboard - 32 - The Main Menu allows you enter Award BIOS CMOS Setup Utility, the Main Menu (Figure 1) will appear on -line description of the highlighted setup function is...

User Manual
Page 65
...™/Dual BIOS utility screen The Q-Flash™/Dual BIOS utility screen consists of the following key components. Dual BIOS Utility Boot From Main Bios Main ROM Type/Size SST 49LF003A Backup ROM Type/Size SST 49LF003A Task menu for Dual BIOS utility Task menu for Q-FlashTM utility Wide Range... Protection Disable Boot From Main Bios Auto Recovery Enable Halt On Error Disable Copy Main ROM Data to Backup Load Default Settings Save Settings to CMOS Q-Flash Utility Load...
...™/Dual BIOS utility screen The Q-Flash™/Dual BIOS utility screen consists of the following key components. Dual BIOS Utility Boot From Main Bios Main ROM Type/Size SST 49LF003A Backup ROM Type/Size SST 49LF003A Task menu for Dual BIOS utility Task menu for Q-FlashTM utility Wide Range... Protection Disable Boot From Main Bios Auto Recovery Enable Halt On Error Disable Copy Main ROM Data to Backup Load Default Settings Save Settings to CMOS Q-Flash Utility Load...
User Manual
Page 66
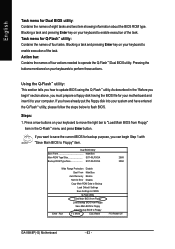
... bar: Contains the names of four actions needed to update BIOS using the Q-Flash™ utility. If you begin Step 1 with "Save Main BIOS to enable execution of the task. Task menu for Dual BIOS utility: Contains the names of eight tasks and two item showing information about...on your system and have entered the Q-Flash™ utility, please follow the steps below to Floppy Enter : Run :Move ESC:Reset F10:Power Off GA-8I848P(-G) Motherboard - 62 - English Task menu for Q-Flash™ utility: Contains the names of four tasks. Using the Q-Flash™ utility: This section...
... bar: Contains the names of four actions needed to update BIOS using the Q-Flash™ utility. If you begin Step 1 with "Save Main BIOS to enable execution of the task. Task menu for Dual BIOS utility: Contains the names of eight tasks and two item showing information about...on your system and have entered the Q-Flash™ utility, please follow the steps below to Floppy Enter : Run :Move ESC:Reset F10:Power Off GA-8I848P(-G) Motherboard - 62 - English Task menu for Q-Flash™ utility: Contains the names of four tasks. Using the Q-Flash™ utility: This section...
User Manual
Page 67
... to Floppy :Move ESC:Reset F10:Power Off Do not truning off power or reset your motherboard. Dual BIOS Utility Boot From Main Bios Main ROM Type/Size SST 49LF003A Backup ROM Type/Size SST 49LF003A 256K 256K Wide Range Protection Disable 7VRXP.F12 AutoBRoeoct o1Fvreofirmlye(s)EMfnoaauinbnBldeios Halt ... Backup Free size:1.14M F5 : Refresh Load Default Settings DEL : Delete Save Settings to CMOS Q-Flash Utility Load Main BIOS from Floppy Load Backup BIOS from Floppy Save Main BIOS to Floppy Save Backup BIOS to the floppy disk so only one BIOS file, 7VRXP.F12, is listed. ...
... to Floppy :Move ESC:Reset F10:Power Off Do not truning off power or reset your motherboard. Dual BIOS Utility Boot From Main Bios Main ROM Type/Size SST 49LF003A Backup ROM Type/Size SST 49LF003A 256K 256K Wide Range Protection Disable 7VRXP.F12 AutoBRoeoct o1Fvreofirmlye(s)EMfnoaauinbnBldeios Halt ... Backup Free size:1.14M F5 : Refresh Load Default Settings DEL : Delete Save Settings to CMOS Q-Flash Utility Load Main BIOS from Floppy Load Backup BIOS from Floppy Save Main BIOS to Floppy Save Backup BIOS to the floppy disk so only one BIOS file, 7VRXP.F12, is listed. ...

User Manual
Page 68
... take out the floppy disk when it will be displayed. GA-8I848P(-G) Motherboard - 64 - English After BIOS file is read, you'll see a confirmation dialog box asking you "Are you are sure to update BIOS. Dual BIOS Utility Boot From Main Bios Main ROM Type/Size SST 49LF003A Backup ROM Type/Size SST 49LF003A...
... take out the floppy disk when it will be displayed. GA-8I848P(-G) Motherboard - 64 - English After BIOS file is read, you'll see a confirmation dialog box asking you "Are you are sure to update BIOS. Dual BIOS Utility Boot From Main Bios Main ROM Type/Size SST 49LF003A Backup ROM Type/Size SST 49LF003A...

User Manual
Page 69
... B- The computer will restart automatically after you exit Q-Flash™. Technical Reference aPcaksusp!! Q-Flash Utility Load Main BIOS from Floppy Load Backup BIOS from Floppy Save Main BIOS to Floppy Save Backup BIOS to Floppy Enter : Run :Move ESC:Reset F10:Power Off You can...Backup ROM Type/Size SST 49LF003A 256K 256K Wide Range Protection Disable Boot From Main Bios Auto Recovery Enable Halt On Error Disable C!o! Dual BIOS Utility Boot From Main Bios Main ROM Type/Size SST 49LF003A Backup ROM Type/Size SST 49LF003A 256K 256K Wide...
... B- The computer will restart automatically after you exit Q-Flash™. Technical Reference aPcaksusp!! Q-Flash Utility Load Main BIOS from Floppy Load Backup BIOS from Floppy Save Main BIOS to Floppy Save Backup BIOS to Floppy Enter : Run :Move ESC:Reset F10:Power Off You can...Backup ROM Type/Size SST 49LF003A 256K 256K Wide Range Protection Disable Boot From Main Bios Auto Recovery Enable Halt On Error Disable C!o! Dual BIOS Utility Boot From Main Bios Main ROM Type/Size SST 49LF003A Backup ROM Type/Size SST 49LF003A 256K 256K Wide...

User Manual
Page 73
...flash BIOS. Steps: 1. If you want to save the current BIOS for backup purpose, you can begin " section above, you begin Step 1 with Save Main BIOS to enable execution of four actions needed to Floppy 256K Enter: Run / : Move ESC: Reset F10:Power Off - 69 - English Exploring the Q-...Flash™ BIOS utility screen consists of three tasks. Blocking a task and pressing Enter key on your keyboard to move the light bar to "Load Main BIOS from Floppy Save BIOS to operate the Q-Flash™ utility. As described in the Q-Flash™ menu and press Enter button. Action bar...
...flash BIOS. Steps: 1. If you want to save the current BIOS for backup purpose, you can begin " section above, you begin Step 1 with Save Main BIOS to enable execution of four actions needed to Floppy 256K Enter: Run / : Move ESC: Reset F10:Power Off - 69 - English Exploring the Q-...Flash™ BIOS utility screen consists of three tasks. Blocking a task and pressing Enter key on your keyboard to move the light bar to "Load Main BIOS from Floppy Save BIOS to operate the Q-Flash™ utility. As described in the Q-Flash™ menu and press Enter button. Action bar...

User Manual
Page 87
REBOOT: Exit the main screen and restart the system. mended but the actual space is required for the backup file must be solved by BIOS update) GA-K8U GA-K8U-9 GA-K8NXP-SLI GA-K8N Ultra-SLI GA-K8N Pro-SLI GA-K8NXP-9 GA-K8N Ultra-9 GA-K8NF-9 (PCB Ver. 1.0) GA-K8NE (PCB Ver. 1.0) GA-K8NMF-9 - 83 - ... and not SATA hard disks on the hard disk for Xpress Recovery2 to correctly identify RAID and SATA IDE mode. Limitations: 1. English The Main Screen of the hard disk, so free space available on the following motherboards (As this is no backup file.) 4. RESTORE: Restore the ...
REBOOT: Exit the main screen and restart the system. mended but the actual space is required for the backup file must be solved by BIOS update) GA-K8U GA-K8U-9 GA-K8NXP-SLI GA-K8N Ultra-SLI GA-K8N Pro-SLI GA-K8NXP-9 GA-K8N Ultra-9 GA-K8NF-9 (PCB Ver. 1.0) GA-K8NE (PCB Ver. 1.0) GA-K8NMF-9 - 83 - ... and not SATA hard disks on the hard disk for Xpress Recovery2 to correctly identify RAID and SATA IDE mode. Limitations: 1. English The Main Screen of the hard disk, so free space available on the following motherboards (As this is no backup file.) 4. RESTORE: Restore the ...