
Manual
Page 3
... motherboard looks like this manual may be reproduced, copied, translated, transmitted, or published in this product, GIGABYTE provides the following types of documentations: For quick set-up of this : "REV: X.X." No part of the product, read the Quick Installation Guide included ...Manual. For product-related information, check on our website at: http://www.gigabyte.com Identifying Your Motherboard Revision The revision number on your motherboard revision before updating motherboard BIOS, drivers, or when looking for technical information. Changes to the specifications and...
... motherboard looks like this manual may be reproduced, copied, translated, transmitted, or published in this product, GIGABYTE provides the following types of documentations: For quick set-up of this : "REV: X.X." No part of the product, read the Quick Installation Guide included ...Manual. For product-related information, check on our website at: http://www.gigabyte.com Identifying Your Motherboard Revision The revision number on your motherboard revision before updating motherboard BIOS, drivers, or when looking for technical information. Changes to the specifications and...

Manual
Page 4
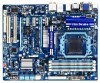
Table of Contents Box Contents...6 Optional Items...6 GA-890GPA-UD3H Motherboard Layout 7 GA-890GPA-UD3H Motherboard Block Diagram 8 Chapter 1 Hardware Installation 9 1-1 Installation Precautions 9 1-2 Product Specifications 10 1-3 Installing the CPU and CPU Cooler 13 1-3-1 ...(M.I.T 39 2-4 Standard CMOS Features 46 2-5 Advanced BIOS Features 48 2-6 Integrated Peripherals 50 2-7 Power Management Setup 53 2-8 PnP/PCI Configurations 55 2-9 PC Health Status 56 2-10 Load Fail-Safe Defaults 58 2-11 Load Optimized Defaults 58 2-12 Set Supervisor/User Password 59 2-13 Save & Exit Setup...
Table of Contents Box Contents...6 Optional Items...6 GA-890GPA-UD3H Motherboard Layout 7 GA-890GPA-UD3H Motherboard Block Diagram 8 Chapter 1 Hardware Installation 9 1-1 Installation Precautions 9 1-2 Product Specifications 10 1-3 Installing the CPU and CPU Cooler 13 1-3-1 ...(M.I.T 39 2-4 Standard CMOS Features 46 2-5 Advanced BIOS Features 48 2-6 Integrated Peripherals 50 2-7 Power Management Setup 53 2-8 PnP/PCI Configurations 55 2-9 PC Health Status 56 2-10 Load Fail-Safe Defaults 58 2-11 Load Optimized Defaults 58 2-12 Set Supervisor/User Password 59 2-13 Save & Exit Setup...

Manual
Page 20
... advanced display performance for AMD platform. BIOS Setup Enter BIOS Setup to set the following instructions on the back panel. Set Init Display First to UMA+SidePort. (Note 2) - C. Set Internal Graphics Mode to OnChipVGA. Set UMA Frame Buffer Size to Disabled. - Set Surround View to 256MB or 512MB. ... the motherboard chipset driver has been installed. (Note 2) To change the Internal Graphics Mode or UMA Frame Buffer Size setting in the operating system first. Configuring the Graphics Driver After installing the motherboard driver in the operating system, go to...
... advanced display performance for AMD platform. BIOS Setup Enter BIOS Setup to set the following instructions on the back panel. Set Init Display First to UMA+SidePort. (Note 2) - C. Set Internal Graphics Mode to OnChipVGA. Set UMA Frame Buffer Size to Disabled. - Set Surround View to 256MB or 512MB. ... the motherboard chipset driver has been installed. (Note 2) To change the Internal Graphics Mode or UMA Frame Buffer Size setting in the operating system first. Configuring the Graphics Driver After installing the motherboard driver in the operating system, go to...

Manual
Page 33
...to do so may cause damage to the motherboard. • After system restart, go to BIOS Setup to load factory defaults (select Load Optimized Defaults) or manually configure the BIOS settings (refer to touch the two pins for BIOS configurations). - 33 - Open: Normal Short: Clear CMOS Values • Always turn off... CMOS values and before turning on the two pins to temporarily short the two pins or use a metal object like a screwdriver to Chapter 2, "BIOS Setup," for a few seconds. To clear the CMOS values, place a jumper cap on your computer and unplug the power cord from the jumper....
...to do so may cause damage to the motherboard. • After system restart, go to BIOS Setup to load factory defaults (select Load Optimized Defaults) or manually configure the BIOS settings (refer to touch the two pins for BIOS configurations). - 33 - Open: Normal Short: Clear CMOS Values • Always turn off... CMOS values and before turning on the two pins to temporarily short the two pins or use a metal object like a screwdriver to Chapter 2, "BIOS Setup," for a few seconds. To clear the CMOS values, place a jumper cap on your computer and unplug the power cord from the jumper....

Manual
Page 35
... CMOS jumper in Chapter 1 for the beep codes description. • It is recommended that you not alter the default settings (unless you not flash the BIOS. Inadequate BIOS flashing may result in system's failure to boot. Refer to Chapter 5, "Troubleshooting," for how to clear the CMOS values...upgrade the BIOS, use either the GIGABYTE Q-Flash or @BIOS utility. • Q-Flash allows the user to quickly and easily upgrade or back up BIOS without entering the operating system. • @BIOS is a Windows-based utility that allows the user to modify basic system configuration settings or to ...
... CMOS jumper in Chapter 1 for the beep codes description. • It is recommended that you not alter the default settings (unless you not flash the BIOS. Inadequate BIOS flashing may result in system's failure to boot. Refer to Chapter 5, "Troubleshooting," for how to clear the CMOS values...upgrade the BIOS, use either the GIGABYTE Q-Flash or @BIOS utility. • Q-Flash allows the user to quickly and easily upgrade or back up BIOS without entering the operating system. • @BIOS is a Windows-based utility that allows the user to modify basic system configuration settings or to ...
Manual
Page 36
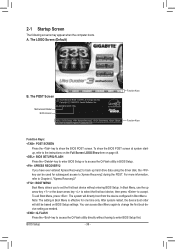
... system will still be used for one time only. 2-1 Startup Screen The following screens may appear when the computer boots. Motherboard Model BIOS Version GA-890GPA-UD3H FBe . . . . : BIOS Setup : XpressRecovery2 : Boot Menu : Qflash 05/24/2010-RS880D-SB850-7A66BG0CC-00 Function Keys Function Keys Function Keys: : POST SCREEN... can be based on page 49. : BIOS SETUP\Q-FLASH Press the key to enter BIOS Setup or to access the Q-Flash utility in BIOS Setup. : XPRESS RECOVERY2 If you to set the first boot device without having to show the BIOS POST screen at system startup, refer to ...
... system will still be used for one time only. 2-1 Startup Screen The following screens may appear when the computer boots. Motherboard Model BIOS Version GA-890GPA-UD3H FBe . . . . : BIOS Setup : XpressRecovery2 : Boot Menu : Qflash 05/24/2010-RS880D-SB850-7A66BG0CC-00 Function Keys Function Keys Function Keys: : POST SCREEN... can be based on page 49. : BIOS SETUP\Q-FLASH Press the key to enter BIOS Setup or to access the Q-Flash utility in BIOS Setup. : XPRESS RECOVERY2 If you to set the first boot device without having to show the BIOS POST screen at system startup, refer to ...

Manual
Page 37
... option is not stable as shown below) appears on the right (submenus only) Restore the previous BIOS settings for the current submenus Load the Fail-Safe BIOS default settings for the current submenus Load the Optimized BIOS default settings for the current submenus Access the Q-Flash utility Display system information Save all the changes and exit...
... option is not stable as shown below) appears on the right (submenus only) Restore the previous BIOS settings for the current submenus Load the Fail-Safe BIOS default settings for the current submenus Load the Optimized BIOS default settings for the current submenus Access the Q-Flash utility Display system information Save all the changes and exit...
Manual
Page 38
...the clock, frequency and voltages of your system becomes unstable and you have loaded the BIOS default settings, you to save the current BIOS settings to a profile. It allows you to restrict access to the system and BIOS Setup. A user password only allows you to make changes. Save & Exit...PnP/PCI Configurations Use this menu to configure the system's PCI & PnP resources. PC Health Status Use this function to load the BIOS settings from BIOS If your CPU, memory, etc. Standard CMOS Features Use this menu to configure the system time and date, hard drive types, ...
...the clock, frequency and voltages of your system becomes unstable and you have loaded the BIOS default settings, you to save the current BIOS settings to a profile. It allows you to restrict access to the system and BIOS Setup. A user password only allows you to make changes. Save & Exit...PnP/PCI Configurations Use this menu to configure the system's PCI & PnP resources. PC Health Status Use this function to load the BIOS settings from BIOS If your CPU, memory, etc. Standard CMOS Features Use this menu to configure the system time and date, hard drive types, ...

Manual
Page 39
...overall system configurations. CPU Host Clock Control x CPU Frequency(MHz) PCIE Clock(MHz) PCIe Spread Spectrum HT Link Width HT Link Frequency Set Memory Clock x Memory Clock } DRAM Configuration ******** System Voltage Optimized ******** System Voltage Control x CPU PLL Voltage Control x DRAM Voltage ...} IGX Configuration CPU Clock Ratio CPU NorthBridge Freq. BIOS Setup This page is recommended that you not to alter the default settings to prevent system instability or other unexpected results. (Inadequately altering the settings may result in red, it is for advanced users ...
...overall system configurations. CPU Host Clock Control x CPU Frequency(MHz) PCIE Clock(MHz) PCIe Spread Spectrum HT Link Width HT Link Frequency Set Memory Clock x Memory Clock } DRAM Configuration ******** System Voltage Optimized ******** System Voltage Control x CPU PLL Voltage Control x DRAM Voltage ...} IGX Configuration CPU Clock Ratio CPU NorthBridge Freq. BIOS Setup This page is recommended that you not to alter the default settings to prevent system instability or other unexpected results. (Inadequately altering the settings may result in red, it is for advanced users ...
Manual
Page 40
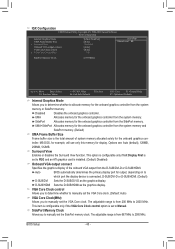
... disables the Surround View function. Auto BIOS automatically determines the primary display port for the onboard graphics controller. VGA Core Clock control Allows you to determine whether to manually set the VGA Core clock. (Default: Auto...Frame Buffer Size Frame buffer size is connected, D-SUB/DVI-D or D-SUB/HDMI. (Default) D-SUB/DVI Sets the D-SUB/DVI-D as the graphics display. SidePort Allocates memory for the onboard graphics controller from the system ... Internal Graphics Mode Allows you to determine whether to manually set the SidePort memory clock. BIOS Setup - 40 -
... disables the Surround View function. Auto BIOS automatically determines the primary display port for the onboard graphics controller. VGA Core Clock control Allows you to determine whether to manually set the VGA Core clock. (Default: Auto...Frame Buffer Size Frame buffer size is connected, D-SUB/DVI-D or D-SUB/HDMI. (Default) D-SUB/DVI Sets the D-SUB/DVI-D as the graphics display. SidePort Allocates memory for the onboard graphics controller from the system ... Internal Graphics Mode Allows you to determine whether to manually set the SidePort memory clock. BIOS Setup - 40 -

Manual
Page 41
.... CPU Frequency(MHz) Allows you to manually set the memory clock. Set Memory Clock Determines whether to manually set the memory clock as required. X4.00 Sets Memory Clock to X5.33. X5.33 Sets Memory Clock to X4.00. BIOS Setup The adjustable range is dependent on the CPU.... Auto (default) allows the BIOS to 16 bit. PCIE Clock(MHz) Allows you to manually set the CPU host frequency. Auto BIOS will automatically adjust the HT Link Frequency. (Default) x1~x10 Sets HT Link Frequency to X6.66. Auto lets BIOS automatically set the PCIe clock frequency. Manual ...
.... CPU Frequency(MHz) Allows you to manually set the memory clock. Set Memory Clock Determines whether to manually set the memory clock as required. X4.00 Sets Memory Clock to X5.33. X5.33 Sets Memory Clock to X4.00. BIOS Setup The adjustable range is dependent on the CPU.... Auto (default) allows the BIOS to 16 bit. PCIE Clock(MHz) Allows you to manually set the CPU host frequency. Auto BIOS will automatically adjust the HT Link Frequency. (Default) x1~x10 Sets HT Link Frequency to X6.66. Auto lets BIOS automatically set the PCIe clock frequency. Manual ...

Manual
Page 42
... two single-channel. (Default) DDR3 Timing Items Manual allows all DDR3 Timing items below to single dual-channel. Ganged Sets memory control mode to be configurable. CAS# latency Options are : Auto (default), Manual. BIOS Setup - 42 - DRAM Configuration CMOS Setup Utility-Copyright (C) 1984-2010 Award Software DRAM Configuration DCTs Mode DDR3 Timing... F5: Previous Values +/-/PU/PD: Value F10: Save F6: Fail-Safe Defaults ESC: Exit F1: General Help F7: Optimized Defaults DCTs Mode Allows you to set memory control mode.
... two single-channel. (Default) DDR3 Timing Items Manual allows all DDR3 Timing items below to single dual-channel. Ganged Sets memory control mode to be configurable. CAS# latency Options are : Auto (default), Manual. BIOS Setup - 42 - DRAM Configuration CMOS Setup Utility-Copyright (C) 1984-2010 Award Software DRAM Configuration DCTs Mode DDR3 Timing... F5: Previous Values +/-/PU/PD: Value F10: Save F6: Fail-Safe Defaults ESC: Exit F1: General Help F7: Optimized Defaults DCTs Mode Allows you to set memory control mode.

Manual
Page 44
...the useful life of the CPU. Auto lets the BIOS automatically set the system voltages. DRAM Voltage Control Allows you to set the memory VTT voltage. NB/PCIe/PLL Voltage Control Allows you to set the SidePort memory voltage. Normal Supplies the memory VTT... the memory to increase memory performance and stability. (Default: Enabled) ******** System Voltage Optimized ******** System Voltage Control Determines whether to manually set the system voltages as required. (Default) 0.720V ~ 1.050V The adjustable range is from 2.220V to 1.890V. Note: Increasing memory...
...the useful life of the CPU. Auto lets the BIOS automatically set the system voltages. DRAM Voltage Control Allows you to set the memory VTT voltage. NB/PCIe/PLL Voltage Control Allows you to set the SidePort memory voltage. Normal Supplies the memory VTT... the memory to increase memory performance and stability. (Default: Enabled) ******** System Voltage Optimized ******** System Voltage Control Determines whether to manually set the system voltages as required. (Default) 0.720V ~ 1.050V The adjustable range is from 2.220V to 1.890V. Note: Increasing memory...

Manual
Page 45
BIOS Setup CPU Voltage Control Allows you to your CPU or reduce the useful life of the CPU. Auto sets the CPU voltage as required. The adjustable range is dependent on the CPU being installed. (Default: Normal) Note: Increasing CPU voltage may result in damage to set the CPU voltage. The... adjustable range is dependent on the CPU being installed. (Default: Normal) Note: Increasing CPU voltage may result in damage to set the CPU North Bridge VID voltage. Normal CPU Vcore Displays the normal operating voltage of your CPU. - 45 - CPU NB VID Control Allows...
BIOS Setup CPU Voltage Control Allows you to your CPU or reduce the useful life of the CPU. Auto sets the CPU voltage as required. The adjustable range is dependent on the CPU being installed. (Default: Normal) Note: Increasing CPU voltage may result in damage to set the CPU voltage. The... adjustable range is dependent on the CPU being installed. (Default: Normal) Note: Increasing CPU voltage may result in damage to set the CPU North Bridge VID voltage. Normal CPU Vcore Displays the normal operating voltage of your CPU. - 45 - CPU NB VID Control Allows...

Manual
Page 46
... the desired field and use the up arrow or down arrow key to set the date. Time (hh:mm:ss) Sets the system time. The date format is 13:0:0. IDE Channel 0, 1 Master/Slave IDE HDD Auto-Detection Press to set the time. IDE Channel 0, 1 Master/Slave Configure your IDE/SATA devices..., date and year. Select the desired field and use the up arrow or down arrow key to autodetect the parameters of the two methods below: BIOS Setup - 46 - 2-4 Standard CMOS Features CMOS Setup Utility-Copyright (C) 1984-2010 Award Software Standard CMOS Features Date (mm:dd:yy) Time (hh:mm:...
... the desired field and use the up arrow or down arrow key to set the date. Time (hh:mm:ss) Sets the system time. The date format is 13:0:0. IDE Channel 0, 1 Master/Slave IDE HDD Auto-Detection Press to set the time. IDE Channel 0, 1 Master/Slave Configure your IDE/SATA devices..., date and year. Select the desired field and use the up arrow or down arrow key to autodetect the parameters of the two methods below: BIOS Setup - 46 - 2-4 Standard CMOS Features CMOS Setup Utility-Copyright (C) 1984-2010 Award Software Standard CMOS Features Date (mm:dd:yy) Time (hh:mm:...

Manual
Page 47
... determined by using one of the two methods below: • Auto Lets the BIOS automatically detect IDE/SATA devices during the POST. (Default) • None If no IDE/SATA devices are used , set this item to None so the system will skip the detection of the device during.... Head Number of sectors. Sector Number of heads. Floppy 3 Mode Support Allows you do not install a floppy disk drive, set this channel. All Errors Whenever the BIOS detects a non-fatal error the system boot will be reserved for any error. All, But Keyboard The system boot will not ...
... determined by using one of the two methods below: • Auto Lets the BIOS automatically detect IDE/SATA devices during the POST. (Default) • None If no IDE/SATA devices are used , set this item to None so the system will skip the detection of the device during.... Head Number of sectors. Sector Number of heads. Floppy 3 Mode Support Allows you do not install a floppy disk drive, set this channel. All Errors Whenever the BIOS detects a non-fatal error the system boot will be reserved for any error. All, But Keyboard The system boot will not ...

Manual
Page 48
...on the MB Intelligent Tweaker(M.I.T.) main menu. CPU core 0 This setting is present only if you install a CPU that supports this function. 2-5 Advanced BIOS Features CMOS Setup Utility-Copyright (C) 1984-2010 Award Software Advanced BIOS Features } IGX Configuration AMD C1E Support Virtualization AMD K8 Cool&...Values +/-/PU/PD: Value F10: Save F6: Fail-Safe Defaults ESC: Exit F1: General Help F7: Optimized Defaults IGX Configuration The settings in this submenu are synchronous to those under the same items on the CPU being used). (Default) Manual Allows you to determine ...
...on the MB Intelligent Tweaker(M.I.T.) main menu. CPU core 0 This setting is present only if you install a CPU that supports this function. 2-5 Advanced BIOS Features CMOS Setup Utility-Copyright (C) 1984-2010 Award Software Advanced BIOS Features } IGX Configuration AMD C1E Support Virtualization AMD K8 Cool&...Values +/-/PU/PD: Value F10: Save F6: Fail-Safe Defaults ESC: Exit F1: General Help F7: Optimized Defaults IGX Configuration The settings in this submenu are synchronous to those under the same items on the CPU being used). (Default) Manual Allows you to determine ...

Manual
Page 58
... case system instability occurs, you may try to load Fail-Safe defaults, which are the safest and most stable BIOS settings for the motherboard. 2-11 Load Optimized Defaults CMOS Setup Utility-Copyright (C) 1984-2010 Award Software MB... Intelligent Tweaker(M.I .T.) Load Fail-Safe Defaults Standard CMOS Features Load Optimized Defaults Advanced BIOS Features Set Supervisor Password Integrated Peripherals Set User Password Power Management Setup PnP/PCI Configurations Save & Exit Setup Load Fail-Safe Defau lt...
... case system instability occurs, you may try to load Fail-Safe defaults, which are the safest and most stable BIOS settings for the motherboard. 2-11 Load Optimized Defaults CMOS Setup Utility-Copyright (C) 1984-2010 Award Software MB... Intelligent Tweaker(M.I .T.) Load Fail-Safe Defaults Standard CMOS Features Load Optimized Defaults Advanced BIOS Features Set Supervisor Password Integrated Peripherals Set User Password Power Management Setup PnP/PCI Configurations Save & Exit Setup Load Fail-Safe Defau lt...

Manual
Page 59
... enter the supervisor password (or user password) at system startup and when entering BIOS Setup. The message "PASSWORD DISABLED" will be requested to make changes to BIOS settings. The BIOS Setup program allows you to specify two separate passwords: Supervisor Password When a system... password is set and the Password Check item in Advanced BIOS Features is set to System, you must enter the supervisor password...
... enter the supervisor password (or user password) at system startup and when entering BIOS Setup. The message "PASSWORD DISABLED" will be requested to make changes to BIOS settings. The BIOS Setup program allows you to specify two separate passwords: Supervisor Password When a system... password is set and the Password Check item in Advanced BIOS Features is set to System, you must enter the supervisor password...

Manual
Page 93
5-1-4 Installing the SATA RAID/AHCI Driver and Operating System With the SATA RAID/AHCI driver diskette and correct BIOS settings, you need to install a third party SCSI or RAID driver. Installing Windows XP Step 1: Restart your hard drive(s). Windows Setup You have chosen to Figure 2 ...
5-1-4 Installing the SATA RAID/AHCI Driver and Operating System With the SATA RAID/AHCI driver diskette and correct BIOS settings, you need to install a third party SCSI or RAID driver. Installing Windows XP Step 1: Restart your hard drive(s). Windows Setup You have chosen to Figure 2 ...


