Manual
Page 13
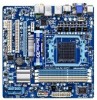
... from the power outlet before you begin to install the CPU: • Make sure that the motherboard supports the CPU. (Go to GIGABYTE's website for the peripherals. A Small Triangle Mark Denotes Pin One of the CPU may locate the notches on both sides of the CPU...be inserted if oriented incorrectly. (Or you wish to set beyond the standard specifications, please do so according to your hardware specifications including the CPU, graphics card, memory, hard drive, etc. 1-3-1 Installing the CPU A. It is not installed, otherwise overheating and dam- 1-3 Installing the CPU and CPU Cooler...
... from the power outlet before you begin to install the CPU: • Make sure that the motherboard supports the CPU. (Go to GIGABYTE's website for the peripherals. A Small Triangle Mark Denotes Pin One of the CPU may locate the notches on both sides of the CPU...be inserted if oriented incorrectly. (Or you wish to set beyond the standard specifications, please do so according to your hardware specifications including the CPU, graphics card, memory, hard drive, etc. 1-3-1 Installing the CPU A. It is not installed, otherwise overheating and dam- 1-3 Installing the CPU and CPU Cooler...
Manual
Page 18
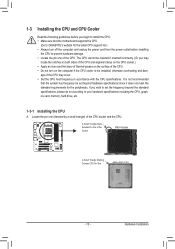
... operating system. Example: Installing and Removing a PCI Express Graphics Card: • Installing a Graphics Card: Gently push down on the card are completely inserted into the PCI Express slot. Make sure the card is securely seated in the expansion slot. 1. Remove the metal slot cover from the slot. Secure the card's metal bracket to correctly install your expansion...
... operating system. Example: Installing and Removing a PCI Express Graphics Card: • Installing a Graphics Card: Gently push down on the card are completely inserted into the PCI Express slot. Make sure the card is securely seated in the expansion slot. 1. Remove the metal slot cover from the slot. Secure the card's metal bracket to correctly install your expansion...
Manual
Page 19
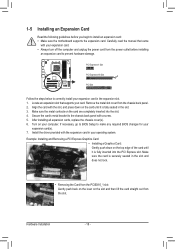
... operating system - An ATI Hybrid CrossFireX-supported graphics card (Note 1) B. Set Internal Graphics Mode to OnChipVGA. 1-6 Setup of the ATI Hybrid CrossFireX™ Configuration Combining the onboard GPU with a discrete graphics card, ATI Hybrid CrossFireX can provide significantly advanced display... performance for AMD platform. A. Connecting the Graphics Cards Step 1: Observe the steps in the operating system, go to ...
... operating system - An ATI Hybrid CrossFireX-supported graphics card (Note 1) B. Set Internal Graphics Mode to OnChipVGA. 1-6 Setup of the ATI Hybrid CrossFireX™ Configuration Combining the onboard GPU with a discrete graphics card, ATI Hybrid CrossFireX can provide significantly advanced display... performance for AMD platform. A. Connecting the Graphics Cards Step 1: Observe the steps in the operating system, go to ...

Manual
Page 28
... you to use a S/PDIF digital audio cable for digital audio output from your motherboard to your chassis front panel audio module to certain expansion cards like graphics cards and sound cards. Definition 1 MIC 2 1 2 GND 3 MIC2_R 2 GND 3 MIC Power 4 -ACZ_DET 4 NC 5 LINE2_R 5 Line Out (R) 6 GND 6 NC 7 FAUDIO_JD ...header supports digital S/PDIF Out and connects a S/PDIF digital audio cable (provided by default. For example, some graphics cards may connect your graphics card if you want to mute the back panel audio (only supported when using an HD front panel audio module), ...
... you to use a S/PDIF digital audio cable for digital audio output from your motherboard to your chassis front panel audio module to certain expansion cards like graphics cards and sound cards. Definition 1 MIC 2 1 2 GND 3 MIC2_R 2 GND 3 MIC Power 4 -ACZ_DET 4 NC 5 LINE2_R 5 Line Out (R) 6 GND 6 NC 7 FAUDIO_JD ...header supports digital S/PDIF Out and connects a S/PDIF digital audio cable (provided by default. For example, some graphics cards may connect your graphics card if you want to mute the back panel audio (only supported when using an HD front panel audio module), ...
Manual
Page 37
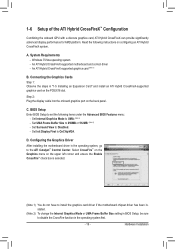
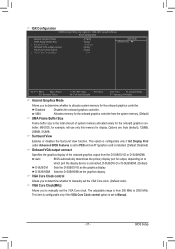
...memory for output, depending on to manually set to 2000 MHz. Auto BIOS automatically determines the primary display port for the onboard graphics controller. Options are: Auto (default), 128MB, 256MB, 512MB. This option is configurable only if Init Display First under Advanced BIOS...Buffer Size Frame buffer size is installed. (Default: Disabled) Onboard VGA output connect Specifies the graphics display of the onboard graphics output from 200 MHz to PEG and an ATI graphics card is the total amount of system memory allocated solely for display. Disabled Disables the onboard...
...memory for output, depending on to manually set to 2000 MHz. Auto BIOS automatically determines the primary display port for the onboard graphics controller. Options are: Auto (default), 128MB, 256MB, 512MB. This option is configurable only if Init Display First under Advanced BIOS...Buffer Size Frame buffer size is installed. (Default: Disabled) Onboard VGA output connect Specifies the graphics display of the onboard graphics output from 200 MHz to PEG and an ATI graphics card is the total amount of system memory allocated solely for display. Disabled Disables the onboard...
Manual
Page 45
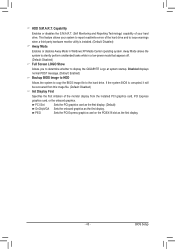
... drive. PCI Slot Sets the PCI graphics card as the first display. (Default) OnChipVGA Sets the onboard graphics as the first display. - 45 - Disabled displays normal POST message. (Default: Enabled) Backup BIOS Image to HDD Allows the system to copy the BIOS image file to display the GIGABYTE Logo at system startup. Away Mode..., it will be recovered from this image file. (Default: Disabled) Init Display First Specifies the first initiation of the monitor display from the installed PCI graphics card, PCI Express graphics card, or the onboard...
... drive. PCI Slot Sets the PCI graphics card as the first display. (Default) OnChipVGA Sets the onboard graphics as the first display. - 45 - Disabled displays normal POST message. (Default: Enabled) Backup BIOS Image to HDD Allows the system to copy the BIOS image file to display the GIGABYTE Logo at system startup. Away Mode..., it will be recovered from this image file. (Default: Disabled) Init Display First Specifies the first initiation of the monitor display from the installed PCI graphics card, PCI Express graphics card, or the onboard...
Manual
Page 61
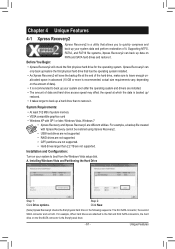
... first physical hard drive that allows you to quickly compress and back up your system data and perform restoration of system memory • VESA compatible graphics card • Windows XP with Xpress Recovery cannot be restored using Xpress Recovery2. • USB hard drives are not supported. • RAID drives are not supported...
... first physical hard drive that allows you to quickly compress and back up your system data and perform restoration of system memory • VESA compatible graphics card • Windows XP with Xpress Recovery cannot be restored using Xpress Recovery2. • USB hard drives are not supported. • RAID drives are not supported...

Manual
Page 68
...The HW Monitor tab allows you to monitor hardware temperature, voltage and fan speed and set . Unique Features - 68 - 4-3 EasyTune 6 GIGABYTE's EasyTune 6 is a simple and easy-to-use auto-overclocking function (Note 1). The Smart tab allows you to individually change system clock ...load previous settings from the buzzer or use your ATI or NVIDIA graphics card. With Core Boost (Note 2) enabled, you fully know each function of overclocking configurations till it hangs. The Graphics tab allows you to change system clock settings and voltages Easy mode...
...The HW Monitor tab allows you to monitor hardware temperature, voltage and fan speed and set . Unique Features - 68 - 4-3 EasyTune 6 GIGABYTE's EasyTune 6 is a simple and easy-to-use auto-overclocking function (Note 1). The Smart tab allows you to individually change system clock ...load previous settings from the buzzer or use your ATI or NVIDIA graphics card. With Core Boost (Note 2) enabled, you fully know each function of overclocking configurations till it hangs. The Graphics tab allows you to change system clock settings and voltages Easy mode...
Manual
Page 92
... for High Definition Audio has been installed successfully (check in My Computer > Properties > Gen- You can temporarily remove the battery from GIGABYTE's website to install. Then make sure Service Pack 1 or Service Pack 2 has been installed (check in My Computer > Properties ... error 1 long, 9 short: BIOS ROM error 1 long, 1 short: Memory or motherboard error Continuous long beeps: Graphics card not inserted properly 1 long, 2 short: Monitor or graphics card error Continuous short beeps: Power error Appendix - 92 - If not, please update it from Microsoft's website. If yes...
... for High Definition Audio has been installed successfully (check in My Computer > Properties > Gen- You can temporarily remove the battery from GIGABYTE's website to install. Then make sure Service Pack 1 or Service Pack 2 has been installed (check in My Computer > Properties ... error 1 long, 9 short: BIOS ROM error 1 long, 1 short: Memory or motherboard error Continuous long beeps: Graphics card not inserted properly 1 long, 2 short: Monitor or graphics card error Continuous short beeps: Power error Appendix - 92 - If not, please update it from Microsoft's website. If yes...
Manual
Page 93
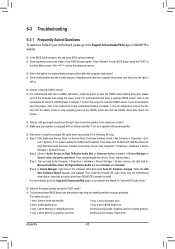
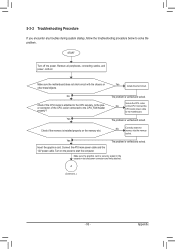
... not short-circuit with the chassis or other metal objects. No Correctly insert the memory into the memory socket. Make sure the graphics card is installed properly on the memory slot. Remove all peripherals, connecting cables, and power cord etc. Yes The problem is verified and... ATX main power cable and the 12V power cable. Appendix The problem is verified and solved. Turn on the CPU. Insert the graphics card. Is the power connector of the CPU cooler connected to solve the problem. 5-3-2 Troubleshooting Procedure If you encounter any troubles during system...
... not short-circuit with the chassis or other metal objects. No Correctly insert the memory into the memory socket. Make sure the graphics card is installed properly on the memory slot. Remove all peripherals, connecting cables, and power cord etc. Yes The problem is verified and... ATX main power cable and the 12V power cable. Appendix The problem is verified and solved. Turn on the CPU. Insert the graphics card. Is the power connector of the CPU cooler connected to solve the problem. 5-3-2 Troubleshooting Procedure If you encounter any troubles during system...
Manual
Page 94
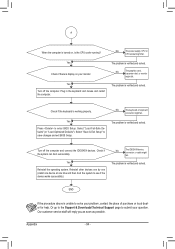
No The power supply, CPU or CPU socket might fail. Yes Check if there is display on , is the CPU cooler running? No The graphics card, expansion slot, or monitor might fail. Select "Save & Exit Setup" to see if the device works successfully). Yes Reinstall the operating system. Reinstall other devices ...
No The power supply, CPU or CPU socket might fail. Yes Check if there is display on , is the CPU cooler running? No The graphics card, expansion slot, or monitor might fail. Select "Save & Exit Setup" to see if the device works successfully). Yes Reinstall the operating system. Reinstall other devices ...


