Manual
Page 3
...in this manual may be reproduced, copied, translated, transmitted, or published in the use GIGABYTE's unique features, read or download the information on/from the Support&Downloads\Motherboard\Technology Guide page on your motherboard revision before updating motherboard BIOS, drivers, or when looking for...form or by copyright laws and is 1.0. No part of GIGABYTE. The trademarks mentioned in this manual are legally registered to assist in any means without prior notice. Copyright © 2009 GIGA-BYTE TECHNOLOGY CO., LTD. For detailed product information, carefully read the ...
...in this manual may be reproduced, copied, translated, transmitted, or published in the use GIGABYTE's unique features, read or download the information on/from the Support&Downloads\Motherboard\Technology Guide page on your motherboard revision before updating motherboard BIOS, drivers, or when looking for...form or by copyright laws and is 1.0. No part of GIGABYTE. The trademarks mentioned in this manual are legally registered to assist in any means without prior notice. Copyright © 2009 GIGA-BYTE TECHNOLOGY CO., LTD. For detailed product information, carefully read the ...
Manual
Page 10
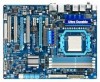
... JMB362 chip: - 2 x eSATA 3Gb/s connectors on the back panel supporting up to 2 SATA 3Gb/s devices - Support for ATI CrossFireX™ technology Technology Storage Interface Chipset: - 1 x IDE connector supporting ATA-133/100/66/33 and up to 2 IDE devices - 6 x SATA 3Gb...1-2 Product Specifications CPU Support for AM3 processors: AMD Phenom™ II processor/ AMD Athlon™ II processor/ (Go to GIGABYTE's website for the latest CPU support list.) Hyper Transport Bus 5200 MT/s Chipset Memory Audio North Bridge:...
... JMB362 chip: - 2 x eSATA 3Gb/s connectors on the back panel supporting up to 2 SATA 3Gb/s devices - Support for ATI CrossFireX™ technology Technology Storage Interface Chipset: - 1 x IDE connector supporting ATA-133/100/66/33 and up to 2 IDE devices - 6 x SATA 3Gb...1-2 Product Specifications CPU Support for AM3 processors: AMD Phenom™ II processor/ AMD Athlon™ II processor/ (Go to GIGABYTE's website for the latest CPU support list.) Hyper Transport Bus 5200 MT/s Chipset Memory Audio North Bridge:...
Manual
Page 16
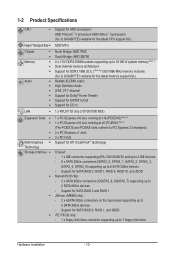
...Dual Channel memory mode will automatically detect the specifications and capacity of the same capacity, brand, speed, and chips be used . (Go to GIGABYTE's website for the latest memory support list.) • Always turn off the computer and unplug the power cord from the power outlet before installing ...unable to insert the memory, switch the direction. 1-4-1 Dual Channel Memory Configuration This motherboard provides four DDR3 memory sockets and supports Dual Channel Technology. Dual Channel mode cannot be enabled if only one direction. DS/SS DS/SS Four Modules DS/SS DS/SS DS/SS DS/SS ...
...Dual Channel memory mode will automatically detect the specifications and capacity of the same capacity, brand, speed, and chips be used . (Go to GIGABYTE's website for the latest memory support list.) • Always turn off the computer and unplug the power cord from the power outlet before installing ...unable to insert the memory, switch the direction. 1-4-1 Dual Channel Memory Configuration This motherboard provides four DDR3 memory sockets and supports Dual Channel Technology. Dual Channel mode cannot be enabled if only one direction. DS/SS DS/SS Four Modules DS/SS DS/SS DS/SS DS/SS ...
Manual
Page 19
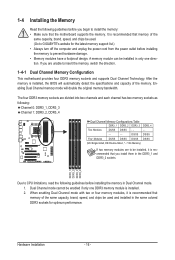
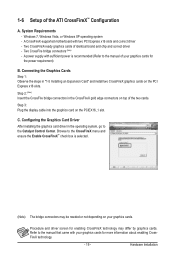
... the CrossFireX gold edge connectors on the PCI Express x16 slots. C. Browse to the Catalyst Control Center. Procedure and driver screen for enabling CrossFireX technology may be needed or not depending on the PCIEX16_1 slot. Step 2: (Note) Insert the CrossFire bridge connectors in "1-5 Installing an Expansion Card" ... graphics cards. Step 3: Plug the display cable into the graphics card on your graphics cards for more information about enabling CrossFireX technology. - 19 - Two CrossFire bridge connectors (Note) - Hardware Installation System Requirements -
... the CrossFireX gold edge connectors on the PCI Express x16 slots. C. Browse to the Catalyst Control Center. Procedure and driver screen for enabling CrossFireX technology may be needed or not depending on the PCIEX16_1 slot. Step 2: (Note) Insert the CrossFire bridge connectors in "1-5 Installing an Expansion Card" ... graphics cards. Step 3: Plug the display cable into the graphics card on your graphics cards for more information about enabling CrossFireX technology. - 19 - Two CrossFire bridge connectors (Note) - Hardware Installation System Requirements -
Manual
Page 47
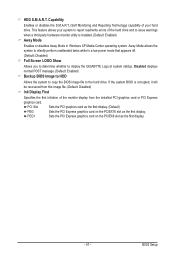
...: Enabled) Backup BIOS Image to HDD Allows the system to copy the BIOS image file to display the GIGABYTE Logo at system startup. Capability Enables or disables the S.M.A.R.T. (Self Monitoring and Reporting Technology) capability of your system to report read/write errors of the monitor display from the installed PCI graphics card...
...: Enabled) Backup BIOS Image to HDD Allows the system to copy the BIOS image file to display the GIGABYTE Logo at system startup. Capability Enables or disables the S.M.A.R.T. (Self Monitoring and Reporting Technology) capability of your system to report read/write errors of the monitor display from the installed PCI graphics card...
Manual
Page 71
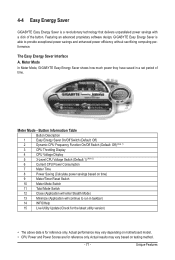
...Power Consumption 7 Meter Time 8 Power Saving (Calculate power savings based on testing method. - 71 - Featuring an advanced proprietary software design, GIGABYTE Easy Energy Saver is able to run in a set period of the button. Actual performance may vary based on time) 9 Meter/Timer ...without sacrificing computing performance. Meter Mode - 4-4 Easy Energy Saver GIGABYTE Easy Energy Saver is a revolutionary technology that delivers unparalleled power savings with a click of time. Meter Mode In Meter Mode, GIGABYTE Easy Energy Saver shows how much power they have saved in ...
...Power Consumption 7 Meter Time 8 Power Saving (Calculate power savings based on testing method. - 71 - Featuring an advanced proprietary software design, GIGABYTE Easy Energy Saver is able to run in a set period of the button. Actual performance may vary based on time) 9 Meter/Timer ...without sacrificing computing performance. Meter Mode - 4-4 Easy Energy Saver GIGABYTE Easy Energy Saver is a revolutionary technology that delivers unparalleled power savings with a click of time. Meter Mode In Meter Mode, GIGABYTE Easy Energy Saver shows how much power they have saved in ...
Manual
Page 74
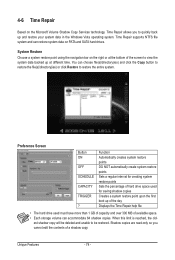
... system data backed up and restore your system data in the Windows Vista operating system. 4-6 Time Repair Based on the Microsoft Volume Shadow Copy Services technology, Time Repair allows you cannot edit the contents of available space. • Each storage volume can restore system data on PATA and SATA hard drives...
... system data backed up and restore your system data in the Windows Vista operating system. 4-6 Time Repair Based on the Microsoft Volume Shadow Copy Services technology, Time Repair allows you cannot edit the contents of available space. • Each storage volume can restore system data on PATA and SATA hard drives...
Manual
Page 82
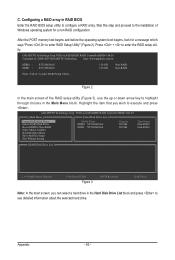
... the main screen of Windows operating system for a message which says "Press to highlight through choices in the Main Menu block. GIGABYTE Technology Corp. Appendix - 82 - After the POST memory test begins and before the operating system boot begins, look for a non-... : ST3120026AS ST3120026AS 120 GB 120 GB Non-RAID Non-RAID Press to SATAII/IDE RAID Controller BIOSv1.06.59 Copyright (C) 2006-2007 GIGABYTE Technology. GIGABYTE Technology Corp. C. Highlight the item that you can select a hard drive in RAID BIOS Enter the RAID BIOS setup utility to execute and...
... the main screen of Windows operating system for a message which says "Press to highlight through choices in the Main Menu block. GIGABYTE Technology Corp. Appendix - 82 - After the POST memory test begins and before the operating system boot begins, look for a non-... : ST3120026AS ST3120026AS 120 GB 120 GB Non-RAID Non-RAID Press to SATAII/IDE RAID Controller BIOSv1.06.59 Copyright (C) 2006-2007 GIGABYTE Technology. GIGABYTE Technology Corp. C. Highlight the item that you can select a hard drive in RAID BIOS Enter the RAID BIOS setup utility to execute and...
Manual
Page 83
GIGABYTE Technology Corp. GIGABYTE Technology Corp. Select RAID Mode: Under the Level item, use up or down arrow key to move onto the next step. Steps: 1. Then press to select ...
GIGABYTE Technology Corp. GIGABYTE Technology Corp. Select RAID Mode: Under the Level item, use up or down arrow key to move onto the next step. Steps: 1. Then press to select ...
Manual
Page 84
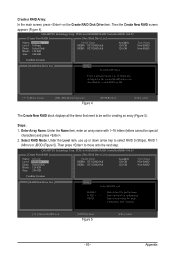
... Creation: After all of the array and press . 6. When prompted to confirm your selection (Figure 7), press to confirm or to seperate RAID members. Press . Press . GIGABYTE Technology Corp. GIGABYTE Technology Corp. 3. PCIE-to-SATAII/IDE RAID Controller BIOSv1.06.59 [ Create New RAID ] [ Hard Disk Drive List ] Name: Level: Disks: Block: Size: GRAID 0-Stripe...
... Creation: After all of the array and press . 6. When prompted to confirm your selection (Figure 7), press to confirm or to seperate RAID members. Press . Press . GIGABYTE Technology Corp. GIGABYTE Technology Corp. 3. PCIE-to-SATAII/IDE RAID Controller BIOSv1.06.59 [ Create New RAID ] [ Hard Disk Drive List ] Name: Level: Disks: Block: Size: GRAID 0-Stripe...
Manual
Page 85
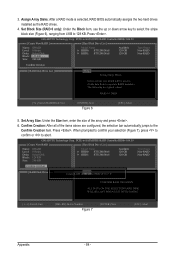
... Inside RAID Inside Members(HDDx) 01 Members: HDD 01 Status: Normal [fgTAB]-Switch Window [hi]-Select RAID Figure 9 [ENTER]-Detail [ESC]-Exit - 85 - Appendix GIGABYTE Technology Corp. GIGABYTE Technology Corp. Select the array and press . PCIE-to-SATAII/IDE RAID Controller BIOSv1.06.59 [ Main Menu ] Create RAID Disk Drive Delete RAID Disk Drive...
... Inside RAID Inside Members(HDDx) 01 Members: HDD 01 Status: Normal [fgTAB]-Switch Window [hi]-Select RAID Figure 9 [ENTER]-Detail [ESC]-Exit - 85 - Appendix GIGABYTE Technology Corp. GIGABYTE Technology Corp. Select the array and press . PCIE-to-SATAII/IDE RAID Controller BIOSv1.06.59 [ Main Menu ] Create RAID Disk Drive Delete RAID Disk Drive...
Manual
Page 86
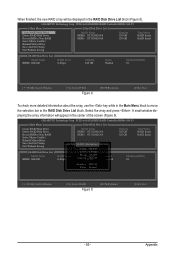
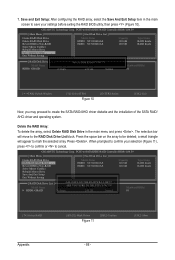
... 240 GB Normal Members(HDDx) 01 [fgTAB]-Switch Window [hi]-Select ITEM Figure 10 [ENTER]-Action [ESC]-Exit Now, you may proceed to be deleted; GIGABYTE Technology Corp. Save and Exit Setup: After configuring the RAID array, select the Save And Exit Setup item in the main menu and press... . GIGABYTE Technology Corp. Delete the RAID Array: To delete the array, select Delete RAID Disk Drive in the main screen to save your selection (Figure 11), press ...
... 240 GB Normal Members(HDDx) 01 [fgTAB]-Switch Window [hi]-Select ITEM Figure 10 [ENTER]-Action [ESC]-Exit Now, you may proceed to be deleted; GIGABYTE Technology Corp. Save and Exit Setup: After configuring the RAID array, select the Save And Exit Setup item in the main menu and press... . GIGABYTE Technology Corp. Delete the RAID Array: To delete the array, select Delete RAID Disk Drive in the main screen to save your selection (Figure 11), press ...
Manual
Page 88
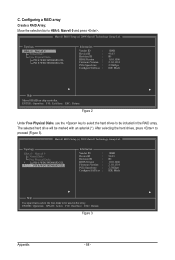
... Ltd. The selected hard drive will be included in the array. Marvell BIOS Setup (c) 2009 Marvell Technology Group Ltd. Topology HBA 0 : Marvell 0 Virtual Disks Free Physical Disks PD 0: WDC WD800JD-22L PD 8: WDC WD800JD-22L Information Vendor ID : Device ID : Revision ID : ...
... Ltd. The selected hard drive will be included in the array. Marvell BIOS Setup (c) 2009 Marvell Technology Group Ltd. Topology HBA 0 : Marvell 0 Virtual Disks Free Physical Disks PD 0: WDC WD800JD-22L PD 8: WDC WD800JD-22L Information Vendor ID : Device ID : Revision ID : ...
Manual
Page 89
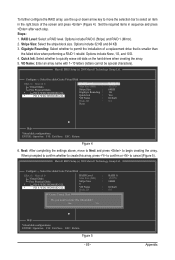
...Stripe Size : 5 VD Name : Disks ID : Next Do you want to begin creating the array. Marvell BIOS Setup (c) 2009 Marvell Technology Group Ltd. Next: After completing the settings above, move the selection bar to select an item in sequence and press after each step. ...Marvell 0 Virtual Disks Free Physical Disks * PD 0: WDC WD800JD-22L * PD 8: WDC WD800JD-22L RAID Level : Max Size (MB) : Stripe Size : Gigabyte Rounding : Quick Init : VD Name : Disks ID : Next RAID 0 152378 64KB 1G Yes Default 0 8 Help Virtual disk configurations. RAID Level: Select a ...
...Stripe Size : 5 VD Name : Disks ID : Next Do you want to begin creating the array. Marvell BIOS Setup (c) 2009 Marvell Technology Group Ltd. Next: After completing the settings above, move the selection bar to select an item in sequence and press after each step. ...Marvell 0 Virtual Disks Free Physical Disks * PD 0: WDC WD800JD-22L * PD 8: WDC WD800JD-22L RAID Level : Max Size (MB) : Stripe Size : Gigabyte Rounding : Quick Init : VD Name : Disks ID : Next RAID 0 152378 64KB 1G Yes Default 0 8 Help Virtual disk configurations. RAID Level: Select a ...
Manual
Page 90
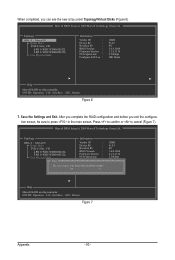
When completed, you exit the configuration screen, be sure to cancel (Figure 7). Marvell BIOS Setup (c) 2009 Marvell Technology Group Ltd. Topology HBA 0 : Marvell 0 Virtual Disks VD 0: New_VD PD 0: WDC WD800JD-22L PD 8: WDC WD800JD-22L Free Physical Disks Information Vendor ID... confirm or to press in the main screen. ENTER: Operation F10: Exit/Save ESC: Return Figure 6 7. Marvell BIOS Setup (c) 2009 Marvell Technology Group Ltd. Save the Settings and Exit. After you complete the RAID configuration and before you can see the new array under Topology\Virtual Disks...
When completed, you exit the configuration screen, be sure to cancel (Figure 7). Marvell BIOS Setup (c) 2009 Marvell Technology Group Ltd. Topology HBA 0 : Marvell 0 Virtual Disks VD 0: New_VD PD 0: WDC WD800JD-22L PD 8: WDC WD800JD-22L Free Physical Disks Information Vendor ID... confirm or to press in the main screen. ENTER: Operation F10: Exit/Save ESC: Return Figure 6 7. Marvell BIOS Setup (c) 2009 Marvell Technology Group Ltd. Save the Settings and Exit. After you complete the RAID configuration and before you can see the new array under Topology\Virtual Disks...
Manual
Page 91
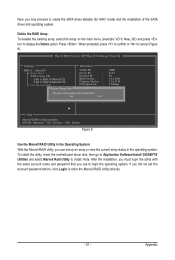
... operating system. Appendix ENTER: Operation F10: Exit/Save ESC: Return Figure 8 Use the Marvell RAID Utility in the operating system. Marvell BIOS Setup (c) 2009 Marvell Technology Group Ltd. Topology HBA 0 : Marvell 0 Virtual Disks VD 0: New_VD PD 0: WDC WD800JD-22L PD 0: WDC WD800JD-22L Free Physical Disks Delete Virtual Disk Information ... the existing array, select the array on chip controller. To install the utility, insert the motherboard driver disk, then go to Application Software\Install GIGABYTE Utilities and select Marvell Raid Utility to delete this virtual disk?
... operating system. Appendix ENTER: Operation F10: Exit/Save ESC: Return Figure 8 Use the Marvell RAID Utility in the operating system. Marvell BIOS Setup (c) 2009 Marvell Technology Group Ltd. Topology HBA 0 : Marvell 0 Virtual Disks VD 0: New_VD PD 0: WDC WD800JD-22L PD 0: WDC WD800JD-22L Free Physical Disks Delete Virtual Disk Information ... the existing array, select the array on chip controller. To install the utility, insert the motherboard driver disk, then go to Application Software\Install GIGABYTE Utilities and select Marvell Raid Utility to delete this virtual disk?
Manual
Page 101
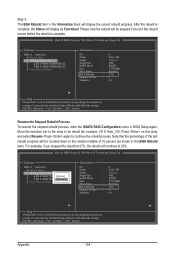
Press to Non-RAID Solve Mirror Conflict Rebuild Mirror Drive Save And Exit Setup Exit Without Saving Gigabyte Technology Corp. The rebuilding progress is displayed at the bottom of the array will move to the degraded array. When done, the status of the screen... Step 2: The selection bar will then move to new hard drive in the operating system to perform the rebuild. • Rebuilding with a new one. Gigabyte Technology Corp. The selection bar will display as Normal. RAID Setup Utility v1.07.06 [ Main Menu ] Create RAID Disk Drive Delete RAID Disk Drive Revert...
Press to Non-RAID Solve Mirror Conflict Rebuild Mirror Drive Save And Exit Setup Exit Without Saving Gigabyte Technology Corp. The rebuilding progress is displayed at the bottom of the array will move to the degraded array. When done, the status of the screen... Step 2: The selection bar will then move to new hard drive in the operating system to perform the rebuild. • Rebuilding with a new one. Gigabyte Technology Corp. The selection bar will display as Normal. RAID Setup Utility v1.07.06 [ Main Menu ] Create RAID Disk Drive Delete RAID Disk Drive Revert...
Manual
Page 103
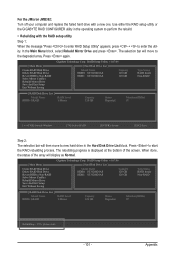
... . Step 1: After the system starts, enter the BIOS Setup program and go to access the RAID configuration menu. Marvell BIOS Setup (c) 2009 Marvell Technology Group Ltd. Topology HBA 0 : Marvell 0 Virtual Disks VD 0: New_VD PD 8: WDC WD8[0D0JeDle-t2e]2L Free Physical Disks [Rebuild] PD 0:... BGA Status : N/A Number of PDs : 1 Do you must enter the GSATA RAID Configuration menu in the array. Marvell BIOS Setup (c) 2009 Marvell Technology Group Ltd. ENTER: Operation SPACE: Select F10: Exit/Save ESC: Return - 103 - Press on this array. Move the selection bar to the array...
... . Step 1: After the system starts, enter the BIOS Setup program and go to access the RAID configuration menu. Marvell BIOS Setup (c) 2009 Marvell Technology Group Ltd. Topology HBA 0 : Marvell 0 Virtual Disks VD 0: New_VD PD 8: WDC WD8[0D0JeDle-t2e]2L Free Physical Disks [Rebuild] PD 0:... BGA Status : N/A Number of PDs : 1 Do you must enter the GSATA RAID Configuration menu in the array. Marvell BIOS Setup (c) 2009 Marvell Technology Group Ltd. ENTER: Operation SPACE: Select F10: Exit/Save ESC: Return - 103 - Press on this array. Move the selection bar to the array...
Manual
Page 104
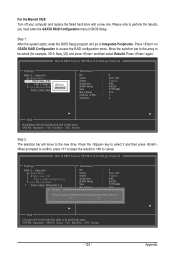
...Functional. Press again to an operating environment as shown in the Information block will be rebuilt (for example, VD 0: New_VD). Marvell BIOS Setup (c) 2009 Marvell Technology Group Ltd. ENTER: Operation F10: Exit/Save ESC: Return Appendix - 104 - Topology HBA 0 : Marvell 0 Virtual Disks VD 0: New_VD PD 0: WDC...display as a range of disk blocks presented to be stopped if you stopped the rebuild at 20%. Marvell BIOS Setup (c) 2009 Marvell Technology Group Ltd. Note that the percentage of the last rebuild progress will be rounded down to the nearest multiple of 10 percent (as ...
...Functional. Press again to an operating environment as shown in the Information block will be rebuilt (for example, VD 0: New_VD). Marvell BIOS Setup (c) 2009 Marvell Technology Group Ltd. ENTER: Operation F10: Exit/Save ESC: Return Appendix - 104 - Topology HBA 0 : Marvell 0 Virtual Disks VD 0: New_VD PD 0: WDC...display as a range of disk blocks presented to be stopped if you stopped the rebuild at 20%. Marvell BIOS Setup (c) 2009 Marvell Technology Group Ltd. Note that the percentage of the last rebuild progress will be rounded down to the nearest multiple of 10 percent (as ...
Manual
Page 119
...: +86-29-85510930 Shenyang TEL: +86-24-83992901 FAX: +86-24-83992909 • GIGABYTE TECHNOLOGY (INDIA) LIMITED - India WEB address : http://www.gigabyte.in • Saudi Arabia WEB address : http://www.gigabyte.com.sa • Gigabyte Technology Pty. LTD. - Contact Us • GIGA-BYTE TECHNOLOGY CO., LTD. Address: No.6, Bau Chiang Road, Hsin-Tien, Taipei 231, Taiwan...
...: +86-29-85510930 Shenyang TEL: +86-24-83992901 FAX: +86-24-83992909 • GIGABYTE TECHNOLOGY (INDIA) LIMITED - India WEB address : http://www.gigabyte.in • Saudi Arabia WEB address : http://www.gigabyte.com.sa • Gigabyte Technology Pty. LTD. - Contact Us • GIGA-BYTE TECHNOLOGY CO., LTD. Address: No.6, Bau Chiang Road, Hsin-Tien, Taipei 231, Taiwan...
