
Manual
Page 35
Press to exit the help screen (General Help) of function keys available for reference only and may differ by BIOS version. - 35 - Help for each item is in the Item Help block on the right side of the submenu. • If you do not find the settings you enter the BIOS Setup program, the Main Menu (as shown below) appears on the right (submenus only) Restore the previous BIOS settings for the current submenus Load the Fail-Safe BIOS default settings for the current submenus Load the Optimized BIOS default settings for the current submenus Access the Q-Flash utility ...
Press to exit the help screen (General Help) of function keys available for reference only and may differ by BIOS version. - 35 - Help for each item is in the Item Help block on the right side of the submenu. • If you do not find the settings you enter the BIOS Setup program, the Main Menu (as shown below) appears on the right (submenus only) Restore the previous BIOS settings for the current submenus Load the Fail-Safe BIOS default settings for the current submenus Load the Optimized BIOS default settings for the current submenus Access the Q-Flash utility ...

Manual
Page 37
... Extended Memory 640K 510M KLJI: Move Enter: Select F5: Previous Values +/-/PU/PD: Value F10: Save F6: Fail-Safe Default ESC: Exit F1: General Help F7: Optimized Defaults Date Sets the system date. For example, 1 p.m. IDE Channel 0 Master/Slave IDE HDD Auto-Detection Press to autodetect the parameters of the IDE...
... Extended Memory 640K 510M KLJI: Move Enter: Select F5: Previous Values +/-/PU/PD: Value F10: Save F6: Fail-Safe Default ESC: Exit F1: General Help F7: Optimized Defaults Date Sets the system date. For example, 1 p.m. IDE Channel 0 Master/Slave IDE HDD Auto-Detection Press to autodetect the parameters of the IDE...
Manual
Page 39
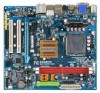
...] Item Help Menu Level` KLJI: Move Enter: Select F5: Previous Values +/-/PU/PD: Value F10: Save F6: Fail-Safe Defaults ESC: Exit F1: General Help F7: Optimized Defaults Hard Disk Boot Priority Specifies the sequence of your system to report read/write errors of the hard drive and to issue warnings...
...] Item Help Menu Level` KLJI: Move Enter: Select F5: Previous Values +/-/PU/PD: Value F10: Save F6: Fail-Safe Defaults ESC: Exit F1: General Help F7: Optimized Defaults Hard Disk Boot Priority Specifies the sequence of your system to report read/write errors of the hard drive and to issue warnings...

Manual
Page 41
... KLJI: Move Enter: Select F5: Previous Values +/-/PU/PD: Value F10: Save F6: Fail-Safe Defaults ESC: Exit F1: General Help F7: Optimized Defaults - 41 - 2-5 Integrated Peripherals CMOS Setup Utility-Copyright (C) 1984-2007 Award Software Integrated Peripherals On-Chip IDE Channel0 IDE Prefetch ...KLJI: Move Enter: Select F5: Previous Values +/-/PU/PD: Value F10: Save F6: Fail-Safe Defaults ESC: Exit F1: General Help F7: Optimized Defaults On-Chip IDE Channel0 Enables or disables the first integrated IDE controller. (Default: Enabled) IDE Prefetch Mode Enables or disbales prefetch...
... KLJI: Move Enter: Select F5: Previous Values +/-/PU/PD: Value F10: Save F6: Fail-Safe Defaults ESC: Exit F1: General Help F7: Optimized Defaults - 41 - 2-5 Integrated Peripherals CMOS Setup Utility-Copyright (C) 1984-2007 Award Software Integrated Peripherals On-Chip IDE Channel0 IDE Prefetch ...KLJI: Move Enter: Select F5: Previous Values +/-/PU/PD: Value F10: Save F6: Fail-Safe Defaults ESC: Exit F1: General Help F7: Optimized Defaults On-Chip IDE Channel0 Enables or disables the first integrated IDE controller. (Default: Enabled) IDE Prefetch Mode Enables or disbales prefetch...

Manual
Page 43
... Item Help Menu Level`` KLJI: Move Enter: Select F5: Previous Values +/-/PU/PD: Value F10: Save F6: Fail-Safe Defaults ESC: Exit F1: General Help F7: Optimized Defaults This motherboard incorporates cable diagnostic feature designed to the fault or short. Link Detected --> 100Mbps Cable Length= 30m Link Detected Cable Length Displays...
... Item Help Menu Level`` KLJI: Move Enter: Select F5: Previous Values +/-/PU/PD: Value F10: Save F6: Fail-Safe Defaults ESC: Exit F1: General Help F7: Optimized Defaults This motherboard incorporates cable diagnostic feature designed to the fault or short. Link Detected --> 100Mbps Cable Length= 30m Link Detected Cable Length Displays...

Manual
Page 45
...] Item Help Menu Level` KLJI: Move Enter: Select F5: Previous Values +/-/PU/PD: Value F10: Save F6: Fail-Safe Defaults ESC: Exit F1: General Help F7: Optimized Defaults ACPI Suspend Type Specifies the ACPI sleep state when the system enters suspend. 2-6 Power Management Setup CMOS Setup Utility-Copyright (C) 1984-2007 Award...
...] Item Help Menu Level` KLJI: Move Enter: Select F5: Previous Values +/-/PU/PD: Value F10: Save F6: Fail-Safe Defaults ESC: Exit F1: General Help F7: Optimized Defaults ACPI Suspend Type Specifies the ACPI sleep state when the system enters suspend. 2-6 Power Management Setup CMOS Setup Utility-Copyright (C) 1984-2007 Award...

Manual
Page 47
...,14,15 PCI 2 IRQ Assignment Auto 3,4,5,7,9,10,11,12,14,15 +/-/PU/PD: Value F10: Save F6: Fail-Safe Defaults ESC: Exit F1: General Help F7: Optimized Defaults BIOS auto-assigns IRQ to the first PCI slot. (Default) Assigns IRQ 3,4,5,7,9,10,11,12,14,15 to the second PCI slot. - 47...
...,14,15 PCI 2 IRQ Assignment Auto 3,4,5,7,9,10,11,12,14,15 +/-/PU/PD: Value F10: Save F6: Fail-Safe Defaults ESC: Exit F1: General Help F7: Optimized Defaults BIOS auto-assigns IRQ to the first PCI slot. (Default) Assigns IRQ 3,4,5,7,9,10,11,12,14,15 to the second PCI slot. - 47...

Manual
Page 48
...KLJI: Move Enter: Select F5: Previous Values +/-/PU/PD: Value F10: Save F6: Fail-Safe Defaults ESC: Exit F1: General Help F7: Optimized Defaults Reset Case Open Status Keeps or clears the record of the chassis intrusion detection device attached to the motherboard CI header. Enabled ...Open Status to Enabled, save the settings to emit warning sound if the CPU/system fan is removed, this occurs. (Default: Disabled) GA-73UM-S2H Motherboard - 48 - Options are: Disabled (default), 60oC/140oF, 70oC/158oF, 80oC/ 176oF, 90oC/194oF. Current System/CPU Temperature Displays current system/...
...KLJI: Move Enter: Select F5: Previous Values +/-/PU/PD: Value F10: Save F6: Fail-Safe Defaults ESC: Exit F1: General Help F7: Optimized Defaults Reset Case Open Status Keeps or clears the record of the chassis intrusion detection device attached to the motherboard CI header. Enabled ...Open Status to Enabled, save the settings to emit warning sound if the CPU/system fan is removed, this occurs. (Default: Disabled) GA-73UM-S2H Motherboard - 48 - Options are: Disabled (default), 60oC/140oF, 70oC/158oF, 80oC/ 176oF, 90oC/194oF. Current System/CPU Temperature Displays current system/...

Manual
Page 50
If this feature. GA-73UM-S2H Motherboard - 50 - This page is for advanced users only and we recommend ...Enter: Select F5: Previous Values +/-/PU/PD: Value F10: Save F6: Fail-Safe Defaults ESC: Exit F1: General Help F7: Optimized Defaults (Note) This item appears only if you install a CPU that supports this occurs, clear the CMOS values and...Previous Values +/-/PU/PD: Value F10: Save F6: Fail-Safe Defaults ESC: Exit F1: General Help F7: Optimized Defaults Incorrectly doing overclock/overvoltage may result in damage to CPU, chipset, or memory and reduce the useful life of these...
If this feature. GA-73UM-S2H Motherboard - 50 - This page is for advanced users only and we recommend ...Enter: Select F5: Previous Values +/-/PU/PD: Value F10: Save F6: Fail-Safe Defaults ESC: Exit F1: General Help F7: Optimized Defaults (Note) This item appears only if you install a CPU that supports this occurs, clear the CMOS values and...Previous Values +/-/PU/PD: Value F10: Save F6: Fail-Safe Defaults ESC: Exit F1: General Help F7: Optimized Defaults Incorrectly doing overclock/overvoltage may result in damage to CPU, chipset, or memory and reduce the useful life of these...

Manual
Page 72
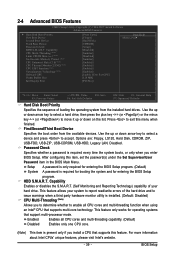
...hard drive connected to the eSATA 3Gb/s port on the back panel, set to configure the SATA controller mode correctly in system BIOS Setup. GA-73UM-S2H Motherboard - 72 - The actual BIOS Setup menu options you will see shall depend on your motherboard. Under Integrated Peripherals, ensure NV Serial-ATA...use for the SATAII1 connector. (Figure 2). For example, SATA-II Pri-Master RAID is enabled (Figure 1). Figure 2 ESC: Exit F1: General Help F7: Optimized Defaults The BIOS Setup menus described in BIOS Setup Make sure to IDE or AHCI for the SATA connectors with hard drives that you...
...hard drive connected to the eSATA 3Gb/s port on the back panel, set to configure the SATA controller mode correctly in system BIOS Setup. GA-73UM-S2H Motherboard - 72 - The actual BIOS Setup menu options you will see shall depend on your motherboard. Under Integrated Peripherals, ensure NV Serial-ATA...use for the SATAII1 connector. (Figure 2). For example, SATA-II Pri-Master RAID is enabled (Figure 1). Figure 2 ESC: Exit F1: General Help F7: Optimized Defaults The BIOS Setup menus described in BIOS Setup Make sure to IDE or AHCI for the SATA connectors with hard drives that you...
Manual
Page 73
...: Optimal Free Disks Port Disk Model 0.0 ST3120026AS 0.2 ST3120026AS Capacity 111.79GB 111.79GB Array Disks Port Disk Model [J] Add Capacity [I] Del [ESC] Quit [F6] Back [F7] Finish [TAB] Navigate [KL] Select [ENTER] Popup Figure 4 - 73 -
...: Optimal Free Disks Port Disk Model 0.0 ST3120026AS 0.2 ST3120026AS Capacity 111.79GB 111.79GB Array Disks Port Disk Model [J] Add Capacity [I] Del [ESC] Quit [F6] Back [F7] Finish [TAB] Navigate [KL] Select [ENTER] Popup Figure 4 - 73 -

Manual
Page 74
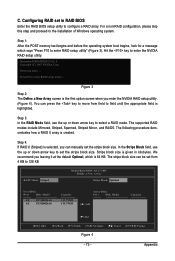
... Model 0.0 [J] Add 0.2 ST3120026AS ST3120026AS Capacity 111.79GB 111.79GB [I ] Del [ESC] Quit [F6] Back [F7] Finish [TAB] Navigate [KL] Select [ENTER] Popup Figure 6 GA-73UM-S2H Motherboard - 74 - Contiune? Stripe Block: Optimal Free Disks Port Disk Model All data on new(or added) disks ...Clear disk [[JY]] YAEddS d[aN11ta]..01N?..MMO ST3120026AS ST3120026AS Capacity 111.79GB 111.79GB [Y] YES [N] NO [I ] Del [ESC] Quit [F6] Back [F7] Finish [TAB] Navigate [KL] Select [ENTER] Popup Figure 5 Step 6: After assigning the RAID drives, press . Press to clear or to abort. ...
... Model 0.0 [J] Add 0.2 ST3120026AS ST3120026AS Capacity 111.79GB 111.79GB [I ] Del [ESC] Quit [F6] Back [F7] Finish [TAB] Navigate [KL] Select [ENTER] Popup Figure 6 GA-73UM-S2H Motherboard - 74 - Contiune? Stripe Block: Optimal Free Disks Port Disk Model All data on new(or added) disks ...Clear disk [[JY]] YAEddS d[aN11ta]..01N?..MMO ST3120026AS ST3120026AS Capacity 111.79GB 111.79GB [Y] YES [N] NO [I ] Del [ESC] Quit [F6] Back [F7] Finish [TAB] Navigate [KL] Select [ENTER] Popup Figure 5 Step 6: After assigning the RAID drives, press . Press to clear or to abort. ...