
Owners Manual
Page 1
Spacemaker Washers ge.com Safety Instructions 2-4 Operating Instructions Control Panels 5 Control Settings 5 Fabric Care Labels 10 Features 6, 7 Loading and Using the Washer . . . . . .8, 9 Installation Instructions . . . . .11-16 Drain Requirements 14 Electrical Requirements 14 Installing the Washer 15, 16 Location of Your Washer 12 Preparing to Install Your Washer . . . . . .11 Replacement Parts 16 Rough-In Dimensions 12 Unpacking Your Washer 13 Water Supply Requirements 14 Troubleshooting Tips 17-19 Consumer Support Consumer Support 22 Warranty for Canadian Customers . . . ...
Spacemaker Washers ge.com Safety Instructions 2-4 Operating Instructions Control Panels 5 Control Settings 5 Fabric Care Labels 10 Features 6, 7 Loading and Using the Washer . . . . . .8, 9 Installation Instructions . . . . .11-16 Drain Requirements 14 Electrical Requirements 14 Installing the Washer 15, 16 Location of Your Washer 12 Preparing to Install Your Washer . . . . . .11 Replacement Parts 16 Rough-In Dimensions 12 Unpacking Your Washer 13 Water Supply Requirements 14 Troubleshooting Tips 17-19 Consumer Support Consumer Support 22 Warranty for Canadian Customers . . . ...

Owners Manual
Page 3
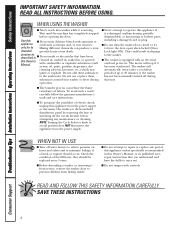
... washer door open door could entice children to hang on , with all governing codes and ordinances. An open . Do not allow children to conform with , or inside the washer. 3 Safety Instructions Operating Instructions Installation Instructions Troubleshooting Tips Consumer Support PROPER INSTALLATION This washer must be properly installed and located in Installation Instructions. Follow details in accordance with the Installation Instructions before it is used . ■ Install or store where it will not be exposed to temperatures...
... washer door open door could entice children to hang on , with all governing codes and ordinances. An open . Do not allow children to conform with , or inside the washer. 3 Safety Instructions Operating Instructions Installation Instructions Troubleshooting Tips Consumer Support PROPER INSTALLATION This washer must be properly installed and located in Installation Instructions. Follow details in accordance with the Installation Instructions before it is used . ■ Install or store where it will not be exposed to temperatures...
Owners Manual
Page 4
... parts, including a damaged cord or plug. ■ Do not slam the washer door closed or try to prevent children from the power supply. This could result in , or spotted Manual. purpose as vinegar and/or rust remover. Do not add these substances around your washer or dryer during this appliance if it from service, remove the washer door to force the door open when locked (Door Lock light ON). Consumer Support Troubleshooting Tips Installation Instructions Operating Instructions Safety Instructions...
... parts, including a damaged cord or plug. ■ Do not slam the washer door closed or try to prevent children from the power supply. This could result in , or spotted Manual. purpose as vinegar and/or rust remover. Do not add these substances around your washer or dryer during this appliance if it from service, remove the washer door to force the door open when locked (Door Lock light ON). Consumer Support Troubleshooting Tips Installation Instructions Operating Instructions Safety Instructions...
Owners Manual
Page 5
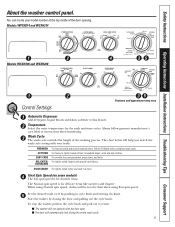
... EASY CARE PULL TO START / PUSH TO STOP FINAL SPIN 3 FINAL SPIN QUICK WASH 5 HOT COLD 4 TEMPERATURES WASH / RINSE WARM COLD COLD COLD WARM WARM CYCLE SIGNAL OFF LOUD EXTRA RINSE COTTONS / EASY CARE ON OFF DELICATES KNITS FINAL SPIN WASH PREWASH COTTONS HEAVY MEDIUM LIGHT 1 2 Control Settings DOOR LOCKED FINAL SPIN PERM PRESS EASY CARE PULL TO START / PUSH TO STOP WASH FINAL SPIN 35 Features and appearance may vary. 1 Automatic Dispenser Add detergent, liquid bleach and fabric softener to lightly soiled cottons, household linens, work and play clothes. The...
... EASY CARE PULL TO START / PUSH TO STOP FINAL SPIN 3 FINAL SPIN QUICK WASH 5 HOT COLD 4 TEMPERATURES WASH / RINSE WARM COLD COLD COLD WARM WARM CYCLE SIGNAL OFF LOUD EXTRA RINSE COTTONS / EASY CARE ON OFF DELICATES KNITS FINAL SPIN WASH PREWASH COTTONS HEAVY MEDIUM LIGHT 1 2 Control Settings DOOR LOCKED FINAL SPIN PERM PRESS EASY CARE PULL TO START / PUSH TO STOP WASH FINAL SPIN 35 Features and appearance may vary. 1 Automatic Dispenser Add detergent, liquid bleach and fabric softener to lightly soiled cottons, household linens, work and play clothes. The...
Owners Manual
Page 6
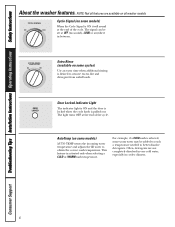
... a temperature needed to remove excess dirt and detergent from soiled loads. DOOR LOCKED Door Locked Indicator Light The indicator light is ON and the door is locked when the cycle knob is activated only when selecting a COLD or WARM wash temperature. Consumer Support Troubleshooting Tips Installation Instructions Operating Instructions Safety Instructions About the washer features. NOTE: Not all washer models. For example, if a COLD wash is selected, some models) When the Cycle Signal is desired to better dissolve detergents. CYCLE SIGNAL OFF LOUD Cycle Signal...
... a temperature needed to remove excess dirt and detergent from soiled loads. DOOR LOCKED Door Locked Indicator Light The indicator light is ON and the door is locked when the cycle knob is activated only when selecting a COLD or WARM wash temperature. Consumer Support Troubleshooting Tips Installation Instructions Operating Instructions Safety Instructions About the washer features. NOTE: Not all washer models. For example, if a COLD wash is selected, some models) When the Cycle Signal is desired to better dissolve detergents. CYCLE SIGNAL OFF LOUD Cycle Signal...

Owners Manual
Page 7
... the washer is part of the normal operation of the cycle. Either powdered or liquid detergent can lead to the detergent compartment of the dispenser drawer. ■ Detergent is recommended for water temperature, water hardness, size and soil level of the bleach and fabric softener. The DOOR LOCK indicator light will drain into the washer drum as it stops. Do not exceed the maximum fill line. After adding laundry products, slowly close the drawer, and the washer will be unlocked. The Fabric Softener Compartment...
... the washer is part of the normal operation of the cycle. Either powdered or liquid detergent can lead to the detergent compartment of the dispenser drawer. ■ Detergent is recommended for water temperature, water hardness, size and soil level of the bleach and fabric softener. The DOOR LOCK indicator light will drain into the washer drum as it stops. Do not exceed the maximum fill line. After adding laundry products, slowly close the drawer, and the washer will be unlocked. The Fabric Softener Compartment...
Owners Manual
Page 8
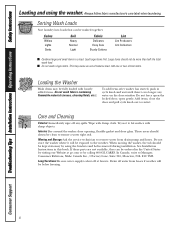
... locked door; These areas should not be clean to remove water from hoses if weather will be ordered in cycle knob and wait until there is shut off any water on the door window. Colors Whites Lights Darks Soil Heavy Normal Light Fabric Delicates Easy Care Sturdy Cottons Lint Lint Producers Lint Collectors ■ Combine large and small items in this book. Consumer Support Troubleshooting Tips Installation Instructions Operating Instructions Safety Instructions Loading...
... locked door; These areas should not be clean to remove water from hoses if weather will be ordered in cycle knob and wait until there is shut off any water on the door window. Colors Whites Lights Darks Soil Heavy Normal Light Fabric Delicates Easy Care Sturdy Cottons Lint Lint Producers Lint Collectors ■ Combine large and small items in this book. Consumer Support Troubleshooting Tips Installation Instructions Operating Instructions Safety Instructions Loading...

Owners Manual
Page 9
... bleach and fabric softener inserts to clean the recess. Lock tab is visible only after drawer has been pulled out ■ Remove the inserts from the upper and lower parts of the drawer cavity and press down firmly on the lock tab, pulling out the drawer. Remove all residue from the bleach and fabric softener compartments. Safety Instructions Operating Instructions Installation Instructions Troubleshooting Tips Consumer Support Dispenser Drawer Area: Detergent and fabric softener may build up in the drum...
... bleach and fabric softener inserts to clean the recess. Lock tab is visible only after drawer has been pulled out ■ Remove the inserts from the upper and lower parts of the drawer cavity and press down firmly on the lock tab, pulling out the drawer. Remove all residue from the bleach and fabric softener compartments. Safety Instructions Operating Instructions Installation Instructions Troubleshooting Tips Consumer Support Dispenser Drawer Area: Detergent and fabric softener may build up in the drum...
Owners Manual
Page 10
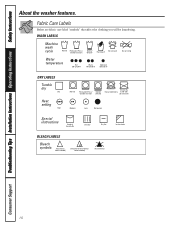
... dry (used with do not wash) Medium Low No heat/air Special instructions Line dry/ hang to dry Drip dry Dry flat In the shade BLEACH LABELS Bleach symbols Any bleach (when needed) Only non-chlorine bleach (when needed) Do not bleach 10 Fabric Care Labels Below are fabric care label "symbols" that affect the clothing you will be laundering. Consumer Support Troubleshooting Tips Installation Instructions Operating Instructions Safety Instructions About the washer features.
... dry (used with do not wash) Medium Low No heat/air Special instructions Line dry/ hang to dry Drip dry Dry flat In the shade BLEACH LABELS Bleach symbols Any bleach (when needed) Only non-chlorine bleach (when needed) Do not bleach 10 Fabric Care Labels Below are fabric care label "symbols" that affect the clothing you will be laundering. Consumer Support Troubleshooting Tips Installation Instructions Operating Instructions Safety Instructions About the washer features.
Owners Manual
Page 11
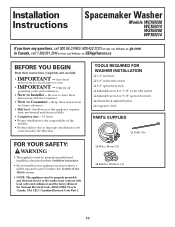
...-lock adjustable pliers ❏ Carpenter's level PARTS SUPPLIED ❏ Cable Tie FOR YOUR SAFETY: WARNING • This appliance must be properly grounded and installed as described in these Installation Instructions. • Do not install or store appliance in Canada, CSA C22.1 Canadian Electrical Code Part 1. ❏ Water Hoses (2) ❏ Rubber Washers (4) 11 Installation Instructions Spacemaker Washer Models WCXH208 WCXH214 WSXH208 WPXH214 If you have any questions, call 800.GE.CARES...
...-lock adjustable pliers ❏ Carpenter's level PARTS SUPPLIED ❏ Cable Tie FOR YOUR SAFETY: WARNING • This appliance must be properly grounded and installed as described in these Installation Instructions. • Do not install or store appliance in Canada, CSA C22.1 Canadian Electrical Code Part 1. ❏ Water Hoses (2) ❏ Rubber Washers (4) 11 Installation Instructions Spacemaker Washer Models WCXH208 WCXH214 WSXH208 WPXH214 If you have any questions, call 800.GE.CARES...
Owners Manual
Page 13
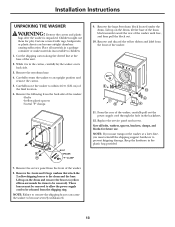
.... Carefully return the washer to prevent shipping damage. Remove the 4 nuts and 6 large washers that attach the 2 yellow shipping braces to within 4 feet (122 cm) of the unit. 2. Remove and discard the yellow ribbon and label from the front of the washer. 8. Remove the large Styrofoam block located under the drum. Replace the service panel and screws. Remove the service panel from the front of the washer, carefully pull out the power supply cord...
.... Carefully return the washer to prevent shipping damage. Remove the 4 nuts and 6 large washers that attach the 2 yellow shipping braces to within 4 feet (122 cm) of the unit. 2. Remove and discard the yellow ribbon and label from the front of the washer. 8. Remove the large Styrofoam block located under the drum. Replace the service panel and screws. Remove the service panel from the front of the washer, carefully pull out the power supply cord...

Owners Manual
Page 14
...″ (147 cm) high standpipe. A standpipe diameter of your washer's water inlet. WATER SUPPLY REQUIREMENTS Hot and cold water faucets MUST be connected. The standpipe height above the floor should be between 10 and 120 pounds per minute. 2. POWER SUPPLY - 2-wire, with 15-amp time-delay fuse or circuit breaker. Water pressure MUST be set to deliver water at your washer is properly installed and grounded in...
...″ (147 cm) high standpipe. A standpipe diameter of your washer's water inlet. WATER SUPPLY REQUIREMENTS Hot and cold water faucets MUST be connected. The standpipe height above the floor should be between 10 and 120 pounds per minute. 2. POWER SUPPLY - 2-wire, with 15-amp time-delay fuse or circuit breaker. Water pressure MUST be set to deliver water at your washer is properly installed and grounded in...

Owners Manual
Page 15
Remove the inlet hoses and rubber washers from the hot and cold faucets to prevent excessive vibration. then tighten another 2/3 turn with pliers. Gently lift up the water valve screens. 2. NOTE: Do not use the dispenser drawer or door to extend the rear leveling legs. Turn the lock nuts on the front of the water valve. If the floor is not level or is damaged, you can adjust the rear legs by hand...
Remove the inlet hoses and rubber washers from the hot and cold faucets to prevent excessive vibration. then tighten another 2/3 turn with pliers. Gently lift up the water valve screens. 2. NOTE: Do not use the dispenser drawer or door to extend the rear leveling legs. Turn the lock nuts on the front of the water valve. If the floor is not level or is damaged, you can adjust the rear legs by hand...
Owners Manual
Page 16
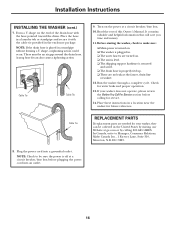
... calling 800.GE.CARES. Turn on . ❏ The unit is level. ❏ The shipping support hardware is removed and saved. ❏ The drain hose is placed in a location near the washer for your washer does not operate, please review the Before You Call For Service section before plugging the power cord into a grounded outlet. NOTE: Check to be an air gap around the drain hose. Before starting the washer, check to Manager, Consumer Relations, Mabe...
... calling 800.GE.CARES. Turn on . ❏ The unit is level. ❏ The shipping support hardware is removed and saved. ❏ The drain hose is placed in a location near the washer for your washer does not operate, please review the Before You Call For Service section before plugging the power cord into a grounded outlet. NOTE: Check to be an air gap around the drain hose. Before starting the washer, check to Manager, Consumer Relations, Mabe...
Owners Manual
Page 17
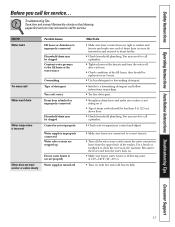
.... • Turn off after each use. • Check condition of the fill hoses; Use a brush or toothpick to clean the screens in and secured to drain facility. • Check household plumbing. Safety Instructions Operating Instructions Installation Instructions Troubleshooting Tips Consumer Support Before you may need to call a plumber. • Tighten hoses at the water source Oversudsing Type of detergent Very soft water Drain hose is kinked or improperly connected Water temperature is incorrect Household drain may need to...
.... • Turn off after each use. • Check condition of the fill hoses; Use a brush or toothpick to clean the screens in and secured to drain facility. • Check household plumbing. Safety Instructions Operating Instructions Installation Instructions Troubleshooting Tips Consumer Support Before you may need to call a plumber. • Tighten hoses at the water source Oversudsing Type of detergent Very soft water Drain hose is kinked or improperly connected Water temperature is incorrect Household drain may need to...
Owners Manual
Page 18
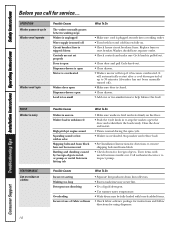
... Washing too long Detergent not dissolving Overloading Incorrect use of up to 30 minutes (if washer has not been manually turned off Circuit breaker/fuse is tripped/blown Controls are not set properly Door is open Dispenser drawer is open Motor is overloaded. Washer should have not been removed Rattling and clanking caused by foreign objects in to help balance the load. Consumer Support Troubleshooting Tips Installation Instructions Operating Instructions Safety Instructions Before you call for directions to inspect pump. Stop washer...
... Washing too long Detergent not dissolving Overloading Incorrect use of up to 30 minutes (if washer has not been manually turned off Circuit breaker/fuse is tripped/blown Controls are not set properly Door is open Dispenser drawer is open Motor is overloaded. Washer should have not been removed Rattling and clanking caused by foreign objects in to help balance the load. Consumer Support Troubleshooting Tips Installation Instructions Operating Instructions Safety Instructions Before you call for directions to inspect pump. Stop washer...

Owners Manual
Page 19
... using dispenser. • Sort whites or lightly colored items from dark colors. • Promptly remove wash load from washer. • Avoid mixing heavy items (like work clothes) with undiluted bleach. Safety Instructions Operating Instructions Installation Instructions Troubleshooting Tips Consumer Support PERFORMANCE (cont.) Clothes too wet Pilling Grayed or yellowed clothes Possible Causes Load is too small Load is out of balance Result of normal wear on poly-cotton blends and fuzzy fabrics Not enough detergent Hard water...
... using dispenser. • Sort whites or lightly colored items from dark colors. • Promptly remove wash load from washer. • Avoid mixing heavy items (like work clothes) with undiluted bleach. Safety Instructions Operating Instructions Installation Instructions Troubleshooting Tips Consumer Support PERFORMANCE (cont.) Clothes too wet Pilling Grayed or yellowed clothes Possible Causes Load is too small Load is out of balance Result of normal wear on poly-cotton blends and fuzzy fabrics Not enough detergent Hard water...
Owners Manual
Page 20
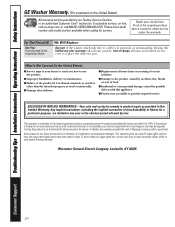
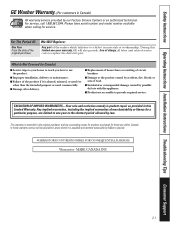
... shipping or service calls to obtain service under the warranty. CCounstsoumer Seurpvipcoret Troubleshooting Tips Installation Instructions Operating Instructions Safety Instructions GE Washer Warranty. (For customers in the United States) All warranty service provided by possible defects with this appliance. ■ Product not accessible to provide required service. Staple your state's Attorney General. Proof of the original purchase date is extended to the original purchaser and any succeeding owner for products...
... shipping or service calls to obtain service under the warranty. CCounstsoumer Seurpvipcoret Troubleshooting Tips Installation Instructions Operating Instructions Safety Instructions GE Washer Warranty. (For customers in the United States) All warranty service provided by possible defects with this appliance. ■ Product not accessible to provide required service. Staple your state's Attorney General. Proof of the original purchase date is extended to the original purchaser and any succeeding owner for products...
Owners Manual
Page 21
... resetting of circuit breakers. ■ Damage to the product caused by accident, fire, floods or acts of merchantability or fitness for service. WARRANTOR IS NOT RESPONSIBLE FOR CONSEQUENTIAL DAMAGES. Any implied warranties, including the implied warranties of God. ■ Incidental or consequential damage caused by Mabe to replace the defective part. Safety Instructions Operating Instructions Installation Instructions Troubleshooting Tips Consumer Support GE Washer Warranty. (For customers in Canada) All warranty service...
... resetting of circuit breakers. ■ Damage to the product caused by accident, fire, floods or acts of merchantability or fitness for service. WARRANTOR IS NOT RESPONSIBLE FOR CONSEQUENTIAL DAMAGES. Any implied warranties, including the implied warranties of God. ■ Incidental or consequential damage caused by Mabe to replace the defective part. Safety Instructions Operating Instructions Installation Instructions Troubleshooting Tips Consumer Support GE Washer Warranty. (For customers in Canada) All warranty service...
Owners Manual
Page 22
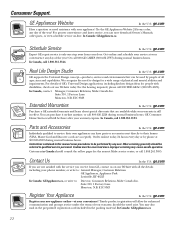
... your door. You may cause unsafe operation. For the hearing impaired, please call 800.GE.CARES (800.432.2737) during normal business hours. Caution must be performed by phone at your convenience any day of the year! Suite 310, 1 Factory Lane Moncton, N.B. In Canada, call 1.800.561.3344. Instructions contained in this manual cover procedures to qualified service personnel...
... your door. You may cause unsafe operation. For the hearing impaired, please call 800.GE.CARES (800.432.2737) during normal business hours. Caution must be performed by phone at your convenience any day of the year! Suite 310, 1 Factory Lane Moncton, N.B. In Canada, call 1.800.561.3344. Instructions contained in this manual cover procedures to qualified service personnel...


