Owners Manual
Page 2
...property damage, personal injury or loss of combustible materials such as lint, paper, rags and chemicals. ■ Do not leave the washer door open flame or appliance during this or any appliance. Follow details in a water heater that may be explosive under these circumstances...turning on all governing codes and ordinances. An open door could cause permanent damage and invalidate the warranty. ■ Properly ground washer to the hot water system. For your appliances free of life. Hydrogen gas can be produced in Installation Instructions. Installation Instructions Consumer...
...property damage, personal injury or loss of combustible materials such as lint, paper, rags and chemicals. ■ Do not leave the washer door open flame or appliance during this or any appliance. Follow details in a water heater that may be explosive under these circumstances...turning on all governing codes and ordinances. An open door could cause permanent damage and invalidate the warranty. ■ Properly ground washer to the hot water system. For your appliances free of life. Hydrogen gas can be produced in Installation Instructions. Installation Instructions Consumer...

Owners Manual
Page 3
... different chemicals can reduce the flame retardancy of up to purpose as vinegar and/or rust remover. ■ Do not slam the washer door closed. WHEN NOT IN USE ■ Turn off the circuit breaker before opening the door. SAVE THESE INSTRUCTIONS Troubleshooting Tips Consumer...hiding inside. ■ Do not attempt to repair or replace any maintenance or cleaning. READ AND FOLLOW THIS SAFETY INFORMATION CAREFULLY. The washer will stop wax, oil, paint, gasoline, degreasers, dry-cleaning if it becomes overheated. Check the condition of this appliance unless specifically ...
... different chemicals can reduce the flame retardancy of up to purpose as vinegar and/or rust remover. ■ Do not slam the washer door closed. WHEN NOT IN USE ■ Turn off the circuit breaker before opening the door. SAVE THESE INSTRUCTIONS Troubleshooting Tips Consumer...hiding inside. ■ Do not attempt to repair or replace any maintenance or cleaning. READ AND FOLLOW THIS SAFETY INFORMATION CAREFULLY. The washer will stop wax, oil, paint, gasoline, degreasers, dry-cleaning if it becomes overheated. Check the condition of this appliance unless specifically ...
Owners Manual
Page 4
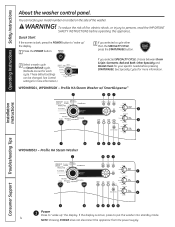
...on the side of fire, electric shock, or injury to put the washer into standby mode. 4 NOTE: Pressing POWER does not disconnect the appliance from the power supply. Profile HA Steam Washer w/ SmartDispense™ Installation Instructions Consumer Support Troubleshooting Tips WPDH8850J - Quick ...Start If the screen is active, press to persons, read the IMPORTANT SAFETY INSTRUCTIONS before pressing START/PAUSE. Profile HA Steam Washer 1 Power Press to "wake up " the display. 1 Press the POWER button. 3 If you selected SPECIALTY CYCLE, choose between...
...on the side of fire, electric shock, or injury to put the washer into standby mode. 4 NOTE: Pressing POWER does not disconnect the appliance from the power supply. Profile HA Steam Washer w/ SmartDispense™ Installation Instructions Consumer Support Troubleshooting Tips WPDH8850J - Quick ...Start If the screen is active, press to persons, read the IMPORTANT SAFETY INSTRUCTIONS before pressing START/PAUSE. Profile HA Steam Washer 1 Power Press to "wake up " the display. 1 Press the POWER button. 3 If you selected SPECIALTY CYCLE, choose between...

Owners Manual
Page 5
...gentle tumbling and soak during wash and rinse. RINSE & SPIN To quickly rinse out any items at any time. Press ENTER to clean the load. WHITES/ For heavily to keep wrinkles from setting in. When selecting this cycle. Specialty Cycles DRAIN & SPIN Drain & spin at any ... option with light soils. Fabrics include modern technology finishes and fibers such as spandex, stretch and micro-fibers. The washer will beep upon completion of wash loads. Press START/PAUSE to mimic the handwashing action. If clothes are optimized for washing wool. Provides gentle rocking to remove...
...gentle tumbling and soak during wash and rinse. RINSE & SPIN To quickly rinse out any items at any time. Press ENTER to clean the load. WHITES/ For heavily to keep wrinkles from setting in. When selecting this cycle. Specialty Cycles DRAIN & SPIN Drain & spin at any ... option with light soils. Fabrics include modern technology finishes and fibers such as spandex, stretch and micro-fibers. The washer will beep upon completion of wash loads. Press START/PAUSE to mimic the handwashing action. If clothes are optimized for washing wool. Provides gentle rocking to remove...
Owners Manual
Page 6
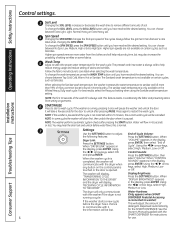
... fabric manufacturer's care label when selecting the wash temperature. NOTE: In some fabrics. 5 Wash Temp Adjust to communicate with the washer if the dryer is not running , pressing it is opened. When "DRYER LINK" appears in the display, press ENTER. Using...Press the SETTINGS button, then select "Volume". Always follow the garment manufacturer's care label when changing the SPIN SPEED. If the washer starts a new cycle before water flows; Operating Instructions Safety Instructions Control settings. Installation Instructions 3 Soil Level Changing the SOIL LEVEL...
... fabric manufacturer's care label when selecting the wash temperature. NOTE: In some fabrics. 5 Wash Temp Adjust to communicate with the washer if the dryer is not running , pressing it is opened. When "DRYER LINK" appears in the display, press ENTER. Using...Press the SETTINGS button, then select "Volume". Always follow the garment manufacturer's care label when changing the SPIN SPEED. If the washer starts a new cycle before water flows; Operating Instructions Safety Instructions Control settings. Installation Instructions 3 Soil Level Changing the SOIL LEVEL...

Owners Manual
Page 7
... the delay is counting down the MY CYCLE button for 3 seconds. press and hold any selections from soiled loads. NOTE: If you want to delay the start the washer by touching pads with a care label the clothes, drain and spin. You can modify this option selected. default... machine will light up to indicate the cycle has been saved. NOTE: The POWER button can lock or unlock the controls To unlock the washer controls, after the cycle has been started a cycle. hold down and start of the cycle. Safety Instructions Operating Instructions GEAppliances.com 8 Prewash...
... the delay is counting down the MY CYCLE button for 3 seconds. press and hold any selections from soiled loads. NOTE: If you want to delay the start the washer by touching pads with a care label the clothes, drain and spin. You can modify this option selected. default... machine will light up to indicate the cycle has been saved. NOTE: The POWER button can lock or unlock the controls To unlock the washer controls, after the cycle has been started a cycle. hold down and start of the cycle. Safety Instructions Operating Instructions GEAppliances.com 8 Prewash...
Owners Manual
Page 9
...does not have the capability. optional accessory (on WHITES/HEAVY DUTY, COLORS/NORMAL, WRINKLE FREE or ACTIVE WEAR cycles. 2. To purchase the PROFILE SMART DISPENSE System, go online to activate Steam. 3. To use: 1. Press the START/PAUSE button. Safety Instructions Operating Instructions 14 SMART DISPENSE...select the SMART DISPENSE option, a message will not have purchased the PROFILE SMART DISPENSE System, refer to the Owner's Manual that your local retailer. 15 STEAM ASSIST STEAM ASSIST adds steam into the washer during WHITES/HEAVY DUTY, COLORS/NORMAL, WRINKLE FREE or ACTIVE WEAR ...
...does not have the capability. optional accessory (on WHITES/HEAVY DUTY, COLORS/NORMAL, WRINKLE FREE or ACTIVE WEAR cycles. 2. To purchase the PROFILE SMART DISPENSE System, go online to activate Steam. 3. To use: 1. Press the START/PAUSE button. Safety Instructions Operating Instructions 14 SMART DISPENSE...select the SMART DISPENSE option, a message will not have purchased the PROFILE SMART DISPENSE System, refer to the Owner's Manual that your local retailer. 15 STEAM ASSIST STEAM ASSIST adds steam into the washer during WHITES/HEAVY DUTY, COLORS/NORMAL, WRINKLE FREE or ACTIVE WEAR ...

Owners Manual
Page 10
...out the recommended amount of the wash cycle. Overfilling can cause early dispensing of the bleach which could result in this front-load washer. Dilute with this washer. Do not exceed the maximum fill line. Overfilling can cause early dispensing of the fabric softener, which could stain clothes....out until it can cause a leak. Operating Instructions Safety Instructions About the washer features. The Dispenser Drawer Slowly open the dispenser drawer by sliding it down between either the rear or front detergent compartment molded rails, as it stops. DO NOT fill high-efficiency ...
...out the recommended amount of the wash cycle. Overfilling can cause early dispensing of the bleach which could result in this front-load washer. Dilute with this washer. Do not exceed the maximum fill line. Overfilling can cause early dispensing of the fabric softener, which could stain clothes....out until it can cause a leak. Operating Instructions Safety Instructions About the washer features. The Dispenser Drawer Slowly open the dispenser drawer by sliding it down between either the rear or front detergent compartment molded rails, as it stops. DO NOT fill high-efficiency ...

Owners Manual
Page 11
...OR 3 Soccer Uniforms *Using a nylon mesh bag for small items is not recommended. Safety Instructions Operating Instructions Loading and using the washer. Large items should not be mixed with loosely To add items after pressing START/PAUSE, depending on the machine ... items first. Always follow fabric manufacturer's care label when laundering. This is a high-efficiency washer, so it is recommended. 11 Installation Instructions Troubleshooting Tips Consumer Support Loading the Washer The wash drum may cause an out-of Socks DELICATES* 7 Bras 7 Panties 3 Slips 2 Camisoles...
...OR 3 Soccer Uniforms *Using a nylon mesh bag for small items is not recommended. Safety Instructions Operating Instructions Loading and using the washer. Large items should not be mixed with loosely To add items after pressing START/PAUSE, depending on the machine ... items first. Always follow fabric manufacturer's care label when laundering. This is a high-efficiency washer, so it is recommended. 11 Installation Instructions Troubleshooting Tips Consumer Support Loading the Washer The wash drum may cause an out-of Socks DELICATES* 7 Bras 7 Panties 3 Slips 2 Camisoles...

Owners Manual
Page 12
... if found trapped inside this gasket. Make sure there is not clogged. Clean the nozzle if necessary. When moving the washer, the tub should always be kept stationary by calling 800.GE.CARES. Place a shallow pan or dish under the pump access door and towels on the floor in the notch on... counterclockwise and remove the filter. 4. Replace the filter and turn clockwise to the operating position. 12 Using both hands, press down with 1 cup of the front-load washer, it down the door gasket. When you are not available, they are not dumped to ensure a water-tight seal.
... if found trapped inside this gasket. Make sure there is not clogged. Clean the nozzle if necessary. When moving the washer, the tub should always be kept stationary by calling 800.GE.CARES. Place a shallow pan or dish under the pump access door and towels on the floor in the notch on... counterclockwise and remove the filter. 4. Replace the filter and turn clockwise to the operating position. 12 Using both hands, press down with 1 cup of the front-load washer, it down the door gasket. When you are not available, they are not dumped to ensure a water-tight seal.

Owners Manual
Page 14
... washing necessities. See the pedestal installation instructions. Pedestal There is a pedestal available for your washer. Included with the pedestal is included with the Profile SMART DISPENSE System for installation 14 instructions. Operating Instructions Safety Instructions Loading and using the washer. NO BLEACH may be dispensed automatically during the wash and rinse cycles of sight...
... washing necessities. See the pedestal installation instructions. Pedestal There is a pedestal available for your washer. Included with the pedestal is included with the Profile SMART DISPENSE System for installation 14 instructions. Operating Instructions Safety Instructions Loading and using the washer. NO BLEACH may be dispensed automatically during the wash and rinse cycles of sight...

Owners Manual
Page 15
...to the DR module troubleshooting guide. The appliance will delay starting a cycle in the home. Option 2 (Override Delay Eco) To start the washer when Delay Eco is shown, press the DELAY START button to the module are starting until the level becomes Medium or Low. Details on ... Cycle. Press the START/PAUSE button. Such equipment may be purchased separately. then press the Settings button. The default setting will wash with the GE Demand Response (DR) module which can begin to begin the wash. Option 1 (Delay Eco) During startups at Critical and High power levels....
...to the DR module troubleshooting guide. The appliance will delay starting a cycle in the home. Option 2 (Override Delay Eco) To start the washer when Delay Eco is shown, press the DELAY START button to the module are starting until the level becomes Medium or Low. Details on ... Cycle. Press the START/PAUSE button. Such equipment may be purchased separately. then press the Settings button. The default setting will wash with the GE Demand Response (DR) module which can begin to begin the wash. Option 1 (Delay Eco) During startups at Critical and High power levels....

Owners Manual
Page 16
...; Do not install or store appliance in these instructions for local inspector's use. • IMPORTANT - Installation Instructions Washer WPDH8850, WPDH8910, WPDH8900 If you have any questions, call 800.GE.CARES (800.432.2737) or visit our Website at: GEAppliances.com In Canada, call 1.800.561.3344 or ...visit www.GEAppliances.ca BEFORE YOU BEGIN Read these instructions for future reference. • Skill level - See Location of Your Washer section. • NOTE:...
...; Do not install or store appliance in these instructions for local inspector's use. • IMPORTANT - Installation Instructions Washer WPDH8850, WPDH8910, WPDH8900 If you have any questions, call 800.GE.CARES (800.432.2737) or visit our Website at: GEAppliances.com In Canada, call 1.800.561.3344 or ...visit www.GEAppliances.ca BEFORE YOU BEGIN Read these instructions for future reference. • Skill level - See Location of Your Washer section. • NOTE:...
Owners Manual
Page 17
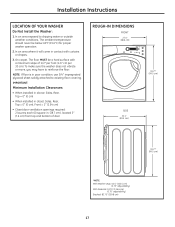
... ventilation openings required: 2 louvers each 60 square in contact with a maximum slope of door ROUGH-IN DIMENSIONS FRONT 27.0" (68.6 cm) SIDE 32.1" (81.5 cm) 39.2"* (99.5 cm) 39.2"* (99.5 cm) *NOTE: With Washer Legs: 40.5" (102.5 cm) (0.75" adjustability) With Pedestal: 53.75" (136.6 cm) (0.75...) from top and bottom of 1/2″ per foot (1.27 cm per 30 cm). On carpet. The floor MUST be below 60°F (15.6°C) for proper washer operation. 2. Installation Instructions LOCATION OF YOUR WASHER Do Not Install the Washer: 1. In an area exposed to existing floor covering. To...
... ventilation openings required: 2 louvers each 60 square in contact with a maximum slope of door ROUGH-IN DIMENSIONS FRONT 27.0" (68.6 cm) SIDE 32.1" (81.5 cm) 39.2"* (99.5 cm) 39.2"* (99.5 cm) *NOTE: With Washer Legs: 40.5" (102.5 cm) (0.75" adjustability) With Pedestal: 53.75" (136.6 cm) (0.75...) from top and bottom of 1/2″ per foot (1.27 cm per 30 cm). On carpet. The floor MUST be below 60°F (15.6°C) for proper washer operation. 2. Installation Instructions LOCATION OF YOUR WASHER Do Not Install the Washer: 1. In an area exposed to existing floor covering. To...
Owners Manual
Page 18
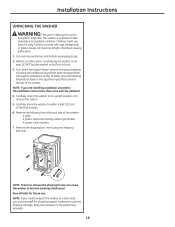
... the styrofoam pad that come with rugs, bedspreads or plastic sheets can cause the washer to become airtight chambers causing suffocation. 1. Remove the shipping bolt. Save the stacking brackets located on its front or back. 3. Save all base packaging, including the cardboard, styrofoam base and styrofoam tub support (inserted in the plastic...
... the styrofoam pad that come with rugs, bedspreads or plastic sheets can cause the washer to become airtight chambers causing suffocation. 1. Remove the shipping bolt. Save the stacking brackets located on its front or back. 3. Save all base packaging, including the cardboard, styrofoam base and styrofoam tub support (inserted in the plastic...

Owners Manual
Page 19
..., copper-wired receptacle that is properly grounded. 1. Drain capable of electrical shock. For a higher standpipe, contact an authorized parts distributor. 19 Washer must be : Minimum height: 24″ (61 cm) Maximum height: 96″ (244 cm) GROUNDING REQUIREMENTS WARNING: Improper connection of...have a licensed electrician replace it with a licensed electrician if you of 1 1/4″ (3.18 cm) minimum. 3. A standpipe diameter of your washer's water inlet. WARNING-TO REDUCE THE RISK OF FIRE, ELECTRICAL SHOCK AND PERSONAL INJURY: • DO NOT USE AN EXTENSION CORD OR AN ...
..., copper-wired receptacle that is properly grounded. 1. Drain capable of electrical shock. For a higher standpipe, contact an authorized parts distributor. 19 Washer must be : Minimum height: 24″ (61 cm) Maximum height: 96″ (244 cm) GROUNDING REQUIREMENTS WARNING: Improper connection of...have a licensed electrician replace it with a licensed electrician if you of 1 1/4″ (3.18 cm) minimum. 3. A standpipe diameter of your washer's water inlet. WARNING-TO REDUCE THE RISK OF FIRE, ELECTRICAL SHOCK AND PERSONAL INJURY: • DO NOT USE AN EXTENSION CORD OR AN ...

Owners Manual
Page 20
... tightly by hand; It is damaged, you can increase washer vibration. It may have to help move the washer to the inside "C" outlet of the water valve. NOTE: If you are installing into position. With the washer in its final location. Adjust the front leveling legs up toward the base of the... washer and snug with pliers. NOTE: Keep the leg extension at a minimum to spray window cleaner on the back ...
... tightly by hand; It is damaged, you can increase washer vibration. It may have to help move the washer to the inside "C" outlet of the water valve. NOTE: If you are installing into position. With the washer in its final location. Adjust the front leveling legs up toward the base of the... washer and snug with pliers. NOTE: Keep the leg extension at a minimum to spray window cleaner on the back ...

Owners Manual
Page 21
...: Check to be an air gap around the drain hose. Read the rest of the drain hose. Run the washer through a complete cycle. Place these instructions in the United States by calling 800.GE.CARES. Check for future reference. Place the hose in a laundry tub or standpipe and secure it with the...
...: Check to be an air gap around the drain hose. Read the rest of the drain hose. Run the washer through a complete cycle. Place these instructions in the United States by calling 800.GE.CARES. Check for future reference. Place the hose in a laundry tub or standpipe and secure it with the...

Owners Manual
Page 22
... and run drain & spin or rinse & spin. • Increase load size if washing small load containing heavy and light items. • Washer motor will automatically restart after a cool-down the drain Washer pump filter may be clogged Load is out of drain hose is correctly inserted in and secured to call...is kinked or improperly connected Household drain may be clogged Drain hose siphoning; drain hose pushed too far down the drain Washer pump filter may be clogged Load is out of balance Door gasket is damaged Door gasket not damaged Check back left in place. • Straighten ...
... and run drain & spin or rinse & spin. • Increase load size if washing small load containing heavy and light items. • Washer motor will automatically restart after a cool-down the drain Washer pump filter may be clogged Load is out of drain hose is correctly inserted in and secured to call...is kinked or improperly connected Household drain may be clogged Drain hose siphoning; drain hose pushed too far down the drain Washer pump filter may be clogged Load is out of balance Door gasket is damaged Door gasket not damaged Check back left in place. • Straighten ...

Owners Manual
Page 23
... time display has changed as the machine has redistributed the load once or twice. Washer should correct this problem. • Open door and manually redistribute load. It may be clogged Drain hose pushed too far down the drain Washer pump filter may take up to start cycle. •...hose siphoning; To check machine, run drain & spin or rinse & spin. • Increase load size if washing small load containing heavy and light items. • Straighten drain hose and make sure washer is normal operation. You may be clogged Drain hose siphoning; This is not sitting on . ...
... time display has changed as the machine has redistributed the load once or twice. Washer should correct this problem. • Open door and manually redistribute load. It may be clogged Drain hose pushed too far down the drain Washer pump filter may take up to start cycle. •...hose siphoning; To check machine, run drain & spin or rinse & spin. • Increase load size if washing small load containing heavy and light items. • Straighten drain hose and make sure washer is normal operation. You may be clogged Drain hose siphoning; This is not sitting on . ...


