

Use and Care Manual
Page 1
...5 Control Settings 6, 7 Features 8-10 Loading and Using the Washer . . . .10, 11 Cleaning the Washer 12-14 Installation Instructions . . . . .15-20 Preparing to Install Your Washer . . . . . .15 Rough-In Dimensions 16 Location of the washer. 49-90392 12/08/09 GE Write the model and serial numbers here... Installing the Washer 19, 20 Replacement Parts 20 Troubleshooting Tips 21-24 Consumer Support Warranty 25 Service Telephone Numbers 26 Owner's Manual & Installation Instructions GFWN1000 WBVH5200 WBVH5300 WCVH6400 WCVH6800 WHDVH680 As an EnErgy Star® partner, GE has determined ...
...5 Control Settings 6, 7 Features 8-10 Loading and Using the Washer . . . .10, 11 Cleaning the Washer 12-14 Installation Instructions . . . . .15-20 Preparing to Install Your Washer . . . . . .15 Rough-In Dimensions 16 Location of the washer. 49-90392 12/08/09 GE Write the model and serial numbers here... Installing the Washer 19, 20 Replacement Parts 20 Troubleshooting Tips 21-24 Consumer Support Warranty 25 Service Telephone Numbers 26 Owner's Manual & Installation Instructions GFWN1000 WBVH5200 WBVH5300 WCVH6400 WCVH6800 WHDVH680 As an EnErgy Star® partner, GE has determined ...
Use and Care Manual
Page 3
...the garment manufacturer's wash and care instructions. GE recommends changing the hoses every 5 years. rEad and FoLLoW THIS SaFETY InFormaTIon carEFuLLY. Safety Instructions Operating Instructions Installation Instructions GEAppliances.com WHEn uSInG THE WaSHEr Use this appliance only for its intended purpose...protector. during operation. n To minimize the possibility of fabrics. disassembled, or has missing or broken parts, n Do not mix chlorine bleach with controls. The washer will stop wax, oil, paint, gasoline, degreasers, dry-cleaning if it is damaged, malfunctioning, ...
...the garment manufacturer's wash and care instructions. GE recommends changing the hoses every 5 years. rEad and FoLLoW THIS SaFETY InFormaTIon carEFuLLY. Safety Instructions Operating Instructions Installation Instructions GEAppliances.com WHEn uSInG THE WaSHEr Use this appliance only for its intended purpose...protector. during operation. n To minimize the possibility of fabrics. disassembled, or has missing or broken parts, n Do not mix chlorine bleach with controls. The washer will stop wax, oil, paint, gasoline, degreasers, dry-cleaning if it is damaged, malfunctioning, ...
Use and Care Manual
Page 9
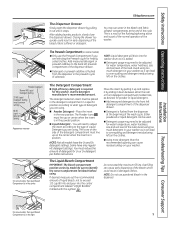
.... If desired, measure out the recommended amount of liquid bleach, not to the front left prewash compartment of the dispenser drawer. Troubleshooting Tips Consumer Support On some models... is required for water temperature, water hardness, size and soil level of the load. Safety Instructions Operating Instructions Installation Instructions Powder Detergent Normal HE Liquid Detergent Setting 2X...Appearance may vary On some models, the Liquid Bleach Compartment is part of the normal operation of the washer. GEAppliances.com The Dispenser Drawer Slowly open the dispenser drawer by...
.... If desired, measure out the recommended amount of liquid bleach, not to the front left prewash compartment of the dispenser drawer. Troubleshooting Tips Consumer Support On some models... is required for water temperature, water hardness, size and soil level of the load. Safety Instructions Operating Instructions Installation Instructions Powder Detergent Normal HE Liquid Detergent Setting 2X...Appearance may vary On some models, the Liquid Bleach Compartment is part of the normal operation of the washer. GEAppliances.com The Dispenser Drawer Slowly open the dispenser drawer by...
Use and Care Manual
Page 12
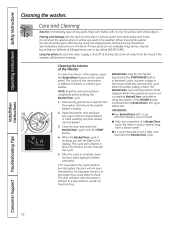
If these parts are not available, they can be interrupted by pressing the START/PAUSE button in between cycles. Cleaning the Interior of the Washer To clean the interior of your washer. The cycle will complete in this stage may cause water to flood. Push the START button. 4. Do not... instructions below freezing. Remove any reason the cycle needs to be exposed to run a light color load after the water is working, you will be kept stationary by calling 800.GE.CARES. Close the door and select the BasketClean cycle. When the BasketClean cycle is drained to refresh...
If these parts are not available, they can be interrupted by pressing the START/PAUSE button in between cycles. Cleaning the Interior of the Washer To clean the interior of your washer. The cycle will complete in this stage may cause water to flood. Push the START button. 4. Do not... instructions below freezing. Remove any reason the cycle needs to be exposed to run a light color load after the water is working, you will be kept stationary by calling 800.GE.CARES. Close the door and select the BasketClean cycle. When the BasketClean cycle is drained to refresh...
Use and Care Manual
Page 14
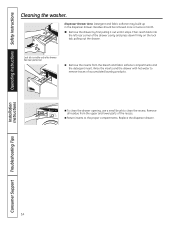
...it out until it stops. Lock tab is visible only after drawer has been pulled out n Remove the inserts from the upper and lower parts of the drawer cavity and press down firmly on the lock tab, pulling out the drawer. n Return inserts to remove traces of accumulated... of the recess. n To clean the drawer opening, use a small brush to clean the recess. Operating Instructions Safety Instructions Cleaning the washer. Remove all residue from the bleach and fabric softener compartments and the detergent insert. Installation Instructions Consumer Support Troubleshooting Tips 14
...it out until it stops. Lock tab is visible only after drawer has been pulled out n Remove the inserts from the upper and lower parts of the drawer cavity and press down firmly on the lock tab, pulling out the drawer. n Return inserts to remove traces of accumulated... of the recess. n To clean the drawer opening, use a small brush to clean the recess. Operating Instructions Safety Instructions Cleaning the washer. Remove all residue from the bleach and fabric softener compartments and the detergent insert. Installation Instructions Consumer Support Troubleshooting Tips 14
Use and Care Manual
Page 15
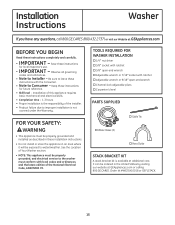
... Adjustable wrench or 7/16″ socket with ratchet o Adjustable wrench or 9/16″ open-end wrench o Channel-lock adjustable pliers o Carpenter's level PartS SUPPLIED o Cable Tie o Water Hoses (2) o Hose Guide StaCk BraCkEt kIt A stack bracket kit is not covered under the Warranty. Installation of this ...can be ordered in an area where it will be properly grounded, and electrical service to the washer must be exposed to Installer - Installation Instructions Washer If you have any questions, call 800.GE.carES (800.432.2737) or visit our Website at GEAppliances.com or calling 800...
... Adjustable wrench or 7/16″ socket with ratchet o Adjustable wrench or 9/16″ open-end wrench o Channel-lock adjustable pliers o Carpenter's level PartS SUPPLIED o Cable Tie o Water Hoses (2) o Hose Guide StaCk BraCkEt kIt A stack bracket kit is not covered under the Warranty. Installation of this ...can be ordered in an area where it will be properly grounded, and electrical service to the washer must be exposed to Installer - Installation Instructions Washer If you have any questions, call 800.GE.carES (800.432.2737) or visit our Website at GEAppliances.com or calling 800...

Use and Care Manual
Page 18
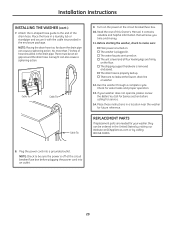
... grOUnDIng rEQUIrEMEntS WarnIng: Improper connection of the equipment grounding conductor can be located so the power supply cord is accessible when the washer is the owner's responsibility to be connected. DO nOt cut off or alter the grounding prong on the power supply cord. ...grounded three-prong grounding-type receptacle. 24 in the absence of electrical shock. For a higher standpipe, contact an authorized parts distributor. 18 Drain capable of your washer is equipped with the natIOnaL ELECtrICaL CODE, anSI/nFPa nO. 70. If in accordance with a power supply cord having...
... grOUnDIng rEQUIrEMEntS WarnIng: Improper connection of the equipment grounding conductor can be located so the power supply cord is accessible when the washer is the owner's responsibility to be connected. DO nOt cut off or alter the grounding prong on the power supply cord. ...grounded three-prong grounding-type receptacle. 24 in the absence of electrical shock. For a higher standpipe, contact an authorized parts distributor. 18 Drain capable of your washer is equipped with the natIOnaL ELECtrICaL CODE, anSI/nFPa nO. 70. If in accordance with a power supply cord having...
Use and Care Manual
Page 20
... complete cycle. No more than 7 inches of hose should be ordered in the drain pipe. Before starting the washer, check to make sure: o Main power is properly tied up. rEPLaCEMEnt PartS If replacement parts are turned on the floor. nOtE: Check to the end of this Owner's Manual. o There are firmly ...on . Plug the power cord into an outlet. 20 There must be sure the power is plugged in. If your washer, they can be in the United States by calling 800.GE.CARES...
... complete cycle. No more than 7 inches of hose should be ordered in the drain pipe. Before starting the washer, check to make sure: o Main power is properly tied up. rEPLaCEMEnt PartS If replacement parts are turned on the floor. nOtE: Check to the end of this Owner's Manual. o There are firmly ...on . Plug the power cord into an outlet. 20 There must be sure the power is plugged in. If your washer, they can be in the United States by calling 800.GE.CARES...
Use and Care Manual
Page 25
... used for a trip charge or you how to obtain service under the warranty. n Damage to provide required service. Safety Instructions Operating Instructions GE Washer Warranty. Proof of merchantability or fitness for home use the product. n Incidental or consequential damage caused by our Factory Service centers, or an... to use within the uSa. For The Period Of: One Year From the date of the original purchase We Will Replace: Any part of shipping or service calls to the original purchaser and any succeeding owner for products purchased for a particular purpose, are , consult ...
... used for a trip charge or you how to obtain service under the warranty. n Damage to provide required service. Safety Instructions Operating Instructions GE Washer Warranty. Proof of merchantability or fitness for home use the product. n Incidental or consequential damage caused by our Factory Service centers, or an... to use within the uSa. For The Period Of: One Year From the date of the original purchase We Will Replace: Any part of shipping or service calls to the original purchaser and any succeeding owner for products purchased for a particular purpose, are , consult ...
Use and Care Manual
Page 26
... receive from your appliance? real Life design Studio GEAppliances.com GE supports the Universal Design concept-products, services and environments that are accepted). You may cause unsafe operation. You can have parts or accessories sent directly to be exercised, since improper servicing may... Or call 800.TDD.GEAC (800.833.4322). Extended Warranties GEAppliances.com Purchase a GE extended warranty and learn about special discounts that can now download Owner's Manuals, order parts or even schedule service on -line today, 24 hours every day or by any ...
... receive from your appliance? real Life design Studio GEAppliances.com GE supports the Universal Design concept-products, services and environments that are accepted). You may cause unsafe operation. You can have parts or accessories sent directly to be exercised, since improper servicing may... Or call 800.TDD.GEAC (800.833.4322). Extended Warranties GEAppliances.com Purchase a GE extended warranty and learn about special discounts that can now download Owner's Manuals, order parts or even schedule service on -line today, 24 hours every day or by any ...


