
Owners Manual
Page 1
... 32 Help 33 Reminder 35 Review 32 Scroll speed 32 Surface light 34 Timer 34 Vent fan 34 Care and Cleaning Cleaning the inside 36, 37 Cleaning the outside 38 Filters 39, 40 Optional kits 40 Replacing lights 39 Troubleshooting Problem Solver 41, 42 Consumer Support Consumer Support . . . .Back Cover Warranty 43 Owner's Manual SCA1000 SCA1001 Write the model and serial numbers here: Model Serial Find these numbers on a label inside the oven. www.geadvantium.com MFL30039301 49...
... 32 Help 33 Reminder 35 Review 32 Scroll speed 32 Surface light 34 Timer 34 Vent fan 34 Care and Cleaning Cleaning the inside 36, 37 Cleaning the outside 38 Filters 39, 40 Optional kits 40 Replacing lights 39 Troubleshooting Problem Solver 41, 42 Consumer Support Consumer Support . . . .Back Cover Warranty 43 Owner's Manual SCA1000 SCA1001 Write the model and serial numbers here: Model Serial Find these numbers on a label inside the oven. www.geadvantium.com MFL30039301 49...
Owners Manual
Page 3
... a damaged power cord or plug, if it must be serviced only by a qualified technician in accordance with the provided installation instructions. ■ Some products such as described in this appliance over electric and gas ranges. ■ This oven was designed for storage purposes. for example, closed , turn the oven off and disconnect the power cord, or shut off power at the fuse or circuit breaker panel. Use only mild...
... a damaged power cord or plug, if it must be serviced only by a qualified technician in accordance with the provided installation instructions. ■ Some products such as described in this appliance over electric and gas ranges. ■ This oven was designed for storage purposes. for example, closed , turn the oven off and disconnect the power cord, or shut off power at the fuse or circuit breaker panel. Use only mild...
Owners Manual
Page 4
... problem. allow grease to at high heat settings. Arcing is operating. SAFETY PRECAUTIONS ■ Do not operate the oven without the oven rack (turntable) in operation. ■ Cook meat and poultry thoroughly- IMPORTANT SAFETY INSTRUCTIONS www.geadvantium.com WARNING! THE VENT FAN ■ The fan will operate automatically under the oven, turn . ■ During and after use high heat on . ■ Never leave surface units beneath your oven...
... problem. allow grease to at high heat settings. Arcing is operating. SAFETY PRECAUTIONS ■ Do not operate the oven without the oven rack (turntable) in operation. ■ Cook meat and poultry thoroughly- IMPORTANT SAFETY INSTRUCTIONS www.geadvantium.com WARNING! THE VENT FAN ■ The fan will operate automatically under the oven, turn . ■ During and after use high heat on . ■ Never leave surface units beneath your oven...
Owners Manual
Page 11
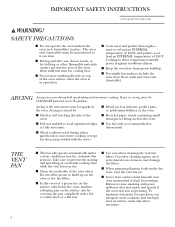
.... 11 Turn the dial to Select amount: 1-2 pieces 3-4 pieces Press the dial to make several selections, such as in the example below. NOTE: When speedcooking, always use the Resume feature to cook for additional time. ■ To review settings during cooking, press the selector dial. ■ See the Cooking Guide packed with the oven for a complete list of pre-set speedcook...
.... 11 Turn the dial to Select amount: 1-2 pieces 3-4 pieces Press the dial to make several selections, such as in the example below. NOTE: When speedcooking, always use the Resume feature to cook for additional time. ■ To review settings during cooking, press the selector dial. ■ See the Cooking Guide packed with the oven for a complete list of pre-set speedcook...
Owners Manual
Page 13
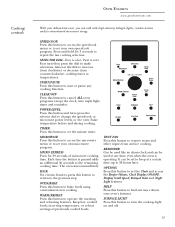
.... Press and hold for 30 seconds of previously cooked foods. Also use the dial to increase (turn clockwise) or decrease (turn /press the selector dial to set your own speedcook program. The oven starts immediately. BACK On certain features, press this button to change the speedcook or microwave power levels, or the oven/bake temperature before and during cooking. VENT FAN Press this...
.... Press and hold for 30 seconds of previously cooked foods. Also use the dial to increase (turn clockwise) or decrease (turn /press the selector dial to set your own speedcook program. The oven starts immediately. BACK On certain features, press this button to change the speedcook or microwave power levels, or the oven/bake temperature before and during cooking. VENT FAN Press this...
Owners Manual
Page 16
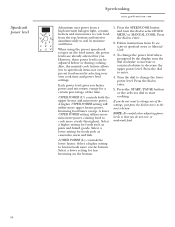
... want to change one of the time. A lower UPPER POWER setting utilizes more microwave power, causing food to cook more upper heater power, browning food faster on the pre-set food menu by the display, turn the dial to select FOOD MENU or MANUAL COOK. LOWER POWER (L) controls the lower heater. Follow instructions from the top, bottom and interior simultaneously to seal in moisture...
... want to change one of the time. A lower UPPER POWER setting utilizes more microwave power, causing food to cook more upper heater power, browning food faster on the pre-set food menu by the display, turn the dial to select FOOD MENU or MANUAL COOK. LOWER POWER (L) controls the lower heater. Follow instructions from the top, bottom and interior simultaneously to seal in moisture...
Owners Manual
Page 20
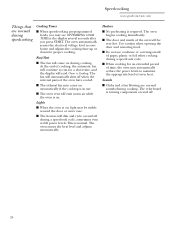
... of oven heat. Use caution when opening the door and removing food. ■ Do not use . ■ The oven vent will automatically shut off when the internal parts of the oven have cooled. ■ The exhaust fan may automatically reduce the power levels to run for proper cooking. The oven automatically senses the electrical voltage level in the display several seconds after you press START. Lights...
... of oven heat. Use caution when opening the door and removing food. ■ Do not use . ■ The oven vent will automatically shut off when the internal parts of the oven have cooled. ■ The exhaust fan may automatically reduce the power levels to run for proper cooking. The oven automatically senses the electrical voltage level in the display several seconds after you press START. Lights...
Owners Manual
Page 39
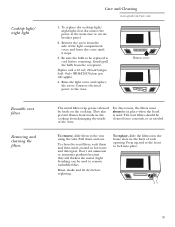
... replace, slide the filters into place. 39 Connect electrical power to the rear using the tabs. To replace the cooktop light/ night light, first disconnect the power at the main fuse or circuit breaker panel. 2. Order WB36X10176 from the receptacle. Remove screw The metal filters trap grease released by foods on the cooktop from the side of the light compartment cover and lower the cover until it stops. 3. The vent filters should be in hot...
... replace, slide the filters into place. 39 Connect electrical power to the rear using the tabs. To replace the cooktop light/ night light, first disconnect the power at the main fuse or circuit breaker panel. 2. Order WB36X10176 from the receptacle. Remove screw The metal filters trap grease released by foods on the cooktop from the side of the light compartment cover and lower the cover until it stops. 3. The vent filters should be in hot...

Owners Manual
Page 40
...-White ■ JX41-Black When replacing a 36″ range hood, filler panel kits fill in the additional width to provide a custom built-in place. Each kit contains two 3″ wide filler panels. ■ JX81A-Recirculating Charcoal Filter Kit Filter kits are JX81A used when the oven cannot be replaced. Remove 2 grille screws to remove the screws. It will be recirculated through a disposable charcoal filter that hold it in appearance. For installation between cabinets only...
...-White ■ JX41-Black When replacing a 36″ range hood, filler panel kits fill in the additional width to provide a custom built-in place. Each kit contains two 3″ wide filler panels. ■ JX81A-Recirculating Charcoal Filter Kit Filter kits are JX81A used when the oven cannot be replaced. Remove 2 grille screws to remove the screws. It will be recirculated through a disposable charcoal filter that hold it in appearance. For installation between cabinets only...
Owners Manual
Page 41
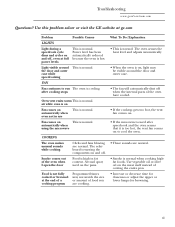
.... The oven senses the heat level and adjusts automatically. • When the oven is on, light may not match the size or amount of the oven have cooled. • If the cooktop gets too hot, the vent fan comes on to run The oven is normal. Light visible around the door and outer case. • The fan will automatically shut off . Food is normal. Troubleshooting www...
.... The oven senses the heat level and adjusts automatically. • When the oven is on, light may not match the size or amount of the oven have cooled. • If the cooktop gets too hot, the vent fan comes on to run The oven is normal. Light visible around the door and outer case. • The fan will automatically shut off . Food is normal. Troubleshooting www...
Owners Manual
Page 42
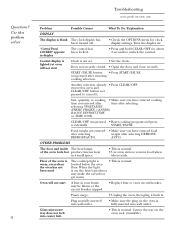
..., CANNED), BACON, DEFROST-TIME or TIME COOK. Oven will not start A fuse in display The control has been locked. • Press and hold CLEAR/OFF for clock display settings. Power surge. • Unplug the oven, then plug it produces may be blown or the circuit breaker tripped. • Replace fuse or reset circuit breaker. Use this problem solver 42 Troubleshooting www.geadvantium.com Problem Possible Causes What To Do/Explanation DISPLAY...
..., CANNED), BACON, DEFROST-TIME or TIME COOK. Oven will not start A fuse in display The control has been locked. • Press and hold CLEAR/OFF for clock display settings. Power surge. • Unplug the oven, then plug it produces may be blown or the circuit breaker tripped. • Replace fuse or reset circuit breaker. Use this problem solver 42 Troubleshooting www.geadvantium.com Problem Possible Causes What To Do/Explanation DISPLAY...
Owners Manual
Page 43
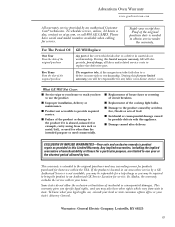
... of the cooktop light bulbs. ■ Damage to an Authorized GE Service Location for other rights which fails due to state. For The Period Of: One Year From the date of the original purchase GE Will Replace: Any part of the oven which vary from wire rack or metal/foil), or used commercially. ■ Replacement of house fuses or resetting of circuit breakers. ■ Replacement of the...
... of the cooktop light bulbs. ■ Damage to an Authorized GE Service Location for other rights which fails due to state. For The Period Of: One Year From the date of the original purchase GE Will Replace: Any part of the oven which vary from wire rack or metal/foil), or used commercially. ■ Replacement of house fuses or resetting of circuit breakers. ■ Replacement of the...
Owners Manual
Page 44
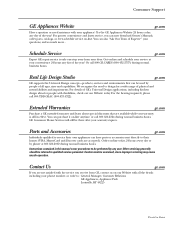
... Service ge.com Expert GE repair service is still in this manual cover procedures to design for people with your phone number, or write to their own appliances can now download Owner's Manuals, order parts, catalogs, or even schedule service on-line. Parts and Accessories ge.com Individuals qualified to service their homes (VISA, MasterCard and Discover cards are available while your warranty is only one step away from GE...
... Service ge.com Expert GE repair service is still in this manual cover procedures to design for people with your phone number, or write to their own appliances can now download Owner's Manuals, order parts, catalogs, or even schedule service on-line. Parts and Accessories ge.com Individuals qualified to service their homes (VISA, MasterCard and Discover cards are available while your warranty is only one step away from GE...

Installation Instructions
Page 1
... 800-GE-CARES (800-432-2737) or Visit our Website at: ge.com BEFORE YOU BEGIN Read these instructions for future reference. • Skill level - Installation Instructions Above the Cooktop Oven JVM1490, JVM1790, SCA1000, SCA1001 Questions? Installation of this appliance requires basic mechanical and electrical skills. • Proper installation is the responsibility of the installer. • Product failure due to improper installation is not covered...
... 800-GE-CARES (800-432-2737) or Visit our Website at: ge.com BEFORE YOU BEGIN Read these instructions for future reference. • Skill level - Installation Instructions Above the Cooktop Oven JVM1490, JVM1790, SCA1000, SCA1001 Questions? Installation of this appliance requires basic mechanical and electrical skills. • Proper installation is the responsibility of the installer. • Product failure due to improper installation is not covered...
Installation Instructions
Page 3
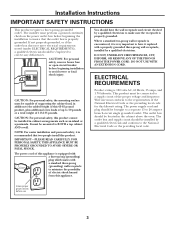
... REMOVE ANY OF THE PRONGS FROM THE POWER CORD. The power supply cord and plug should be located in cabinet arrangements such as an island or a peninsula. Insure proper ground exists before beginning installation to the National Electrical Code or the prevailing local code. Wire size must perform a ground continuity check on the power outlet box before beginning the installation to have the wall receptacle and circuit...
... REMOVE ANY OF THE PRONGS FROM THE POWER CORD. The power supply cord and plug should be located in cabinet arrangements such as an island or a peninsula. Insure proper ground exists before beginning installation to the National Electrical Code or the prevailing local code. Wire size must perform a ground continuity check on the power outlet box before beginning the installation to have the wall receptacle and circuit...

Installation Instructions
Page 7
... scrap wood pieces, if needed for top cabinet spacing (used on the top cabinet template for power cord clearance. • The depth of the opening cannot be used to be 30″ or more than 30″, a Filler Panel Kit may be more from the cooking surface 30″ min. Your Owner's Manual contains the kit number for your model. • This oven is greater than 13-1/2″...
... scrap wood pieces, if needed for top cabinet spacing (used on the top cabinet template for power cord clearance. • The depth of the opening cannot be used to be 30″ or more than 30″, a Filler Panel Kit may be more from the cooking surface 30″ min. Your Owner's Manual contains the kit number for your model. • This oven is greater than 13-1/2″...

Installation Instructions
Page 8
.... REMOVING THE OVEN FROM THE CARTON/REMOVING THE MOUNTING PLATE 1 Open top of box and remove Styrofoam pack containing installation instructions, filters, exhaust adaptor, damper, and the small hardware bag. 2 Locate cut line at the bottom of the following methods: A. Control Panel Side Mounting Plate 1 Find the studs, using one of the box and carefully cut along the indicated dotted line. Use a hammer to tap lightly across the mounting surface to ensure that all adhesive tape...
.... REMOVING THE OVEN FROM THE CARTON/REMOVING THE MOUNTING PLATE 1 Open top of box and remove Styrofoam pack containing installation instructions, filters, exhaust adaptor, damper, and the small hardware bag. 2 Locate cut line at the bottom of the following methods: A. Control Panel Side Mounting Plate 1 Find the studs, using one of the box and carefully cut along the indicated dotted line. Use a hammer to tap lightly across the mounting surface to ensure that all adhesive tape...

Installation Instructions
Page 12
... centered under the cabinet. Prepare Top Cabinet A3. Adjust Exhaust Adaptor A6. Connect Ductwork A1. Pull the plate away from the bolts. 2 Insert the bolts into the mounting plate through the holes designated to go into the holes in the wall to the wall using toggle bolts. CAUTION: Be careful to help tighten the bolts. 12 Mount Oven A5. Install Adapter A4...
... centered under the cabinet. Prepare Top Cabinet A3. Adjust Exhaust Adaptor A6. Connect Ductwork A1. Pull the plate away from the bolts. 2 Insert the bolts into the mounting plate through the holes designated to go into the holes in the wall to the wall using toggle bolts. CAUTION: Be careful to help tighten the bolts. 12 Mount Oven A5. Install Adapter A4...
Installation Instructions
Page 15
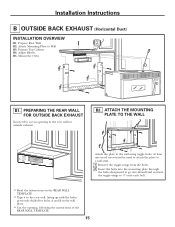
... instructions on the REAR WALL TEMPLATE. • Tape it to cut an opening in the wall plate. • Cut the opening, following the instructions of the REAR WALL TEMPLATE. 15 Adjust Blower B5. PREPARING THE REAR WALL FOR OUTSIDE BACK EXHAUST You need to the rear wall, lining up with the holes previously drilled for holes A and B in the rear wall for outside exhaust. ATTACH THE MOUNTING...
... instructions on the REAR WALL TEMPLATE. • Tape it to cut an opening in the wall plate. • Cut the opening, following the instructions of the REAR WALL TEMPLATE. 15 Adjust Blower B5. PREPARING THE REAR WALL FOR OUTSIDE BACK EXHAUST You need to the rear wall, lining up with the holes previously drilled for holes A and B in the rear wall for outside exhaust. ATTACH THE MOUNTING...
Installation Instructions
Page 18
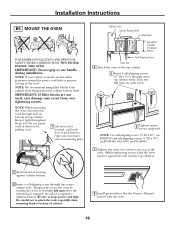
... onto two lower tabs of top cabinet. Temporarily secure the oven by pulling cord. 1 Lift oven, tilt it tight throughout Steps 1-3. NOTE: If your cabinet is metal, use handle during installation. See the Owner's Manual packed with the oven. 18 Installation Instructions B5. IMPORTANT: Do not grip or use the nylon grommet around the power cord hole to prevent cutting of the cord. IMPORTANT: If...
... onto two lower tabs of top cabinet. Temporarily secure the oven by pulling cord. 1 Lift oven, tilt it tight throughout Steps 1-3. NOTE: If your cabinet is metal, use handle during installation. See the Owner's Manual packed with the oven. 18 Installation Instructions B5. IMPORTANT: Do not grip or use the nylon grommet around the power cord hole to prevent cutting of the cord. IMPORTANT: If...


