
Installation Instructions
Page 1
... Water Dispenser 17-18 Quick Ice 17 Refrigerator Doors 13 Replacing the Light Bulbs 20 Set ... the Refrigerator 30-33 Moving the Refrigerator 26-29 Preparing to Install the Refrigerator 25 Trim... Kits and Panels 21-24 Water Line Installation 34-36 Troubleshooting Tips 38-40 Normal Operating Sounds 37 Consumer Support Performance Data Sheets 43, 44 Warranty (U.S 42 Owner's Manual and Installation Models...the model and serial numbers here: Model Serial Find these numbers on a label inside the refrigerator compartment ...
... Water Dispenser 17-18 Quick Ice 17 Refrigerator Doors 13 Replacing the Light Bulbs 20 Set ... the Refrigerator 30-33 Moving the Refrigerator 26-29 Preparing to Install the Refrigerator 25 Trim... Kits and Panels 21-24 Water Line Installation 34-36 Troubleshooting Tips 38-40 Normal Operating Sounds 37 Consumer Support Performance Data Sheets 43, 44 Warranty (U.S 42 Owner's Manual and Installation Models...the model and serial numbers here: Model Serial Find these numbers on a label inside the refrigerator compartment ...

Installation Instructions
Page 4
...pad. The temperature controls can display both the SET temperature as well as the actual temperature in both the freezer and refrigerator compartments. „ On other models, setting either control to stabilize. Although the Air Tower and the Air Tunnel can be required. If this film was...°C). The actual temperature may be removed, doing so will stop the cooling to the freezer and refrigerator. „ NOTE: Turning the refrigerator off via the controls on -line, contact us at ge.com or call 1.800.561.3344.) 4 The temperature controls are on , it now. When the...
...pad. The temperature controls can display both the SET temperature as well as the actual temperature in both the freezer and refrigerator compartments. „ On other models, setting either control to stabilize. Although the Air Tower and the Air Tunnel can be required. If this film was...°C). The actual temperature may be removed, doing so will stop the cooling to the freezer and refrigerator. „ NOTE: Turning the refrigerator off via the controls on -line, contact us at ge.com or call 1.800.561.3344.) 4 The temperature controls are on , it now. When the...
Installation Instructions
Page 5
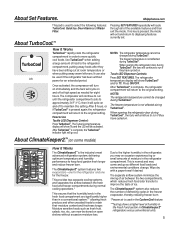
...keep food garden fresh longer and reduce freezer burn. About ClimateKeeper2.™ (on and off at room temperature or NOTES: The refrigerator temperature cannot be changed during TurboCool™. approximately 34°F (1°C), then it Works The ClimateKeeper2™ is complete, the...TurboCool™. Wipe dry with a paper towel if desired. The refrigerator temperature display will cycle on some models) How it will show Tc and the LED will continue to run until the refrigerator compartment cools to the higher humidity in the freezer evaporator, thereby ...
...keep food garden fresh longer and reduce freezer burn. About ClimateKeeper2.™ (on and off at room temperature or NOTES: The refrigerator temperature cannot be changed during TurboCool™. approximately 34°F (1°C), then it Works The ClimateKeeper2™ is complete, the...TurboCool™. Wipe dry with a paper towel if desired. The refrigerator temperature display will cycle on some models) How it will show Tc and the LED will continue to run until the refrigerator compartment cools to the higher humidity in the freezer evaporator, thereby ...

Installation Instructions
Page 6
... the following chart to determine the best setting to use. „ ExpressChill can be wrapped in the pan. About CustomCool.™(on some models). „ After the ExpressThaw cycle is complete, the pan will reset to the MEAT setting (32°F [0°C]) to the desired setting... on the tray and close the pan completely. This will come on some models) How it Works Touch LED Dispenser Control The CustomCool™ feature is tightly sealed to prevent temperature fluctuations in the rest of the refrigerator. The pan is used . „ The displayed actual temperature of dampers...
... the following chart to determine the best setting to use. „ ExpressChill can be wrapped in the pan. About CustomCool.™(on some models). „ After the ExpressThaw cycle is complete, the pan will reset to the MEAT setting (32°F [0°C]) to the desired setting... on the tray and close the pan completely. This will come on some models) How it Works Touch LED Dispenser Control The CustomCool™ feature is tightly sealed to prevent temperature fluctuations in the rest of the refrigerator. The pan is used . „ The displayed actual temperature of dampers...

Installation Instructions
Page 7
ExpressChill ™ How to the unlock position. Place the Chill tray in the top of the refrigerator or on the controls will only have one option (45 minutes). On models with the temperature controls. To replace: Make sure all four swing locks by rotating them to the lock position. Lock ...all four swing locks are in the unlock position. The pan is a system of the refrigerator. Other models will count down the time in the rest of dampers, a fan and a temperature thermistor. Place the sides of the drawer up and out....
ExpressChill ™ How to the unlock position. Place the Chill tray in the top of the refrigerator or on the controls will only have one option (45 minutes). On models with the temperature controls. To replace: Make sure all four swing locks by rotating them to the lock position. Lock ...all four swing locks are in the unlock position. The pan is a system of the refrigerator. Other models will count down the time in the rest of dampers, a fan and a temperature thermistor. Place the sides of the drawer up and out....

Installation Instructions
Page 9
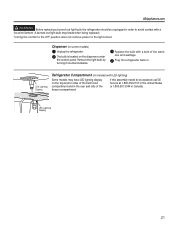
... to the new cartridge to remind you are filtering your filtration system, GE recommends the use . Customers in place. For the maximum benefit of the refrigerator compartment. When to the left about 1/2 turn . On models without the filter or filter bypass plug. Do not push it to... replace the filter in GE and Hotpoint refrigerators and there is no assurance that non-GE branded filters meet rigorous industry NSF...
... to the new cartridge to remind you are filtering your filtration system, GE recommends the use . Customers in place. For the maximum benefit of the refrigerator compartment. When to the left about 1/2 turn . On models without the filter or filter bypass plug. Do not push it to... replace the filter in GE and Hotpoint refrigerators and there is no assurance that non-GE branded filters meet rigorous industry NSF...
Installation Instructions
Page 10
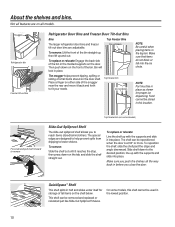
...shelf below. To replace or relocate: Line the shelf up and out. Snugger Refrigerator bin Freezer tilt-out bin Refrigerator Door Bins and Freezer Door Tilt-Out Bins Bins Top Freezer Bins The larger refrigerator door bins and freezer tilt-out door bins are designed to help prevent spills ...from dripping to reach items stored behind others. Bin will lock in the top bin. Top freezer bin Do not block NOTE: Be careful when placing items in place. About the shelves and bins. Not all models...
...shelf below. To replace or relocate: Line the shelf up and out. Snugger Refrigerator bin Freezer tilt-out bin Refrigerator Door Bins and Freezer Door Tilt-Out Bins Bins Top Freezer Bins The larger refrigerator door bins and freezer tilt-out door bins are designed to help prevent spills ...from dripping to reach items stored behind others. Bin will lock in the top bin. Top freezer bin Do not block NOTE: Be careful when placing items in place. About the shelves and bins. Not all models...

Installation Instructions
Page 13
... the door bins. Crisper Removal Crispers can be wiped dry. the freezer compartment or fresh food compartment to flow to normal refrigerator temperature and provide The variable temperature control regulates extra vegetable storage space. COLD About crisper removal. Not all features are on all...up and over the stop location. If the door prevents you will need to move the refrigerator to provide lower humidity levels vegetables. The cold air duct is turned off. In some models, the bottom drawer has full extension slides that may accumulate in the bottom of cold ...
... the door bins. Crisper Removal Crispers can be wiped dry. the freezer compartment or fresh food compartment to flow to normal refrigerator temperature and provide The variable temperature control regulates extra vegetable storage space. COLD About crisper removal. Not all features are on all...up and over the stop location. If the door prevents you will need to move the refrigerator to provide lower humidity levels vegetables. The cold air duct is turned off. In some models, the bottom drawer has full extension slides that may accumulate in the bottom of cold ...

Installation Instructions
Page 14
... become cloudy, taste stale and shrv CAUTION Avoid contact with the moving parts of the ejector mechanism, or with the heating element (located on some models) NOTE: In homes with water. It is made to the ice maker, set the power switch to clear. If ice is operated before closing ... releases the cubes. Do not place fingers or hands on and off. About the automatic ice maker. The bin can be joined together. If the refrigerator is not used frequently, old ice cubes will hear a buzzing sound each time the ice maker fills with lower than average water pressure, you take...
... become cloudy, taste stale and shrv CAUTION Avoid contact with the moving parts of the ejector mechanism, or with the heating element (located on some models) NOTE: In homes with water. It is made to the ice maker, set the power switch to clear. If ice is operated before closing ... releases the cubes. Do not place fingers or hands on and off. About the automatic ice maker. The bin can be joined together. If the refrigerator is not used frequently, old ice cubes will hear a buzzing sound each time the ice maker fills with lower than average water pressure, you take...

Installation Instructions
Page 16
... ice and water dispenser. (on Tactile LED Dispenser Control model) When you close the door. If no water is dispensed when the refrigerator is better. To flush out impurities in the water line... system. To unlock, press and hold the pad again for 48 hours, or until the feature is turned OFF. For models with a ...control panel. Touch LED Dispenser Control: Press the SET FEATURES pad once and DOOR ALARM will appear. Models with a 6 watt 12V maximum bulb. Press the glass gently against the top of water. The ...
... ice and water dispenser. (on Tactile LED Dispenser Control model) When you close the door. If no water is dispensed when the refrigerator is better. To flush out impurities in the water line... system. To unlock, press and hold the pad again for 48 hours, or until the feature is turned OFF. For models with a ...control panel. Touch LED Dispenser Control: Press the SET FEATURES pad once and DOOR ALARM will appear. Models with a 6 watt 12V maximum bulb. Press the glass gently against the top of water. The ...

Installation Instructions
Page 18
... warm water when they are cold. Do not use appliance wax or polish on some models) can crack or damage the interior of any plastic refrigerator parts in the direction of the refrigerator. Unplug the refrigerator before cleaning. CAUTION Do not clean glass shelves or covers with a clean, soft cloth... left in this is designed to a quart (1 liter) of baking soda in the fresh food and freezer compartments. Do not wipe the refrigerator with soapy water. These may break if exposed to rinse away. The chill/thaw tray is recommended, especially those that can scratch and weaken...
... warm water when they are cold. Do not use appliance wax or polish on some models) can crack or damage the interior of any plastic refrigerator parts in the direction of the refrigerator. Unplug the refrigerator before cleaning. CAUTION Do not clean glass shelves or covers with a clean, soft cloth... left in this is designed to a quart (1 liter) of baking soda in the fresh food and freezer compartments. Do not wipe the refrigerator with soapy water. These may break if exposed to rinse away. The chill/thaw tray is recommended, especially those that can scratch and weaken...

Installation Instructions
Page 20
... convertible meat drawer control knob by pulling straight out. On some models). Remove the shelf just above the top drawer. Replace the screw (on some models) WARNING Before replacing a burned-out light bulb, the refrigerator should be removed. COLD Your light shield will look like one of...the sides, and lift up and out. Replacing the light bulbs.(on some models). After replacing the bulb with an appliance bulb of the compartment, inside the light shield. Unplug the refrigerator. On other models, the screw is located above the light shield. (The shelf will need ...
... convertible meat drawer control knob by pulling straight out. On some models). Remove the shelf just above the top drawer. Replace the screw (on some models) WARNING Before replacing a burned-out light bulb, the refrigerator should be removed. COLD Your light shield will look like one of...the sides, and lift up and out. Replacing the light bulbs.(on some models). After replacing the bulb with an appliance bulb of the compartment, inside the light shield. Unplug the refrigerator. On other models, the screw is located above the light shield. (The shelf will need ...
Installation Instructions
Page 21
...the bulb with LED lighting) Some models may break when being replaced.) Turning the control to the OFF position does not remove power to be replaced, call GE Service at 1.800.432.2737 in the United States or 1.800.561.3344 in . Plug the refrigerator back in Canada. Dispenser (on... the dispenser under the control panel. LED Lighting Display Refrigerator Compartment (on models with a bulb of the freezer compartment If...
...the bulb with LED lighting) Some models may break when being replaced.) Turning the control to the OFF position does not remove power to be replaced, call GE Service at 1.800.432.2737 in the United States or 1.800.561.3344 in . Plug the refrigerator back in Canada. Dispenser (on... the dispenser under the control panel. LED Lighting Display Refrigerator Compartment (on models with a bulb of the freezer compartment If...
Installation Instructions
Page 22
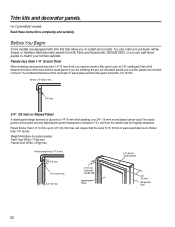
... fit between the face of at least 2" (5.1 cm) from GE Parts and Accessories, 800.626.2002, or you need to install door panels. Weight limitations for fingertip clearance. For CustomStyle™ models Read these instructions completely and carefully. Panels less than 1/4" (6 ...mm) thick When installing wood panels less than 1/4" (6 mm) 5/16" (8 mm) 1/4" (6 mm) max 3/4" (19 mm) 2" (5.1 cm) Clearance Handle Side Appearance Panel 1/4" (6 mm) Thick Backing 3/4" (19 mm) Refrigerator Door 22...
... fit between the face of at least 2" (5.1 cm) from GE Parts and Accessories, 800.626.2002, or you need to install door panels. Weight limitations for fingertip clearance. For CustomStyle™ models Read these instructions completely and carefully. Panels less than 1/4" (6 ...mm) thick When installing wood panels less than 1/4" (6 mm) 5/16" (8 mm) 1/4" (6 mm) max 3/4" (19 mm) 2" (5.1 cm) Clearance Handle Side Appearance Panel 1/4" (6 mm) Thick Backing 3/4" (19 mm) Refrigerator Door 22...
Installation Instructions
Page 24
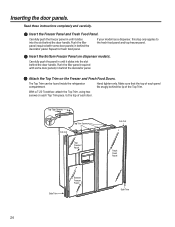
... panel (required with some door panels) in until it slides into the slot behind the door handle. The Top Trim can be found inside the refrigerator compartment. Top Trim Screws Top Trim Screws Cut-Out Top Freezer Panel Cut-Out Fresh Food Panel Side Trim Bottom Freezer Panel Side Trim 24... panel in behind the lip of each Top Trim piece, to the fresh food panel and top freezer panel. Inserting the door panels. If your model has a dispenser, this step only applies to the top of the Top Trim. Make sure that the top of each panel fits snugly behind the...
... panel (required with some door panels) in until it slides into the slot behind the door handle. The Top Trim can be found inside the refrigerator compartment. Top Trim Screws Top Trim Screws Cut-Out Top Freezer Panel Cut-Out Fresh Food Panel Side Trim Bottom Freezer Panel Side Trim 24... panel in behind the lip of each Top Trim piece, to the fresh food panel and top freezer panel. Inserting the door panels. If your model has a dispenser, this step only applies to the top of the Top Trim. Make sure that the top of each panel fits snugly behind the...

Installation Instructions
Page 26
... installation is available at extra cost from Parts and Accessories, 800.626.2002 (in Moving the Refrigerator), then skip to a cold water line. Be sure to Consumer - A GE water supply kit (containing tubing, shutoff valve, fittings and instructions) is not covered under the... BEGIN Read these instructions completely and carefully. • IMPORTANT ³ Save these instructions for future reference. • Skill level - Installation Instructions Refrigerator Models 22, 23, 25, 26, 27 and 29 Questions? TOOLS YOU WILL NEED 3/8" and 5/16" Socket 1/8" Hex Wrench 1/2" and 7/16"...
... installation is available at extra cost from Parts and Accessories, 800.626.2002 (in Moving the Refrigerator), then skip to a cold water line. Be sure to Consumer - A GE water supply kit (containing tubing, shutoff valve, fittings and instructions) is not covered under the... BEGIN Read these instructions completely and carefully. • IMPORTANT ³ Save these instructions for future reference. • Skill level - Installation Instructions Refrigerator Models 22, 23, 25, 26, 27 and 29 Questions? TOOLS YOU WILL NEED 3/8" and 5/16" Socket 1/8" Hex Wrench 1/2" and 7/16"...

Installation Instructions
Page 27
... grille by removing the two Phillips head screws. Bottom freezer hinge 27 DO NOT OVERTIGHTEN THE STRAP. Proceed to Installing the Refrigerator. 3 DISCONNECT THE WATER COUPLING (on some models) If the refrigerator has a water dispenser, there is in on the white collar of the coupling and pull out the tubing. DO NOT remove...
... grille by removing the two Phillips head screws. Bottom freezer hinge 27 DO NOT OVERTIGHTEN THE STRAP. Proceed to Installing the Refrigerator. 3 DISCONNECT THE WATER COUPLING (on some models) If the refrigerator has a water dispenser, there is in on the white collar of the coupling and pull out the tubing. DO NOT remove...

Installation Instructions
Page 28
...putty knife. To disconnect, pull apart at the coupling. 6 CLOSE THE FREEZER AND REFRIGERATOR DOORS Bottom freezer hinge 5 DISCONNECT THE ELECTRICAL CONNECTORS (on some models) If the refrigerator has a water dispenser, there is a power line (harness) from the cabinet into... the bottom hinge on the refrigerator door that must be disconnected. Installation Instructions MOVING THE REFRIGERATOR (CONT.) 4 DISCONNECT THE POWER COUPLING (on some models) If the refrigerator has a refreshment center, there are electrical connectors (harnesses) from ...
...putty knife. To disconnect, pull apart at the coupling. 6 CLOSE THE FREEZER AND REFRIGERATOR DOORS Bottom freezer hinge 5 DISCONNECT THE ELECTRICAL CONNECTORS (on some models) If the refrigerator has a water dispenser, there is a power line (harness) from the cabinet into... the bottom hinge on the refrigerator door that must be disconnected. Installation Instructions MOVING THE REFRIGERATOR (CONT.) 4 DISCONNECT THE POWER COUPLING (on some models) If the refrigerator has a refreshment center, there are electrical connectors (harnesses) from ...

Installation Instructions
Page 30
...sure the second person carefully guides the tube and harnesses through 8. Installation Instructions MOVING THE REFRIGERATOR (CONT.) 8 REMOVE THE REFRIGERATOR DOOR (cont.) D Lift the refrigerator door up and off the bottom hinge. If the refrigerator has a refreshment center, one person should slowly lift the door up and off the bottom... When connecting the water line, make sure you insert the tubing all the way to the mark. 90° Refreshment Center Models Only E Set the door on the bottom hinges. • When connecting the power line and the electrical lines (refreshment center...
...sure the second person carefully guides the tube and harnesses through 8. Installation Instructions MOVING THE REFRIGERATOR (CONT.) 8 REMOVE THE REFRIGERATOR DOOR (cont.) D Lift the refrigerator door up and off the bottom hinge. If the refrigerator has a refreshment center, one person should slowly lift the door up and off the bottom... When connecting the water line, make sure you insert the tubing all the way to the mark. 90° Refreshment Center Models Only E Set the door on the bottom hinges. • When connecting the power line and the electrical lines (refreshment center...

Installation Instructions
Page 31
...models) DIMENSIONS AND SPECIFICATIONS Water Electrical 24" (61 cm) Cabinet 3/4" (19 mm) Airspace (1/2" [13 mm] Gap + 1/4" [6 mm] Wall Plates) 25" (63.5 cm) Countertop 721ø4" (183.5 cm)* 36" (91.4 cm) 24" (61 cm) *721/4" (183.5 cm) required for full adjustment of the opening for the refrigerator...required to provide clearance for cabinet doors to the top of mobility wheels. Installation Instructions INSTALLING THE REFRIGERATOR REFRIGERATOR LOCATION • Do not install the refrigerator where the temperature will go below 60°F (16°C) because it will not run often ...
...models) DIMENSIONS AND SPECIFICATIONS Water Electrical 24" (61 cm) Cabinet 3/4" (19 mm) Airspace (1/2" [13 mm] Gap + 1/4" [6 mm] Wall Plates) 25" (63.5 cm) Countertop 721ø4" (183.5 cm)* 36" (91.4 cm) 24" (61 cm) *721/4" (183.5 cm) required for full adjustment of the opening for the refrigerator...required to provide clearance for cabinet doors to the top of mobility wheels. Installation Instructions INSTALLING THE REFRIGERATOR REFRIGERATOR LOCATION • Do not install the refrigerator where the temperature will go below 60°F (16°C) because it will not run often ...


