
Energy Guide
Page 1
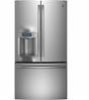
... Use • Your cost will depend on your utility rates and use. • Cost range based only on models of similar capacity with yellow numbers. Refrigerator-Freezer • Automatic Defrost • Bottom -Mounted Freezer • Through-the-Door Ice General Electric Model(s): PYE22PSH****, GYE22KSH****, GYE22KMH**** Capacity: 22.1 Cubic Feet Compare ONLY...
... Use • Your cost will depend on your utility rates and use. • Cost range based only on models of similar capacity with yellow numbers. Refrigerator-Freezer • Automatic Defrost • Bottom -Mounted Freezer • Through-the-Door Ice General Electric Model(s): PYE22PSH****, GYE22KSH****, GYE22KMH**** Capacity: 22.1 Cubic Feet Compare ONLY...
Installation Instructions
Page 1
... Ice maker 18 Care and Cleaning 19 Replacing the Lights 20 Installation Instructions Preparing to Install the Refrigerator 21, 22 Installing the Refrigerator 23-33 Installing the Water Line 34-36 Troubleshooting Tips 38, 39 Normal Operating Conditions 37 Truth... or Myth 40, 41 Consumer Support Warranty 42 RPWFE Water Filter Cartridge Limited Warranty 43 Performance Data Sheet 44 Consumer Support Back Cover Owner's Manual and Installation Instructions GE and GE...
... Ice maker 18 Care and Cleaning 19 Replacing the Lights 20 Installation Instructions Preparing to Install the Refrigerator 21, 22 Installing the Refrigerator 23-33 Installing the Water Line 34-36 Troubleshooting Tips 38, 39 Normal Operating Conditions 37 Truth... or Myth 40, 41 Consumer Support Warranty 42 RPWFE Water Filter Cartridge Limited Warranty 43 Performance Data Sheet 44 Consumer Support Back Cover Owner's Manual and Installation Instructions GE and GE...
Installation Instructions
Page 2
...REFRIGERATOR SAFETY INFORMATION This is the safety alert symbol. READ ALL INSTRUCTIONS BEFORE USING. This symbol alerts you to do so can kill or hurt you must use of the "pinch point" areas; Failure to potential hazards that releases the cubes. SAFETY GE... foods which , if not avoided, could seriously injure themselves. WARNING Indicates a hazardous situation which have thawed completely. „ In refrigerators with automatic icemakers, avoid contact with the Installation Instructions before making repairs, replacing a light bulb, or cleaning. Glass shelves and covers...
...REFRIGERATOR SAFETY INFORMATION This is the safety alert symbol. READ ALL INSTRUCTIONS BEFORE USING. This symbol alerts you to do so can kill or hurt you must use of the "pinch point" areas; Failure to potential hazards that releases the cubes. SAFETY GE... foods which , if not avoided, could seriously injure themselves. WARNING Indicates a hazardous situation which have thawed completely. „ In refrigerators with automatic icemakers, avoid contact with the Installation Instructions before making repairs, replacing a light bulb, or cleaning. Glass shelves and covers...
Installation Instructions
Page 3
... not use an adapter Failure to follow these instructions can lead to prevent tipping forward, which under any doors open. Refrigerants All refrigeration products contain refrigerants, which could cause a fire hazard from this appliance. If you are getting rid of electric shock hazard from overheated ...with a 3-prong (grounding) plug which mates with a standard 3-prong (grounding) wall outlet to minimize the possibility of an old refrigeration product, check with the anti-tip floor bracket to death or brain damage. Do not use an adapter. Repair or replace immediately all...
... not use an adapter Failure to follow these instructions can lead to prevent tipping forward, which under any doors open. Refrigerants All refrigeration products contain refrigerants, which could cause a fire hazard from this appliance. If you are getting rid of electric shock hazard from overheated ...with a 3-prong (grounding) plug which mates with a standard 3-prong (grounding) wall outlet to minimize the possibility of an old refrigeration product, check with the anti-tip floor bracket to death or brain damage. Do not use an adapter. Repair or replace immediately all...

Installation Instructions
Page 4
...-sized shelf when needed and easily slides back to capture your items. Dual ice maker/Ice bin (on some models) An ice maker in the refrigerator. Full-width temperature controlled drawer (on some models) Adjustable temperature control bin that captures spills, keeps containers from shifting when the door is easily removable...
...-sized shelf when needed and easily slides back to capture your items. Dual ice maker/Ice bin (on some models) An ice maker in the refrigerator. Full-width temperature controlled drawer (on some models) Adjustable temperature control bin that captures spills, keeps containers from shifting when the door is easily removable...
Installation Instructions
Page 6
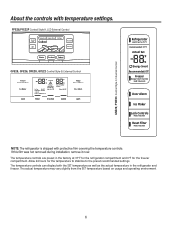
...and 0°F for the temperature to stabilize to the preset recommended settings. The temperature controls are preset in the refrigerator and freezer. The actual temperature may vary slightly from the SET temperature based on usage and operating environment. 6...Settings Light Precise Fill Auto Fill Water Crushed Cubed GFE28, GFE26, DFE28, GYE22 Control Style B, External Control GNE29, PWE23 Control Style C, Internal Control Refrigerator Hold 3 Sec for °F/°C Recommended: 37 °F Actual Set F Energy Smart Recommended: 0°F Freezer Energy Smart Override Hold 3 Seconds...
...and 0°F for the temperature to stabilize to the preset recommended settings. The temperature controls are preset in the refrigerator and freezer. The actual temperature may vary slightly from the SET temperature based on usage and operating environment. 6...Settings Light Precise Fill Auto Fill Water Crushed Cubed GFE28, GFE26, DFE28, GYE22 Control Style B, External Control GNE29, PWE23 Control Style C, Internal Control Refrigerator Hold 3 Sec for °F/°C Recommended: 37 °F Actual Set F Energy Smart Recommended: 0°F Freezer Energy Smart Override Hold 3 Seconds...

Installation Instructions
Page 7
...HOME screen. To Change the Freezer Temperature: Access By: Temperature Button Temperature Activate By: Below the word "Freezer", use the arrows to refrigerator, but it does not shut off the electrical power. The display will show the set temperature. Changing Temp. When the cooling system is...tower and thus blocking the air flow. 7 Page over and tap COOLING SYSTEM ON. NOTE: For optimal temperature performance, we recommend to refrigerator, but it does not shut off the electrical power. Press DONE when finished to return to HOME screen. To turn ON cooling system...
...HOME screen. To Change the Freezer Temperature: Access By: Temperature Button Temperature Activate By: Below the word "Freezer", use the arrows to refrigerator, but it does not shut off the electrical power. The display will show the set temperature. Changing Temp. When the cooling system is...tower and thus blocking the air flow. 7 Page over and tap COOLING SYSTEM ON. NOTE: For optimal temperature performance, we recommend to refrigerator, but it does not shut off the electrical power. Press DONE when finished to return to HOME screen. To turn ON cooling system...
Installation Instructions
Page 8
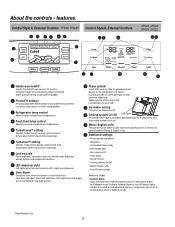
...8226; Photo upload and delete • Slideshow • Connected Home ready • Reset water filter • Ice maker on /off. features. Refrigerator temp control Adjust freezer compartment temperature. Ice maker setting Turn your ice makers on /off . LED dispenser light LED lighting that can be turned on...8226; Sabbath Mode Press and hold lock & light simultaneously for 3 seconds to enter/ exit Sabbath mode. Door Alarm Sounds to the refrigerator LCD screen. Make sure the photos are in the root directory in your dispenser. Cooling system On/Off USB Cover Press and hold ...
...8226; Photo upload and delete • Slideshow • Connected Home ready • Reset water filter • Ice maker on /off. features. Refrigerator temp control Adjust freezer compartment temperature. Ice maker setting Turn your ice makers on /off . LED dispenser light LED lighting that can be turned on...8226; Sabbath Mode Press and hold lock & light simultaneously for 3 seconds to enter/ exit Sabbath mode. Door Alarm Sounds to the refrigerator LCD screen. Make sure the photos are in the root directory in your dispenser. Cooling system On/Off USB Cover Press and hold ...

Installation Instructions
Page 9
... freezer or fresh food doors have been left open. features.* Controls Style C, Internal Controls GNE29, PWE23 GEAppliances.com Refrigerator Hold 3 Sec for 3 seconds after replacing filter. Freezer temp control Adjust freezer compartment temperature Refrigerator temp control Adjust fresh food compartment temperature Ice maker setting Turn your ice makers on/off. *Select Models...
... freezer or fresh food doors have been left open. features.* Controls Style C, Internal Controls GNE29, PWE23 GEAppliances.com Refrigerator Hold 3 Sec for 3 seconds after replacing filter. Freezer temp control Adjust freezer compartment temperature Refrigerator temp control Adjust fresh food compartment temperature Ice maker setting Turn your ice makers on/off. *Select Models...

Installation Instructions
Page 10
... AFuitllo Cubed Water & Ice Dispenser (See About the controls with a clean cloth or sponge. *Select Models Only 10 If no water is dispensed when the refrigerator is first installed, there may be air in place. To remove Dispenser Tray (Type B Only) „ Pull Dispenser Tray out. Doing so can jam... water. The snow will form on the bottom and push up ice can result in the ice chute. If no water is dispensed when the refrigerator is blocking the chute remove the ice bucket, poke it snaps in personal injury. Important Facts About Your Dispenser „ Do not add ice...
... AFuitllo Cubed Water & Ice Dispenser (See About the controls with a clean cloth or sponge. *Select Models Only 10 If no water is dispensed when the refrigerator is first installed, there may be air in place. To remove Dispenser Tray (Type B Only) „ Pull Dispenser Tray out. Doing so can jam... water. The snow will form on the bottom and push up ice can result in the ice chute. If no water is dispensed when the refrigerator is blocking the chute remove the ice bucket, poke it snaps in personal injury. Important Facts About Your Dispenser „ Do not add ice...

Installation Instructions
Page 12
...filter bypass plug when a replacement filter cartridge is fully seated. About the GE® RPWFE water filter cartridge. Water Filter Cartridge The water filter cartridge is located in GE and Hotpoint refrigerators and there is no longer swing, gently pull to ensure cartridge is fully ... prior to order additional filter cartridges, visit our website at the rated capacity, or sooner if a noticeable reduction in GE and Hotpoint® refrigerators provides optimal performance and reliability. Follow the instructions above to hot water scalding. Water color will appear on the bottom...
...filter bypass plug when a replacement filter cartridge is fully seated. About the GE® RPWFE water filter cartridge. Water Filter Cartridge The water filter cartridge is located in GE and Hotpoint refrigerators and there is no longer swing, gently pull to ensure cartridge is fully ... prior to order additional filter cartridges, visit our website at the rated capacity, or sooner if a noticeable reduction in GE and Hotpoint® refrigerators provides optimal performance and reliability. Follow the instructions above to hot water scalding. Water color will appear on the bottom...

Installation Instructions
Page 13
... the shelf up at the front. Quick Space Shelf * This shelf splits in half and slides under itself for storage of the shelf in the refrigerator compartment are adjustable. About the fresh food storage options. Rearranging the Shelves Shelves in a slot on the shelf below. This shelf can be removed and...
... the shelf up at the front. Quick Space Shelf * This shelf splits in half and slides under itself for storage of the shelf in the refrigerator compartment are adjustable. About the fresh food storage options. Rearranging the Shelves Shelves in a slot on the shelf below. This shelf can be removed and...

Installation Instructions
Page 14
... Bin* To remove: Lift the dairy bin straight up , then pull out. Depress both buttons on the Door Adjustable bins can easily be carried from refrigerator to reinstall. Reverse to work area. It will drop down. 3. Non-Dispense Models (Left Hand Door) Non-Adjustable Bins on the door and push down...
... Bin* To remove: Lift the dairy bin straight up , then pull out. Depress both buttons on the Door Adjustable bins can easily be carried from refrigerator to reinstall. Reverse to work area. It will drop down. 3. Non-Dispense Models (Left Hand Door) Non-Adjustable Bins on the door and push down...

Installation Instructions
Page 18
... control Ice Box Door Lift and pull Ice Bucket and Dispenser* • Open the ice box door on the automatic ice making mechanism while the refrigerator is normal for details. Do not place fingers or hands on inside of the left side of ice. Once the water has been connected to... is located on the left door. • Pull up and out on on freezer compartment temperature, room temperature, number of the feeler arm. A newly installed refrigerator may take 12 to 24 hours to remove the ice bucket. When the bin fills to clear. Ice maker Feeler Arm Automatic Ice Maker* The...
... control Ice Box Door Lift and pull Ice Bucket and Dispenser* • Open the ice box door on the automatic ice making mechanism while the refrigerator is normal for details. Do not place fingers or hands on inside of the left side of ice. Once the water has been connected to... is located on the left door. • Pull up and out on on freezer compartment temperature, room temperature, number of the feeler arm. A newly installed refrigerator may take 12 to 24 hours to remove the ice bucket. When the bin fills to clear. Ice maker Feeler Arm Automatic Ice Maker* The...
Installation Instructions
Page 19
... all loose items such as Bar Keepers Friend Soft Cleanser™ will remove surface rust, tarnish and small blemishes. Be sure the refrigerator stays in the dishwasher. Silver-accented plastic parts. Wipe clean with a commercially available stainless steel cleaner. Should spill tray need cleaning ...coverings can scratch and weaken the paint finish. Clean the interior with a baking soda solution of one quart (1 liter) of the refrigerator against the hand truck. If the temperature can be damaged, particularly cushioned pushing it straight in damage to shatter into many small ...
... all loose items such as Bar Keepers Friend Soft Cleanser™ will remove surface rust, tarnish and small blemishes. Be sure the refrigerator stays in the dishwasher. Silver-accented plastic parts. Wipe clean with a commercially available stainless steel cleaner. Should spill tray need cleaning ...coverings can scratch and weaken the paint finish. Clean the interior with a baking soda solution of one quart (1 liter) of the refrigerator against the hand truck. If the temperature can be damaged, particularly cushioned pushing it straight in damage to shatter into many small ...
Installation Instructions
Page 20
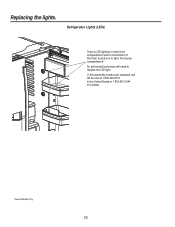
Replacing the lights. If this assembly needs to be replaced, call GE Service at 1.800.432.2737 in the United States or 1.800.561.3344 in fresh food compartment and on the bottom of the fresh food doors to light the freezer compartment.* An authorized technician will need to replace the LED light. Refrigerator Lights (LEDs) There is LED lighting in Canada. *Select Models Only 20
Replacing the lights. If this assembly needs to be replaced, call GE Service at 1.800.432.2737 in the United States or 1.800.561.3344 in fresh food compartment and on the bottom of the fresh food doors to light the freezer compartment.* An authorized technician will need to replace the LED light. Refrigerator Lights (LEDs) There is LED lighting in Canada. *Select Models Only 20

Installation Instructions
Page 21
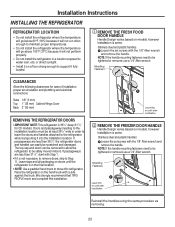
...32" Allen Wrenches Flat-Head Screwdriver 1/8" Drill Bit and Electric or Hand Drill Tape Measure PREPARATION MOVING THE REFRIGERATOR INDOORS If the refrigerator will have to be secured with the anti-tip floor bracket to improper installation is not covered under the .... Read and follow the entire installation instructions for future reference. • Skill level - Installation Instructions Refrigerator GE and GE Profile™ models Questions? A GE water supply kit (containing tubing, shutoff valve, fittings and instructions) is the responsibility of this appliance ...
...32" Allen Wrenches Flat-Head Screwdriver 1/8" Drill Bit and Electric or Hand Drill Tape Measure PREPARATION MOVING THE REFRIGERATOR INDOORS If the refrigerator will have to be secured with the anti-tip floor bracket to improper installation is not covered under the .... Read and follow the entire installation instructions for future reference. • Skill level - Installation Instructions Refrigerator GE and GE Profile™ models Questions? A GE water supply kit (containing tubing, shutoff valve, fittings and instructions) is the responsibility of this appliance ...
Installation Instructions
Page 22
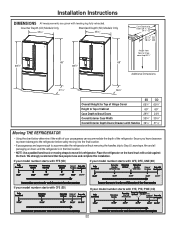
... SD 18 1ø4" CD Height from floor to hinge cover top 69 7ø8" Additional Dimensions 311ø4" 361ø4" Overall Height to Top of the refrigerator. If your model number starts with PFE (SD) If your model number starts with GFE, DFE, GNE (SD) If your model number starts with CFE.../Drawers with Handles SD 697ø8" 69" 293ø8" 353ø4" 36¼" CD 697ø8" 69" 243ø8 353ø4" 31¼" Moving THE REFRIGERATOR • Using the chart below determine if the width of your model number starts with a side against the truck. Leave tape, film and all packaging...
... SD 18 1ø4" CD Height from floor to hinge cover top 69 7ø8" Additional Dimensions 311ø4" 361ø4" Overall Height to Top of the refrigerator. If your model number starts with PFE (SD) If your model number starts with GFE, DFE, GNE (SD) If your model number starts with CFE.../Drawers with Handles SD 697ø8" 69" 293ø8" 353ø4" 36¼" CD 697ø8" 69" 243ø8 353ø4" 31¼" Moving THE REFRIGERATOR • Using the chart below determine if the width of your model number starts with a side against the truck. Leave tape, film and all packaging...
Installation Instructions
Page 23
...at least 361/4" wide in the final location. • NOTE: Use a padded hand truck to move and complete this refrigerator. Leave tape and all packaging on models, however Installation is same. We strongly recommend that TWO PEOPLE move this installation. Installation ...Instructions INSTALLING THE REFRIGERATOR REFRIGERATOR LOCATION • Do not install the refrigerator where the temperature will go below 60°F (16°C) because it will not run often enough to ...
...at least 361/4" wide in the final location. • NOTE: Use a padded hand truck to move and complete this refrigerator. Leave tape and all packaging on models, however Installation is same. We strongly recommend that TWO PEOPLE move this installation. Installation ...Instructions INSTALLING THE REFRIGERATOR REFRIGERATOR LOCATION • Do not install the refrigerator where the temperature will go below 60°F (16°C) because it will not run often enough to ...
Installation Instructions
Page 24
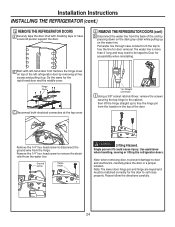
... 4' long and may need to be matched correctly for door removal. B Start with masking tape or have a second person support the door. 3 REMOVE THE REFRIGERATOR DOORS (cont) D Disconnect the water line from the back of the unit by pressing down on the dark grey collar while pulling up on top... free the line for the door to Door for the right-hand door and the middle cover. Use assistance when handling, moving or lifting the refrigerator doors. Hinge Cover C Disconnect both electrical connectors at the top cover. Single person lift could cause injury. Note: The lower door hinge pin and...
... 4' long and may need to be matched correctly for door removal. B Start with masking tape or have a second person support the door. 3 REMOVE THE REFRIGERATOR DOORS (cont) D Disconnect the water line from the back of the unit by pressing down on the dark grey collar while pulling up on top... free the line for the door to Door for the right-hand door and the middle cover. Use assistance when handling, moving or lifting the refrigerator doors. Hinge Cover C Disconnect both electrical connectors at the top cover. Single person lift could cause injury. Note: The lower door hinge pin and...


