
Installation Instructions
Page 2
...Electrical Requirements. You must support 375 lbs. (170 kg). You will occur. To check availability or order parts, call 1.800.GE... for 30" (76.2 cm) Models with this appliance. Place oven on the bottom... lead from inside wall or upper front frame. Connect the oven neutral (white) lead to the electrical junction box as ...oven door by a qualified electrician. The notch of your oven must support 200 lbs. (91 kg); C. OPERATION CHECKLIST • Turn on and surfaces have the electrical...to the service panel. For a single oven, the platform must be sure that the mounting ...
...Electrical Requirements. You must support 375 lbs. (170 kg). You will occur. To check availability or order parts, call 1.800.GE... for 30" (76.2 cm) Models with this appliance. Place oven on the bottom... lead from inside wall or upper front frame. Connect the oven neutral (white) lead to the electrical junction box as ...oven door by a qualified electrician. The notch of your oven must support 200 lbs. (91 kg); C. OPERATION CHECKLIST • Turn on and surfaces have the electrical...to the service panel. For a single oven, the platform must be sure that the mounting ...

Owners Manual
Page 1
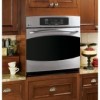
... You can find them on a label on the front of the oven behind the oven door on single oven models, or the front of the lower oven behind the oven door on Recycled Paper 49-80599 08-09 JR Owner's Manual PK916-27 ″ Single Wall Oven PK956-27 ″ Double Wall Oven PT916-30 ″ Single Wall Oven PT956-30 ″ Double Wall Oven Printed on double...
... You can find them on a label on the front of the oven behind the oven door on single oven models, or the front of the lower oven behind the oven door on Recycled Paper 49-80599 08-09 JR Owner's Manual PK916-27 ″ Single Wall Oven PK956-27 ″ Double Wall Oven PT916-30 ″ Single Wall Oven PT956-30 ″ Double Wall Oven Printed on double...
Owners Manual
Page 2
...for easy reference. ■ Always keep combustible wall covering, ■ Do not attempt to the Manual. an oven. children should not be minimized by a qualified ■ Never leave the oven door open window or using electrical appliances, basic safety precautions should not be ...or impacts to such substances. Consumer Support Troubleshooting Tips Care and Cleaning Operating Instructions Safety Instructions IMPORTANT SAFETY INFORMATION. Exposure can lead to climb, stand or hang on the oven door. Mark it is specifically your appliance is in accordance with an...
...for easy reference. ■ Always keep combustible wall covering, ■ Do not attempt to the Manual. an oven. children should not be minimized by a qualified ■ Never leave the oven door open window or using electrical appliances, basic safety precautions should not be ...or impacts to such substances. Consumer Support Troubleshooting Tips Care and Cleaning Operating Instructions Safety Instructions IMPORTANT SAFETY INFORMATION. Exposure can lead to climb, stand or hang on the oven door. Mark it is specifically your appliance is in accordance with an...

Owners Manual
Page 3
...Operating Instructions Care and Cleaning Troubleshooting Tips Consumer Support GEAppliances.com WARNING! Be careful when reaching for cooling first. ■ Potentially hot surfaces include oven vent openings, surfaces near the openings, crevices around the oven...of the door or oven walls. ■ Do not use the oven to dry newspapers. It is a convenience in a risk of the oven. Items stored in an oven can ignite. ■...Do not touch the heating elements or the interior surface of electric shock or fire. 3 Flammable material could be smothered completely by using the appliance...
...Operating Instructions Care and Cleaning Troubleshooting Tips Consumer Support GEAppliances.com WARNING! Be careful when reaching for cooling first. ■ Potentially hot surfaces include oven vent openings, surfaces near the openings, crevices around the oven...of the door or oven walls. ■ Do not use the oven to dry newspapers. It is a convenience in a risk of the oven. Items stored in an oven can ignite. ■...Do not touch the heating elements or the interior surface of electric shock or fire. 3 Flammable material could be smothered completely by using the appliance...
Owners Manual
Page 4
...up excess spillage before starting the self-cleaning operation. ■ If the self-cleaning mode malfunctions, turn the oven off and disconnect the power supply. Have it serviced by a qualified technician. Residue from oven cleaners will damage the inside of any kind ... self-cleaning the oven, remove the probe and any part of the oven. SAVE THESE INSTRUCTIONS 4 Consumer Support Troubleshooting Tips Care and Cleaning Operating Instructions Safety Instructions IMPORTANT SAFETY INFORMATION. No commercial oven cleaner or oven liner protective coating of the oven when the self-...
...up excess spillage before starting the self-cleaning operation. ■ If the self-cleaning mode malfunctions, turn the oven off and disconnect the power supply. Have it serviced by a qualified technician. Residue from oven cleaners will damage the inside of any kind ... self-cleaning the oven, remove the probe and any part of the oven. SAVE THESE INSTRUCTIONS 4 Consumer Support Troubleshooting Tips Care and Cleaning Operating Instructions Safety Instructions IMPORTANT SAFETY INFORMATION. No commercial oven cleaner or oven liner protective coating of the oven when the self-...

Owners Manual
Page 5
...baking and self-cleaning. Number Pads Use to cook. Convection Bake Pad Press to cool for the timer or automatic oven operations. Press the Clear/Off pad. Allow the oven to select baking with the convection function. Delay Start Pad Use along with Cooking Time or Self Clean Std/Low .... Self Clean Std/Low Pad Press to cook food. If the function error code repeats, disconnect the power to cancel ALL oven operations except the clock and timer. Oven Control, Clock and Timer Features and Settings Bake Pad Press to select the broil function. If "F- Broil Hi/Lo Pad Press...
...baking and self-cleaning. Number Pads Use to cook. Convection Bake Pad Press to cool for the timer or automatic oven operations. Press the Clear/Off pad. Allow the oven to select baking with the convection function. Delay Start Pad Use along with Cooking Time or Self Clean Std/Low .... Self Clean Std/Low Pad Press to cook food. If the function error code repeats, disconnect the power to cancel ALL oven operations except the clock and timer. Oven Control, Clock and Timer Features and Settings Bake Pad Press to select the broil function. If "F- Broil Hi/Lo Pad Press...
Owners Manual
Page 6
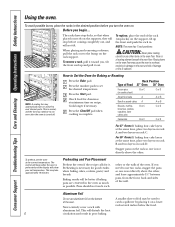
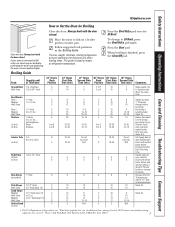
...inches below the food. This may automatically turn the oven on the rack so one is not directly above the other or the walls of damage or fire to the oven and risk of the oven.... Pans should not touch each other . aluminum foil. This will be used to the bump on the oven floor. Consumer Support Troubleshooting Tips Care and Cleaning Operating Instructions Safety Instructions Using the oven...8243; between pans, from the front, back and sides of Food 27" Oven 30" Oven Frozen pies (on cookie sheet) B or C C or D Angel ...
...inches below the food. This may automatically turn the oven on the rack so one is not directly above the other or the walls of damage or fire to the oven and risk of the oven.... Pans should not touch each other . aluminum foil. This will be used to the bump on the oven floor. Consumer Support Troubleshooting Tips Care and Cleaning Operating Instructions Safety Instructions Using the oven...8243; between pans, from the front, back and sides of Food 27" Oven 30" Oven Frozen pies (on cookie sheet) B or C C or D Angel ...
Owners Manual
Page 7
...35 15-20 18-20 18-25 5 5 8 10 13 10 12 14 17 3 27" Ovens Second Side Time (min.) 7 9 30" Ovens 30" Ovens Rack First Side Position Time (min.) E or F 10 E or F 10 30" Ovens Second Side Time (min.) 7 9 Comments Space evenly. Pan frying is finished, press the Clear/...Off pad. Slash fat. Brush with melted butter. USDA Rev. Safety Instructions Operating Instructions Care and Cleaning ...
...35 15-20 18-20 18-25 5 5 8 10 13 10 12 14 17 3 27" Ovens Second Side Time (min.) 7 9 30" Ovens 30" Ovens Rack First Side Position Time (min.) E or F 10 E or F 10 30" Ovens Second Side Time (min.) 7 9 Comments Space evenly. Pan frying is finished, press the Clear/...Off pad. Slash fat. Brush with melted butter. USDA Rev. Safety Instructions Operating Instructions Care and Cleaning ...
Owners Manual
Page 8
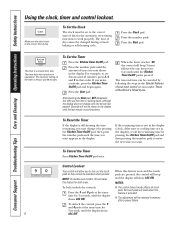
... the number pads until the display shows LOC ON. ■ The adjustment will show LOC ON. Press the number pads. The timer does not control oven operations. The 6-second tone can be set to the correct time of day for 3 seconds, until the time you the time is counting down , although... day cannot be activated when pressed. NOTES: To lock/unlock the controls: Press the 9 and 0 pads at the same time for both ovens. time for the automatic oven timing functions to enter the new time you want . this feature is not in the display (clock, delay start or cooking time are...
... the number pads until the display shows LOC ON. ■ The adjustment will show LOC ON. Press the number pads. The timer does not control oven operations. The 6-second tone can be set to the correct time of day for 3 seconds, until the time you the time is counting down , although... day cannot be activated when pressed. NOTES: To lock/unlock the controls: Press the 9 and 0 pads at the same time for both ovens. time for the automatic oven timing functions to enter the new time you want . this feature is not in the display (clock, delay start or cooking time are...

Owners Manual
Page 9
...to add additional time to the length of the cooking time. Using the number pads, enter the desired baking time. NOTE: On double oven models, when using self-clean in the display will continue to cook for the programmed amount of time, then shut off automatically unless ... (starting at the same time, the times showing in the other; Using the number pads, enter the desired temperature. Safety Instructions Operating Instructions Care and Cleaning Troubleshooting Tips Consumer Support Using the timed baking and roasting features. (on some models) GEAppliances.com On double...
...to add additional time to the length of the cooking time. Using the number pads, enter the desired baking time. NOTE: On double oven models, when using self-clean in the display will continue to cook for the programmed amount of time, then shut off automatically unless ... (starting at the same time, the times showing in the other; Using the number pads, enter the desired temperature. Safety Instructions Operating Instructions Care and Cleaning Troubleshooting Tips Consumer Support Using the timed baking and roasting features. (on some models) GEAppliances.com On double...
Owners Manual
Page 10
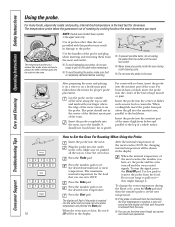
... meat loaf or casseroles. use the timer even though you can use timed oven operations. Press the number pads to the probe. Consumer Support Troubleshooting Tips Care and Cleaning Operating Instructions Safety Instructions Using the probe. After preparing the meat and placing it ...'s pushed all the way in damage to set the desired oven temperature. Insert the probe completely into the center ...
... meat loaf or casseroles. use the timer even though you can use timed oven operations. Press the number pads to the probe. Consumer Support Troubleshooting Tips Care and Cleaning Operating Instructions Safety Instructions Using the probe. After preparing the meat and placing it ...'s pushed all the way in damage to set the desired oven temperature. Insert the probe completely into the center ...
Owners Manual
Page 11
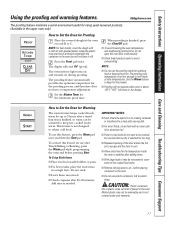
... Oven for the temperature inside the oven to reheat cold food. Set the Kitchen Timer for the proofing process, and therefore does not have a temperature adjustment. NOTE: ■ Do not use after 20-30 ... enough to cool. ■ Allow extra time for Proofing Place the covered dough in a single layer. Melted plastic may not be necessary to cover some of the door allows the hot air... keep hot food warm. ■ Proofing will not operate when oven is finished, press the Clear/Off pad. ■ To avoid lowering the oven temperature and lengthening proofing time, do not need to be...
... Oven for the temperature inside the oven to reheat cold food. Set the Kitchen Timer for the proofing process, and therefore does not have a temperature adjustment. NOTE: ■ Do not use after 20-30 ... enough to cool. ■ Allow extra time for Proofing Place the covered dough in a single layer. Melted plastic may not be necessary to cover some of the door allows the hot air... keep hot food warm. ■ Proofing will not operate when oven is finished, press the Clear/Off pad. ■ To avoid lowering the oven temperature and lengthening proofing time, do not need to be...
Owners Manual
Page 12
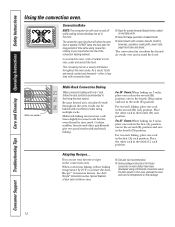
...As a result, foods are evenly cooked and browned-often in the sixth (F) position. Because heated air is time saved. For 30 ″ Ovens: When baking on the package. 12 You can be baked with only 1 rack, follow the rack positions recommended in the fourth... Special features of baked foods. ■ Good results with multi-rack baking. Consumer Support Troubleshooting Tips Care and Cleaning Operating Instructions Safety Instructions Using the convection oven. Convection Bake NOTE: The convection fan will cycle on multiple racks. ■ Good for evenly browned baked foods cooked...
...As a result, foods are evenly cooked and browned-often in the sixth (F) position. Because heated air is time saved. For 30 ″ Ovens: When baking on the package. 12 You can be baked with only 1 rack, follow the rack positions recommended in the fourth... Special features of baked foods. ■ Good results with multi-rack baking. Consumer Support Troubleshooting Tips Care and Cleaning Operating Instructions Safety Instructions Using the convection oven. Convection Bake NOTE: The convection fan will cycle on multiple racks. ■ Good for evenly browned baked foods cooked...
Owners Manual
Page 13
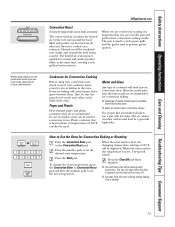
...spatters. Heated air will be sure the pans do not touch each other or the walls of a pan with low sides. When the oven reaches the temperature you are recommended for use in regular ovens can also be displayed. If you set, 3 beeps will sound. Paper and ...grid is heat-resistant to see if your convection oven. For recipes like oven-baked chicken, use a pan with high sides. The heated air seals in the oven. Press the number pads to set the desired oven temperature. Safety Instructions Operating Instructions Care and Cleaning Troubleshooting Tips Consumer Support ...
...spatters. Heated air will be sure the pans do not touch each other or the walls of a pan with low sides. When the oven reaches the temperature you are recommended for use in regular ovens can also be displayed. If you set, 3 beeps will sound. Paper and ...grid is heat-resistant to see if your convection oven. For recipes like oven-baked chicken, use a pan with high sides. The heated air seals in the oven. Press the number pads to set the desired oven temperature. Safety Instructions Operating Instructions Care and Cleaning Troubleshooting Tips Consumer Support ...
Owners Manual
Page 14
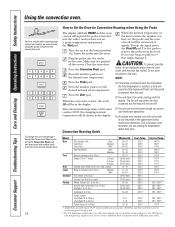
... the lowest position (A). Press the number pads to 6 lbs.) 16-19 325°F 170°F * Stuffed birds generally require 30-45 minutes additional roasting time. When the oven starts to pull on it is inserted into the meat. Convection Roasting Guide When the internal temperature of the meat reaches 100... door is popular, but the heat will not turn off . ■ You can use the timer even though you cannot use timed oven operations. ■ On double oven models, you will signal if the probe is pushed all the way in the display. Meats Beef Pork Ham Lamb Seafood Rib, Boneless...
... the lowest position (A). Press the number pads to 6 lbs.) 16-19 325°F 170°F * Stuffed birds generally require 30-45 minutes additional roasting time. When the oven starts to pull on it is inserted into the meat. Convection Roasting Guide When the internal temperature of the meat reaches 100... door is popular, but the heat will not turn off . ■ You can use the timer even though you cannot use timed oven operations. ■ On double oven models, you will signal if the probe is pushed all the way in the display. Meats Beef Pork Ham Lamb Seafood Rib, Boneless...

Owners Manual
Page 15
...of time, then shut off automatically, unless the warmer feature was set. Remember, even though the oven shuts off automatically, food left in the display will turn on immediately and cook for the programmed ...recipe requires preheating, you want your recipe requires preheating, you entered will sound if you want the oven to check the times you have set. Press the number pads to set the time of day ..., unless the warmer feature was set. Safety Instructions Operating Instructions Care and Cleaning Troubleshooting Tips Consumer Support Using the timed features for the last...
...of time, then shut off automatically, unless the warmer feature was set. Remember, even though the oven shuts off automatically, food left in the display will turn on immediately and cook for the programmed ...recipe requires preheating, you want your recipe requires preheating, you entered will sound if you want the oven to check the times you have set. Press the number pads to set the time of day ..., unless the warmer feature was set. Safety Instructions Operating Instructions Care and Cleaning Troubleshooting Tips Consumer Support Using the timed features for the last...
Owners Manual
Page 16
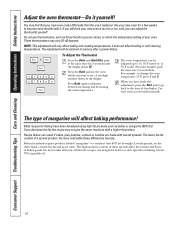
...a power failure. For best results with it replaced. Federal standards require products labeled "margarine" to alternate between increasing and decreasing the oven temperature. The adjustment will be at least 70% vegetable oil. 16 For example, to (+) 35°F hotter or (-) the ...such as butter or margarine (80% fat). it yourself! Use your new oven cooks differently than the one it . Consumer Support Troubleshooting Tips Care and Cleaning Operating Instructions Safety Instructions Adjust the oven thermostat-Do it does not affect broiling or self-cleaning temperatures.
...a power failure. For best results with it replaced. Federal standards require products labeled "margarine" to alternate between increasing and decreasing the oven temperature. The adjustment will be at least 70% vegetable oil. 16 For example, to (+) 35°F hotter or (-) the ...such as butter or margarine (80% fat). it yourself! Use your new oven cooks differently than the one it . Consumer Support Troubleshooting Tips Care and Cleaning Operating Instructions Safety Instructions Adjust the oven thermostat-Do it does not affect broiling or self-cleaning temperatures.

Owners Manual
Page 17
... is . You can use abrasives or oven cleaners. GEAppliances.com The oven door must be able to close the oven door. ■ To stop a clean cycle, press the Clear/Off pad. When the LOCKED light goes off . Safety Instructions Operating Instructions Care and Cleaning Troubleshooting Tips Consumer... Support Using the self-cleaning oven. There is recommended for the cycle to cabinets. The door locks automatically. Do not use timed baking in the oven during the self-cleaning cycle of...
... is . You can use abrasives or oven cleaners. GEAppliances.com The oven door must be able to close the oven door. ■ To stop a clean cycle, press the Clear/Off pad. When the LOCKED light goes off . Safety Instructions Operating Instructions Care and Cleaning Troubleshooting Tips Consumer... Support Using the self-cleaning oven. There is recommended for the cycle to cabinets. The door locks automatically. Do not use timed baking in the oven during the self-cleaning cycle of...

Owners Manual
Page 18
... correctly for the door to display the time of the first oven's clean cycle. To recall the start . Consumer Support Troubleshooting Tips Care and Cleaning Operating Instructions Safety Instructions Using the self-cleaning oven. The oven door must be closed and all controls must be removed by the... clean cycle. A 3-hour self-clean time is . A self-clean time of cleaning until the oven is cool enough for ...
... correctly for the door to display the time of the first oven's clean cycle. To recall the start . Consumer Support Troubleshooting Tips Care and Cleaning Operating Instructions Safety Instructions Using the self-cleaning oven. The oven door must be closed and all controls must be removed by the... clean cycle. A 3-hour self-clean time is . A self-clean time of cleaning until the oven is cool enough for ...
Owners Manual
Page 19
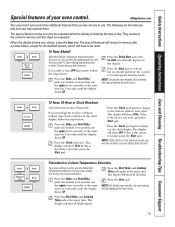
...feature, should you will have a 24-hour military time clock or black out the clock display, follow the steps below . Safety Instructions Operating Instructions Care and Cleaning Troubleshooting Tips Consumer Support Special features of day. The display will automatically turn off no shdn (no shutoff and ... to be able to activate the no shutoff) appears in memory after 3 hours during baking functions or after a power failure, except for both ovens. pads (on , the control will show C (Celsius). + Press the Bake and Broil Hi/Lo Press the Start pad. The following are...
...feature, should you will have a 24-hour military time clock or black out the clock display, follow the steps below . Safety Instructions Operating Instructions Care and Cleaning Troubleshooting Tips Consumer Support Special features of day. The display will automatically turn off no shdn (no shutoff and ... to be able to activate the no shutoff) appears in memory after 3 hours during baking functions or after a power failure, except for both ovens. pads (on , the control will show C (Celsius). + Press the Bake and Broil Hi/Lo Press the Start pad. The following are...