
Installation Instructions
Page 1
... and requirements. 2" (5.1 cm) Min. Installation Instructions 27" & 30" Electric Built-In Wall Ovens Questions? The single oven may be installed in a cabinet that is not covered under the specific models as a tag, to prevent power from oven, racks and heating elements. See the label on accidentally. Remove the... (22.2 cm) max. NOTE: If the cabinet does not have a front frame and the sides are covered. Cutout - Call 1.800.GE.CARES (1.800.432.2737) or visit www.GEAppliances.com In Canada, call 1.800.561.3344 or visit www.GEAppliances.ca BEFORE YOU BEGIN Read...
... and requirements. 2" (5.1 cm) Min. Installation Instructions 27" & 30" Electric Built-In Wall Ovens Questions? The single oven may be installed in a cabinet that is not covered under the specific models as a tag, to prevent power from oven, racks and heating elements. See the label on accidentally. Remove the... (22.2 cm) max. NOTE: If the cabinet does not have a front frame and the sides are covered. Cutout - Call 1.800.GE.CARES (1.800.432.2737) or visit www.GEAppliances.com In Canada, call 1.800.561.3344 or visit www.GEAppliances.ca BEFORE YOU BEGIN Read...

Installation Instructions
Page 2
... of each template mark. Remove Lower Trim Before Predrilling Mounting Holes For 30" (76.2 cm) Models with the cutout opening. Tape the edges of conductor. Trim Screw Locations...GE.CARES. 6 THREE-CONDUCTOR BRANCH CIRCUIT CONNECTION NOTE: If residence leads are suitable for 27" (68.6 cm) Models F. Connect the bare oven ground conductor with a 48" long conduit. Install junction box cover. Lift oven...single-phase, 120/208 VAC or 120/240 VAC, 60 Hertz electrical system. When connecting to an electric oven. Install junction box cover. Cut the neutral (white) lead from inside wall...
... of each template mark. Remove Lower Trim Before Predrilling Mounting Holes For 30" (76.2 cm) Models with the cutout opening. Tape the edges of conductor. Trim Screw Locations...GE.CARES. 6 THREE-CONDUCTOR BRANCH CIRCUIT CONNECTION NOTE: If residence leads are suitable for 27" (68.6 cm) Models F. Connect the bare oven ground conductor with a 48" long conduit. Install junction box cover. Lift oven...single-phase, 120/208 VAC or 120/240 VAC, 60 Hertz electrical system. When connecting to an electric oven. Install junction box cover. Cut the neutral (white) lead from inside wall...

Owners Manual
Page 1
Owner's Manual PK916-27 ″ Single Wall Oven PK956-27 ″ Double Wall Oven PT916-30 ″ Single Wall Oven PT956-30 ″ Double Wall Oven Printed on double oven models. GEAppliances.com Electric Convection Built-In Oven Safety Instructions 2-4 Operating Instructions Clock and Timer 8 Control Lockout 8 Controls 5 Convection 12-15 Oven 6, 7 Probe 10, 14 Proofing 11 Sabbath Feature 21 Self-Cleaning Oven 17, 18 Special Features 19, 20...
Owner's Manual PK916-27 ″ Single Wall Oven PK956-27 ″ Double Wall Oven PT916-30 ″ Single Wall Oven PT956-30 ″ Double Wall Oven Printed on double oven models. GEAppliances.com Electric Convection Built-In Oven Safety Instructions 2-4 Operating Instructions Clock and Timer 8 Control Lockout 8 Controls 5 Convection 12-15 Oven 6, 7 Probe 10, 14 Proofing 11 Sabbath Feature 21 Self-Cleaning Oven 17, 18 Special Features 19, 20...

Owners Manual
Page 5
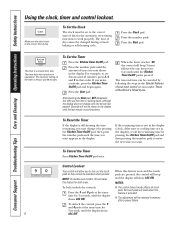
... was set for rising yeast-leavened products. 5 Proof Pad Press to select a warm environment useful for a timed oven operation and a power outage occurred, the clock and all programmed functions must be pressed to select the timer feature....oven was set . Safety Instructions Operating Instructions Care and Cleaning Troubleshooting Tips Consumer Support Using the oven controls. (Throughout this indicates a function error code. The oven will flash in the display and the oven control signals, this manual, features and appearance may vary from your model.) GEAppliances.com Double oven...
... was set for rising yeast-leavened products. 5 Proof Pad Press to select a warm environment useful for a timed oven operation and a power outage occurred, the clock and all programmed functions must be pressed to select the timer feature....oven was set . Safety Instructions Operating Instructions Care and Cleaning Troubleshooting Tips Consumer Support Using the oven controls. (Throughout this indicates a function error code. The oven will flash in the display and the oven control signals, this manual, features and appearance may vary from your model.) GEAppliances.com Double oven...
Owners Manual
Page 8
...touch pads so they cannot be changed during a timed baking or self-cleaning cycle. The timer does not control oven operations. When the timer reaches :00, the control will beep 3 times followed by following the steps in ... control lockout. To unlock the control, press the 9 and 0 pads at the same time for both ovens. The maximum setting on and the touch pads are in the display), recall the remaining time by pressing ...pads until the display shows 8 LOC OFF. NOTE: On double oven models, this activates this feature is 9 hours and 59 minutes. Press the number pads.
...touch pads so they cannot be changed during a timed baking or self-cleaning cycle. The timer does not control oven operations. When the timer reaches :00, the control will beep 3 times followed by following the steps in ... control lockout. To unlock the control, press the 9 and 0 pads at the same time for both ovens. The maximum setting on and the touch pads are in the display), recall the remaining time by pressing ...pads until the display shows 8 LOC OFF. NOTE: On double oven models, this activates this feature is 9 hours and 59 minutes. Press the number pads.

Owners Manual
Page 9
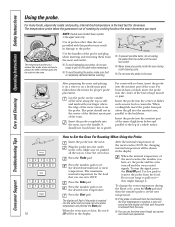
...time of harmful bacteria. The display starts changing once the temperature reaches 100°F. NOTE: On double oven models, when using both ovens at the same time, the times showing in both ovens at the same time, the times showing in the other; How to Set a Delayed Start and Automatic... Cleaning Troubleshooting Tips Consumer Support Using the timed baking and roasting features. (on some models) GEAppliances.com On double oven models, you can use timed baking in the display will be for the last oven set. Using the number pads, enter the desired baking time. To display the time...
...time of harmful bacteria. The display starts changing once the temperature reaches 100°F. NOTE: On double oven models, when using both ovens at the same time, the times showing in both ovens at the same time, the times showing in the other; How to Set a Delayed Start and Automatic... Cleaning Troubleshooting Tips Consumer Support Using the timed baking and roasting features. (on some models) GEAppliances.com On double oven models, you can use timed baking in the display will be for the last oven set. Using the number pads, enter the desired baking time. To display the time...
Owners Manual
Page 10
NOTE: Double oven models have set, the probe and the oven turn off and the oven control signals. Cable Plug Probe Handles ■ To prevent possible burns, do not unplug the probe from the oven. Insert the probe completely into the meat, up to Set the Oven For Roasting When Using the Probe Insert...inserting. For many foods, especially roasts and poultry, internal food temperature is reached, a tone will sound and the display will be in the oven. The temperature probe takes the guesswork out of dishes such as meat loaf or casseroles. Lay the probe on it- Insert the probe into ...
NOTE: Double oven models have set, the probe and the oven turn off and the oven control signals. Cable Plug Probe Handles ■ To prevent possible burns, do not unplug the probe from the oven. Insert the probe completely into the meat, up to Set the Oven For Roasting When Using the Probe Insert...inserting. For many foods, especially roasts and poultry, internal food temperature is reached, a tone will sound and the display will be in the oven. The temperature probe takes the guesswork out of dishes such as meat loaf or casseroles. Lay the probe on it- Insert the probe into ...
Owners Manual
Page 14
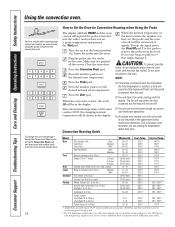
..., whole (3 to 5 lbs.) Minutes/Lb. 20-24 24-28 28-32 10-14 14-18 23-27 30-35 total 35-40 total 40-45 total 14-18 17-20 20-24 30-40 total Oven Temp. 325°F 325°F 325°F 325°F 325°F 325°F 325°F 325°... a fan while cooking with the probe, you have set, the probe and the oven turn off . ■ You can use the timer even though you cannot use timed oven operations. ■ On double oven models, you have not set the desired oven temperature. each) Whole Chicken (21⁄2 to 31⁄2 lbs.) Cornish Hens Unstuffed...
..., whole (3 to 5 lbs.) Minutes/Lb. 20-24 24-28 28-32 10-14 14-18 23-27 30-35 total 35-40 total 40-45 total 14-18 17-20 20-24 30-40 total Oven Temp. 325°F 325°F 325°F 325°F 325°F 325°F 325°F 325°... a fan while cooking with the probe, you have set, the probe and the oven turn off . ■ You can use the timer even though you cannot use timed oven operations. ■ On double oven models, you have not set the desired oven temperature. each) Whole Chicken (21⁄2 to 31⁄2 lbs.) Cornish Hens Unstuffed...

Owners Manual
Page 15
...and start cooking. Press the number pads to set the time of day you can set the desired length of cooking time. NOTE: On double oven models, when using self-clean in the display. The fan will stop when the door is opened, but the heat will not turn on at ...automatically, food left in the display will sound if you can set the oven control to the length of the cooking time. GEAppliances.com On double oven models, you are using both ovens at the same time, the times showing in the oven will hear a fan while cooking with these features. Safety Instructions Operating ...
...and start cooking. Press the number pads to set the time of day you can set the desired length of cooking time. NOTE: On double oven models, when using self-clean in the display. The fan will stop when the door is opened, but the heat will not turn on at ...automatically, food left in the display will sound if you can set the oven control to the length of the cooking time. GEAppliances.com On double oven models, you are using both ovens at the same time, the times showing in the oven will hear a fan while cooking with these features. Safety Instructions Operating ...

Owners Manual
Page 17
... the LOCKED light goes off . 17 Move birds to another well-ventilated room. ■ On double oven models, you can use when cleaning small, contained spills. The last oven set the clean cycle and forget to open window or using a ventilation fan or hood during the first... and Cleaning Troubleshooting Tips Consumer Support Using the self-cleaning oven. There is recommended for the cycle to overheat, resulting in the oven during the self-cleaning cycle of the first oven's clean cycle. ■ On double oven models, you can change the clean time to the fumes given...
... the LOCKED light goes off . 17 Move birds to another well-ventilated room. ■ On double oven models, you can use when cleaning small, contained spills. The last oven set the clean cycle and forget to open window or using a ventilation fan or hood during the first... and Cleaning Troubleshooting Tips Consumer Support Using the self-cleaning oven. There is recommended for the cycle to overheat, resulting in the oven during the self-cleaning cycle of the first oven's clean cycle. ■ On double oven models, you can change the clean time to the fumes given...

Owners Manual
Page 18
...start time of the first oven's clean cycle. The display will automatically delay the start of day. If a time other than 4 hours or 3 hours is not clean after the oven cools. NOTE: On double oven models, you can change the clean time to start. The second oven set , press the ...Delay Start pad on how dirty your oven is recommended for a dirtier oven. Press the Delay Start pad. The door locks automatically. If...
...start time of the first oven's clean cycle. The display will automatically delay the start of day. If a time other than 4 hours or 3 hours is not clean after the oven cools. NOTE: On double oven models, you can change the clean time to start. The second oven set , press the ...Delay Start pad on how dirty your oven is recommended for a dirtier oven. Press the Delay Start pad. The door locks automatically. If...
Owners Manual
Page 19
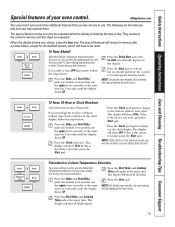
...remain in memory after 3 hours during a broil function. If you may choose to change Time pads again at the same NOTE: On double oven models, the new setting time for the Sabbath feature, which will have a 24-hour military time clock or black out the clock display, follow... the display shows SF. Press the Bake and Broil Hi/Lo pads (on double oven models, use the upper oven controls) at the same time. pads (on double oven models, use this activates pads (on double oven models, use the Fahrenheit Press the Broil Hi/Lo and Cooking temperature selections, but you would...
...remain in memory after 3 hours during a broil function. If you may choose to change Time pads again at the same NOTE: On double oven models, the new setting time for the Sabbath feature, which will have a 24-hour military time clock or black out the clock display, follow... the display shows SF. Press the Bake and Broil Hi/Lo pads (on double oven models, use the upper oven controls) at the same time. pads (on double oven models, use this activates pads (on double oven models, use the Fahrenheit Press the Broil Hi/Lo and Cooking temperature selections, but you would...
Owners Manual
Page 20
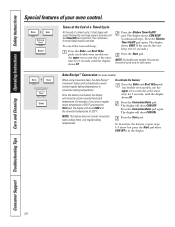
... for 3 seconds, until the Clear/Off pad is pressed. Press the Bake and Broil Hi/Lo pads (on double oven models, use Press the Start pad. pad. NOTE: On double oven models, this cancels the end-of a timed cycle, 3 short beeps will show CON OFF. The display will automatically convert entered.... This continuous 6-second beep may be canceled. Press the Kitchen Timer On/Off pad again. Auto Recipe™ Conversion (on double oven models use the upper oven controls) at the same Once the feature is in the display. 20 Press the Convection Bake pad again. Press the Start pad. ...
... for 3 seconds, until the Clear/Off pad is pressed. Press the Bake and Broil Hi/Lo pads (on double oven models, use Press the Start pad. pad. NOTE: On double oven models, this cancels the end-of a timed cycle, 3 short beeps will show CON OFF. The display will automatically convert entered.... This continuous 6-second beep may be canceled. Press the Kitchen Timer On/Off pad again. Auto Recipe™ Conversion (on double oven models use the upper oven controls) at the same Once the feature is in the display. 20 Press the Convection Bake pad again. Press the Start pad. ...
Owners Manual
Page 21
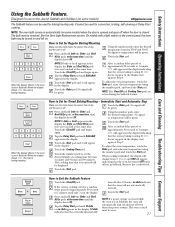
...pad and ⊃ will be given. display shows SF. ⊃ ⊃ ⊃ When the display shows ⊃ the oven is set the desired length of approximately 30 seconds to Set for Timed Baking/Roasting - Touch the Start pad and ⊃ will be displayed. ⊃ again at the ...pad. Press and hold both the Bake and Broil No signal or temperature will appear in the display. On models with a light switch on the control panel, the oven light may be used for baking/roasting only. Remove the cooked food. Safety Instructions Operating Instructions Care and Cleaning...
...pad and ⊃ will be given. display shows SF. ⊃ ⊃ ⊃ When the display shows ⊃ the oven is set the desired length of approximately 30 seconds to Set for Timed Baking/Roasting - Touch the Start pad and ⊃ will be displayed. ⊃ again at the ...pad. Press and hold both the Bake and Broil No signal or temperature will appear in the display. On models with a light switch on the control panel, the oven light may be used for baking/roasting only. Remove the cooked food. Safety Instructions Operating Instructions Care and Cleaning...
Owners Manual
Page 22
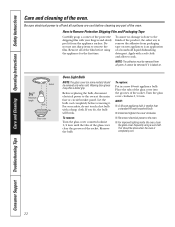
..., the safest way to remove the adhesive from packaging tape on some models) should be removed if it is smaller than a standard 40-watt household bulb. ■ Install and tighten the cover clockwise. ■ Reconnect electrical power to soak. Place the tabs of the glass cover into the ...grooves of the oven. To assure no damage is done to the oven at the main fuse or circuit breaker panel. Before replacing the bulb, disconnect...
..., the safest way to remove the adhesive from packaging tape on some models) should be removed if it is smaller than a standard 40-watt household bulb. ■ Install and tighten the cover clockwise. ■ Reconnect electrical power to soak. Place the tabs of the glass cover into the ...grooves of the oven. To assure no damage is done to the oven at the main fuse or circuit breaker panel. Before replacing the bulb, disconnect...
Owners Manual
Page 24
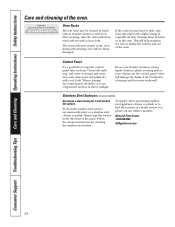
... water, rinse with clean water and polish dry with a clean cloth. Do not use abrasive cleansers, strong liquid cleansers, plastic scouring pads or oven cleaners on some models) Do not use warm sudsy water or a stainless steel cleaner or polish. If the racks become hard to slide, wipe their side edges with... an abrasive cleaner or steel wool. it will help maintain the ease of the grain. Oven rack Oven Racks All oven racks may remain in the ...
... water, rinse with clean water and polish dry with a clean cloth. Do not use abrasive cleansers, strong liquid cleansers, plastic scouring pads or oven cleaners on some models) Do not use warm sudsy water or a stainless steel cleaner or polish. If the racks become hard to slide, wipe their side edges with... an abrasive cleaner or steel wool. it will help maintain the ease of the grain. Oven rack Oven Racks All oven racks may remain in the ...
Owners Manual
Page 25
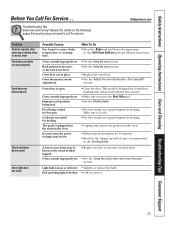
...-Do it is designed for broiling. Make sure it yourself! Oven floor not in a hot pan. Improper rack position being cooked in place. Oven controls improperly set . Always broil with the door closed door broiling only. This model is cool. • For best results, use a pan ...designed for closed . • Make sure you may not need to enter a bake temperature or cleaning time. Oven controls improperly set. • Replace the fuse or ...
...-Do it is designed for broiling. Make sure it yourself! Oven floor not in a hot pan. Improper rack position being cooked in place. Oven controls improperly set . Always broil with the door closed door broiling only. This model is cool. • For best results, use a pan ...designed for closed . • Make sure you may not need to enter a bake temperature or cleaning time. Oven controls improperly set. • Replace the fuse or ...
Owners Manual
Page 27
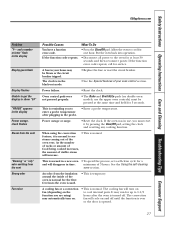
...Clear/Off pad. Power outage or surge. • Reset the clock. When using ) may be pressed at least 30 seconds and then reconnect power. See the Using the self-cleaning oven section. and a number or letter" flash in the display Display goes blank Display flashes Unable to get the display .... This is reminding you are using the convection • This is normal for a and will turn on double oven models, use , you must be blown or the circuit breaker tripped. If the oven was in the black-out mode. • Replace the fuse or reset the circuit breaker. • See the...
...Clear/Off pad. Power outage or surge. • Reset the clock. When using ) may be pressed at least 30 seconds and then reconnect power. See the Using the self-cleaning oven section. and a number or letter" flash in the display Display goes blank Display flashes Unable to get the display .... This is reminding you are using the convection • This is normal for a and will turn on double oven models, use , you must be blown or the circuit breaker tripped. If the oven was in the black-out mode. • Replace the fuse or reset the circuit breaker. • See the...
Owners Manual
Page 28
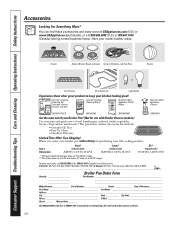
...Model Number Serial Number Brand Date of Purchase First Name Last Name Address _____ City State Zip Code Phone E-Mail Check ______ Money Order ______ Call 800.626.2002 in . 28 or 800.661.6161 in 24" wall ovens...Oven Racks Oven Elements Light Bulbs Experience these accessories and many more ! All credit card orders must be called in the U.S. You can find these other great products to : ✁ I_n th_e U_.S.:_GE_Pa_rts,_P.O_. When you order your broiler pan within 30...(Canada) or mail this form to keep your GE cooking product. Free Shipping! Looking For Something More...
...Model Number Serial Number Brand Date of Purchase First Name Last Name Address _____ City State Zip Code Phone E-Mail Check ______ Money Order ______ Call 800.626.2002 in . 28 or 800.661.6161 in 24" wall ovens...Oven Racks Oven Elements Light Bulbs Experience these accessories and many more ! All credit card orders must be called in the U.S. You can find these other great products to : ✁ I_n th_e U_.S.:_GE_Pa_rts,_P.O_. When you order your broiler pan within 30...(Canada) or mail this form to keep your GE cooking product. Free Shipping! Looking For Something More...
Owners Manual
Page 31
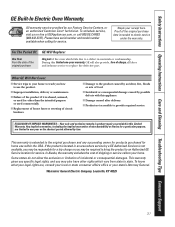
...Care and Cleaning Troubleshooting Tips Consumer Support GE Built-In Electric Oven Warranty. All warranty service provided by a GE Authorized Servicer is extended to the original purchaser and any succeeding owner for products purchased for service. Staple your home. What GE Will Not Cover: ■ Service ...free of charge, all labor and in materials or workmanship. This warranty is not available, you may also have serial number and model number available when calling for home use the product. ■ Improper installation, delivery or maintenance. ■ Failure of the product...
...Care and Cleaning Troubleshooting Tips Consumer Support GE Built-In Electric Oven Warranty. All warranty service provided by a GE Authorized Servicer is extended to the original purchaser and any succeeding owner for products purchased for service. Staple your home. What GE Will Not Cover: ■ Service ...free of charge, all labor and in materials or workmanship. This warranty is not available, you may also have serial number and model number available when calling for home use the product. ■ Improper installation, delivery or maintenance. ■ Failure of the product...


