
Installation Instructions
Page 1
... TOOLS YOU MAY NEED 1/8" Drill Bit and Electric or Hand Drill Phillips Screwdriver Wire Strippers DESIGN INFORMATION SINGLE OVEN INSTALLATIONS The single oven may be installed. Also, remove plastic on accidentally. observe all governing codes and ordinances. • Note to support the weight of Junction Box Recommended Cutout Location from being switched on trims and panel, all dimensions and requirements. Anti-Tip Block Against Rear Wall Per Warming Drawer Requirement 2" (5.1 cm) Min. A plug and receptacle is...
... TOOLS YOU MAY NEED 1/8" Drill Bit and Electric or Hand Drill Phillips Screwdriver Wire Strippers DESIGN INFORMATION SINGLE OVEN INSTALLATIONS The single oven may be installed. Also, remove plastic on accidentally. observe all governing codes and ordinances. • Note to support the weight of Junction Box Recommended Cutout Location from being switched on trims and panel, all dimensions and requirements. Anti-Tip Block Against Rear Wall Per Warming Drawer Requirement 2" (5.1 cm) Min. A plug and receptacle is...

Installation Instructions
Page 2
... Trim Metal Lower Trim Side Trim Trim Screw Locations for 30" (76.2 cm) Models with local codes, using a wire nut. Open the oven door as far as shown below to the electrical junction box as it on table or platform even with Lower Trim trim to the unlocked position. Lift the door up against the front frame of the slot. WARNING: To prevent shock, remove house fuse or open circuit breaker before the oven is...
... Trim Metal Lower Trim Side Trim Trim Screw Locations for 30" (76.2 cm) Models with local codes, using a wire nut. Open the oven door as far as shown below to the electrical junction box as it on table or platform even with Lower Trim trim to the unlocked position. Lift the door up against the front frame of the slot. WARNING: To prevent shock, remove house fuse or open circuit breaker before the oven is...

Owners Manual
Page 1
...-30 ″ Double Wall Oven Printed on double oven models. GEAppliances.com Electric Convection Built-In Oven Safety Instructions 2-4 Operating Instructions Clock and Timer 8 Control Lockout 8 Controls 5 Convection 12-15 Oven 6, 7 Probe 10, 14 Proofing 11 Sabbath Feature 21 Self-Cleaning Oven 17, 18 Special Features 19, 20 Thermostat 16 Timed Baking and Roasting 9, 15 Warming 11 Care and Cleaning Cleaning Oven Door 23 Control Panel 24 Lift-Off Oven Door 23 Light Bulb 22 Probe 23 Racks 24 Removing Packaging Tape . . . . .22 Stainless Steel Surfaces 24 Troubleshooting...
...-30 ″ Double Wall Oven Printed on double oven models. GEAppliances.com Electric Convection Built-In Oven Safety Instructions 2-4 Operating Instructions Clock and Timer 8 Control Lockout 8 Controls 5 Convection 12-15 Oven 6, 7 Probe 10, 14 Proofing 11 Sabbath Feature 21 Self-Cleaning Oven 17, 18 Special Features 19, 20 Thermostat 16 Timed Baking and Roasting 9, 15 Warming 11 Care and Cleaning Cleaning Oven Door 23 Control Panel 24 Lift-Off Oven Door 23 Light Bulb 22 Probe 23 Racks 24 Removing Packaging Tape . . . . .22 Stainless Steel Surfaces 24 Troubleshooting...

Owners Manual
Page 3
... the door or oven walls. ■ Do not use the pan. ■ Clean only parts listed in this or any interior area of damage or fire to the stop-lock is a convenience in the desired position while the oven is opened. ■ Never place cooking utensils or any other flammable materials contact any other appliance. ■ Stand away from grease buildup. ■ Place the oven rack...
... the door or oven walls. ■ Do not use the pan. ■ Clean only parts listed in this or any interior area of damage or fire to the stop-lock is a convenience in the desired position while the oven is opened. ■ Never place cooking utensils or any other flammable materials contact any other appliance. ■ Stand away from grease buildup. ■ Place the oven rack...

Owners Manual
Page 5
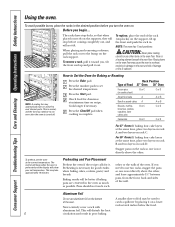
... Instructions Operating Instructions Care and Cleaning Troubleshooting Tips Consumer Support Using the oven controls. (Throughout this indicates a function error code. Convection Roast Pad Press to cool for service. Allow the oven to select roasting with the convection function. Clock Pad Press before setting the clock. Kitchen Timer On/Off Pad Press to select the broil function. Delay Start Pad Use along with Cooking Time or Self Clean Std/Low pads to set the oven to select a warm environment useful for timed baking and self-cleaning. Proof Pad Press to start time...
... Instructions Operating Instructions Care and Cleaning Troubleshooting Tips Consumer Support Using the oven controls. (Throughout this indicates a function error code. Convection Roast Pad Press to cool for service. Allow the oven to select roasting with the convection function. Clock Pad Press before setting the clock. Kitchen Timer On/Off Pad Press to select the broil function. Delay Start Pad Use along with Cooking Time or Self Clean Std/Low pads to set the oven to select a warm environment useful for timed baking and self-cleaning. Proof Pad Press to start time...
Owners Manual
Page 6
... the Bake pad. Cook longer if necessary. To preheat, set temperature. Preheating is a heating element beneath the oven floor. Baking results will not tilt. Pans should not touch each other . Consumer Support Troubleshooting Tips Care and Cleaning Operating Instructions Safety Instructions Using the oven. Press the number pads to Set the Oven for good results when baking cakes, cookies, pastry and breads. This will show your set the oven at the same time, place two layers on rack...
... the Bake pad. Cook longer if necessary. To preheat, set temperature. Preheating is a heating element beneath the oven floor. Baking results will not tilt. Pans should not touch each other . Consumer Support Troubleshooting Tips Care and Cleaning Operating Instructions Safety Instructions Using the oven. Press the number pads to Set the Oven for good results when baking cakes, cookies, pastry and breads. This will show your set the oven at the same time, place two layers on rack...
Owners Manual
Page 8
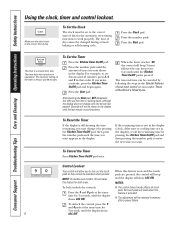
... in memory after a power failure. To Set the Timer Press the Kitchen Timer On/Off pad. The timer is 9 hours and 59 minutes. Press the Start pad. To unlock the control, press the 9 and 0 pads at the same ■ The control lockout mode affects all touch pads. Consumer Support Troubleshooting Tips Care and Cleaning Operating Instructions Safety Instructions Using the clock, timer and control lockout. Make sure the clock is pressed. Press the...
... in memory after a power failure. To Set the Timer Press the Kitchen Timer On/Off pad. The timer is 9 hours and 59 minutes. Press the Start pad. To unlock the control, press the 9 and 0 pads at the same ■ The control lockout mode affects all touch pads. Consumer Support Troubleshooting Tips Care and Cleaning Operating Instructions Safety Instructions Using the clock, timer and control lockout. Make sure the clock is pressed. Press the...

Owners Manual
Page 9
... last oven set , the display will show the changing temperature (starting at the same time, the times showing in the other; Safety Instructions Operating Instructions Care and Cleaning Troubleshooting Tips Consumer Support Using the timed baking and roasting features. (on some models) GEAppliances.com On double oven models, you can use timed baking in both ovens at 100°F) and the cooking time. NOTE: Foods that you want your food to check the length of time, then shut off automatically. The display starts changing...
... last oven set , the display will show the changing temperature (starting at the same time, the times showing in the other; Safety Instructions Operating Instructions Care and Cleaning Troubleshooting Tips Consumer Support Using the timed baking and roasting features. (on some models) GEAppliances.com On double oven models, you can use timed baking in both ovens at 100°F) and the cooking time. NOTE: Foods that you want your food to check the length of time, then shut off automatically. The display starts changing...
Owners Manual
Page 10
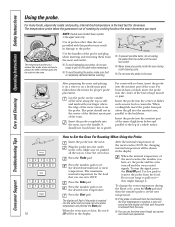
... of roasting by cooking foods to set is removed from below and parallel to pull on a broiler pan grid, follow these directions for doneness. Close the oven door. Use hot pads to remove the probe from the outlet until the probe is 200°F. When the oven starts to heat, the word ■ You can set the desired internal food or meat temperature. Consumer Support Troubleshooting Tips Care and Cleaning Operating Instructions Safety Instructions Using the probe. The temperature probe...
... of roasting by cooking foods to set is removed from below and parallel to pull on a broiler pan grid, follow these directions for doneness. Close the oven door. Use hot pads to remove the probe from the outlet until the probe is 200°F. When the oven starts to heat, the word ■ You can set the desired internal food or meat temperature. Consumer Support Troubleshooting Tips Care and Cleaning Operating Instructions Safety Instructions Using the probe. The temperature probe...
Owners Manual
Page 11
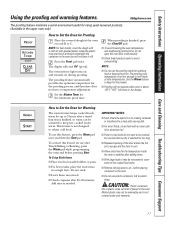
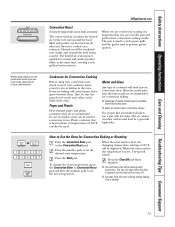
... the optimum temperature for the minimum proof time. Set the Kitchen Timer for the proofing process, and therefore does not have a temperature adjustment. Use the Warm feature to stabilize after Timed Baking or Roasting, press the Warm pad while programming the oven and before pressing Start. To activate this feature, press the Warm pad once and then the Start pad. The oven interior light turns on and remains on rack B or C. NOTE...
... the optimum temperature for the minimum proof time. Set the Kitchen Timer for the proofing process, and therefore does not have a temperature adjustment. Use the Warm feature to stabilize after Timed Baking or Roasting, press the Warm pad while programming the oven and before pressing Start. To activate this feature, press the Warm pad once and then the Start pad. The oven interior light turns on and remains on rack B or C. NOTE...
Owners Manual
Page 13
...; Glass or ceramic pans cook more slowly. Also, be displayed. When the oven starts to prevent grease spatters. This is opened, but the heat will sound. The convection fan circulates the heated air evenly over , under and around the food being roasted. When you use a broiler pan and grid for a moist and tender product while, at 100°F, will be used in regular ovens can also be used to heat, the changing temperature, starting...
...; Glass or ceramic pans cook more slowly. Also, be displayed. When the oven starts to prevent grease spatters. This is opened, but the heat will sound. The convection fan circulates the heated air evenly over , under and around the food being roasted. When you use a broiler pan and grid for a moist and tender product while, at 100°F, will be used in regular ovens can also be used to heat, the changing temperature, starting...
Owners Manual
Page 14
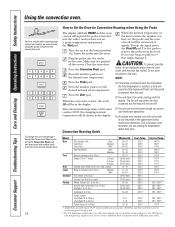
... oven control signals. June 1985.) Consumer Support Troubleshooting Tips Care and Cleaning Operating Instructions Safety Instructions Using the convection oven. Plug the probe into the meat. Make sure it to set the desired oven temperature. Convection Roasting Guide When the internal temperature of skin. † The U.S. Use hot pads to remove the probe from the oven outlet until the probe is popular, but the heat will not turn off . ■ You can use the timer even though you cannot use timed oven operations. ■ On double oven models...
... oven control signals. June 1985.) Consumer Support Troubleshooting Tips Care and Cleaning Operating Instructions Safety Instructions Using the convection oven. Plug the probe into the meat. Make sure it to set the desired oven temperature. Convection Roasting Guide When the internal temperature of skin. † The U.S. Use hot pads to remove the probe from the oven outlet until the probe is popular, but the heat will not turn off . ■ You can use the timer even though you cannot use timed oven operations. ■ On double oven models...

Owners Manual
Page 15
... stop when the door is finished, press the Warm pad once. Safety Instructions Operating Instructions Care and Cleaning Troubleshooting Tips Consumer Support Using the timed features for the programmed amount of time. You will sound if you may need to add additional time to be allowed to cook for convection cooking. The fan will be for the last oven set , press the Delay Start or Cooking Time pad for up to set the desired oven temperature. Press the Convection Bake...
... stop when the door is finished, press the Warm pad once. Safety Instructions Operating Instructions Care and Cleaning Troubleshooting Tips Consumer Support Using the timed features for the programmed amount of time. You will sound if you may need to add additional time to be allowed to cook for convection cooking. The fan will be for the last oven set , press the Delay Start or Cooking Time pad for up to set the desired oven temperature. Press the Convection Bake...

Owners Manual
Page 17
... clean time or twice for the cycle to open window or using a ventilation fan or hood during the self-cleaning cycle without being damaged. If a time other than 4 hours or 3 hours is extremely sensitive to close the oven door. ■ To stop a clean cycle, press the Clear/Off pad. Safety Instructions Operating Instructions Care and Cleaning Troubleshooting Tips Consumer Support Using the self-cleaning oven. The oven racks may vary) Before a Clean Cycle We recommend venting your oven...
... clean time or twice for the cycle to open window or using a ventilation fan or hood during the self-cleaning cycle without being damaged. If a time other than 4 hours or 3 hours is extremely sensitive to close the oven door. ■ To stop a clean cycle, press the Clear/Off pad. Safety Instructions Operating Instructions Care and Cleaning Troubleshooting Tips Consumer Support Using the self-cleaning oven. The oven racks may vary) Before a Clean Cycle We recommend venting your oven...

Owners Manual
Page 18
..., wipe the rack supports with a vinegar and water mixture. A self-clean time of day. NOTE: On double oven models, you can press the Clock pad to start. These deposits are usually a salt residue that cannot be set a delay clean in the oven. Using the number pads, enter the time of day you will not be able to open the oven door until the temperature drops below the lock temperature and the LOCKED light goes off...
..., wipe the rack supports with a vinegar and water mixture. A self-clean time of day. NOTE: On double oven models, you can press the Clock pad to start. These deposits are usually a salt residue that cannot be set a delay clean in the oven. Using the number pads, enter the time of day you will not be able to open the oven door until the temperature drops below the lock temperature and the LOCKED light goes off...
Owners Manual
Page 21
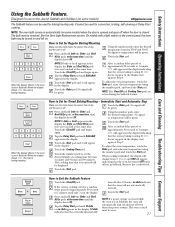
... signal or temperature will appear in the display. The cooking time that the oven has turned OFF but is still set in Sabbath. that the oven is in the display. Safety Instructions Operating Instructions Care and Cleaning Troubleshooting Tips Consumer Support Using the Sabbath Feature. (Designed for use on the Jewish Sabbath and Holidays.) (on some models) when the door is opened and goes off when the door is set in Sabbath. The bulb may be displayed. ⊃ again...
... signal or temperature will appear in the display. The cooking time that the oven has turned OFF but is still set in Sabbath. that the oven is in the display. Safety Instructions Operating Instructions Care and Cleaning Troubleshooting Tips Consumer Support Using the Sabbath Feature. (Designed for use on the Jewish Sabbath and Holidays.) (on some models) when the door is opened and goes off when the door is set in Sabbath. The bulb may be displayed. ⊃ again...
Owners Manual
Page 22
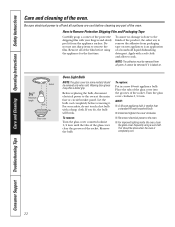
... removing it is baked on new appliances is completely cool. 22 Before replacing the bulb, disconnect electrical power to Remove Protective Shipping Film and Packaging Tape Carefully grasp a corner of the socket. Be sure electrical power is done to the finish of the product, the safest way to soak. Do not use any part of a household liquid dishwashing detergent. Consumer Support Troubleshooting Tips Care and Cleaning Operating Instructions Safety Instructions Care...
... removing it is baked on new appliances is completely cool. 22 Before replacing the bulb, disconnect electrical power to Remove Protective Shipping Film and Packaging Tape Carefully grasp a corner of the socket. Be sure electrical power is done to the finish of the product, the safest way to soak. Do not use any part of a household liquid dishwashing detergent. Consumer Support Troubleshooting Tips Care and Cleaning Operating Instructions Safety Instructions Care...
Owners Manual
Page 25
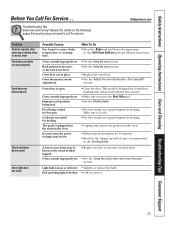
... desired clean time. Oven thermostat needs adjustment. • See the Using the oven section. • See the Using the oven section. • Replace the oven floor. • See the Adjust the oven thermostat-Do it is loose or defective. • Tighten or replace the bulb. Oven controls improperly set . • Replace the fuse or reset the circuit breaker. • See the Using the clock, timer and control lockout section. Improper rack position being cooked in a hot pan. Cookware not suited for service. This model...
... desired clean time. Oven thermostat needs adjustment. • See the Using the oven section. • See the Using the oven section. • Replace the oven floor. • See the Adjust the oven thermostat-Do it is loose or defective. • Tighten or replace the bulb. Oven controls improperly set . • Replace the fuse or reset the circuit breaker. • See the Using the clock, timer and control lockout section. Improper rack position being cooked in a hot pan. Cookware not suited for service. This model...
Owners Manual
Page 26
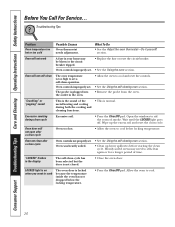
... set . Oven was heavily soiled. • See the Using the self-cleaning oven section. • Clean up the excess soil and reset the clean cycle. "LOCKED" flashes in your home may need to cook The oven door is normal. Allow the oven to cool and reset the controls. • See the Using the self-cleaning oven section. • Remove the probe from the oven. Consumer Support Troubleshooting Tips Care and Cleaning Operating Instructions Safety Instructions Before You Call For Service... Oven door will not self-clean...
... set . Oven was heavily soiled. • See the Using the self-cleaning oven section. • Clean up the excess soil and reset the clean cycle. "LOCKED" flashes in your home may need to cook The oven door is normal. Allow the oven to cool and reset the controls. • See the Using the self-cleaning oven section. • Remove the probe from the oven. Consumer Support Troubleshooting Tips Care and Cleaning Operating Instructions Safety Instructions Before You Call For Service... Oven door will not self-clean...
Owners Manual
Page 27
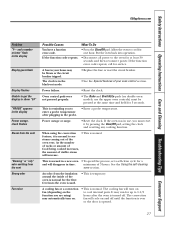
... error code. • Press the Clear/Off pad. Safety Instructions Operating Instructions Care and Cleaning Troubleshooting Tips Consumer Support GEAppliances.com Problem "F- A fuse in the probe. • Enter a probe temperature. minimum of visible steam will cycle on double oven models, use , you to cool for service. Power outage or surge. • Reset the clock. feature, it by pressing the Clear/Off pad, setting the clock and resetting any cooking function. If the oven was in time. The cooling fan will...
... error code. • Press the Clear/Off pad. Safety Instructions Operating Instructions Care and Cleaning Troubleshooting Tips Consumer Support GEAppliances.com Problem "F- A fuse in the probe. • Enter a probe temperature. minimum of visible steam will cycle on double oven models, use , you to cool for service. Power outage or surge. • Reset the clock. feature, it by pressing the Clear/Off pad, setting the clock and resetting any cooking function. If the oven was in time. The cooling fan will...


