
Owners Manual
Page 1
Profile Side by Side Refrigerators ge.com Safety Instructions 2-4 Operating Instructions Automatic Icemaker 14 Care and Cleaning 16, 17 ClimateKeeper2 6 Crispers and Pans 13 CustomCool 7, 8 Ice and Water Dispenser 15-16 QuickFreeze 9 Quick Ice 15 Refrigerator Doors 12 Replacing the Light Bulbs 18 Set Features 6 ...44 State of California Water Treatment Device Certificate 42 Warranty (Canadian 39 Warranty (U.S 40 Owner's Manual and Installation Models 23, 25 and 26 Profile Côte à Côte Réfrigérateurs Manuel d'utilisation et d'installation La section fran&#...
Profile Side by Side Refrigerators ge.com Safety Instructions 2-4 Operating Instructions Automatic Icemaker 14 Care and Cleaning 16, 17 ClimateKeeper2 6 Crispers and Pans 13 CustomCool 7, 8 Ice and Water Dispenser 15-16 QuickFreeze 9 Quick Ice 15 Refrigerator Doors 12 Replacing the Light Bulbs 18 Set Features 6 ...44 State of California Water Treatment Device Certificate 42 Warranty (Canadian 39 Warranty (U.S 40 Owner's Manual and Installation Models 23, 25 and 26 Profile Côte à Côte Réfrigérateurs Manuel d'utilisation et d'installation La section fran&#...
Owners Manual
Page 2
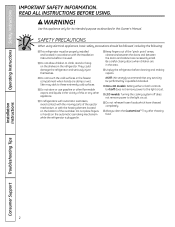
... between the doors and cabinet are in this Owner's Manual. s Non-LCD models: Setting either or both controls to 0 (off does not remove power to these extremely cold surfaces. s In refrigerators with automatic icemakers, avoid contact with the moving parts of the ejector mechanism, ...making repairs. Be careful closing doors when children are necessarily small. s LCD models: Turning the cooling system off ) does not remove power to climb, stand or hang on the shelves in the refrigerator. Installation Instructions Consumer Support Troubleshooting Tips 2 WARNING! Use this or any ...
... between the doors and cabinet are in this Owner's Manual. s Non-LCD models: Setting either or both controls to 0 (off does not remove power to these extremely cold surfaces. s In refrigerators with automatic icemakers, avoid contact with the moving parts of the ejector mechanism, ...making repairs. Be careful closing doors when children are necessarily small. s LCD models: Turning the cooling system off ) does not remove power to climb, stand or hang on the shelves in the refrigerator. Installation Instructions Consumer Support Troubleshooting Tips 2 WARNING! Use this or any ...
Owners Manual
Page 5
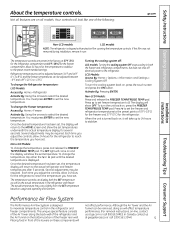
... show OFF. Several adjustments may vary slightly from the SET temperature based on the bottom portion of the following: ge.com Installation Instructions Non-LCD models LCD models NOTE: The refrigerator is designed to 5. Non-LCD Models: Press and release the FREEZER TEMP/FRIDGE TEMP pad. In Canada, contact us at 37°F (3°C) for...
... show OFF. Several adjustments may vary slightly from the SET temperature based on the bottom portion of the following: ge.com Installation Instructions Non-LCD models LCD models NOTE: The refrigerator is designed to 5. Non-LCD Models: Press and release the FREEZER TEMP/FRIDGE TEMP pad. In Canada, contact us at 37°F (3°C) for...
Owners Manual
Page 6
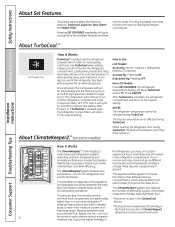
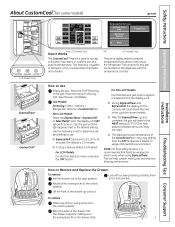
... during TurboCool. Once activated, the compressor will turn on immediately and the fans will return to Use LCD Models: Access By: Home > Options > Refrigerator Options > TurboCool Activate By: Pressing ON. the fresh food compartment are significantly *Freezer air is complete, the... refrigerator compartment will cycle on some models) How to the original setting. Operating Instructions Safety Instructions About Set Features. About ClimateKeeper2.™ (on and...
... during TurboCool. Once activated, the compressor will turn on immediately and the fans will return to Use LCD Models: Access By: Home > Options > Refrigerator Options > TurboCool Activate By: Pressing ON. the fresh food compartment are significantly *Freezer air is complete, the... refrigerator compartment will cycle on some models) How to the original setting. Operating Instructions Safety Instructions About Set Features. About ClimateKeeper2.™ (on and...
Owners Manual
Page 7
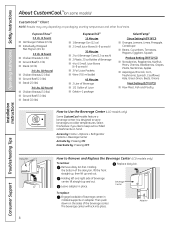
... of the drawer up and out. This will come on the dispenser with the temperature controls. Lock all four swing locks by : Home > Options > Refrigerator Options > CustomCool Pan Non-LCD Models: Select the ExpressThaw™, ExpressChill™ or SelectTemp™ pad.... Safety Instructions Operating Instructions About CustomCool.™(on some models) ge.com Installation Instructions LCD Models Only ExpressThaw™ ExpressChill ™ REFRIGERATOR OPTIONS CUSTOM COOL PAN BEVERAGE CENTER TURBOCOOL BACK Non-LCD Models Only How it is off. s During ExpressThaw and ...
... of the drawer up and out. This will come on the dispenser with the temperature controls. Lock all four swing locks by : Home > Options > Refrigerator Options > CustomCool Pan Non-LCD Models: Select the ExpressThaw™, ExpressChill™ or SelectTemp™ pad.... Safety Instructions Operating Instructions About CustomCool.™(on some models) ge.com Installation Instructions LCD Models Only ExpressThaw™ ExpressChill ™ REFRIGERATOR OPTIONS CUSTOM COOL PAN BEVERAGE CENTER TURBOCOOL BACK Non-LCD Models Only How it is off. s During ExpressThaw and ...
Owners Manual
Page 8
... replace: Engage backside of beverage center in place. Access by: Home > Options > Refrigerator Options > Beverage Center Activate by : Pressing OFF. Replace dairy bin. Adapter Select this feature if you like to Use the Beverage Center (LCD models only) Some CustomCool models feature a beverage center. The beverage center will lock into place. Then push...
... replace: Engage backside of beverage center in place. Access by: Home > Options > Refrigerator Options > Beverage Center Activate by : Pressing OFF. Replace dairy bin. Adapter Select this feature if you like to Use the Beverage Center (LCD models only) Some CustomCool models feature a beverage center. The beverage center will lock into place. Then push...
Owners Manual
Page 9
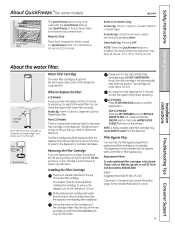
... Installing the Filter Cartridge There is located in the back upper right corner of the refrigerator compartment. To remove the adapter, turn it to the left . Fill the replacement cartridge ... By: Pressing OFF. This is lit. Access By: Home > Options > Dispenser Options > Reset Water Filter Non-LCD Models: There is only to be replaced when the replacement indicator light turns red or...the cartridge, it will rotate about 1/4 turn it to clear the system and prevent sputtering. ge.com Some LCD Models Only: Access By: Home > Options > Freezer Options > QuickFreeze Activate By: Using the ...
... Installing the Filter Cartridge There is located in the back upper right corner of the refrigerator compartment. To remove the adapter, turn it to the left . Fill the replacement cartridge ... By: Pressing OFF. This is lit. Access By: Home > Options > Dispenser Options > Reset Water Filter Non-LCD Models: There is only to be replaced when the replacement indicator light turns red or...the cartridge, it will rotate about 1/4 turn it to clear the system and prevent sputtering. ge.com Some LCD Models Only: Access By: Home > Options > Freezer Options > QuickFreeze Activate By: Using the ...
Owners Manual
Page 10
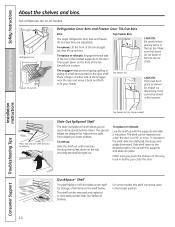
...in the lowest position. 10 Make sure you push the shelves all models. Snugger Refrigerator bin Freezer tilt-out bin Refrigerator Door Bins and Freezer Door Tilt-Out Bins Bins Top Freezer Bins The larger refrigerator door bins and freezer tilt-out door bins are designed to help ...door shelf. Installation Instructions Consumer Support Troubleshooting Tips QuickSpace™ Shelf This shelf splits in half and slides under itself for proper ice dispensing. The snugger helps prevent tipping, spilling or sliding of the bin straight up, then lift up with the supports and slide into...
...in the lowest position. 10 Make sure you push the shelves all models. Snugger Refrigerator bin Freezer tilt-out bin Refrigerator Door Bins and Freezer Door Tilt-Out Bins Bins Top Freezer Bins The larger refrigerator door bins and freezer tilt-out door bins are designed to help ...door shelf. Installation Instructions Consumer Support Troubleshooting Tips QuickSpace™ Shelf This shelf splits in half and slides under itself for proper ice dispensing. The snugger helps prevent tipping, spilling or sliding of the bin straight up, then lift up with the supports and slide into...
Owners Manual
Page 13
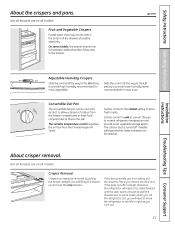
...the control to cold to convert the pan to the pan. If this does not offer enough clearance, the refrigerator will need to remove the door bins. In some models, the bottom drawer has full extension slides that may accumulate in the bottom of cold air from the Climate... Keeper Air The cold air duct is turned off. ge.com Installation Instructions Troubleshooting Tips Consumer Support Adjustable Humidity ...
...the control to cold to convert the pan to the pan. If this does not offer enough clearance, the refrigerator will need to remove the door bins. In some models, the bottom drawer has full extension slides that may accumulate in the bottom of cold air from the Climate... Keeper Air The cold air duct is turned off. ge.com Installation Instructions Troubleshooting Tips Consumer Support Adjustable Humidity ...
Owners Manual
Page 14
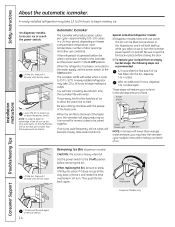
...(on and off ) position before closing the door. A newly installed refrigerator may take ice out or turn . Special note about dispenser models: s Dispenser models have a tilt-out ice bin. Removing Ice Bin (dispenser models) CAUTION: The ice bin is normal for several cubes to begin making... ice. On dispenser models, to 15°F (-10°C). If the refrigerator is operated before the water...
...(on and off ) position before closing the door. A newly installed refrigerator may take ice out or turn . Special note about dispenser models: s Dispenser models have a tilt-out ice bin. Removing Ice Bin (dispenser models) CAUTION: The ice bin is normal for several cubes to begin making... ice. On dispenser models, to 15°F (-10°C). If the refrigerator is operated before the water...
Owners Manual
Page 15
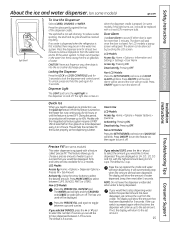
... you selected CUPS, press the or pad to select the amount you need to 40%. If no water is dispensed when the refrigerator is pressed. For LCD models, a popup screen will turn solid. LCD Models: Access By: Home > Options > Information and Settings > Settings > Door Alarm Access By: Pressing ON. ...amount of water. If not, the display will stop when the amount set amount. To flush out impurities in the dispenser on some models) ge.com Spill Shelf To Use the Dispenser Select CUBED, CRUSHED or WATER. Press ON/OFF to turn it should be set amount. 15 > To unlock, ...
... you selected CUPS, press the or pad to select the amount you need to 40%. If no water is dispensed when the refrigerator is pressed. For LCD models, a popup screen will turn solid. LCD Models: Access By: Home > Options > Information and Settings > Settings > Door Alarm Access By: Pressing ON. ...amount of water. If not, the display will stop when the amount set amount. To flush out impurities in the dispenser on some models) ge.com Spill Shelf To Use the Dispenser Select CUBED, CRUSHED or WATER. Press ON/OFF to turn it should be set amount. 15 > To unlock, ...
Owners Manual
Page 16
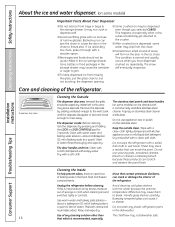
... in this is blocking the chute, poke it to jam. Dispenser drip area. The dispenser cradle. Before cleaning, lock the dispenser by adding undiluted vinegar to break. Dry and polish with a soft cloth. Unplug the refrigerator before cleaning. Use warm water and baking soda solution- Do not... wash any cleaning solution other than The chill/thaw tray is dispensed, some models) Important Facts About Your Dispenser s Do not add ice from missing the glass, ...
... in this is blocking the chute, poke it to jam. Dispenser drip area. The dispenser cradle. Before cleaning, lock the dispenser by adding undiluted vinegar to break. Dry and polish with a soft cloth. Unplug the refrigerator before cleaning. Use warm water and baking soda solution- Do not... wash any cleaning solution other than The chill/thaw tray is dispensed, some models) Important Facts About Your Dispenser s Do not add ice from missing the glass, ...
Owners Manual
Page 18
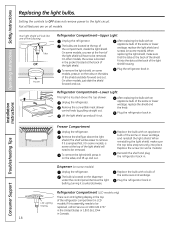
... does not remove power to be replaced, call GE Service at the top of the light shield will be removed. On some models). Plug the refrigerator back in . control knob by turning it counterclockwise. Replace the screw (on the dispenser under the control panel. The bulb is an... LED lighting display in LCD models. To remove the light shield, on the sides...
... does not remove power to be replaced, call GE Service at the top of the light shield will be removed. On some models). Plug the refrigerator back in . control knob by turning it counterclockwise. Replace the screw (on the dispenser under the control panel. The bulb is an... LED lighting display in LCD models. To remove the light shield, on the sides...
Owners Manual
Page 19
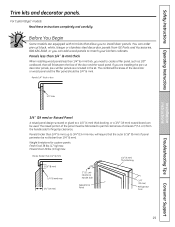
For CustomStyle™ models Read these instructions completely and carefully. If you...raised portion of the panel must be fabricated to permit clearances of at least 2″ (5.1 cm) from GE Parts and Accessories, 800.626.2002, or you can add wood panels to create a filler panel, such...8243; (19 mm) 2″ (5.1 cm) Clearance Handle Side Appearance Panel 1/4″ (6 mm) Thick Backing 3/4″ (19 mm) Refrigerator Door Installation Instructions Troubleshooting Tips Consumer Support 19 Weight limitations for fingertip clearance. Freezer Door 28 lbs. (13 kg) max. The combined ...
For CustomStyle™ models Read these instructions completely and carefully. If you...raised portion of the panel must be fabricated to permit clearances of at least 2″ (5.1 cm) from GE Parts and Accessories, 800.626.2002, or you can add wood panels to create a filler panel, such...8243; (19 mm) 2″ (5.1 cm) Clearance Handle Side Appearance Panel 1/4″ (6 mm) Thick Backing 3/4″ (19 mm) Refrigerator Door Installation Instructions Troubleshooting Tips Consumer Support 19 Weight limitations for fingertip clearance. Freezer Door 28 lbs. (13 kg) max. The combined ...
Owners Manual
Page 21
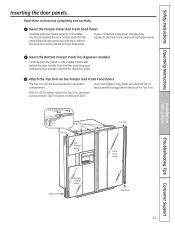
... Trim Bottom Freezer Panel Side Trim Troubleshooting Tips Consumer Support 21 Repeat for fresh food panel. If your model has a dispenser, this step only applies to the top of each Top Trim piece, to the fresh food panel and... top freezer panel. Attach the Top Trim on dispenser models). Hand tighten only. Read these instructions completely and carefully. With a T-20 Torxdriver, attach the Top Trim, using...Freezer Panel and Fresh Food Panel. The Top Trim can be found inside the refrigerator compartment.
... Trim Bottom Freezer Panel Side Trim Troubleshooting Tips Consumer Support 21 Repeat for fresh food panel. If your model has a dispenser, this step only applies to the top of each Top Trim piece, to the fresh food panel and... top freezer panel. Attach the Top Trim on dispenser models). Hand tighten only. Read these instructions completely and carefully. With a T-20 Torxdriver, attach the Top Trim, using...Freezer Panel and Fresh Food Panel. The Top Trim can be found inside the refrigerator compartment.
Owners Manual
Page 23
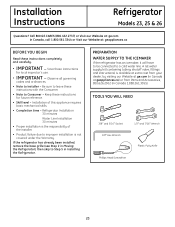
Installation Instructions Refrigerator Models 23, 25 & 26 Questions? Keep these instructions completely and carefully. • IMPORTANT - Refrigerator Installation 30 minutes Water Line Installation 30 minutes • Proper installation is the responsibility of this appliance requires basic mechanical skills. • Completion time - A GE water supply kit (containing tubing, shutoff valve, fittings and instructions) is not covered under...
Installation Instructions Refrigerator Models 23, 25 & 26 Questions? Keep these instructions completely and carefully. • IMPORTANT - Refrigerator Installation 30 minutes Water Line Installation 30 minutes • Proper installation is the responsibility of this appliance requires basic mechanical skills. • Completion time - A GE water supply kit (containing tubing, shutoff valve, fittings and instructions) is not covered under...
Owners Manual
Page 24
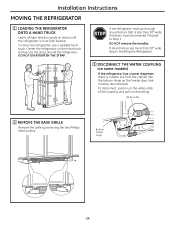
... entrances are more than 38″ wide, the doors must be removed. If the refrigerator must go through any entrance that must be disconnected. Proceed to Installing the Refrigerator. 3 DISCONNECT THE WATER COUPLING (on some models) If the refrigerator has a water dispenser, there is less than 38″ wide, skip to Step 3. If all tape...
... entrances are more than 38″ wide, the doors must be removed. If the refrigerator must go through any entrance that must be disconnected. Proceed to Installing the Refrigerator. 3 DISCONNECT THE WATER COUPLING (on some models) If the refrigerator has a water dispenser, there is less than 38″ wide, skip to Step 3. If all tape...
Owners Manual
Page 25
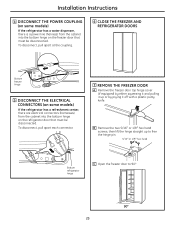
... C Open the freezer door to 90.° 90° 25 Installation Instructions 4 DISCONNECT THE POWER COUPLING (on some models) If the refrigerator has a refreshment center, there are electrical connectors (harnesses) from the cabinet into the bottom hinge on the freezer door ... with a plastic putty knife. To disconnect, pull apart at the coupling. 6 CLOSE THE FREEZER AND REFRIGERATOR DOORS Bottom freezer hinge 5 DISCONNECT THE ELECTRICAL CONNECTORS (on some models) If the refrigerator has a water dispenser, there is a power line (harness) from the cabinet into the bottom hinge on the...
... C Open the freezer door to 90.° 90° 25 Installation Instructions 4 DISCONNECT THE POWER COUPLING (on some models) If the refrigerator has a refreshment center, there are electrical connectors (harnesses) from the cabinet into the bottom hinge on the freezer door ... with a plastic putty knife. To disconnect, pull apart at the coupling. 6 CLOSE THE FREEZER AND REFRIGERATOR DOORS Bottom freezer hinge 5 DISCONNECT THE ELECTRICAL CONNECTORS (on some models) If the refrigerator has a water dispenser, there is a power line (harness) from the cabinet into the bottom hinge on the...
Owners Manual
Page 27
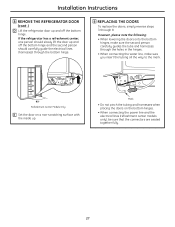
...bottom hinges. • When connecting the power line and the electrical lines (refreshment center models only), be sure that the connectors are seated together fully. 27 Installation Instructions 8 REMOVE THE REFRIGERATOR DOOR (cont .) D Lift the refrigerator door up and off the bottom hinge and the second person should carefully guide the ... in the hinges. • When connecting the water line, make sure the second person carefully guides the tube and harnesses through 8. If the refrigerator has a refreshment center, one person should slowly lift the door up and off the bottom hinge.
...bottom hinges. • When connecting the power line and the electrical lines (refreshment center models only), be sure that the connectors are seated together fully. 27 Installation Instructions 8 REMOVE THE REFRIGERATOR DOOR (cont .) D Lift the refrigerator door up and off the bottom hinge and the second person should carefully guide the ... in the hinges. • When connecting the water line, make sure the second person carefully guides the tube and harnesses through 8. If the refrigerator has a refreshment center, one person should slowly lift the door up and off the bottom hinge.
Owners Manual
Page 28
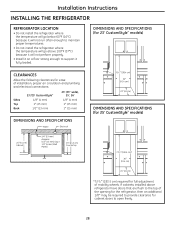
.... 28 DIMENSIONS AND SPECIFICATIONS (for 23' CustomStyle™ models) CLEARANCES Allow the following clearances for ease of mobility wheels. Installation Instructions INSTALLING THE REFRIGERATOR REFRIGERATOR LOCATION • Do not install the refrigerator where the temperature will go below 60°F (16°...23' (33" wide), 25', 26' 1/8″ (4 mm) 1″ (25 mm) 1″ (25 mm) DIMENSIONS AND SPECIFICATIONS Water Electrical 701⁄4″ (178.4 cm) 36″ (91.4 cm) 24″ (61 cm) DIMENSIONS AND SPECIFICATIONS (for 25' CustomStyle™ models) 24″ (61 cm) ...
.... 28 DIMENSIONS AND SPECIFICATIONS (for 23' CustomStyle™ models) CLEARANCES Allow the following clearances for ease of mobility wheels. Installation Instructions INSTALLING THE REFRIGERATOR REFRIGERATOR LOCATION • Do not install the refrigerator where the temperature will go below 60°F (16°...23' (33" wide), 25', 26' 1/8″ (4 mm) 1″ (25 mm) 1″ (25 mm) DIMENSIONS AND SPECIFICATIONS Water Electrical 701⁄4″ (178.4 cm) 36″ (91.4 cm) 24″ (61 cm) DIMENSIONS AND SPECIFICATIONS (for 25' CustomStyle™ models) 24″ (61 cm) ...


