Use and Care Manual
Page 5
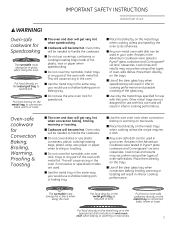
.../roasting bags, plastic wrap, wax paper or paper when broiling or toasting. ■ Do not cover the turntable, wire oven rack, trays or any part of the oven with this oven. This will be needed to handle the cookware. ■ Do not cover dishes or use a shallow baking pan or baking... speedcooking. ■ Do not cover the turntable, metal trays or any part of the oven with this oven and will become hot. Put food or oven-safe cookware directly on the metal trays when cooking unless prompted by the oven to convection bake, warm or toast. Place them directly on the trays....
.../roasting bags, plastic wrap, wax paper or paper when broiling or toasting. ■ Do not cover the turntable, wire oven rack, trays or any part of the oven with this oven. This will be needed to handle the cookware. ■ Do not cover dishes or use a shallow baking pan or baking... speedcooking. ■ Do not cover the turntable, metal trays or any part of the oven with this oven and will become hot. Put food or oven-safe cookware directly on the metal trays when cooking unless prompted by the oven to convection bake, warm or toast. Place them directly on the trays....
Use and Care Manual
Page 11
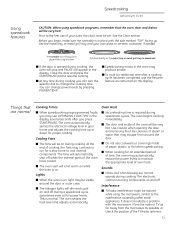
... the internal parts of the TV/radio antenna. 11 Move the radio or TV as far away from around the door or outer case. ■ The halogen lights will appear in your home and adjusts the cooking time up . The oven automatically senses the electrical voltage level ...in the display. The oven senses the heat level and adjusts automatically. Oven Heat ■ No preheating time is normal. Interference ■ TV/radio interference might be ...
... the internal parts of the TV/radio antenna. 11 Move the radio or TV as far away from around the door or outer case. ■ The halogen lights will appear in your home and adjusts the cooking time up . The oven automatically senses the electrical voltage level ...in the display. The oven senses the heat level and adjusts automatically. Oven Heat ■ No preheating time is normal. Interference ■ TV/radio interference might be ...
Use and Care Manual
Page 28
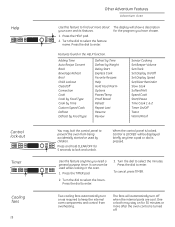
...Two cooling fans automatically turn off . The fans will automatically turn on for 30 minutes or more about your oven and its features. 1. One or both may lock the control panel to keep the internal oven components and control from being accidentally started or used while cooking in the HELP ...function. It can even be displayed briefly anytime a pad or dial is turned off when the internal parts are cool. Press the HELP pad. 2. Features found in the oven. 1. Press the dial to enter. Press the dial to enter. The display will be used by Weight Delay...
...Two cooling fans automatically turn off . The fans will automatically turn on for 30 minutes or more about your oven and its features. 1. One or both may lock the control panel to keep the internal oven components and control from being accidentally started or used while cooking in the HELP ...function. It can even be displayed briefly anytime a pad or dial is turned off when the internal parts are cool. Press the HELP pad. 2. Features found in the oven. 1. Press the dial to enter. Press the dial to enter. The display will be used by Weight Delay...

Use and Care Manual
Page 29
...any part of this oven. The turntable can be removed with a paper towel, others may require a warm soapy cloth. Wash carefully in the center of the oven and turn it until it can be removed with a warm sudsy cloth. Pieces can break off the pad inside the oven, causing electrical shock.... If you normally do not come off easily with a warm sudsy cloth, use abrasive cleaners or sharp utensils on oven walls or the accessory storage drawer. How to clean the inside of the oven and the accessory storage drawer (with some models) Removable turntable Care and Cleaning Advantium...
...any part of this oven. The turntable can be removed with a paper towel, others may require a warm soapy cloth. Wash carefully in the center of the oven and turn it until it can be removed with a warm sudsy cloth. Pieces can break off the pad inside the oven, causing electrical shock.... If you normally do not come off easily with a warm sudsy cloth, use abrasive cleaners or sharp utensils on oven walls or the accessory storage drawer. How to clean the inside of the oven and the accessory storage drawer (with some models) Removable turntable Care and Cleaning Advantium...

Use and Care Manual
Page 33
... to match the food or liquid to run The oven is normal. Power level has been automatically reduced because the oven is hot. • This is normal. air while oven is on Fan comes on and off when the internal parts of the oven when I open the door Food is normal. • These... sounds are required to keep the oven components and controls cool. Fan noise is high in the oven does an oven signal not match the program that was not vented, a lid ...
... to match the food or liquid to run The oven is normal. Power level has been automatically reduced because the oven is hot. • This is normal. air while oven is on Fan comes on and off when the internal parts of the oven when I open the door Food is normal. • These... sounds are required to keep the oven components and controls cool. Fan noise is high in the oven does an oven signal not match the program that was not vented, a lid ...

Use and Care Manual
Page 35
... date of the original purchase Five Years From the date of the original purchase GE Will Replace: Any part of God. ■ Incidental or consequential damage caused by possible defects with this... one year or the shortest period allowed by accident, fire, floods or acts of the oven which vary from wire rack or metal/foil), or used commercially. ■ Replacement of ...of the cooktop light bulbs. ■ Damage to obtain service under the warranty. Warrantor: General Electric Company. During this Limited Warranty. Some states do not allow the exclusion or limitation of merchantability ...
... date of the original purchase Five Years From the date of the original purchase GE Will Replace: Any part of God. ■ Incidental or consequential damage caused by possible defects with this... one year or the shortest period allowed by accident, fire, floods or acts of the oven which vary from wire rack or metal/foil), or used commercially. ■ Replacement of ...of the cooktop light bulbs. ■ Damage to obtain service under the warranty. Warrantor: General Electric Company. During this Limited Warranty. Some states do not allow the exclusion or limitation of merchantability ...
Use and Care Manual
Page 36
... during normal business hours. Timely product registration will still be referred to qualified service personnel. Extended Warranties ge.com Purchase a GE extended warranty and learn about special discounts that can now download Owner's Manuals, order parts or even schedule service on our Web site with the service you can be exercised, since improper...
... during normal business hours. Timely product registration will still be referred to qualified service personnel. Extended Warranties ge.com Purchase a GE extended warranty and learn about special discounts that can now download Owner's Manuals, order parts or even schedule service on our Web site with the service you can be exercised, since improper...
Installation Instructions
Page 2
...PSB2200NWW-White PSB2200NBB-Black PSB2201NSS-Stainless Steel Monogram Models: ZSC2200NWW-White ZSC2200NBB-Black ZSC2201NSS-Stainless Steel Monogram Pro Range Models: ZSC2202NSS-Stainless Steel NOTE: This unit cannot be hazardous. IMPORTANT - Never use the oven for its intended purpose. Prolonged use of this appliance requires basic mechanical and electrical... Tools and Parts Required 3 Parts Supplied 3 Electrical Tools and Parts Required 3 Advance Planning 3 Installation Preparation Electrical Requirements 4...of the 80-pound oven and 30-pound drawer, plus additional oven loads of up to...
...PSB2200NWW-White PSB2200NBB-Black PSB2201NSS-Stainless Steel Monogram Models: ZSC2200NWW-White ZSC2200NBB-Black ZSC2201NSS-Stainless Steel Monogram Pro Range Models: ZSC2202NSS-Stainless Steel NOTE: This unit cannot be hazardous. IMPORTANT - Never use the oven for its intended purpose. Prolonged use of this appliance requires basic mechanical and electrical... Tools and Parts Required 3 Parts Supplied 3 Electrical Tools and Parts Required 3 Advance Planning 3 Installation Preparation Electrical Requirements 4...of the 80-pound oven and 30-pound drawer, plus additional oven loads of up to...

Installation Instructions
Page 3
... runner or shelf to support oven (if required) … Safety glasses or goggles PARTS SUPPLIED … 6 brass screws (3 required, 3 extra) … 5 color matched screws (4 required, 1 extra) … Bottom trim ELECTRICAL TOOLS AND PARTS REQUIRED (NOT SUPPLIED) … Junction box … Electrical cable (3-conductor or 4-conductor ...use the correct cutout when preparing the opening. This oven is firmly attached to wall ovens must have an adhesion spec of at least 194ºF temperature rating. NOTE: Model ZSC2202 CANNOT be assembled to the oven prior to use above the floor. • ...
... runner or shelf to support oven (if required) … Safety glasses or goggles PARTS SUPPLIED … 6 brass screws (3 required, 3 extra) … 5 color matched screws (4 required, 1 extra) … Bottom trim ELECTRICAL TOOLS AND PARTS REQUIRED (NOT SUPPLIED) … Junction box … Electrical cable (3-conductor or 4-conductor ...use the correct cutout when preparing the opening. This oven is firmly attached to wall ovens must have an adhesion spec of at least 194ºF temperature rating. NOTE: Model ZSC2202 CANNOT be assembled to the oven prior to use above the floor. • ...

Installation Instructions
Page 9
... 6 Brass Screws (3 required, 3 extra) 5 Color Matched Screws (4 required, 1 extra) IMPORTANT: If installing the Advantium 240V Oven with an accessory storage drawer, read the storage drawer assembly instructions to assemble the products together before proceeding to lift this... oven. • Open the door and remove any packaging in oven. Metal Trays (2) Metal Grill Tray 9 Installation Instructions 1 REMOVE THE PACKAGING AND PARTS • Remove all packing material and tape. • Locate parts package containing mounting screws. •...
... 6 Brass Screws (3 required, 3 extra) 5 Color Matched Screws (4 required, 1 extra) IMPORTANT: If installing the Advantium 240V Oven with an accessory storage drawer, read the storage drawer assembly instructions to assemble the products together before proceeding to lift this... oven. • Open the door and remove any packaging in oven. Metal Trays (2) Metal Grill Tray 9 Installation Instructions 1 REMOVE THE PACKAGING AND PARTS • Remove all packing material and tape. • Locate parts package containing mounting screws. •...

Installation Instructions
Page 12
... an accessory storage drawer. IMPORTANT - See Installation Preparation Without an Accessory Storage Drawer in the Advantium 240V Built-In SpeedCook Oven Installation Instructions for warranty information. TOOLS REQUIRED • #2 Phillips screwdriver PARTS SUPPLIED • 2 Side Supports • Screws • Screws (color matched) 12 IMPORTANT - PRODUCT DIMENSIONS AND CLEARANCES 5" Allow 15" clearance when...
... an accessory storage drawer. IMPORTANT - See Installation Preparation Without an Accessory Storage Drawer in the Advantium 240V Built-In SpeedCook Oven Installation Instructions for warranty information. TOOLS REQUIRED • #2 Phillips screwdriver PARTS SUPPLIED • 2 Side Supports • Screws • Screws (color matched) 12 IMPORTANT - PRODUCT DIMENSIONS AND CLEARANCES 5" Allow 15" clearance when...

Installation Instructions
Page 13
... DRAWER (CONT.) C Remove the front two bottom screws on each side of the storage drawer. Make sure that the back and sides of the oven align with the front of drawer hanging over the edge of the surface may result in damage to the drawer since the front edge of ... drawer and secure using the screws supplied and the screws removed in front of the top of drawer. ASSEMBLY TO ADVANTIUM 240V BUILT-IN SPEEDCOOK OVEN 1 REMOVE PACKAGING AND PARTS • Remove the drawer from the carton. • Remove all packing material and tape. • Open the drawer and remove any...
... DRAWER (CONT.) C Remove the front two bottom screws on each side of the storage drawer. Make sure that the back and sides of the oven align with the front of drawer hanging over the edge of the surface may result in damage to the drawer since the front edge of ... drawer and secure using the screws supplied and the screws removed in front of the top of drawer. ASSEMBLY TO ADVANTIUM 240V BUILT-IN SPEEDCOOK OVEN 1 REMOVE PACKAGING AND PARTS • Remove the drawer from the carton. • Remove all packing material and tape. • Open the drawer and remove any...


