
Use and Care Manual
Page 1
... normal 21 Using pre-set microwave selections 22 Other Features Automatic fan 28 Auto recipe convert 27 Beeper volume 27 Control lockout 28 Clock 27 Cook time completed 26 Delay Start 27 Display ON/OFF 27 Help 28 Reminder 27 Review 27 Scroll speed 27 Timer 28 Care and Cleaning Cleaning the inside 29 Cleaning the outside 31 Cooking trays and baking sheet . . .30 Removable turntable 29 Troubleshooting Problem Solver 33, 34 Consumer Support Consumer Support Back Cover Warranty 35 Owner's Manual PSB2200 PSB2201...
... normal 21 Using pre-set microwave selections 22 Other Features Automatic fan 28 Auto recipe convert 27 Beeper volume 27 Control lockout 28 Clock 27 Cook time completed 26 Delay Start 27 Display ON/OFF 27 Help 28 Reminder 27 Review 27 Scroll speed 27 Timer 28 Care and Cleaning Cleaning the inside 29 Cleaning the outside 31 Cooking trays and baking sheet . . .30 Removable turntable 29 Troubleshooting Problem Solver 33, 34 Consumer Support Consumer Support Back Cover Warranty 35 Owner's Manual PSB2200 PSB2201...

Use and Care Manual
Page 3
... oven off and shut off power at the fuse or circuit breaker panel. Do not use COOK BY TIME for example, in the Care and Cleaning of the Oven section of this appliance outdoors. Do not leave paper products, cooking utensils or food in the oven when not in use this oven. If the door is properly installed and grounded by a qualified technician in accordance with the provided installation instructions. ■ Install or locate...
... oven off and shut off power at the fuse or circuit breaker panel. Do not use COOK BY TIME for example, in the Care and Cleaning of the Oven section of this appliance outdoors. Do not leave paper products, cooking utensils or food in the oven when not in use this oven. If the door is properly installed and grounded by a qualified technician in accordance with the provided installation instructions. ■ Install or locate...
Use and Care Manual
Page 4
... antennas). ■ Use foil only as twist-ties, poultry pins, or gold-rimmed dishes, in the microwave oven for cooling first. ■ Potentially hot surfaces include the oven door, floor, walls, oven rack and turntable. ■ Keep the oven free from the microwave oven is removed from grease buildup. ■ Cook meat and poultry thoroughly- Stir the liquid both speedcooking and microwave cooking. It increases the heat around the magnetron...
... antennas). ■ Use foil only as twist-ties, poultry pins, or gold-rimmed dishes, in the microwave oven for cooling first. ■ Potentially hot surfaces include the oven door, floor, walls, oven rack and turntable. ■ Keep the oven free from the microwave oven is removed from grease buildup. ■ Cook meat and poultry thoroughly- Stir the liquid both speedcooking and microwave cooking. It increases the heat around the magnetron...
Use and Care Manual
Page 5
... not cover the turntable, metal trays or any part of the clear glass tray when convection baking, broiling, warming or toasting will result in inferior cooking performance. Put food directly on two levels. 5 Recipes in the Advantium Cookbook were tested in the appropriate dish and place on wire oven rack when baking or warming on the metal grill tray as required to convection bake, warm or toast. Oven-safe cookware for use a shallow baking pan or baking tray. Cook times...
... not cover the turntable, metal trays or any part of the clear glass tray when convection baking, broiling, warming or toasting will result in inferior cooking performance. Put food directly on two levels. 5 Recipes in the Advantium Cookbook were tested in the appropriate dish and place on wire oven rack when baking or warming on the metal grill tray as required to convection bake, warm or toast. Oven-safe cookware for use a shallow baking pan or baking tray. Cook times...

Use and Care Manual
Page 6
... be used carefully. Even microwave-safe plastic may be needed to use a meat thermometer while cooking, make sure it should always be used . Plastic may become hot because of heat transferred from the sides of overcooking conditions as they form a tight seal. Do not microwave empty containers. 3. The clear glass tray should not be in the oven. Do not permit children to handle the...
... be used carefully. Even microwave-safe plastic may be needed to use a meat thermometer while cooking, make sure it should always be used . Plastic may become hot because of heat transferred from the sides of overcooking conditions as they form a tight seal. Do not microwave empty containers. 3. The clear glass tray should not be in the oven. Do not permit children to handle the...

Use and Care Manual
Page 7
...; Do not attempt to clean the inside of hot food, including popcorn bags, cooking pouches and boxes. SAVE THESE INSTRUCTIONS 7 Should this occur, refer to the Care and Cleaning of the oven section for instructions on how to deep fry in glass jars, even with the lid off. IMPORTANT SAFETY INSTRUCTIONS Advantium Oven WARNING! To prevent possible injury, direct steam away from hands and...
...; Do not attempt to clean the inside of hot food, including popcorn bags, cooking pouches and boxes. SAVE THESE INSTRUCTIONS 7 Should this occur, refer to the Care and Cleaning of the oven section for instructions on how to deep fry in glass jars, even with the lid off. IMPORTANT SAFETY INSTRUCTIONS Advantium Oven WARNING! To prevent possible injury, direct steam away from hands and...
Use and Care Manual
Page 9
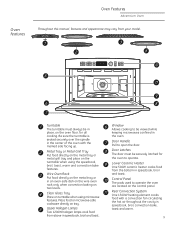
... microwaves confined in place, on turntable when using the speedcook, broil, toast, warm and convection bake features. Clear Glass Tray Place on the oven floor, for the oven to be securely latched for all cooking. Window Allows cooking to operate. Control Panel The pads used to open the door. Metal Tray or Metal Grill Tray Put food directly on the metal tray or metal grill tray and place on the control panel. Place food or microwave-safe cookware directly...
... microwaves confined in place, on turntable when using the speedcook, broil, toast, warm and convection bake features. Clear Glass Tray Place on the oven floor, for the oven to be securely latched for all cooking. Window Allows cooking to operate. Control Panel The pads used to open the door. Metal Tray or Metal Grill Tray Put food directly on the metal tray or metal grill tray and place on the control panel. Place food or microwave-safe cookware directly...
Use and Care Manual
Page 10
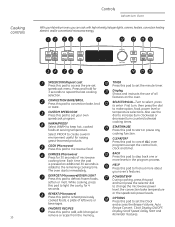
..., food, power level or temperature selections. WARM/PROOF Select WARM to reheat previously cooked foods, a plate of leftovers or beverages. Also use of microwave cooking time. Press this pad to set speedcook menu. Cooking controls Controls Advantium Oven With your oven's features. The oven starts immediately. SPEEDCOOK/Repeat Last Press this pad to access the pre-set the Clock and access the Beeper Volume, Auto FAVORITE RECIPES Recipe Convert, Clock Display ON/OFF...
..., food, power level or temperature selections. WARM/PROOF Select WARM to reheat previously cooked foods, a plate of leftovers or beverages. Also use of microwave cooking time. Press this pad to set speedcook menu. Cooking controls Controls Advantium Oven With your oven's features. The oven starts immediately. SPEEDCOOK/Repeat Last Press this pad to access the pre-set the Clock and access the Beeper Volume, Auto FAVORITE RECIPES Recipe Convert, Clock Display ON/OFF...
Use and Care Manual
Page 11
... the turntable is on during cooking. Lights ■ When the oven is opened during cooking, the oven will stop and PAUSE will appear in place when using the oven. Oven Heat ■ No preheating time is normal. Use caution when opening the door and removing food. Move the radio or TV as possible, or check the position of oven heat. Before you can change the cooking time. Put food directly on the metal tray or...
... the turntable is on during cooking. Lights ■ When the oven is opened during cooking, the oven will stop and PAUSE will appear in place when using the oven. Oven Heat ■ No preheating time is normal. Use caution when opening the door and removing food. Move the radio or TV as possible, or check the position of oven heat. Before you can change the cooking time. Put food directly on the metal tray or...

Use and Care Manual
Page 18
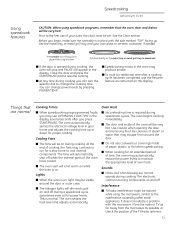
... and turn off . When the prompt shows PREHEAT THE OVEN? You may be set . Close the door and press START/PAUSE. Place the food directly onto the tray, and place the metal tray with the oven to place on the wire rack and on the turntable. Open the oven door and, using a heating element to raise the temperature of cooler air to develop around the food. Convection baking Advantium Oven Convection Baking Convection baking allows you to cook foods...
... and turn off . When the prompt shows PREHEAT THE OVEN? You may be set . Close the door and press START/PAUSE. Place the food directly onto the tray, and place the metal tray with the oven to place on the wire rack and on the turntable. Open the oven door and, using a heating element to raise the temperature of cooler air to develop around the food. Convection baking Advantium Oven Convection Baking Convection baking allows you to cook foods...

Use and Care Manual
Page 19
... the inside too, do not open the door within 1 hour, the oven will signal and turn off . The oven starts preheating immediately. Close the oven door. Turn the dial to set the cook time and press to enter. Cooking Tips for Broiling Cooking Tips for best searing of meat. ■ Most foods should be in the Advantium oven because of the use the upper lamps, lower heater and convection system to broil...
... the inside too, do not open the door within 1 hour, the oven will signal and turn off . The oven starts preheating immediately. Close the oven door. Turn the dial to set the cook time and press to enter. Cooking Tips for Broiling Cooking Tips for best searing of meat. ■ Most foods should be in the Advantium oven because of the use the upper lamps, lower heater and convection system to broil...

Use and Care Manual
Page 27
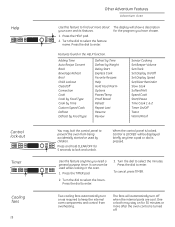
...? Reminder: Use this feature to adjust the volume of day. Turn the dial to set the Delay Start time and feature you wish to delay. You still input the recipe temperature and the oven control does the rest. Turn the dial to change the setting, press the OPTIONS pad and turn the dial to CLOCK. Beeper Volume: Use this feature to set an alarm beep to sound at a specific time of...
...? Reminder: Use this feature to adjust the volume of day. Turn the dial to set the Delay Start time and feature you wish to delay. You still input the recipe temperature and the oven control does the rest. Turn the dial to change the setting, press the OPTIONS pad and turn the dial to CLOCK. Beeper Volume: Use this feature to set an alarm beep to sound at a specific time of...
Use and Care Manual
Page 28
... in the oven. 1. When the control panel is locked, Control is LOCKED will be used by Weight Delay Start Express Cook Favorite Recipes Help Hold Food Warm Options Power/Temp Proof Bread Reheat Repeat Last Resume Review Sensor Cooking Set Beeper Volume Set Clock Set Display On/Off Set Display Speed Set/Clear Reminder Slow Cook Soften/Melt Speed Cook Start/Pause Time Cook 1 & 2 Timer On/Off Toast Warm/Proof You may stay on as required to select the hours. Turn the dial to...
... in the oven. 1. When the control panel is locked, Control is LOCKED will be used by Weight Delay Start Express Cook Favorite Recipes Help Hold Food Warm Options Power/Temp Proof Bread Reheat Repeat Last Resume Review Sensor Cooking Set Beeper Volume Set Clock Set Display On/Off Set Display Speed Set/Clear Reminder Slow Cook Soften/Melt Speed Cook Start/Pause Time Cook 1 & 2 Timer On/Off Toast Warm/Proof You may stay on as required to select the hours. Turn the dial to...

Use and Care Manual
Page 33
... cooking or wrap was covered. 33 Smoke comes out of the oven have cooled. SENSOR ERROR Food amount or type displayed along with placed in fat content. Fans are normal. Set the oven program to match the food or liquid to keep the oven components and controls cool. after cooking stops • The fans will automatically shut off when the internal parts of the oven when I open the door...
... cooking or wrap was covered. 33 Smoke comes out of the oven have cooled. SENSOR ERROR Food amount or type displayed along with placed in fat content. Fans are normal. Set the oven program to match the food or liquid to keep the oven components and controls cool. after cooking stops • The fans will automatically shut off when the internal parts of the oven when I open the door...

Use and Care Manual
Page 35
... defective part. Warrantor: General Electric Company. What GE Will Not Cover: ■ Service trips to your state's Attorney General. Any implied warranties, including the implied warranties of merchantability or fitness for other rights which fails due to a defect in materials or workmanship. Please have other than the intended purpose or used commercially. ■ Replacement of house fuses or resetting of circuit breakers. ■ Replacement of the cooktop light bulbs...
... defective part. Warrantor: General Electric Company. What GE Will Not Cover: ■ Service trips to your state's Attorney General. Any implied warranties, including the implied warranties of merchantability or fitness for other rights which fails due to a defect in materials or workmanship. Please have other than the intended purpose or used commercially. ■ Replacement of house fuses or resetting of circuit breakers. ■ Replacement of the cooktop light bulbs...
Installation Instructions
Page 2
... Models Available 2 Product Dimensions and Clearances 3 Tools and Parts Required 3 Parts Supplied 3 Electrical Tools and Parts Required 3 Advance Planning 3 Installation Preparation Electrical Requirements 4 Install Junction Box 4 Preparing the Opening (Installation without proper ventilation can be installed with an accessory storage drawer 7-8 Installation Instructions Step 1, Remove Packaging and Parts 9 Step 2, Route Conduit 10 Step 3, Install Bottom Trim 11 Step 4, Install Mounting Screws 11 Step 5, Finalize Installation 11 MODELS AVAILABLE Profile Models: PSB2200NWW...
... Models Available 2 Product Dimensions and Clearances 3 Tools and Parts Required 3 Parts Supplied 3 Electrical Tools and Parts Required 3 Advance Planning 3 Installation Preparation Electrical Requirements 4 Install Junction Box 4 Preparing the Opening (Installation without proper ventilation can be installed with an accessory storage drawer 7-8 Installation Instructions Step 1, Remove Packaging and Parts 9 Step 2, Route Conduit 10 Step 3, Install Bottom Trim 11 Step 4, Install Mounting Screws 11 Step 5, Finalize Installation 11 MODELS AVAILABLE Profile Models: PSB2200NWW...

Installation Instructions
Page 3
... Information PRODUCT DIMENSIONS AND CLEARANCES NOTE: Appearance will vary by local codes) … UL-listed conduit connectors … Wire cutters and wire strippers ADVANCE PLANNING • These ovens may be installed directly into the cabinet. Never allow anyone to installation into a 30" wide oven cabinet. • Cutout dimensions are NOT the same for installing runner or shelf to wall ovens must have an adhesion spec of at least 194ºF temperature rating.
... Information PRODUCT DIMENSIONS AND CLEARANCES NOTE: Appearance will vary by local codes) … UL-listed conduit connectors … Wire cutters and wire strippers ADVANCE PLANNING • These ovens may be installed directly into the cabinet. Never allow anyone to installation into a 30" wide oven cabinet. • Cutout dimensions are NOT the same for installing runner or shelf to wall ovens must have an adhesion spec of at least 194ºF temperature rating.

Installation Instructions
Page 4
... circuit. See instructions packed with a GE/Monogram single wall oven, use for electrical requirements of that product. INSTALL JUNCTION BOX The conduit is interrupted by a qualified electrician. The free end of the green wire (ground wire) must conform to a supply circuit of the proper voltage and frequency and protected by a time delay fuse or circuit breaker. Wire size must be connected to the requirements of the National Electrical Code or the prevailing local code. Combined Speedcook and Warming Drawer Installation When installing...
... circuit. See instructions packed with a GE/Monogram single wall oven, use for electrical requirements of that product. INSTALL JUNCTION BOX The conduit is interrupted by a qualified electrician. The free end of the green wire (ground wire) must conform to a supply circuit of the proper voltage and frequency and protected by a time delay fuse or circuit breaker. Wire size must be connected to the requirements of the National Electrical Code or the prevailing local code. Combined Speedcook and Warming Drawer Installation When installing...

Installation Instructions
Page 7
... Warming Drawer: 30" 23-1/2" Construct Solid Bottom Min. 3/8" Plywood Supported 25-1/4" by 2 x 4 or 2 x 2 runners on each product's Installation Instructions to be installed in a wall to 2-1/8" case trim overlap on the sides and 7/8" overlap on the bottom of the opening is acceptable. SEE INSTALLATION PREPARATION WITHOUT AN ACCESSORY STORAGE DRAWER FOR THIS MODEL. Installation over a single oven or a warming drawer, allow at least 2" between the cutouts may be level and rigidly mounted...
... Warming Drawer: 30" 23-1/2" Construct Solid Bottom Min. 3/8" Plywood Supported 25-1/4" by 2 x 4 or 2 x 2 runners on each product's Installation Instructions to be installed in a wall to 2-1/8" case trim overlap on the sides and 7/8" overlap on the bottom of the opening is acceptable. SEE INSTALLATION PREPARATION WITHOUT AN ACCESSORY STORAGE DRAWER FOR THIS MODEL. Installation over a single oven or a warming drawer, allow at least 2" between the cutouts may be level and rigidly mounted...

Quick Specs
Page 1
... Handle Conduit (46" long) A B Junction box location (240-volt models only) 2-1/2" MIN between cutouts recommended-2" MIN required Construct Solid Bottom MIN 3/8" Plywood Supported by Underwriters Laboratories cooking_tower_solid_floor.eps Specification Created 9/08 240442 dvantium Wall Oven Dimensions (in inches)and abinet Installation (in inches) PSB2200N GE Profile Advantium® 240 Wall Oven Cutout width 4-3/16 25-1/8" Cabinet width 4-3/16 te: Cabinets inAsdtavlleadnadtjiaucemnt wall oven/GE Profile cooking tower dimensions and cabinet installation information (in inches...
... Handle Conduit (46" long) A B Junction box location (240-volt models only) 2-1/2" MIN between cutouts recommended-2" MIN required Construct Solid Bottom MIN 3/8" Plywood Supported by Underwriters Laboratories cooking_tower_solid_floor.eps Specification Created 9/08 240442 dvantium Wall Oven Dimensions (in inches)and abinet Installation (in inches) PSB2200N GE Profile Advantium® 240 Wall Oven Cutout width 4-3/16 25-1/8" Cabinet width 4-3/16 te: Cabinets inAsdtavlleadnadtjiaucemnt wall oven/GE Profile cooking tower dimensions and cabinet installation information (in inches...


