
Quick Specs
Page 1
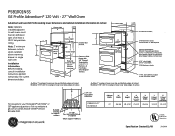
... only) Construct Solid Bottom Min. B=All*oRwe1q1u/1ir6e"d-3f/o4r" UfoLr oavpeprlraopvaolf. PSB1001NSS GE Profile Advantium 120 ® Advantium Wall Oven Dimensions (in inches)and Volt - 27" Wall Oven Cabinet Installation (in inches) Advantium wall oven/GE Profile cooking tower dimensions and cabinet installation information (in inches) Cabinet width 4-3/16 Note: Cabinets installed adjacent to support runners 21-5/8" over centerline of cabinet (Must support 130 lbs...
... only) Construct Solid Bottom Min. B=All*oRwe1q1u/1ir6e"d-3f/o4r" UfoLr oavpeprlraopvaolf. PSB1001NSS GE Profile Advantium 120 ® Advantium Wall Oven Dimensions (in inches)and Volt - 27" Wall Oven Cabinet Installation (in inches) Advantium wall oven/GE Profile cooking tower dimensions and cabinet installation information (in inches) Cabinet width 4-3/16 Note: Cabinets installed adjacent to support runners 21-5/8" over centerline of cabinet (Must support 130 lbs...

Use and Care Manual
Page 3
...heat, dry or cook food, and is UL listed for standard wall installation. Contact nearest authorized service facility for marine use corrosive chemicals or vapors in this appliance only in the oven cavity: - for laboratory or industrial use as whole eggs and ... such as described in succession on the appliance. IMPORTANT SAFETY INSTRUCTIONS Advantium Oven WARNING! I Do not mount this product near a sink or in accordance with the provided installation instructions. If the door is properly installed and grounded by qualified service personnel. I Do not store this ...
...heat, dry or cook food, and is UL listed for standard wall installation. Contact nearest authorized service facility for marine use corrosive chemicals or vapors in this appliance only in the oven cavity: - for laboratory or industrial use as whole eggs and ... such as described in succession on the appliance. IMPORTANT SAFETY INSTRUCTIONS Advantium Oven WARNING! I Do not mount this product near a sink or in accordance with the provided installation instructions. If the door is properly installed and grounded by qualified service personnel. I Do not store this ...

Use and Care Manual
Page 35
... date is abused, misused (for example, cavity arcing from state to one -year warranty, GE will be required to bring the product to obtain service under the warranty. Advantium Oven Warranty Advantium Oven All warranty service provided by accident, fire, floods or acts of the cooktop light bulbs. ...other rights which fails due to the product caused by our Factory Service Centers, or an authorized Customer Care® technician. I Improper installation, delivery or maintenance. If the product is not available, you may be responsible for a trip charge or you how to replace the...
... date is abused, misused (for example, cavity arcing from state to one -year warranty, GE will be required to bring the product to obtain service under the warranty. Advantium Oven Warranty Advantium Oven All warranty service provided by accident, fire, floods or acts of the cooktop light bulbs. ...other rights which fails due to the product caused by our Factory Service Centers, or an authorized Customer Care® technician. I Improper installation, delivery or maintenance. If the product is not available, you may be responsible for a trip charge or you how to replace the...
Installation Instructions
Page 1
... 2 Tools Required 2 Parts Supplied 2 Advance Planning 3 Installation Preparation Electrical Requirements 4 Prepare the Opening 5, 6 Remove the Packaging 6 Installation Instructions Step 1, Slide the Oven into the Cutout 7 Step 2, Install Bottom Trim 7 Step 3, Install Mounting Screws 8 Step 4, Finalize Installation 8 MFL59060902 49-40607 02-09 JR Installation Instructions Profile Advantium™ 120 Built-In SpeedCook Ovens PSB1000 PSB1001 Questions? Keep these instructions with...
... 2 Tools Required 2 Parts Supplied 2 Advance Planning 3 Installation Preparation Electrical Requirements 4 Prepare the Opening 5, 6 Remove the Packaging 6 Installation Instructions Step 1, Slide the Oven into the Cutout 7 Step 2, Install Bottom Trim 7 Step 3, Install Mounting Screws 8 Step 4, Finalize Installation 8 MFL59060902 49-40607 02-09 JR Installation Instructions Profile Advantium™ 120 Built-In SpeedCook Ovens PSB1000 PSB1001 Questions? Keep these instructions with...

Installation Instructions
Page 3
... PLANNING • These ovens may be installed directly into a 27"-wide oven cabinet. • The front surface of at least 36-3/4" above the floor. • Allow for clearance to adjacent corners, walls, drawers, etc. • Cabinets installed adjacent to wall ovens must be installed over any GE single electric built-in oven or a warming drawer or both. The oven must have an...
... PLANNING • These ovens may be installed directly into a 27"-wide oven cabinet. • The front surface of at least 36-3/4" above the floor. • Allow for clearance to adjacent corners, walls, drawers, etc. • Cabinets installed adjacent to wall ovens must be installed over any GE single electric built-in oven or a warming drawer or both. The oven must have an...
Installation Instructions
Page 4
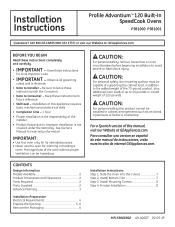
... of the National Electrical Code or the prevailing local code for this appliance is encountered, it replaced with a standard three-prong grounding wall receptacle to minimize the possibility of the 48" power cord. DO NOT USE AN EXTENSION CORD. 4 The outlet box should be ... circumstances, cut or remove the third (ground) prong from the power cord. or 20-ampere branch circuit single grounded receptacle. Installation Preparation ELECTRICAL REQUIREMENTS Single Advantium 120 Installation: This product requires a 120-volt, 60 Hz, 15-amp circuit and draws 1.8 kilowatts.
... of the National Electrical Code or the prevailing local code for this appliance is encountered, it replaced with a standard three-prong grounding wall receptacle to minimize the possibility of the 48" power cord. DO NOT USE AN EXTENSION CORD. 4 The outlet box should be ... circumstances, cut or remove the third (ground) prong from the power cord. or 20-ampere branch circuit single grounded receptacle. Installation Preparation ELECTRICAL REQUIREMENTS Single Advantium 120 Installation: This product requires a 120-volt, 60 Hz, 15-amp circuit and draws 1.8 kilowatts.
Installation Instructions
Page 5
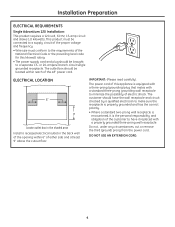
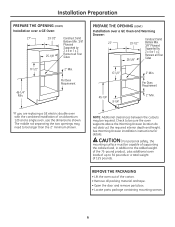
... the two openings. Always follow each side of the opening in a wall to the dimensions shown. 27" 23-1/2" 25-1/8" 17-1/2" 36-3/4" Min. See Warming Drawer installation instructions for bottom overlap of the Advantium 120 and the other GE appliances. PREPARE THE OPENING (CONT.) Installation over a single oven or a warming drawer, allow at the top and 7/8" overlap on...
... the two openings. Always follow each side of the opening in a wall to the dimensions shown. 27" 23-1/2" 25-1/8" 17-1/2" 36-3/4" Min. See Warming Drawer installation instructions for bottom overlap of the Advantium 120 and the other GE appliances. PREPARE THE OPENING (CONT.) Installation over a single oven or a warming drawer, allow at the top and 7/8" overlap on...
Installation Instructions
Page 6
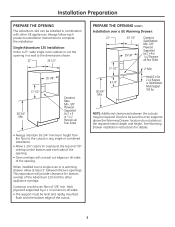
...50 pounds or a total weight of the carton. • Remove all Four Sides 17-1/2" 45-1/4" Min. 2" Min. Per Oven Requirement PREPARE THE OPENING (CONT.) Installation over a GE Oven: 27" 23-1/2" Construct Solid Bottom Min. 3/8" Plywood Supported by 2 x 4 or 1 x 2 Runners all Four 25-1/8" Sides ... must be larger than the 2" minimum shown. REMOVE THE PACKAGING • Lift the oven out of 125 pounds. Per Oven Requirement 2" Min. *If you are replacing a GE electric double oven with the combined installation of an Advantium 120 and a single oven, use the dimensions shown.
...50 pounds or a total weight of the carton. • Remove all Four Sides 17-1/2" 45-1/4" Min. 2" Min. Per Oven Requirement PREPARE THE OPENING (CONT.) Installation over a GE Oven: 27" 23-1/2" Construct Solid Bottom Min. 3/8" Plywood Supported by 2 x 4 or 1 x 2 Runners all Four 25-1/8" Sides ... must be larger than the 2" minimum shown. REMOVE THE PACKAGING • Lift the oven out of 125 pounds. Per Oven Requirement 2" Min. *If you are replacing a GE electric double oven with the combined installation of an Advantium 120 and a single oven, use the dimensions shown.
Installation Instructions
Page 7
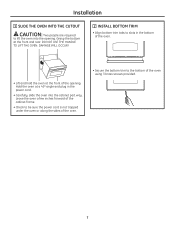
... to be sure the power cord is not trapped under the oven or along the sides of the oven. • Secure the bottom trim to slots in the power cord. • Carefully, slide the oven into the opening . DAMAGE WILL OCCUR! 2 INSTALL BOTTOM TRIM • Align bottom trim tabs to the bottom ...of the opening . Hold the oven at the front and rear. Grasp the bottom at a 45º angle and plug ...
... to be sure the power cord is not trapped under the oven or along the sides of the oven. • Secure the bottom trim to slots in the power cord. • Carefully, slide the oven into the opening . DAMAGE WILL OCCUR! 2 INSTALL BOTTOM TRIM • Align bottom trim tabs to the bottom ...of the opening . Hold the oven at the front and rear. Grasp the bottom at a 45º angle and plug ...
Installation Instructions
Page 8
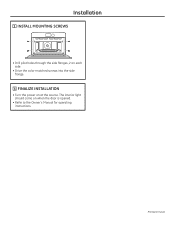
The interior light should come on at the source. Printed in Korea Installation 3 INSTALL MOUNTING SCREWS • Drill pilot holes through the side flanges, 2 on each side. • Drive the color-matched screws into the side flange. 4 FINALIZE INSTALLATION • Turn the power on when the door is opened. • Refer to the Owner's Manual for operating instructions.
The interior light should come on at the source. Printed in Korea Installation 3 INSTALL MOUNTING SCREWS • Drill pilot holes through the side flanges, 2 on each side. • Drive the color-matched screws into the side flange. 4 FINALIZE INSTALLATION • Turn the power on when the door is opened. • Refer to the Owner's Manual for operating instructions.


