
Use and Care Manual
Page 3
...I This oven is opened, the fire may spread. - Do not overcook food. If the door is UL listed for standard wall installation. IMPORTANT SAFETY INSTRUCTIONS Advantium Oven WARNING! When using this appliance if it has been damaged or dropped. I As with any openings on top of burns, electric... a sink or in use the oven for marine use corrosive chemicals or vapors in this appliance only in accordance with the provided installation instructions. I This oven is undercooked after the first countdown, use this appliance over a sink. Remove wire twist-ties and metal handles...
...I This oven is opened, the fire may spread. - Do not overcook food. If the door is UL listed for standard wall installation. IMPORTANT SAFETY INSTRUCTIONS Advantium Oven WARNING! When using this appliance if it has been damaged or dropped. I As with any openings on top of burns, electric... a sink or in use the oven for marine use corrosive chemicals or vapors in this appliance only in accordance with the provided installation instructions. I This oven is undercooked after the first countdown, use this appliance over a sink. Remove wire twist-ties and metal handles...
Installation Instructions
Page 1
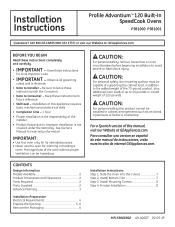
.... Observe all governing codes and ordinances. • Note to Installer - IMPORTANT: • Use this manual, visit our Website at : GEAppliances.com BEFORE YOU BEGIN Read these instructions for warranty information. Call 800.GE.CARES (800.432.2737) or visit our Website at GEAppliances.com. Installation Instructions Profile Advantium™ 120 Built-In SpeedCook Ovens PSB1000 PSB1001 Questions?
.... Observe all governing codes and ordinances. • Note to Installer - IMPORTANT: • Use this manual, visit our Website at : GEAppliances.com BEFORE YOU BEGIN Read these instructions for warranty information. Call 800.GE.CARES (800.432.2737) or visit our Website at GEAppliances.com. Installation Instructions Profile Advantium™ 120 Built-In SpeedCook Ovens PSB1000 PSB1001 Questions?
Installation Instructions
Page 5
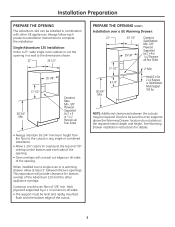
...allow at the top and 7/8" overlap on the bottom and each product's Installation Instructions to complete the installation. Construct Base Min. 3/8" Plywood Supported by 2 x 4 or 1 x 2 Runners all sides of the opening. When installed over a GE Warming Drawer: 27" 23-1/2" Construct Solid Bottom Min. 3/8" Plywood Supported... 5 Construct a solid oven floor of the Advantium 120 and the other GE appliances. NOTE: Additional clearances between the two openings. Installation Preparation PREPARE THE OPENING The Advantium 120 can be installed in combination with the bottom edge of the ...
...allow at the top and 7/8" overlap on the bottom and each product's Installation Instructions to complete the installation. Construct Base Min. 3/8" Plywood Supported by 2 x 4 or 1 x 2 Runners all sides of the opening. When installed over a GE Warming Drawer: 27" 23-1/2" Construct Solid Bottom Min. 3/8" Plywood Supported... 5 Construct a solid oven floor of the Advantium 120 and the other GE appliances. NOTE: Additional clearances between the two openings. Installation Preparation PREPARE THE OPENING The Advantium 120 can be installed in combination with the bottom edge of the ...
Installation Instructions
Page 6
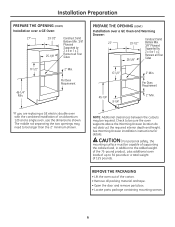
REMOVE THE PACKAGING • Lift the oven out of an Advantium 120 and a single oven, use the dimensions shown. Installation Preparation PREPARE THE OPENING (CONT.) Installation over a GE Oven and Warming Drawer: Construct Solid 27" 23-1/2" Bottom Min. 3/8" Plywood Supported ...Requirement PREPARE THE OPENING (CONT.) Installation over a GE Oven: 27" 23-1/2" Construct Solid Bottom Min. 3/8" Plywood Supported by 2 x 4 or 1 x 2 Runners all Four 25-1/8" Sides 17-1/2" 45-1/4" 9-1/4" 2" Min. See Warming Drawer installation instructions for details. Per Oven Requirement 2"...
REMOVE THE PACKAGING • Lift the oven out of an Advantium 120 and a single oven, use the dimensions shown. Installation Preparation PREPARE THE OPENING (CONT.) Installation over a GE Oven and Warming Drawer: Construct Solid 27" 23-1/2" Bottom Min. 3/8" Plywood Supported ...Requirement PREPARE THE OPENING (CONT.) Installation over a GE Oven: 27" 23-1/2" Construct Solid Bottom Min. 3/8" Plywood Supported by 2 x 4 or 1 x 2 Runners all Four 25-1/8" Sides 17-1/2" 45-1/4" 9-1/4" 2" Min. See Warming Drawer installation instructions for details. Per Oven Requirement 2"...
Installation Instructions
Page 8
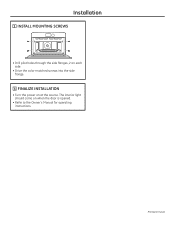
The interior light should come on at the source. Installation 3 INSTALL MOUNTING SCREWS • Drill pilot holes through the side flanges, 2 on each side. • Drive the color-matched screws into the side flange. 4 FINALIZE INSTALLATION • Turn the power on when the door is opened. • Refer to the Owner's Manual for operating instructions. Printed in Korea
The interior light should come on at the source. Installation 3 INSTALL MOUNTING SCREWS • Drill pilot holes through the side flanges, 2 on each side. • Drive the color-matched screws into the side flange. 4 FINALIZE INSTALLATION • Turn the power on when the door is opened. • Refer to the Owner's Manual for operating instructions. Printed in Korea
Quick Specs
Page 1
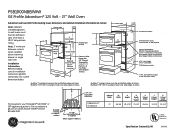
... Handle W Conduit (46" long) A B Junction box location (240-volt models only) 3" MIN between cutouts 1" Min. Installation Information: Before installing, consult installation instructions packed with product for Advantium) (Must Support 200 lbs. Suitable bracing to your Monogram,® GE Profile™ or GE® appliance questions, visit our website at top edge of cutout. Note: 2" minimum between cutouts when...
... Handle W Conduit (46" long) A B Junction box location (240-volt models only) 3" MIN between cutouts 1" Min. Installation Information: Before installing, consult installation instructions packed with product for Advantium) (Must Support 200 lbs. Suitable bracing to your Monogram,® GE Profile™ or GE® appliance questions, visit our website at top edge of cutout. Note: 2" minimum between cutouts when...


