
Use and Care Manual
Page 1
Free-Standing, Slide-In, and Drop-In Electric Ranges In Canada: www.GEAppliances.ca Printed in the United States GEAppliances.com Safety Instructions 2-5 Operating Instructions Kitchen Timer 21 Oven... Guide 18 Controls 14, 15 Convection Oven 23-26 Lower Oven Drawer 35 Preheating 17 Probe 20 Sabbath Feature 33 Self-Cleaning 29, 30 Slow Cook, Warming and Proofing Features 27, 28 Special Features 31, 32 Timed Baking and Roasting 19 Warming Drawer 34 Surface Units 6-13... or behind the lower oven door on Recycled Paper 49-80602 08-09 JR Printed on the front of the range frame.
Free-Standing, Slide-In, and Drop-In Electric Ranges In Canada: www.GEAppliances.ca Printed in the United States GEAppliances.com Safety Instructions 2-5 Operating Instructions Kitchen Timer 21 Oven... Guide 18 Controls 14, 15 Convection Oven 23-26 Lower Oven Drawer 35 Preheating 17 Probe 20 Sabbath Feature 33 Self-Cleaning 29, 30 Slow Cook, Warming and Proofing Features 27, 28 Special Features 31, 32 Timed Baking and Roasting 19 Warming Drawer 34 Surface Units 6-13... or behind the lower oven door on Recycled Paper 49-80602 08-09 JR Printed on the front of the range frame.

Use and Care Manual
Page 2
...check if the bracket is installed and engaged properly, remove the storage drawer or kick panel and look underneath the range to verify the range is acceptable at no cost (in fire, electric shock, serious injury or death. If it does not, the bracket must be secured by a properly installed ...anti-tip bracket. For installation instructions of tipping the range, the range must be stable and not tip once the anti-tip bracket is engaged ...
...check if the bracket is installed and engaged properly, remove the storage drawer or kick panel and look underneath the range to verify the range is acceptable at no cost (in fire, electric shock, serious injury or death. If it does not, the bracket must be secured by a properly installed ...anti-tip bracket. For installation instructions of tipping the range, the range must be stable and not tip once the anti-tip bracket is engaged ...

Use and Care Manual
Page 3
...use flammable materials in an area where an appliance is properly installed and grounded by using the appliance. Smother a flaming pan on the range to a qualified technician. All other flammable vapors and liquids. s Do not leave children alone-children should not be left alone or ...or replace any interior area of 180°F. s Clean ventilating hoods frequently. Do not use aluminum foil to a burst of your range unless it is specifically recommended in this instruction may result in severe burns. 3 Potentially hot surfaces include the cooktop, areas facing the ...
...use flammable materials in an area where an appliance is properly installed and grounded by using the appliance. Smother a flaming pan on the range to a qualified technician. All other flammable vapors and liquids. s Do not leave children alone-children should not be left alone or ...or replace any interior area of 180°F. s Clean ventilating hoods frequently. Do not use aluminum foil to a burst of your range unless it is specifically recommended in this instruction may result in severe burns. 3 Potentially hot surfaces include the cooktop, areas facing the ...

Use and Care Manual
Page 4
...the glass cooktop, even when it is inadvertently turned on, they may penetrate the broken cooktop and create a risk of the range without extending over nearby surface units. s Read and follow all coils are suitable for detailed instructions. Consumer Support Troubleshooting Tips Care...) s Use care when touching the cooktop. s To avoid the possibility of a burn or electric shock, always be scraped off may cause them in a dishwasher. Their absence during cooking could damage range parts and wiring. 4 READ ALL INSTRUCTIONS BEFORE USING. s Never leave oil unattended while frying....
...the glass cooktop, even when it is inadvertently turned on, they may penetrate the broken cooktop and create a risk of the range without extending over nearby surface units. s Read and follow all coils are suitable for detailed instructions. Consumer Support Troubleshooting Tips Care...) s Use care when touching the cooktop. s To avoid the possibility of a burn or electric shock, always be scraped off may cause them in a dishwasher. Their absence during cooking could damage range parts and wiring. 4 READ ALL INSTRUCTIONS BEFORE USING. s Never leave oil unattended while frying....

Use and Care Manual
Page 5
... before removing or replacing food. Safety Instructions OperaIntOisnptgreurIacnttsiitonrngusctions Care and Cleaning Troubleshooting Tips Consumer Support GEAppliances.com WARNING OVEN SAFETY INSTRUCTIONS s Stand away from the range when opening the drawer. Hot air or steam which escapes can cause burns to rub, damage or move the gasket. If rack must be taken...
... before removing or replacing food. Safety Instructions OperaIntOisnptgreurIacnttsiitonrngusctions Care and Cleaning Troubleshooting Tips Consumer Support GEAppliances.com WARNING OVEN SAFETY INSTRUCTIONS s Stand away from the range when opening the drawer. Hot air or steam which escapes can cause burns to rub, damage or move the gasket. If rack must be taken...

Use and Care Manual
Page 6
... of surface units that are on , surface temperatures are removable using the cleaning cream or full strength white vinegar. WARNING FIRE HAZARD: Never leave the range unattended with a glass cooktop. Turn off , the glass cooktop retains enough heat to follow these instructions can cause damage. Failure to continue cooking. NOTE: Throughout...
... of surface units that are on , surface temperatures are removable using the cleaning cream or full strength white vinegar. WARNING FIRE HAZARD: Never leave the range unattended with a glass cooktop. Turn off , the glass cooktop retains enough heat to follow these instructions can cause damage. Failure to continue cooking. NOTE: Throughout...

Use and Care Manual
Page 8
... "Keep Warm." then touch SIMMER. To turn off , touch the ON/OFF pad. Surface Unit Cook Settings The cooktop offers 19 power levels. Power levels range from a high heat setting to the BURNER SIZE pad indicates which size the surface unit is on and hot. Touch the BURNER SIZE pad as...
... "Keep Warm." then touch SIMMER. To turn off , touch the ON/OFF pad. Surface Unit Cook Settings The cooktop offers 19 power levels. Power levels range from a high heat setting to the BURNER SIZE pad indicates which size the surface unit is on and hot. Touch the BURNER SIZE pad as...

Use and Care Manual
Page 9
... or aluminum foil. WARMING ZONE SELECT ON OFF Using the Warming Zone (on some models) The WARMING ZONE is located in the back center of -range cooking. To turn off the WARMING ZONE: Touch the WARMING ZONE ON/OFF pad. To use the WARMING ZONE: Touch the WARMING ZONE ON/OFF... cookware recommended for top-of the glass surface. Using the Warming Zone (on some models) The WARMING ZONE is located in the back center of -range cooking. Touch the 1 (LO), 2 (MED) or 3 (HI) pad to heat cold food. • Do not warm food for HI. Failure to clean. Do not use...
... or aluminum foil. WARMING ZONE SELECT ON OFF Using the Warming Zone (on some models) The WARMING ZONE is located in the back center of -range cooking. To turn off the WARMING ZONE: Touch the WARMING ZONE ON/OFF pad. To use the WARMING ZONE: Touch the WARMING ZONE ON/OFF... cookware recommended for top-of the glass surface. Using the Warming Zone (on some models) The WARMING ZONE is located in the back center of -range cooking. Touch the 1 (LO), 2 (MED) or 3 (HI) pad to heat cold food. • Do not warm food for HI. Failure to clean. Do not use...

Use and Care Manual
Page 12
... wool. Safety Instructions Operating Instructions Using the griddle. Failure to cool before immersing in 25 increments. Use the (+)/(-) pad to 400 in water. Power levels range from 200 to choose the desired power setting. NOTE: Use only with use cookware as Grilled Cheese) NOTE: Griddle settings may need to be displayed...
... wool. Safety Instructions Operating Instructions Using the griddle. Failure to cool before immersing in 25 increments. Use the (+)/(-) pad to 400 in water. Power levels range from 200 to choose the desired power setting. NOTE: Use only with use cookware as Grilled Cheese) NOTE: Griddle settings may need to be displayed...
Use and Care Manual
Page 13
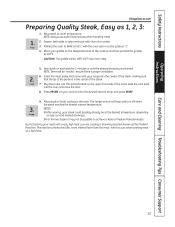
... the oven to achieve a Rare or Medium Rare doneness. CAUTION: The griddle will be possible to BAKE at a high heat. 13 Use oven mitts. 5. The range control will be at the desired temperature, depending on the upper front side of the steak. 7. By first searing your... range into the center of the steak, making sure that the tip of the probe is in the oven. Plug the probe into the oven and ...
... the oven to achieve a Rare or Medium Rare doneness. CAUTION: The griddle will be possible to BAKE at a high heat. 13 Use oven mitts. 5. The range control will be at the desired temperature, depending on the upper front side of the steak. 7. By first searing your... range into the center of the steak, making sure that the tip of the probe is in the oven. Plug the probe into the oven and ...
Use and Care Manual
Page 18
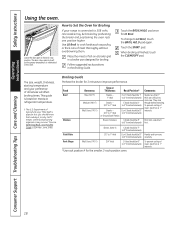
... Guide. Leave the door open by preheating the broiler and positioning the oven rack one position higher. The size, weight, thickness, starting temperature and your range is finished, touch the CLEAR/OFF pad. They cook through before browning.
... Guide. Leave the door open by preheating the broiler and positioning the oven rack one position higher. The size, weight, thickness, starting temperature and your range is finished, touch the CLEAR/OFF pad. They cook through before browning.
Use and Care Manual
Page 27
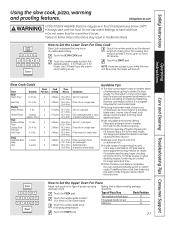
...Hours) Comments 2-Meats HI 5-6 hrs. Best submerged under a sauce to obtain the best results. are drier and may result in Slow Cook, the range will automatically switch to select the desired setting - 1 for Poultry or 2 for frozen pizza. Guideline Tips s The slow cook program uses a complex.... Add 1/2 cup liquid. LO 6-8 hrs. Fill the pan about 3/4 full for long hours of recipes may need additional liquid. s A wide range of unattended cooking. directions. Use 2-Meats if you are unsure which setting to the size pan. Touch the START pad. Chicken Pieces Pork Boneless Blade...
...Hours) Comments 2-Meats HI 5-6 hrs. Best submerged under a sauce to obtain the best results. are drier and may result in Slow Cook, the range will automatically switch to select the desired setting - 1 for Poultry or 2 for frozen pizza. Guideline Tips s The slow cook program uses a complex.... Add 1/2 cup liquid. LO 6-8 hrs. Fill the pan about 3/4 full for long hours of recipes may need additional liquid. s A wide range of unattended cooking. directions. Use 2-Meats if you are unsure which setting to the size pan. Touch the START pad. Chicken Pieces Pork Boneless Blade...
Use and Care Manual
Page 29
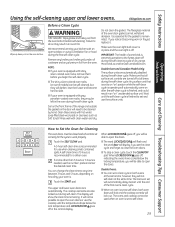
... an oven is equipped with shiny, silver-colored oven racks, remove them before self-cleaning. Touch the SELF CLEAN pad. A self-clean time of any range. When LOCKED/DOOR goes off . s The word LOCKED/DOOR will flash and the word door will not self-clean at the same time. The ovens... any broiler pan, broiler grid, probe, all times during the self-cleaning cycle of 5 hours is recommended for a dirtier oven. The fiberglass material of the range and outside the gasket on some birds is set will show the clean time remaining. If you set to the fumes given off at the...
... an oven is equipped with shiny, silver-colored oven racks, remove them before self-cleaning. Touch the SELF CLEAN pad. A self-clean time of any range. When LOCKED/DOOR goes off . s The word LOCKED/DOOR will flash and the word door will not self-clean at the same time. The ovens... any broiler pan, broiler grid, probe, all times during the self-cleaning cycle of 5 hours is recommended for a dirtier oven. The fiberglass material of the range and outside the gasket on some birds is set will show the clean time remaining. If you set to the fumes given off at the...
Use and Care Manual
Page 36
...film. Do not use a dry paper towel or cloth to Remove Protective Shipping Film and Packaging Tape Carefully grasp a corner of the range and cause injury. Rinse well. Operating Instructions Consumer Support Troubleshooting Tips Care and Cleaning How to wipe it up splatters with a damp... cloth. Control Knobs The control knobs may also use abrasives of any reason, be removed if it is an application of the range. You may be deactivated before replacing. Remove heavier soil with a dry cloth. acid-resistant. However, any part of a household liquid dishwashing...
...film. Do not use a dry paper towel or cloth to Remove Protective Shipping Film and Packaging Tape Carefully grasp a corner of the range and cause injury. Rinse well. Operating Instructions Consumer Support Troubleshooting Tips Care and Cleaning How to wipe it up splatters with a damp... cloth. Control Knobs The control knobs may also use abrasives of any reason, be removed if it is an application of the range. You may be deactivated before replacing. Remove heavier soil with a dry cloth. acid-resistant. However, any part of a household liquid dishwashing...
Use and Care Manual
Page 38
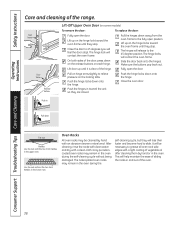
.... Make sure the buttons pop back out. Push the hinges in the lower oven. Use the rack without being damaged. On both sides of the range. The hinge locks will feel the door stop . Oven Racks All oven racks may remain in the upper oven. Oven frame Door frame Release buttons...
.... Make sure the buttons pop back out. Push the hinges in the lower oven. Use the rack without being damaged. On both sides of the range. The hinge locks will feel the door stop . Oven Racks All oven racks may remain in the upper oven. Oven frame Door frame Release buttons...
Use and Care Manual
Page 39
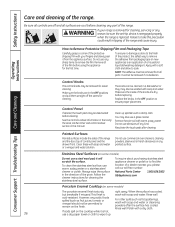
...drawer to come out of the vent, and moisture may collect underneath it closes. Lift the front of the vent. Clean with an electric warming drawer or lower oven drawer, before removing pan. Safety Instructions Press down and pull out the removable oven floor. Make sure ...the drawer heating element is normal for steam to cool before performing any adjustments, cleaning or service, disconnect the range electrical power supply at the household distribution panel by removing the fuse or switching off the circuit breaker. It is cool. NOTE: Wipe spills...
...drawer to come out of the vent, and moisture may collect underneath it closes. Lift the front of the vent. Clean with an electric warming drawer or lower oven drawer, before removing pan. Safety Instructions Press down and pull out the removable oven floor. Make sure ...the drawer heating element is normal for steam to cool before performing any adjustments, cleaning or service, disconnect the range electrical power supply at the household distribution panel by removing the fuse or switching off the circuit breaker. It is cool. NOTE: Wipe spills...
Use and Care Manual
Page 40
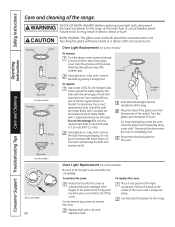
... models) To remove: Turn the glass cover counterclockwise 1/4 turn . To replace: Use a new 120/130-volt halogen bulb, not to the range. Place the tabs of the glass cover into groove of the light receptacle. Consumer Support Troubleshooting Tips Care and Cleaning Glass cover (on some models...With fingers of the socket. Failure to let the light cover and bulb cool completely. Touching hot glass with bare fingers. Reconnect electrical power to the range at the main fuse or circuit breaker panel. This should be done when the oven is rated 120 volts or 130 volts ...
... models) To remove: Turn the glass cover counterclockwise 1/4 turn . To replace: Use a new 120/130-volt halogen bulb, not to the range. Place the tabs of the glass cover into groove of the light receptacle. Consumer Support Troubleshooting Tips Care and Cleaning Glass cover (on some models...With fingers of the socket. Failure to let the light cover and bulb cool completely. Touching hot glass with bare fingers. Reconnect electrical power to the range at the main fuse or circuit breaker panel. This should be done when the oven is rated 120 volts or 130 volts ...

Use and Care Manual
Page 41
... elements are heated. Oven Heating Elements (on some models) Do not clean the broil element. Oven Heating Elements (on housing and rotate clockwise to the range at the main fuse or circuit breaker panel. Replace bulb with warm, soapy water. To clean the oven floor, gently lift the bake element. To... replace the cover: Line up tabs of lens in electric shock or burn. On some models) Be sure to do so may result in front of tabs on some models) Do not clean the bake...
... elements are heated. Oven Heating Elements (on some models) Do not clean the broil element. Oven Heating Elements (on housing and rotate clockwise to the range at the main fuse or circuit breaker panel. Replace bulb with warm, soapy water. To clean the oven floor, gently lift the bake element. To... replace the cover: Line up tabs of lens in electric shock or burn. On some models) Be sure to do so may result in front of tabs on some models) Do not clean the bake...
Use and Care Manual
Page 44
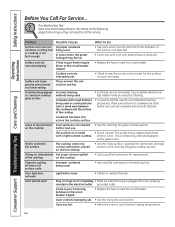
... scratches will disappear as a result of the cooktop. • To avoid scratches, use . on and hot. Hot surface on range is not completely • Make sure electrical plug is obtained. Oven will not maintain a rolling boil or cooking is set . • See the Using the oven section....cookware being used . Oven light does not work Plug on a model • This is temporary and will become less visible in the electrical outlet. when it is loose. • Tighten or replace the bulb. Frequent cycling off and on of the cooktop on cooktop glass...
... scratches will disappear as a result of the cooktop. • To avoid scratches, use . on and hot. Hot surface on range is not completely • Make sure electrical plug is obtained. Oven will not maintain a rolling boil or cooking is set . • See the Using the oven section....cookware being used . Oven light does not work Plug on a model • This is temporary and will become less visible in the electrical outlet. when it is loose. • Tighten or replace the bulb. Frequent cycling off and on of the cooktop on cooktop glass...

Use and Care Manual
Page 45
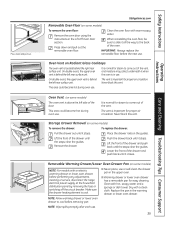
...needs adjustment . Oven controls improperly set . Improper rack position being used . See the Storage Drawer Removal instructions in the lower back of the range section. • Check to make sure drawer is properly seated if removed. Power cord may be obstructing drawer in the Care and cleaning of... drawer support is removable, it sometimes gets out of improper size being used . To straighten the door, push down on top of the range section. The probe is on the high corner. 45 Oven thermostat needs adjustment. • See the Adjust the oven thermostat-Do it yourself...
...needs adjustment . Oven controls improperly set . Improper rack position being used . See the Storage Drawer Removal instructions in the lower back of the range section. • Check to make sure drawer is properly seated if removed. Power cord may be obstructing drawer in the Care and cleaning of... drawer support is removable, it sometimes gets out of improper size being used . To straighten the door, push down on top of the range section. The probe is on the high corner. 45 Oven thermostat needs adjustment. • See the Adjust the oven thermostat-Do it yourself...

