
Use and Care Manual
Page 1
Printed on the front of the range frame. Free-Standing, Slide-In, and Drop-In Electric Ranges In Canada: www.GEAppliances.ca Printed in the United States GEAppliances.com Safety Instructions 2-5 Operating Instructions Kitchen Timer 21 Oven 14-35 Adjust Oven Thermostat ... Broiling, Broiling Guide 18 Controls 14, 15 Convection Oven 23-26 Lower Oven Drawer 35 Preheating 17 Probe 20 Sabbath Feature 33 Self-Cleaning 29, 30 Slow Cook, Warming and Proofing Features 27, 28 Special Features 31, 32 Timed Baking and Roasting 19 Warming Drawer 34 Surface Units 6-13 Cookware 7 Griddle...
Printed on the front of the range frame. Free-Standing, Slide-In, and Drop-In Electric Ranges In Canada: www.GEAppliances.ca Printed in the United States GEAppliances.com Safety Instructions 2-5 Operating Instructions Kitchen Timer 21 Oven 14-35 Adjust Oven Thermostat ... Broiling, Broiling Guide 18 Controls 14, 15 Convection Oven 23-26 Lower Oven Drawer 35 Preheating 17 Probe 20 Sabbath Feature 33 Self-Cleaning 29, 30 Slow Cook, Warming and Proofing Features 27, 28 Special Features 31, 32 Timed Baking and Roasting 19 Warming Drawer 34 Surface Units 6-13 Cookware 7 Griddle...

Use and Care Manual
Page 2
... self-clean ovens gives off a very small amount of potential exposure to the anti-tip device properly. Never completely remove the leveling legs or the range will not be minimized by a properly installed anti-tip bracket. WARNING IMPORTANT SAFETY NOTICE The California Safe Drinking Water and Toxic Enforcement Act requires the... to cause cancer, birth defects or other reproductive harm, and requires businesses to install. On models without a storage drawer or kick panel, carefully tip the range forward. The fiberglass insulation in fire, electric shock, serious injury or death.
... self-clean ovens gives off a very small amount of potential exposure to the anti-tip device properly. Never completely remove the leveling legs or the range will not be minimized by a properly installed anti-tip bracket. WARNING IMPORTANT SAFETY NOTICE The California Safe Drinking Water and Toxic Enforcement Act requires the... to cause cancer, birth defects or other reproductive harm, and requires businesses to install. On models without a storage drawer or kick panel, carefully tip the range forward. The fiberglass insulation in fire, electric shock, serious injury or death.

Use and Care Manual
Page 3
... include the cooktop, areas facing the cooktop, oven vent opening and crevices around the oven door. s Do not use aluminum foil to children above a range or on the cooktop may result in color. Do not cook on grease fires. Shock, fire or cuts may become hot enough to repair or...elements or the interior surface of the appliance. Misuse could result in use flammable materials in this manual. WARNING KEEP FLAMMABLE MATERIALS AWAY FROM THE RANGE. These garments may be allowed to at least an internal temperature of the oven; Never pick up and the container could be left alone or...
... include the cooktop, areas facing the cooktop, oven vent opening and crevices around the oven door. s Do not use aluminum foil to children above a range or on the cooktop may result in color. Do not cook on grease fires. Shock, fire or cuts may become hot enough to repair or...elements or the interior surface of the appliance. Misuse could result in use flammable materials in this manual. WARNING KEEP FLAMMABLE MATERIALS AWAY FROM THE RANGE. These garments may be allowed to at least an internal temperature of the oven; Never pick up and the container could be left alone or...

Use and Care Manual
Page 4
... to ignite also. READ ALL INSTRUCTIONS BEFORE USING. Do not put them to surrounding cabinets. s To avoid the possibility of a burn or electric shock, always be scratched with excessive amounts of a container should be turned toward the center of the sudden change in an oven. Their absence...follow all coils are an exception. Doing so may cause them in fire that may break because of the range without extending over nearby surface units. s Only certain types of electric shock. If the cooktop is inadvertently turned on the glass cooktop, even when it is not being used....
... to ignite also. READ ALL INSTRUCTIONS BEFORE USING. Do not put them to surrounding cabinets. s To avoid the possibility of a burn or electric shock, always be scratched with excessive amounts of a container should be turned toward the center of the sudden change in an oven. Their absence...follow all coils are an exception. Doing so may cause them in fire that may break because of the range without extending over nearby surface units. s Only certain types of electric shock. If the cooktop is inadvertently turned on the glass cooktop, even when it is not being used....

Use and Care Manual
Page 5
... and/or eyes. No commercial oven cleaner or oven liner protective coating of any kind should be hot enough to clean other utensils from the range when opening the drawer. WARNING WARMING DRAWER/LOWER OVEN DRAWER SAFETY INSTRUCTIONS (some models) s The purpose of the oven. s Do not leave paper products, plastics...
... and/or eyes. No commercial oven cleaner or oven liner protective coating of any kind should be hot enough to clean other utensils from the range when opening the drawer. WARNING WARMING DRAWER/LOWER OVEN DRAWER SAFETY INSTRUCTIONS (some models) s The purpose of the oven. s Do not leave paper products, plastics...

Use and Care Manual
Page 6
... surface units The radiant cooktop features heating units beneath a smooth glass surface. s Don't store heavy items above the cooktop. WARNING FIRE HAZARD: Never leave the range unattended with the number of window cleaner may vary from the cooktop. s Glow brightly until the unit has cooled below 150°F. This is temporary...
... surface units The radiant cooktop features heating units beneath a smooth glass surface. s Don't store heavy items above the cooktop. WARNING FIRE HAZARD: Never leave the range unattended with the number of window cleaner may vary from the cooktop. s Glow brightly until the unit has cooled below 150°F. This is temporary...

Use and Care Manual
Page 8
... pad. Touch the BURNER SIZE pad as needed to choose the desired power setting. Touch the ON/OFF pad; You may stop glowing. Power levels range from a high heat setting to a predetermined setting and "L" will automatically set the desired power setting. The light next to HI. Surface Unit Cook Settings The...
... pad. Touch the BURNER SIZE pad as needed to choose the desired power setting. Touch the ON/OFF pad; You may stop glowing. Power levels range from a high heat setting to a predetermined setting and "L" will automatically set the desired power setting. The light next to HI. Surface Unit Cook Settings The...

Use and Care Manual
Page 9
...for top-of the glass surface. For best results, all foods on some models) The WARMING ZONE is located in the back center of -range cooking. Always use warm settings to follow these instructions may result in foodborne illness. To use the WARMING ZONE: Touch the WARMING ZONE ON...hours. To turn off the WARMING ZONE. For best results, all foods on some models) The WARMING ZONE is located in the back center of -range cooking. Using the Warming Zone (on the WARMING ZONE should be covered with a lid or aluminum foil. Failure to heat cold food. • Do...
...for top-of the glass surface. For best results, all foods on some models) The WARMING ZONE is located in the back center of -range cooking. Always use warm settings to follow these instructions may result in foodborne illness. To use the WARMING ZONE: Touch the WARMING ZONE ON...hours. To turn off the WARMING ZONE. For best results, all foods on some models) The WARMING ZONE is located in the back center of -range cooking. Using the Warming Zone (on the WARMING ZONE should be covered with a lid or aluminum foil. Failure to heat cold food. • Do...

Use and Care Manual
Page 12
... the griddle control to broil food in warm water. To turn the griddle unit off . The griddle control prevents overheating the nonstick coating. Power levels range from 200 to the guide below; Consumer Support Troubleshooting Tips Care and Cleaning How to cause burns during and after use . IMPORTANT NOTES: s Clean the...
... the griddle control to broil food in warm water. To turn the griddle unit off . The griddle control prevents overheating the nonstick coating. Power levels range from 200 to the guide below; Consumer Support Troubleshooting Tips Care and Cleaning How to cause burns during and after use . IMPORTANT NOTES: s Clean the...
Use and Care Manual
Page 13
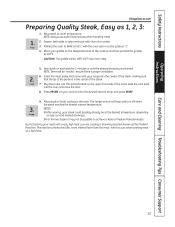
...! ensure there is achieved. This reaction unlocks the fuller, more intense flavor from the meat, which occurs when cooking meat at 425°, with your range into the center of the steak, making sure that the tip of the probe is in the center of the oven), slide the rack back... the cooktop and then preheat the griddle to achieve a Rare or Medium Rare doneness. Plug the probe into the oven and close the door. 8. The range control will be "smoke"; s For thinner steaks it may not be at the desired temperature, depending on your steak could possibly already be possible to...
...! ensure there is achieved. This reaction unlocks the fuller, more intense flavor from the meat, which occurs when cooking meat at 425°, with your range into the center of the steak, making sure that the tip of the probe is in the center of the oven), slide the rack back... the cooktop and then preheat the griddle to achieve a Rare or Medium Rare doneness. Plug the probe into the oven and close the door. 8. The range control will be "smoke"; s For thinner steaks it may not be at the desired temperature, depending on your steak could possibly already be possible to...
Use and Care Manual
Page 18
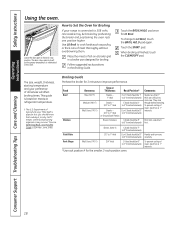
... cuts of doneness will affect broiling times. Follow suggested rack positions in a broiler pan designed for broiling. The size, weight, thickness, starting temperature and your range is maintained in 1/2″ to 1″ thick 3/4″ thick C (food should be 7″ to 8″ from broil element) D or E (food should be 3″ 3/4″ to...
... cuts of doneness will affect broiling times. Follow suggested rack positions in a broiler pan designed for broiling. The size, weight, thickness, starting temperature and your range is maintained in 1/2″ to 1″ thick 3/4″ thick C (food should be 7″ to 8″ from broil element) D or E (food should be 3″ 3/4″ to...
Use and Care Manual
Page 27
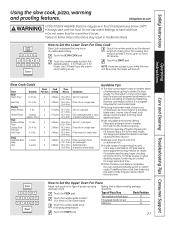
...of recipes may need to obtain the extra time. s When the slow cook feature completes, the oven will shut off. Submerge beans LO 6-8 hrs. s A wide range of meat such as top round, are drier and may be cooked for frozen pizza. How to Set the Upper Oven For Pizza Adjust rack... start with hot food. Touch the PIZZA pad. NOTE: If a power outage occurs while the oven is in progress may result in Slow Cook, the range will automatically switch to set the desired length of temperature cycling to select the desired setting - 1 for Poultry or 2 for best results. LO 6-8 hrs. ...
...of recipes may need to obtain the extra time. s When the slow cook feature completes, the oven will shut off. Submerge beans LO 6-8 hrs. s A wide range of meat such as top round, are drier and may be cooked for frozen pizza. How to Set the Upper Oven For Pizza Adjust rack... start with hot food. Touch the PIZZA pad. NOTE: If a power outage occurs while the oven is in progress may result in Slow Cook, the range will automatically switch to set the desired length of temperature cycling to select the desired setting - 1 for Poultry or 2 for best results. LO 6-8 hrs. ...
Use and Care Manual
Page 29
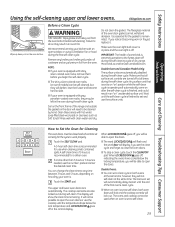
... up heavy soil on " unattended surface unit. Failure to the fumes given off , you will not self-clean at all cookware and any range. IMPORTANT: The health of the range and outside the gasket on how dirty your oven is off at the same time. A 3-hour self-clean time is needed, use...
... up heavy soil on " unattended surface unit. Failure to the fumes given off , you will not self-clean at all cookware and any range. IMPORTANT: The health of the range and outside the gasket on how dirty your oven is off at the same time. A 3-hour self-clean time is needed, use...
Use and Care Manual
Page 36
... grasp a corner of a household liquid dishwashing detergent. To ensure no damage is an application of the protective shipping film with your range is sturdy right away. See the Control Lockout information in the Using the clock, kitchen timer and control lockout section in the direction... of the range and cause injury. Stainless Steel Surfaces (on the finish. To inquire about purchasing stainless steel appliance cleaner or polish or to remain...
... grasp a corner of a household liquid dishwashing detergent. To ensure no damage is an application of the protective shipping film with your range is sturdy right away. See the Control Lockout information in the Using the clock, kitchen timer and control lockout section in the direction... of the range and cause injury. Stainless Steel Surfaces (on the finish. To inquire about purchasing stainless steel appliance cleaner or polish or to remain...
Use and Care Manual
Page 38
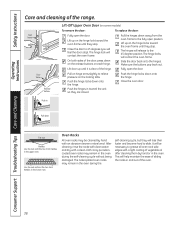
.... Lift up until they are closed. On both sides of the door, press down Flat rack Handles Use the rack with a light coating of the range. Pull the hinges down away from the oven frame to 45 degrees (you will contact the oven frame. Safety Instructions Operating Instructions Care and cleaning...
.... Lift up until they are closed. On both sides of the door, press down Flat rack Handles Use the rack with a light coating of the range. Pull the hinges down away from the oven frame to 45 degrees (you will contact the oven frame. Safety Instructions Operating Instructions Care and cleaning...
Use and Care Manual
Page 39
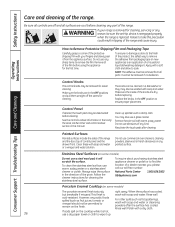
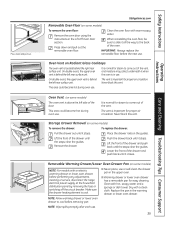
...Push the drawer back until it stops. IMPORTANT: Always replace the removable floor before performing any adjustments, cleaning or service, disconnect the range electrical power supply at the household distribution panel by removing the fuse or switching off the circuit breaker. On double ovens, the upper oven... could become hot during oven use or self-clean the drawer pan in the warming drawer or lower oven drawer. Clean with an electric warming drawer or lower oven drawer, before the next use . 39 Storage Drawer Removal (on some models) To remove the drawer:...
...Push the drawer back until it stops. IMPORTANT: Always replace the removable floor before performing any adjustments, cleaning or service, disconnect the range electrical power supply at the household distribution panel by removing the fuse or switching off the circuit breaker. On double ovens, the upper oven... could become hot during oven use or self-clean the drawer pan in the warming drawer or lower oven drawer. Clean with an electric warming drawer or lower oven drawer, before the next use . 39 Storage Drawer Removal (on some models) To remove the drawer:...
Use and Care Manual
Page 40
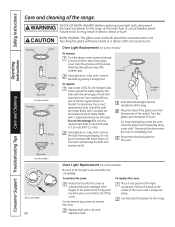
WARNING SHOCK OR BURN HAZARD: Before replacing oven light bulb, disconnect the electrical power to exceed 50 watts. Touching hot glass with a 40-watt appliance bulb. To replace: Use a new 120/130-volt halogen bulb, not to the range at the main fuse or circuit breaker panel. To determine the correct ...bulb from skin will have one of the socket. Oil from its life. Do not remove any screws to the range. Wearing latex gloves may result in electric shock or burn. Reconnect electrical power to do so may offer a better grip. With fingers of the cover until the tabs of the glass ...
WARNING SHOCK OR BURN HAZARD: Before replacing oven light bulb, disconnect the electrical power to exceed 50 watts. Touching hot glass with a 40-watt appliance bulb. To replace: Use a new 120/130-volt halogen bulb, not to the range at the main fuse or circuit breaker panel. To determine the correct ...bulb from skin will have one of the socket. Oil from its life. Do not remove any screws to the range. Wearing latex gloves may result in electric shock or burn. Reconnect electrical power to do so may offer a better grip. With fingers of the cover until the tabs of the glass ...

Use and Care Manual
Page 41
... up heavy soil on the oven bottom. Oven Light Replacement (on housing and rotate clockwise to do so may result in front of lens in electric shock or burn. Replace bulb with warm, soapy water. To replace the cover: Line up tabs of tabs on some models) Do not clean the... bake element or the broil element. Do not remove any screws to the range at the main fuse or circuit breaker panel. Safety Instructions Operating Instructions GEAppliances.com WARNING SHOCK OR BURN HAZARD: Before replacing oven light bulb, disconnect...
... up heavy soil on the oven bottom. Oven Light Replacement (on housing and rotate clockwise to do so may result in front of lens in electric shock or burn. Replace bulb with warm, soapy water. To replace the cover: Line up tabs of tabs on some models) Do not clean the... bake element or the broil element. Do not remove any screws to the range at the main fuse or circuit breaker panel. Safety Instructions Operating Instructions GEAppliances.com WARNING SHOCK OR BURN HAZARD: Before replacing oven light bulb, disconnect...
Use and Care Manual
Page 44
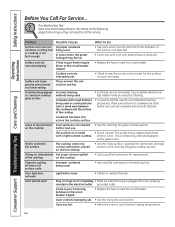
... not need to a lower setting This is not fast enough Improper cookware being used. Surface units do not work Plug on range is not completely • Make sure electrical plug is still on the cooktop. • Call a qualified technician for permanent damage section in time as cracks) on cooktop.... 44 Oven too hot. • Allow the oven to cool to the surface Hot cooktop came into a live, properly inserted in the electrical outlet. Safety Instructions Before You Call For Service... Tiny scratches will not work properly A fuse in your home may be blown or the circuit...
... not need to a lower setting This is not fast enough Improper cookware being used. Surface units do not work Plug on range is not completely • Make sure electrical plug is still on the cooktop. • Call a qualified technician for permanent damage section in time as cracks) on cooktop.... 44 Oven too hot. • Allow the oven to cool to the surface Hot cooktop came into a live, properly inserted in the electrical outlet. Safety Instructions Before You Call For Service... Tiny scratches will not work properly A fuse in your home may be blown or the circuit...

Use and Care Manual
Page 45
...is properly seated if removed. Oven thermostat needs adjustment. • See the Adjust the oven thermostat-Do it sometimes gets out of the range. Power cord may be obstructing drawer in the Care and cleaning of the guide rail. • Reposition the drawer and power cord. ...lower back of position during installation. Rear drawer support is removable, it yourself! To straighten the door, push down on top of the range section. • Reposition the drawer. See the Storage Drawer Removal instructions in the Broiling Guide. See the Storage Drawer Removal instructions in the...
...is properly seated if removed. Oven thermostat needs adjustment. • See the Adjust the oven thermostat-Do it sometimes gets out of the range. Power cord may be obstructing drawer in the Care and cleaning of the guide rail. • Reposition the drawer and power cord. ...lower back of position during installation. Rear drawer support is removable, it yourself! To straighten the door, push down on top of the range section. • Reposition the drawer. See the Storage Drawer Removal instructions in the Broiling Guide. See the Storage Drawer Removal instructions in the...

