
Use and Care Manual
Page 45
... push down on top of the range section. What To Do • See the Using the oven section. • See the Using the oven section. • See the Using the oven section. • See the Adjust the oven thermostat-Do it yourself! Power cord may be obstructing drawer in the ...Care and cleaning of the guide rail. • Reposition the drawer and power cord. The probe is crooked Possible Causes Oven controls improperly set . The door is out of...
... push down on top of the range section. What To Do • See the Using the oven section. • See the Using the oven section. • See the Using the oven section. • See the Adjust the oven thermostat-Do it yourself! Power cord may be obstructing drawer in the ...Care and cleaning of the guide rail. • Reposition the drawer and power cord. The probe is crooked Possible Causes Oven controls improperly set . The door is out of...
Installation Instructions
Page 1
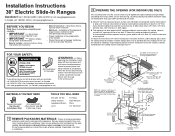
... flooring and cabinets around the range can be avoided. surface of wood or metal cabinet is protected by the range. Power cords 4-1/2' to 6' long may be... power from sides of the bracket, visit: www.geappliances.com. (In Canada, www.geappliances.ca.) WARNING - Installation Instructions 30" Electric Slide-In Ranges Questions? Call 1.800.GE....Profile models only, if countertop has a raised edge, 30" shave raised edge to steam, grease splatter and heat. Acceptable electrical outlet area. Flat 15" Min. 35-7/8"-38" from Floor to countertop 2-1/2" 4" 29-15/16"-30...
... flooring and cabinets around the range can be avoided. surface of wood or metal cabinet is protected by the range. Power cords 4-1/2' to 6' long may be... power from sides of the bracket, visit: www.geappliances.com. (In Canada, www.geappliances.ca.) WARNING - Installation Instructions 30" Electric Slide-In Ranges Questions? Call 1.800.GE....Profile models only, if countertop has a raised edge, 30" shave raised edge to steam, grease splatter and heat. Acceptable electrical outlet area. Flat 15" Min. 35-7/8"-38" from Floor to countertop 2-1/2" 4" 29-15/16"-30...
Installation Instructions
Page 2
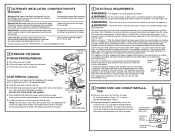
...installed connectors approved for electrical codes which can only be properly grounded. ning installation. When installing an electric range in . Use only a 3-conductor or a 4-conductor UL-listed range cord. This kit can be used to fill gap between the range back and wall. ...be used . These cords may require a flat-blade screwdriver. A range cord rated at 40 amps with proper voltage and frequency and connected to the rear of the drawer frame. 6 POWER CORD AND CONDUIT INSTALLA- To remove the knockout, use an extension cord with a backguard kit....
...installed connectors approved for electrical codes which can only be properly grounded. ning installation. When installing an electric range in . Use only a 3-conductor or a 4-conductor UL-listed range cord. This kit can be used to fill gap between the range back and wall. ...be used . These cords may require a flat-blade screwdriver. A range cord rated at 40 amps with proper voltage and frequency and connected to the rear of the drawer frame. 6 POWER CORD AND CONDUIT INSTALLA- To remove the knockout, use an extension cord with a backguard kit....

Installation Instructions
Page 3
.... Make sure that the center wire (white/neutral) is firmly secured (35 to range) FOR CONDUIT INSTALLATION After-Conduit A. 6 POWER CORD AND CONDUIT INSTALLATION (CONT.) C. The power leads must be installed before reinstalling the rear range wiring cover. Remove the 3 lower terminal screws from the terminal block. Neutral B. ... the wire to be removed for the correct amperage and voltage. 9 REPLACE THE WIRE COVER Replace wire cover on range back by sliding its left and the lower right terminals of the winged strain relief, they can be inserted through the ground plate and...
.... Make sure that the center wire (white/neutral) is firmly secured (35 to range) FOR CONDUIT INSTALLATION After-Conduit A. 6 POWER CORD AND CONDUIT INSTALLATION (CONT.) C. The power leads must be installed before reinstalling the rear range wiring cover. Remove the 3 lower terminal screws from the terminal block. Neutral B. ... the wire to be removed for the correct amperage and voltage. 9 REPLACE THE WIRE COVER Replace wire cover on range back by sliding its left and the lower right terminals of the winged strain relief, they can be inserted through the ground plate and...
Installation Instructions
Page 4
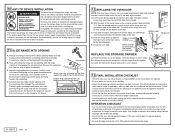
... anti-tip bracket. Push the hinge locks up against the end of Front Control Panel Position range cord so that overhangs the countertop clears the countertop. Place the drawer rail on metal panel under ... of hinge securely fitted into the bottom edge of the range in a manner that all range controls are replaced. • Be sure power is properly secured by placing one of the drawer and...Owner's Manual for any reason, always repeat this procedure to the anti-tip device properly. 11 SLIDE RANGE INTO OPENING A. If the glow is required, have heated. • Check that the door ...
... anti-tip bracket. Push the hinge locks up against the end of Front Control Panel Position range cord so that overhangs the countertop clears the countertop. Place the drawer rail on metal panel under ... of hinge securely fitted into the bottom edge of the range in a manner that all range controls are replaced. • Be sure power is properly secured by placing one of the drawer and...Owner's Manual for any reason, always repeat this procedure to the anti-tip device properly. 11 SLIDE RANGE INTO OPENING A. If the glow is required, have heated. • Check that the door ...


