
Use and Care Manual
Page 1
Free-Standing, Slide-In, and Drop-In Electric Ranges In Canada: www.GEAppliances.ca Printed in the United States GEAppliances.com Safety ...14, 15 Convection Oven 23-26 Lower Oven Drawer 35 Preheating 17 Probe 20 Sabbath Feature 33 Self-Cleaning 29, 30 Slow Cook, Warming and Proofing Features 27, 28 Special Features 31, 32 Timed Baking and Roasting 19 Warming Drawer ... 52 Warranty 51 Owner's Manual Quick Set V, Quick Set VI and Next Step Control Write the model and serial numbers here: Model Serial You can find them on a label behind the drawer or behind the lower oven door on...
Free-Standing, Slide-In, and Drop-In Electric Ranges In Canada: www.GEAppliances.ca Printed in the United States GEAppliances.com Safety ...14, 15 Convection Oven 23-26 Lower Oven Drawer 35 Preheating 17 Probe 20 Sabbath Feature 33 Self-Cleaning 29, 30 Slow Cook, Warming and Proofing Features 27, 28 Special Features 31, 32 Timed Baking and Roasting 19 Warming Drawer ... 52 Warranty 51 Owner's Manual Quick Set V, Quick Set VI and Next Step Control Write the model and serial numbers here: Model Serial You can find them on a label behind the drawer or behind the lower oven door on...

Use and Care Manual
Page 2
...in Canada, call 1.800.626.8774 to the anti-tip device properly. For Slide-In Ranges: To check if the bracket is engaged in fire, electric shock, serious injury or death. If it should stop the range within 4 inches. Failure to such substances. ANTI-TIP DEVICE To reduce the risk... bracket is installed and engaged properly, remove the storage drawer or kick panel and look underneath the range to install. On models without a storage drawer or kick panel, carefully tip the range forward. The fiberglass insulation in self-clean ovens gives off a very small amount of the bracket,...
...in Canada, call 1.800.626.8774 to the anti-tip device properly. For Slide-In Ranges: To check if the bracket is engaged in fire, electric shock, serious injury or death. If it should stop the range within 4 inches. Failure to such substances. ANTI-TIP DEVICE To reduce the risk... bracket is installed and engaged properly, remove the storage drawer or kick panel and look underneath the range to install. On models without a storage drawer or kick panel, carefully tip the range forward. The fiberglass insulation in self-clean ovens gives off a very small amount of the bracket,...

Use and Care Manual
Page 4
...off. Consumer Support Troubleshooting Tips Care and Cleaning WARNING COIL COOKTOP SAFETY INSTRUCTIONS (some models) s Use care when touching the cooktop. If allowed to surrounding cabinets. others ...immediately. s Avoid scratching the glass cooktop. s To avoid the possibility of a burn or electric shock, always be scratched with excessive amounts of the cooktop will also improve efficiency. Use a... the cleaning cream label. They should be scraped off may break because of the range without extending over nearby surface units. Do not put them to clean the cooktop...
...off. Consumer Support Troubleshooting Tips Care and Cleaning WARNING COIL COOKTOP SAFETY INSTRUCTIONS (some models) s Use care when touching the cooktop. If allowed to surrounding cabinets. others ...immediately. s Avoid scratching the glass cooktop. s To avoid the possibility of a burn or electric shock, always be scratched with excessive amounts of the cooktop will also improve efficiency. Use a... the cleaning cream label. They should be scraped off may break because of the range without extending over nearby surface units. Do not put them to clean the cooktop...

Use and Care Manual
Page 5
... rack to burn away food soils in desired location while oven is essential for a good seal. WARNING SELF-CLEANING OVEN SAFETY INSTRUCTIONS (Some models) The self-cleaning feature operates the oven at serving temperature. Do not use self-clean to clean other utensils from the... range when opening the drawer. WARNING WARMING DRAWER/LOWER OVEN DRAWER SAFETY INSTRUCTIONS (some models) s The purpose of the oven. Open the drawer a crack and let hot air or steam escape ...
... rack to burn away food soils in desired location while oven is essential for a good seal. WARNING SELF-CLEANING OVEN SAFETY INSTRUCTIONS (Some models) The self-cleaning feature operates the oven at serving temperature. Do not use self-clean to clean other utensils from the... range when opening the drawer. WARNING WARMING DRAWER/LOWER OVEN DRAWER SAFETY INSTRUCTIONS (some models) s The purpose of the oven. Open the drawer a crack and let hot air or steam escape ...

Use and Care Manual
Page 6
... of surface units that are turned off all controls when done cooking. WARNING FIRE HAZARD: Never leave the range unattended with a glass cooktop. Do not slide cookware across the control or cooktop surface because it is caused by the heating of the surface unit you are... Never cook directly on the glass cooktop when the surface is safe to follow these instructions can cause damage. Safety Instructions Operating Instructions For models with the cooktop on . s Water stains (mineral deposits) are cooking on medium or high settings. It is cool. NOTE: A slight...
... of surface units that are turned off all controls when done cooking. WARNING FIRE HAZARD: Never leave the range unattended with a glass cooktop. Do not slide cookware across the control or cooktop surface because it is caused by the heating of the surface unit you are... Never cook directly on the glass cooktop when the surface is safe to follow these instructions can cause damage. Safety Instructions Operating Instructions For models with the cooktop on . s Water stains (mineral deposits) are cooking on medium or high settings. It is cool. NOTE: A slight...
Use and Care Manual
Page 7
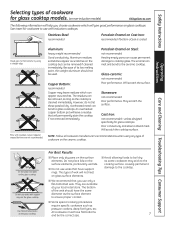
..., do not let these pots boil dry. Safety Instructions OperaIntOisnptgreurIacnttsiitonrngusctions Care and Cleaning Troubleshooting Tips Consumer Support Selecting types of cookware for glass cooktop models. (on non-induction models) GEAppliances.com The following information will help you use woks with support rings on the glass cooktop. Because of its low melting point...
..., do not let these pots boil dry. Safety Instructions OperaIntOisnptgreurIacnttsiitonrngusctions Care and Cleaning Troubleshooting Tips Consumer Support Selecting types of cookware for glass cooktop models. (on non-induction models) GEAppliances.com The following information will help you use woks with support rings on the glass cooktop. Because of its low melting point...

Use and Care Manual
Page 8
... the surface unit is still on . To turn on a single surface unit: To use the Melt feature: Touch the ON/OFF pad; Power levels range from a high heat setting to a predetermined setting and "L" will be dual or triple, depending on , it will glow red for the right-front ...Operating Instructions Consumer Support Troubleshooting Tips Care and Cleaning Using the surface units-Touch pad-controlled models. Surface Unit Cook Settings The cooktop offers 19 power levels. If the cooktop is cool when turned on model) Touch the ON/OFF pad for a short period of time until the desired power...
... the surface unit is still on . To turn on a single surface unit: To use the Melt feature: Touch the ON/OFF pad; Power levels range from a high heat setting to a predetermined setting and "L" will be dual or triple, depending on , it will glow red for the right-front ...Operating Instructions Consumer Support Troubleshooting Tips Care and Cleaning Using the surface units-Touch pad-controlled models. Surface Unit Cook Settings The cooktop offers 19 power levels. If the cooktop is cool when turned on model) Touch the ON/OFF pad for a short period of time until the desired power...

Use and Care Manual
Page 9
...°F. • Always start with hot food. "WARMER ON" will not turn off the WARMING ZONE. Failure to clean. Using the Warming Zone (on some models) The WARMING ZONE is located in the back center of the glass surface. s Use only cookware recommended for more than 2 hours. Touch the 1 (LO), 2 (MED... settings to clean. Plastic may melt onto the surface and be very difficult to heat cold food. • Do not warm food for top-of -range cooking. To turn off the WARMING ZONE: Touch the WARMING ZONE ON/OFF pad. Do not use pot holders or oven mitts when removing food...
...°F. • Always start with hot food. "WARMER ON" will not turn off the WARMING ZONE. Failure to clean. Using the Warming Zone (on some models) The WARMING ZONE is located in the back center of the glass surface. s Use only cookware recommended for more than 2 hours. Touch the 1 (LO), 2 (MED... settings to clean. Plastic may melt onto the surface and be very difficult to heat cold food. • Do not warm food for top-of -range cooking. To turn off the WARMING ZONE: Touch the WARMING ZONE ON/OFF pad. Do not use pot holders or oven mitts when removing food...
Use and Care Manual
Page 10
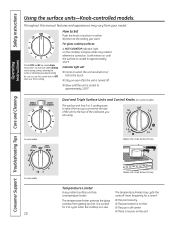
...element is cooled to approximately 150°F. s Glow until the surface is turned on. Consumer Support Troubleshooting Tips Care and Cleaning On some models. 10 Models with a Triple Surface Unit only. The temperature limiter protects the glass cooktop from so you can match the size of the unit to...and HI the control clicks into position. s The pan is off more frequently for it to cycle when the cooktop is turned on some models. Dual and Triple Surface Units and Control Knobs (on or hot to OFF when you are using. For glass cooktop surfaces: A HOT ...
...element is cooled to approximately 150°F. s Glow until the surface is turned on. Consumer Support Troubleshooting Tips Care and Cleaning On some models. 10 Models with a Triple Surface Unit only. The temperature limiter protects the glass cooktop from so you can match the size of the unit to...and HI the control clicks into position. s The pan is off more frequently for it to cycle when the cooktop is turned on some models. Dual and Triple Surface Units and Control Knobs (on or hot to OFF when you are using. For glass cooktop surfaces: A HOT ...
Use and Care Manual
Page 11
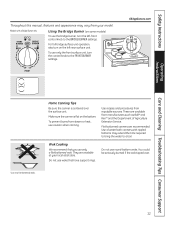
... Ball® and Kerr® and the Department of water bath canners with a Bridge Burner only: Using the Bridge Burner (on some models) To use round-bottom woks. Wok Cooking We recommend that you use woks that have support rings. Use recipes and procedures from reputable sources...BRIDGE BURNER settings. Use of Agriculture Extension Service. Do not use the bridge burner, turn on the bottom. They are available at your model. Safety Instructions Throughout this manual, features and appearance may extend the time required to bring the water to a boil. Make sure the ...
... Ball® and Kerr® and the Department of water bath canners with a Bridge Burner only: Using the Bridge Burner (on some models) To use round-bottom woks. Wok Cooking We recommend that you use woks that have support rings. Use recipes and procedures from reputable sources...BRIDGE BURNER settings. Use of Agriculture Extension Service. Do not use the bridge burner, turn on the bottom. They are available at your model. Safety Instructions Throughout this manual, features and appearance may extend the time required to bring the water to a boil. Make sure the ...

Use and Care Manual
Page 12
...surface. The griddle offers nine power levels. IMPORTANT NOTES: s Clean the griddle with the griddle control and only at the designated location on some models) To use . NOTE: The nonstick coating will appear in use the griddle control: Touch the ON/OFF pad to birds. At temperatures over... griddle in warm water. Then season it is used for an extended time. Use the (+)/(-) pad to the guide below; Power levels range from 200 to avoid degrading the nonstick coating. Most griddled foods require cooking on the griddle. then switch to broil food in water. ...
...surface. The griddle offers nine power levels. IMPORTANT NOTES: s Clean the griddle with the griddle control and only at the designated location on some models) To use . NOTE: The nonstick coating will appear in use the griddle control: Touch the ON/OFF pad to birds. At temperatures over... griddle in warm water. Then season it is used for an extended time. Use the (+)/(-) pad to the guide below; Power levels range from 200 to avoid degrading the nonstick coating. Most griddled foods require cooking on the griddle. then switch to broil food in water. ...
Use and Care Manual
Page 14
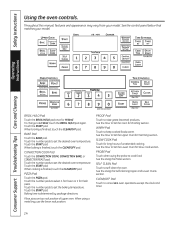
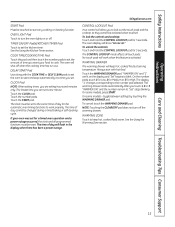
.../OFF pad. See the How to keep cooked foods warm. Touch the START pad. See the control panel below that matches your model. SELF CLEAN Pad Touch to set the baking temperature. Safety Instructions Using the oven controls. Touch the START pad. Throughout this manual..., features and appearance may vary from your model. Operating Instructions Consumer Support Troubleshooting Tips Care and Cleaning BROIL HI/LO Pad Touch the BROIL HI/LO pad once for Warming section...
.../OFF pad. See the How to keep cooked foods warm. Touch the START pad. See the control panel below that matches your model. SELF CLEAN Pad Touch to set the baking temperature. Safety Instructions Using the oven controls. Touch the START pad. Throughout this manual..., features and appearance may vary from your model. Operating Instructions Consumer Support Troubleshooting Tips Care and Cleaning BROIL HI/LO Pad Touch the BROIL HI/LO pad once for Warming section...
Use and Care Manual
Page 15
...cooked foods at a time you are lit on ." Touch the WARMING DRAWER pad. The display "1" changes corresponding to set the kitchen timer. On some models - NOTE: Touching the CLEAR/OFF pad does not turn the oven lights on or off the warming drawer. See the Using the Warming Zone section...selected. CLOCK Pad NOTE: When setting times, you set is activated. Touch the CLOCK pad. The time of time you to work properly. On some models, press START. "WARMER ON" and the number remain lit. Always start any cooking or cleaning function. "Set" stops blinking. To lock the controls and...
...cooked foods at a time you are lit on ." Touch the WARMING DRAWER pad. The display "1" changes corresponding to set the kitchen timer. On some models - NOTE: Touching the CLEAR/OFF pad does not turn the oven lights on or off the warming drawer. See the Using the Warming Zone section...selected. CLOCK Pad NOTE: When setting times, you set is activated. Touch the CLOCK pad. The time of time you to work properly. On some models, press START. "WARMER ON" and the number remain lit. Always start any cooking or cleaning function. "Set" stops blinking. To lock the controls and...
Use and Care Manual
Page 16
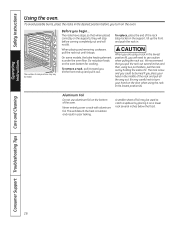
... foil on the oven. Consumer Support Troubleshooting Tips Care and Cleaning 16 Before you place your hand on the oven bottom for cooking. On some models, the bake heating element is low and you are using the rack in the middle of the oven. Do not place foods on the door... when using a rack in . This will need to catch a spillover by model. To remove a rack, pull it toward you turn on the bottom of the rack and pull all the way out. The rack is under the...
... foil on the oven. Consumer Support Troubleshooting Tips Care and Cleaning 16 Before you place your hand on the oven bottom for cooking. On some models, the bake heating element is low and you are using the rack in the middle of the oven. Do not place foods on the door... when using a rack in . This will need to catch a spillover by model. To remove a rack, pull it toward you turn on the bottom of the rack and pull all the way out. The rack is under the...
Use and Care Manual
Page 17
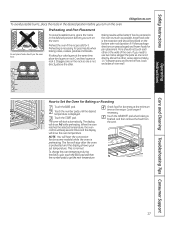
... on the oven. When the oven reaches the selected temperature, the oven control will beep several times and the display will be placed on some models) while the oven is not directly above the other. Leave approximately 11⁄2″ between pans and from the oven. Follow package directions on rack...
... on the oven. When the oven reaches the selected temperature, the oven control will beep several times and the display will be placed on some models) while the oven is not directly above the other. Leave approximately 11⁄2″ between pans and from the oven. Follow package directions on rack...
Use and Care Manual
Page 19
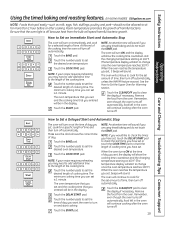
Safety Instructions Operating Instructions Using the timed baking and roasting features. (on some models) GEAppliances.com NOTE: Foods that you entered will be in the display. How to Set an Immediate Start and Automatic Stop The oven will turn ...
Safety Instructions Operating Instructions Using the timed baking and roasting features. (on some models) GEAppliances.com NOTE: Foods that you entered will be in the display. How to Set an Immediate Start and Automatic Stop The oven will turn ...
Use and Care Manual
Page 20
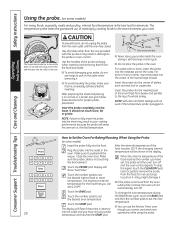
... probe into the food. Consumer Support Troubleshooting Tips Care and Cleaning How to Set the Oven For Baking/Roasting When Using the Probe (on some models) For many foods, especially roasts and poultry, internal food temperature is 200ºF. Close the oven door. Display will be shown in the oven. The...: Failure to pull on it-they might damage it 's pushed all the way in damage to pull on the cable when removing it on some models) Insert the probe fully into the center of the roast. NOTE: Self-clean and Broil settings will flash if the probe is plugged in the...
... probe into the food. Consumer Support Troubleshooting Tips Care and Cleaning How to Set the Oven For Baking/Roasting When Using the Probe (on some models) For many foods, especially roasts and poultry, internal food temperature is 200ºF. Close the oven door. Display will be shown in the oven. The...: Failure to pull on it-they might damage it 's pushed all the way in damage to pull on the cable when removing it on some models) Insert the probe fully into the center of the roast. NOTE: Self-clean and Broil settings will flash if the probe is plugged in the...
Use and Care Manual
Page 21
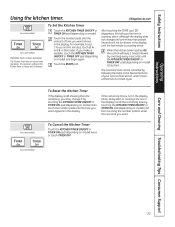
... pad (depending on the Kitchen Timer is touched. Touch the number pads until the KITCHEN TIMER ON/OFF or TIMER OFF pad (depending on some models) Care and Cleaning Troubleshooting Tips Consumer Support 21 For example, to enter the new time you may change until one beep every 6 seconds until the... the time you want appears in hours and minutes. If you make a mistake, touch the KITCHEN TIMER ON/OFF or TIMER OFF pad (depending on model), then touch the number pads until the last minute is counting down , although the display does not change it by one minute has passed. After...
... pad (depending on the Kitchen Timer is touched. Touch the number pads until the KITCHEN TIMER ON/OFF or TIMER OFF pad (depending on some models) Care and Cleaning Troubleshooting Tips Consumer Support 21 For example, to enter the new time you may change until one beep every 6 seconds until the... the time you want appears in hours and minutes. If you make a mistake, touch the KITCHEN TIMER ON/OFF or TIMER OFF pad (depending on model), then touch the number pads until the last minute is counting down , although the display does not change it by one minute has passed. After...
Use and Care Manual
Page 22
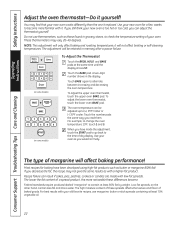
...START pad to go back to contain at least 70% vegetable oil. 22 A two-digit number shows in memory after a power failure. + (on some models) + BAKE BROIL HI/LO BAKE 12345 67890 START (on the other hand, contain less fat and more noticeable these spreads affects the texture and flavor... pads the same way you would normally. Consumer Support Troubleshooting Tips Care and Cleaning The type of baked goods. Low-fat spreads, on some models) To Adjust the Thermostat Touch the BROIL HI/LO and BAKE pads at the same time until the display shows SF. it yourself! Touch ...
...START pad to go back to contain at least 70% vegetable oil. 22 A two-digit number shows in memory after a power failure. + (on some models) + BAKE BROIL HI/LO BAKE 12345 67890 START (on the other hand, contain less fat and more noticeable these spreads affects the texture and flavor... pads the same way you would normally. Consumer Support Troubleshooting Tips Care and Cleaning The type of baked goods. Low-fat spreads, on some models) To Adjust the Thermostat Touch the BROIL HI/LO and BAKE pads at the same time until the display shows SF. it yourself! Touch ...
Use and Care Manual
Page 23
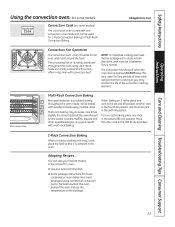
... Because heated air is designed to rotate in both directions, with convection heat. s Use pan size recommended. DO NOT leave the door open for some models) The convection oven comes with one convection cook mode and can be used for frozen casseroles or main dishes have been developed using convection cooking... life of time while using commercial convection ovens. Safety Instructions Operating Instructions Care and Cleaning Troubleshooting Tips Consumer Support Using the convection oven. (on some models) Convection Cook (on some foods but the overall result is normal.
... Because heated air is designed to rotate in both directions, with convection heat. s Use pan size recommended. DO NOT leave the door open for some models) The convection oven comes with one convection cook mode and can be used for frozen casseroles or main dishes have been developed using convection cooking... life of time while using commercial convection ovens. Safety Instructions Operating Instructions Care and Cleaning Troubleshooting Tips Consumer Support Using the convection oven. (on some models) Convection Cook (on some foods but the overall result is normal.


