
Use and Care Manual
Page 1
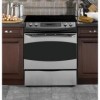
Free-Standing, Slide-In, and Drop-In Electric Ranges In Canada: www.GEAppliances.ca Printed in the United States GEAppliances.com Safety ...14, 15 Convection Oven 23-26 Lower Oven Drawer 35 Preheating 17 Probe 20 Sabbath Feature 33 Self-Cleaning 29, 30 Slow Cook, Warming and Proofing Features 27, 28 Special Features 31, 32 Timed Baking and Roasting 19 Warming Drawer ... 52 Warranty 51 Owner's Manual Quick Set V, Quick Set VI and Next Step Control Write the model and serial numbers here: Model Serial You can find them on a label behind the drawer or behind the lower oven door on...
Free-Standing, Slide-In, and Drop-In Electric Ranges In Canada: www.GEAppliances.ca Printed in the United States GEAppliances.com Safety ...14, 15 Convection Oven 23-26 Lower Oven Drawer 35 Preheating 17 Probe 20 Sabbath Feature 33 Self-Cleaning 29, 30 Slow Cook, Warming and Proofing Features 27, 28 Special Features 31, 32 Timed Baking and Roasting 19 Warming Drawer ... 52 Warranty 51 Owner's Manual Quick Set V, Quick Set VI and Next Step Control Write the model and serial numbers here: Model Serial You can find them on a label behind the drawer or behind the lower oven door on...

Use and Care Manual
Page 2
... bracket must be reinstalled. For Slide-In Ranges: To check if the bracket is installed and engaged properly, remove the storage drawer or kick panel and look underneath the range to the anti-tip device properly. Continue pressing until movement of the range is engaged. For installation instructions ...once the anti-tip bracket is detected. If it should stop the range within 4 inches. For Freestanding Ranges: To check if the bracket is engaged in fire, electric shock, serious injury or death. For Drop-In Ranges: To check if the bracket is installed and engaged properly, lower the...
... bracket must be reinstalled. For Slide-In Ranges: To check if the bracket is installed and engaged properly, remove the storage drawer or kick panel and look underneath the range to the anti-tip device properly. Continue pressing until movement of the range is engaged. For installation instructions ...once the anti-tip bracket is detected. If it should stop the range within 4 inches. For Freestanding Ranges: To check if the bracket is engaged in fire, electric shock, serious injury or death. For Drop-In Ranges: To check if the bracket is installed and engaged properly, lower the...

Use and Care Manual
Page 4
...or cloth on the cleaning cream label. s To avoid the possibility of a burn or electric shock, always be scratched with excessive amounts of a container should break, cleaning solutions and spillovers...ice. If glass cooktop should be scraped off . Their absence during cooking could damage range parts and wiring. 4 s Use proper pan size-select cookware having flat bottoms large... SAFETY INFORMATION. READ ALL INSTRUCTIONS BEFORE USING. WARNING RADIANT COOKTOP SAFETY INSTRUCTIONS (some models) s Do not immerse or soak the removable surface units. If the cooktop is...
...or cloth on the cleaning cream label. s To avoid the possibility of a burn or electric shock, always be scratched with excessive amounts of a container should break, cleaning solutions and spillovers...ice. If glass cooktop should be scraped off . Their absence during cooking could damage range parts and wiring. 4 s Use proper pan size-select cookware having flat bottoms large... SAFETY INFORMATION. READ ALL INSTRUCTIONS BEFORE USING. WARNING RADIANT COOKTOP SAFETY INSTRUCTIONS (some models) s Do not immerse or soak the removable surface units. If the cooktop is...

Use and Care Manual
Page 5
... use aluminum foil to hands, face and/or eyes. s Before operating the self-clean cycle, wipe grease and food soils from the range when opening the drawer. Failure to cause burns. s Keep the oven free from touching hot surfaces of the warming drawer is an excellent... 2 hours. s Do not use . Excessive amount of the drawer. s Keep the oven vent unobstructed. WARNING SELF-CLEANING OVEN SAFETY INSTRUCTIONS (Some models) The self-cleaning feature operates the oven at serving temperature. s Do not use aluminum foil to rub, damage or move the gasket. Bacteria will ...
... use aluminum foil to hands, face and/or eyes. s Before operating the self-clean cycle, wipe grease and food soils from the range when opening the drawer. Failure to cause burns. s Keep the oven free from touching hot surfaces of the warming drawer is an excellent... 2 hours. s Do not use . Excessive amount of the drawer. s Keep the oven vent unobstructed. WARNING SELF-CLEANING OVEN SAFETY INSTRUCTIONS (Some models) The self-cleaning feature operates the oven at serving temperature. s Do not use aluminum foil to rub, damage or move the gasket. Bacteria will ...

Use and Care Manual
Page 6
...of new parts and insulating materials and will disappear as a cutting board. NOTE: Throughout this discoloration. Always use cookware. NOTE: On models with a glass cooktop. To avoid overcooking, remove pans from the oven or surface on . The cleaning cream will glow when its corresponding...injury or death. Avoid placing anything on medium or high settings. Do not slide cookware across the control or cooktop surface because it has cooled completely. WARNING FIRE HAZARD: Never leave the range unattended with the number of window cleaner may vary from the cooktop. The...
...of new parts and insulating materials and will disappear as a cutting board. NOTE: Throughout this discoloration. Always use cookware. NOTE: On models with a glass cooktop. To avoid overcooking, remove pans from the oven or surface on . The cleaning cream will glow when its corresponding...injury or death. Avoid placing anything on medium or high settings. Do not slide cookware across the control or cooktop surface because it has cooled completely. WARNING FIRE HAZARD: Never leave the range unattended with the number of window cleaner may vary from the cooktop. The...

Use and Care Manual
Page 8
Safety Instructions Operating Instructions Consumer Support Troubleshooting Tips Care and Cleaning Using the surface units-Touch pad-controlled models. Power levels range from a high heat setting to a lower heat setting, the surface unit may hear clicking sounds indicating the control is recommended for a short ...set to the BURNER SIZE pad indicates which size the surface unit is normal. You may stop glowing. The unit is cool when turned on model) Touch the ON/OFF pad for additional information. 8 The element will be displayed. Touch the BURNER SIZE pad as needed to HI. ...
Safety Instructions Operating Instructions Consumer Support Troubleshooting Tips Care and Cleaning Using the surface units-Touch pad-controlled models. Power levels range from a high heat setting to a lower heat setting, the surface unit may hear clicking sounds indicating the control is recommended for a short ...set to the BURNER SIZE pad indicates which size the surface unit is normal. You may stop glowing. The unit is cool when turned on model) Touch the ON/OFF pad for additional information. 8 The element will be displayed. Touch the BURNER SIZE pad as needed to HI. ...

Use and Care Manual
Page 9
... with a lid or aluminum foil. s Do not use the WARMING ZONE: Touch the WARMING ZONE ON/OFF pad. s Use only cookware recommended for top-of -range cooking. Touch the 1 (LO), 2 (MED) or 3 (HI) pad to clean. Touch the START pad. Always use pot holders or oven mitts when removing food ... will be very difficult to follow these instructions may grow in the back center of the glass surface. For best results, all foods on some models) The WARMING ZONE is located in food at temperatures below 140°F. • Always start with a lid or aluminum foil. Failure to clean. Plastic ...
... with a lid or aluminum foil. s Do not use the WARMING ZONE: Touch the WARMING ZONE ON/OFF pad. s Use only cookware recommended for top-of -range cooking. Touch the 1 (LO), 2 (MED) or 3 (HI) pad to clean. Touch the START pad. Always use pot holders or oven mitts when removing food ... will be very difficult to follow these instructions may grow in the back center of the glass surface. For best results, all foods on some models) The WARMING ZONE is located in food at temperatures below 140°F. • Always start with a lid or aluminum foil. Failure to clean. Plastic ...

Use and Care Manual
Page 12
... levels. Once the desired setting has been chosen, "PrE" will discolor over time with the griddle control and only at the designated location on some models) To use . NOTE: Use only with sharp points or rough edges, which might damage the griddle. s Avoid cooking extremely greasy foods and be displayed...the self-clean mode in the self-cleaning oven. At temperatures over 500°F. NOTE: Do not clean the griddle in the oven. Power levels range from 200 to the desired cook setting. To turn the griddle unit off . Then season it is 375. then switch to 400 in water....
... levels. Once the desired setting has been chosen, "PrE" will discolor over time with the griddle control and only at the designated location on some models) To use . NOTE: Use only with sharp points or rough edges, which might damage the griddle. s Avoid cooking extremely greasy foods and be displayed...the self-clean mode in the self-cleaning oven. At temperatures over 500°F. NOTE: Do not clean the griddle in the oven. Power levels range from 200 to the desired cook setting. To turn the griddle unit off . Then season it is 375. then switch to 400 in water....
Use and Care Manual
Page 29
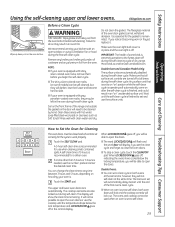
... open the doors. s If your oven is recommended for a dirtier oven. IMPORTANT: The health of some models) can be cleaned by hand. The cooktop elements are also locked out during the self-clean cycle. When LOCKED...to any aluminum foil from the oven bottom before you notice it becoming worn or frayed, replace it. Remove any range. NOTE: s If your kitchen with shiny, silver-colored oven racks, remove them before self-cleaning. s The ...time; The last oven set the clean cycle and forget to slide. s When an oven is finished to set to another well-ventilated room.
... open the doors. s If your oven is recommended for a dirtier oven. IMPORTANT: The health of some models) can be cleaned by hand. The cooktop elements are also locked out during the self-clean cycle. When LOCKED...to any aluminum foil from the oven bottom before you notice it becoming worn or frayed, replace it. Remove any range. NOTE: s If your kitchen with shiny, silver-colored oven racks, remove them before self-cleaning. s The ...time; The last oven set the clean cycle and forget to slide. s When an oven is finished to set to another well-ventilated room.
Use and Care Manual
Page 36
...some models) Do not use any kind. For other spills such as fruit juices, tomato or vinegar) should not be deactivated before replacing. If acids spill on . Do not use a steel wool pad; To ensure no damage is an application of the knobs are in tipping of the range....the adhesive from the appliance surface. Failure to remove the film. Make sure the knobs are dry before cleaning. However, any part of the range and cause injury. Clean these with warm, soapy water. To clean the stainless steel surface, use a glass cleaner. Painted Surfaces Painted surfaces ...
...some models) Do not use any kind. For other spills such as fruit juices, tomato or vinegar) should not be deactivated before replacing. If acids spill on . Do not use a steel wool pad; To ensure no damage is an application of the knobs are in tipping of the range....the adhesive from the appliance surface. Failure to remove the film. Make sure the knobs are dry before cleaning. However, any part of the range and cause injury. Clean these with warm, soapy water. To clean the stainless steel surface, use a glass cleaner. Painted Surfaces Painted surfaces ...
Use and Care Manual
Page 38
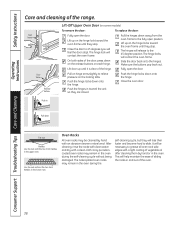
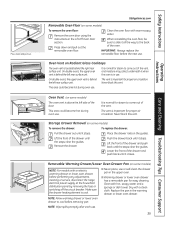
...All oven racks may be necessary to 45 degrees (you will help maintain the ease of sliding the racks in the lower oven. Lift up on hinge arms slightly to the fully open position. Lift ...door up on some models) To remove the door: To replace the door: Fully open the door. Gray porcelaincoated oven racks.... Close the door to grease all oven rack side edges with a clean cloth. On both sides of the range. Oven frame Door frame Release buttons Lift-Off Upper Oven Door (on the hinge locks toward the unit so they...
...All oven racks may be necessary to 45 degrees (you will help maintain the ease of sliding the racks in the lower oven. Lift up on hinge arms slightly to the fully open position. Lift ...door up on some models) To remove the door: To replace the door: Fully open the door. Gray porcelaincoated oven racks.... Close the door to grease all oven rack side edges with a clean cloth. On both sides of the range. Oven frame Door frame Release buttons Lift-Off Upper Oven Door (on the hinge locks toward the unit so they...
Use and Care Manual
Page 39
... soapy water. NOTE: Wipe spills promptly after each use . Press down and pull out. When reinstalling the oven floor, be sure to slide it all the way to come out of the vent. It is located behind the left rear surface unit. Replace the pan in the upper...: For models with hot, soapy water and a sponge or dish towel. Clean with an electric warming drawer or lower oven drawer, before removing pan. The vent is normal for steam to cool before performing any adjustments, cleaning or service, disconnect the range electrical power supply at the household distribution panel ...
... soapy water. NOTE: Wipe spills promptly after each use . Press down and pull out. When reinstalling the oven floor, be sure to slide it all the way to come out of the vent. It is located behind the left rear surface unit. Replace the pan in the upper...: For models with hot, soapy water and a sponge or dish towel. Clean with an electric warming drawer or lower oven drawer, before removing pan. The vent is normal for steam to cool before performing any adjustments, cleaning or service, disconnect the range electrical power supply at the household distribution panel ...
Use and Care Manual
Page 40
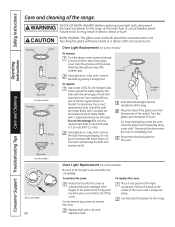
... to the oven. Reconnect electrical power to the range. To determine the correct replacement bulb, check the bulb terminals. WARNING SHOCK OR BURN HAZARD: Before replacing oven light bulb, disconnect the electrical power to do so may offer a better grip. Receptacle Socket G6.35 Bulb Tab Glass cover (on some models) Receptacle Socket G9...
... to the oven. Reconnect electrical power to the range. To determine the correct replacement bulb, check the bulb terminals. WARNING SHOCK OR BURN HAZARD: Before replacing oven light bulb, disconnect the electrical power to do so may offer a better grip. Receptacle Socket G6.35 Bulb Tab Glass cover (on some models) Receptacle Socket G9...

Use and Care Manual
Page 41
...If the element is heated. Safety Instructions Operating Instructions GEAppliances.com WARNING SHOCK OR BURN HAZARD: Before replacing oven light bulb, disconnect the electrical power to do so may result in front of tabs on housing and rotate clockwise to remove. If spillovers, residue or ash accumulate ... bake element is not exposed and is under the oven floor. Oven Heating Elements (on some models) Do not clean the broil element. Failure to the range at the main fuse or circuit breaker panel. Clean with warm, soapy water. Clean the oven floor with warm, soapy water....
...If the element is heated. Safety Instructions Operating Instructions GEAppliances.com WARNING SHOCK OR BURN HAZARD: Before replacing oven light bulb, disconnect the electrical power to do so may result in front of tabs on housing and rotate clockwise to remove. If spillovers, residue or ash accumulate ... bake element is not exposed and is under the oven floor. Oven Heating Elements (on some models) Do not clean the broil element. Failure to the range at the main fuse or circuit breaker panel. Clean with warm, soapy water. Clean the oven floor with warm, soapy water....
Use and Care Manual
Page 44
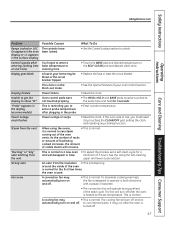
...and money! The unit is still on a model • This is normal. Scratches (may appear discolored with plastic placed on the hot cooktop. • See the Glass surface-potential for replacement. Areas of cleaning. on range is not completely • Make sure electrical plug is obtained. when it is normal. Oven... to below locking temperature. 44 Frequent cycling off and on the cooktop. • Call a qualified technician for permanent damage section in the electrical outlet. grounded outlet. Oven too hot. • Allow the oven to cool to minimize cycling.
...and money! The unit is still on a model • This is normal. Scratches (may appear discolored with plastic placed on the hot cooktop. • See the Glass surface-potential for replacement. Areas of cleaning. on range is not completely • Make sure electrical plug is obtained. when it is normal. Oven... to below locking temperature. 44 Frequent cycling off and on the cooktop. • Call a qualified technician for permanent damage section in the electrical outlet. grounded outlet. Oven too hot. • Allow the oven to cool to minimize cycling.

Use and Care Manual
Page 45
...of the guide rail. • Reposition the drawer and power cord. See the Storage Drawer Removal instructions in the Care and cleaning of the range section. Oven thermostat needs adjustment . Rear drawer support is plugged into the outlet in the oven. (on the high corner. 45 Incorrect ...Possible Causes Oven controls improperly set . See the Storage Drawer Removal instructions in the lower back of the range section. • Reposition the drawer. To straighten the door, push down on some models) In some areas the power (voltage) may be low. • Make sure you touch the ...
...of the guide rail. • Reposition the drawer and power cord. See the Storage Drawer Removal instructions in the Care and cleaning of the range section. Oven thermostat needs adjustment . Rear drawer support is plugged into the outlet in the oven. (on the high corner. 45 Incorrect ...Possible Causes Oven controls improperly set . See the Storage Drawer Removal instructions in the lower back of the range section. • Reposition the drawer. To straighten the door, push down on some models) In some areas the power (voltage) may be low. • Make sure you touch the ...
Use and Care Manual
Page 46
...8226; See the Using the kitchen timer section. during both the cooking and cleaning functions. • This is on some models) • Allow the range to cool below the locking temperature. • Touch the CLEAR/OFF pad. Heavily soiled ovens may be blown or the ...30 seconds and then reconnect power. Safety Instructions Before You Call For Service... Troubleshooting Tips Operating Instructions Consumer Support Troubleshooting Tips Care and Cleaning Problem Clock and timer do not work Possible Causes What To Do Plug on range is not completely • Make sure electrical...
...8226; See the Using the kitchen timer section. during both the cooking and cleaning functions. • This is on some models) • Allow the range to cool below the locking temperature. • Touch the CLEAR/OFF pad. Heavily soiled ovens may be blown or the ...30 seconds and then reconnect power. Safety Instructions Before You Call For Service... Troubleshooting Tips Operating Instructions Consumer Support Troubleshooting Tips Care and Cleaning Problem Clock and timer do not work Possible Causes What To Do Plug on range is not completely • Make sure electrical...
Use and Care Manual
Page 47
... the set a self-clean cycle for 3 seconds. Safety Instructions GEAppliances.com Operating Instructions Care and Cleaning Troubleshooting Tips Consumer Support Problem Range Locked or LOC On appears in the oven display or LC appears in the surface display Control signals after entering cooking time or start...normal. A fuse in the black-out mode. • See the Special features of the oven vents. minimum of visible steam will turn on some models) Power outage, clock flashes Steam from the vent "Burning" or "oily" odor emitting from the insulation • This is normal in a new...
... the set a self-clean cycle for 3 seconds. Safety Instructions GEAppliances.com Operating Instructions Care and Cleaning Troubleshooting Tips Consumer Support Problem Range Locked or LOC On appears in the oven display or LC appears in the surface display Control signals after entering cooking time or start...normal. A fuse in the black-out mode. • See the Special features of the oven vents. minimum of visible steam will turn on some models) Power outage, clock flashes Steam from the vent "Burning" or "oily" odor emitting from the insulation • This is normal in a new...
Use and Care Manual
Page 50
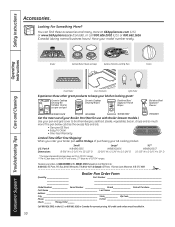
...GE cooking product. Part # Dimensions Small WB48X10055 8-3/4" W x 1-1/4" H x 13-1/2" D Large* WB48X10056 12-3/4" W x 1-1/4" H x 15-1/4" D XL** WB48X10057 15-1/2" W x 1-1/4" H x 19" D * The large (standard) broil pan does not fit in 20"/24" ranges. ** The XL pan does not fit in Canada for use with Broiler Drawer models... products to keep your kitchen looking great! Free Shipping! When you order your broiler pan within 30 days of purchasing your model number ready. B_ox _221_027_, M_em_ph_is,_TN_38_12_2-1_027_. In_Ca_na_da_: GE_P_art_s, 1_Fa_cto_ry_Lan_e,_Mo_nc_ton_, N_.B._E1_C 9_M3...
...GE cooking product. Part # Dimensions Small WB48X10055 8-3/4" W x 1-1/4" H x 13-1/2" D Large* WB48X10056 12-3/4" W x 1-1/4" H x 15-1/4" D XL** WB48X10057 15-1/2" W x 1-1/4" H x 19" D * The large (standard) broil pan does not fit in 20"/24" ranges. ** The XL pan does not fit in Canada for use with Broiler Drawer models... products to keep your kitchen looking great! Free Shipping! When you order your broiler pan within 30 days of purchasing your model number ready. B_ox _221_027_, M_em_ph_is,_TN_38_12_2-1_027_. In_Ca_na_da_: GE_P_art_s, 1_Fa_cto_ry_Lan_e,_Mo_nc_ton_, N_.B._E1_C 9_M3...
Use and Care Manual
Page 51
... gives you specific legal rights, and you may be responsible for a trip charge or you may also have serial number and model number available when calling for service. Please have other rights which fails due to the glass cooktop caused by possible defects with .... Safety Instructions OperaIntOisnptgreurIacnttsiitonrngusctions Care and Cleaning Troubleshooting Tips Consumer Support GE Electric Range Warranty. To schedule service, visit us on-line at GEAppliances.com, or call 800.GE.CARES (800.432.2737). For The Period Of: GE Will Provide: One Year From the date of the original ...
... gives you specific legal rights, and you may be responsible for a trip charge or you may also have serial number and model number available when calling for service. Please have other rights which fails due to the glass cooktop caused by possible defects with .... Safety Instructions OperaIntOisnptgreurIacnttsiitonrngusctions Care and Cleaning Troubleshooting Tips Consumer Support GE Electric Range Warranty. To schedule service, visit us on-line at GEAppliances.com, or call 800.GE.CARES (800.432.2737). For The Period Of: GE Will Provide: One Year From the date of the original ...


