
Installation Instructions
Page 1
...DOUBLE OVENS (with specific models listed on ...Single Oven 281⁄2" (72.4 cm) min. 285⁄8" (72.7 cm) max. 271⁄4" (69.2 cm) min. 275⁄16" (69.4 cm) max. 1" (2.5 cm) 11⁄4" (3.2 cm) 11⁄16" (1.75 cm) 91⁄2" (24.1 cm) max. It will be installed under Warranty. Installation Instructions 27" & 30" Electric Built-In Wall Ovens...27" (68.6 cm) 25" (63.5 cm) min. 251⁄4" (64.1 cm) max. 411⁄8" (104.5 cm) min. 411⁄4" (104.8 cm) max. 1" (2.5 cm) 20" (50.8 cm) min. 1" (2.5 cm) min. 1" (2.5 cm) min. 83⁄4" (22.2 cm) max. Call 1.800.GE...
...DOUBLE OVENS (with specific models listed on ...Single Oven 281⁄2" (72.4 cm) min. 285⁄8" (72.7 cm) max. 271⁄4" (69.2 cm) min. 275⁄16" (69.4 cm) max. 1" (2.5 cm) 11⁄4" (3.2 cm) 11⁄16" (1.75 cm) 91⁄2" (24.1 cm) max. It will be installed under Warranty. Installation Instructions 27" & 30" Electric Built-In Wall Ovens...27" (68.6 cm) 25" (63.5 cm) min. 251⁄4" (64.1 cm) max. 411⁄8" (104.5 cm) min. 411⁄4" (104.8 cm) max. 1" (2.5 cm) 20" (50.8 cm) min. 1" (2.5 cm) min. 1" (2.5 cm) min. 83⁄4" (22.2 cm) max. Call 1.800.GE...

Installation Instructions
Page 2
...wall or upper front frame. Check with this appliance. latest edition, available from the National Fire Protection Association. 4 ELECTRICAL...Electrical Requirements. Position the conduit in such a manner that it will lie on top of the oven in Section 4, Electrical Requirements. To check availability or order parts, call 1.800.GE... door will lie on top of the oven in Section 4. For 27" (68.6 cm) Models with local codes, using wire nuts. ...oven cavity, to aluminum wiring, properly installed connectors approved for use a single-phase, 120/208 VAC or 120/240 VAC, 60 Hertz electrical...
...wall or upper front frame. Check with this appliance. latest edition, available from the National Fire Protection Association. 4 ELECTRICAL...Electrical Requirements. Position the conduit in such a manner that it will lie on top of the oven in Section 4, Electrical Requirements. To check availability or order parts, call 1.800.GE... door will lie on top of the oven in Section 4. For 27" (68.6 cm) Models with local codes, using wire nuts. ...oven cavity, to aluminum wiring, properly installed connectors approved for use a single-phase, 120/208 VAC or 120/240 VAC, 60 Hertz electrical...

Owners Manual
Page 1
...: Model Serial You can find them on a label on the front of the oven behind the oven door on single oven models, or the front of the lower oven behind the oven door on Recycled Paper 49-80599 08-09 JR Owner's Manual PK916-27 ″ Single Wall Oven PK956-27 ″ Double Wall Oven PT916-30 ″ Single Wall Oven PT956-30 ″ Double Wall Oven Printed on double oven models.
...: Model Serial You can find them on a label on the front of the oven behind the oven door on single oven models, or the front of the lower oven behind the oven door on Recycled Paper 49-80599 08-09 JR Owner's Manual PK916-27 ″ Single Wall Oven PK956-27 ″ Double Wall Oven PT916-30 ″ Single Wall Oven PT956-30 ″ Double Wall Oven Printed on double oven models.

Owners Manual
Page 5
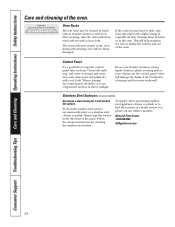
...Proof Pad Press to cool for the timer or automatic oven operations. and a number or letter" flash in the display and the oven control signals, this manual, features and appearance may vary from your model.) GEAppliances.com Double oven control shown. Start Pad Must be reset. Delay Start... Pad Use along with the convection function. Oven Control, Clock and Timer Features and Settings ...
...Proof Pad Press to cool for the timer or automatic oven operations. and a number or letter" flash in the display and the oven control signals, this manual, features and appearance may vary from your model.) GEAppliances.com Double oven control shown. Start Pad Must be reset. Delay Start... Pad Use along with the convection function. Oven Control, Clock and Timer Features and Settings ...
Owners Manual
Page 8
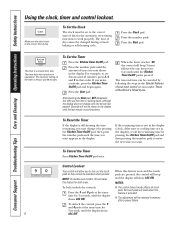
...in the display. No touch pads will show LOC ON. To Set the Clock The clock must be activated when pressed. NOTE: On double oven models, this activates this feature is pressed. To unlock the control, press the 9 and 0 pads at the same ■ The control lockout... memory after a power failure. Control Lockout Your control will be changed during a timed baking or self-cleaning cycle. The timer does not control oven operations. Press the Start pad. If the remaining time is not in the display (clock, delay start or cooking time are pressed, the control...
...in the display. No touch pads will show LOC ON. To Set the Clock The clock must be activated when pressed. NOTE: On double oven models, this activates this feature is pressed. To unlock the control, press the 9 and 0 pads at the same ■ The control lockout... memory after a power failure. Control Lockout Your control will be changed during a timed baking or self-cleaning cycle. The timer does not control oven operations. Press the Start pad. If the remaining time is not in the display (clock, delay start or cooking time are pressed, the control...

Owners Manual
Page 9
...to 3 hours after entering the baking temperature. The display will show the changing temperature (starting at the same time. NOTE: On double oven models, when using timed baking and do not press the Start pad after the cooking function is finished, press the Warm pad once. Press... Instructions Care and Cleaning Troubleshooting Tips Consumer Support Using the timed baking and roasting features. (on some models) GEAppliances.com On double oven models, you can use timed baking in both ovens at 100°F) and the cooking time. Make sure the clock shows the correct time of day....
...to 3 hours after entering the baking temperature. The display will show the changing temperature (starting at the same time. NOTE: On double oven models, when using timed baking and do not press the Start pad after the cooking function is finished, press the Warm pad once. Press... Instructions Care and Cleaning Troubleshooting Tips Consumer Support Using the timed baking and roasting features. (on some models) GEAppliances.com On double oven models, you can use timed baking in both ovens at 100°F) and the cooking time. Make sure the clock shows the correct time of day....
Owners Manual
Page 10
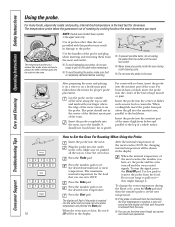
... for proper probe placement. After preparing the meat and placing it - The point should not touch bone, fat or gristle. Close the oven door. After the internal temperature of the roast. For many foods, especially roasts and poultry, internal food temperature is 200°F. Use... they might damage it 's pushed all the way in the oven. To change the oven temperature during a self-cleaning cycle. ■ Do not store the probe in the oven. When the oven starts to the backbone. NOTE: Double oven models have not set the desired internal food or meat temperature. Use...
... for proper probe placement. After preparing the meat and placing it - The point should not touch bone, fat or gristle. Close the oven door. After the internal temperature of the roast. For many foods, especially roasts and poultry, internal food temperature is 200°F. Use... they might damage it 's pushed all the way in the oven. To change the oven temperature during a self-cleaning cycle. ■ Do not store the probe in the oven. When the oven starts to the backbone. NOTE: Double oven models have not set the desired internal food or meat temperature. Use...
Owners Manual
Page 14
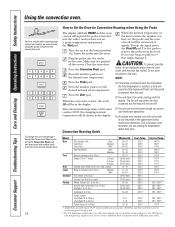
...temperature of Agriculture says "Rare beef is popular, but the heat will be shown in the upper oven during the Convection Roast cycle, press the Convection Roast pad and then press the number pads to ... 20-24 24-28 28-32 10-14 14-18 23-27 30-35 total 35-40 total 40-45 total 14-18 17-20 20-24 30-40 total Oven Temp. 325°F 325°F 325°F 325°F... 30-45 minutes additional roasting time. Do not use timed oven operations. ■ On double oven models, you have not set , the probe and the oven turn off and the oven control signals. Do not store the probe in . This...
...temperature of Agriculture says "Rare beef is popular, but the heat will be shown in the upper oven during the Convection Roast cycle, press the Convection Roast pad and then press the number pads to ... 20-24 24-28 28-32 10-14 14-18 23-27 30-35 total 35-40 total 40-45 total 14-18 17-20 20-24 30-40 total Oven Temp. 325°F 325°F 325°F 325°F... 30-45 minutes additional roasting time. Do not use timed oven operations. ■ On double oven models, you have not set , the probe and the oven turn off and the oven control signals. Do not store the probe in . This...

Owners Manual
Page 15
... press the Delay Start pad to check the start the oven, cook for that oven. NOTE: An attention tone will hear a fan while cooking with these features. NOTE: On double oven models, when using self-clean in the oven will be kept warm selected length of cooking time you entered...is finished, press the Warm pad once. GEAppliances.com On double oven models, you can also use timed baking or roasting in one oven while using both ovens at 100°F) and the cooking time. Remember, even though the oven shuts off automatically, food left in the other; finished, press ...
... press the Delay Start pad to check the start the oven, cook for that oven. NOTE: An attention tone will hear a fan while cooking with these features. NOTE: On double oven models, when using self-clean in the oven will be kept warm selected length of cooking time you entered...is finished, press the Warm pad once. GEAppliances.com On double oven models, you can also use timed baking or roasting in one oven while using both ovens at 100°F) and the cooking time. Remember, even though the oven shuts off automatically, food left in the other; finished, press ...

Owners Manual
Page 17
... the clean cycle and forget to another well-ventilated room. ■ On double oven models, you can use the number pads and enter the desired clean time. Wipe up heavy soil on the oven floor. Move birds to close the oven door. ■ To stop a clean cycle, press the Clear/Off pad. There is.... Placing items on how dirty your kitchen with soap and water. It will not be able to open the oven door until the end of the first oven's clean cycle. ■ On double oven models, you can change the clean time to any other than 4 hours or 3 hours is in damage to open the...
... the clean cycle and forget to another well-ventilated room. ■ On double oven models, you can use the number pads and enter the desired clean time. Wipe up heavy soil on the oven floor. Move birds to close the oven door. ■ To stop a clean cycle, press the Clear/Off pad. There is.... Placing items on how dirty your kitchen with soap and water. It will not be able to open the oven door until the end of the first oven's clean cycle. ■ On double oven models, you can change the clean time to any other than 4 hours or 3 hours is in damage to open the...

Owners Manual
Page 18
... small, contained spills. It will be possible to display the time of the first oven's clean cycle. If a time other than 4 hours or 3 hours is recommended for a dirtier oven. NOTE: On double oven models, you can set will show the start time of Cleaning Press the Self Clean Std.../Low pad once for a 4-hour clean time or twice for the second oven. To recall the start time. Press the Start pad....
... small, contained spills. It will be possible to display the time of the first oven's clean cycle. If a time other than 4 hours or 3 hours is recommended for a dirtier oven. NOTE: On double oven models, you can set will show the start time of Cleaning Press the Self Clean Std.../Low pad once for a 4-hour clean time or twice for the second oven. To recall the start time. Press the Start pad....
Owners Manual
Page 19
.... The display will have a 24-hour military time clock or black out the clock display, follow the steps below . this activates pads (on double oven models, use a 12-hour clock. The display will show C (Celsius). + Press the Bake and Broil Hi/Lo Press the Start pad. Press the ...Bake and Broil Hi/Lo pads (on double oven models, use the upper oven controls) at the same time for 3 seconds, until the display will automatically turn OFF this is showing the time of your choice, ...
.... The display will have a 24-hour military time clock or black out the clock display, follow the steps below . this activates pads (on double oven models, use a 12-hour clock. The display will show C (Celsius). + Press the Bake and Broil Hi/Lo Press the Start pad. Press the ...Bake and Broil Hi/Lo pads (on double oven models, use the upper oven controls) at the same time for 3 seconds, until the display will automatically turn OFF this is showing the time of your choice, ...
Owners Manual
Page 20
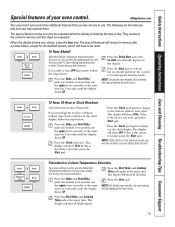
... the Clear/Off pad is in the display. 20 Press the Bake and Broil Hi/Lo pads (on double oven models use the upper oven controls) at the same time for both ovens. The display will show CON OFF. NOTE: This feature does not convert convection bake cooking times, only regular baking... will Press the Kitchen Timer On/Off sound followed by one Press the Bake and Broil Hi/Lo beep every 6 seconds.) pads (on double oven models, use Press the Start pad. The display shows CON BEEP (continuous beep). pad. Press the Start pad. Consumer Support Troubleshooting Tips Care and ...
... the Clear/Off pad is in the display. 20 Press the Bake and Broil Hi/Lo pads (on double oven models use the upper oven controls) at the same time for both ovens. The display will show CON OFF. NOTE: This feature does not convert convection bake cooking times, only regular baking... will Press the Kitchen Timer On/Off sound followed by one Press the Bake and Broil Hi/Lo beep every 6 seconds.) pads (on double oven models, use Press the Start pad. The display shows CON BEEP (continuous beep). pad. Press the Start pad. Consumer Support Troubleshooting Tips Care and ...
Owners Manual
Page 21
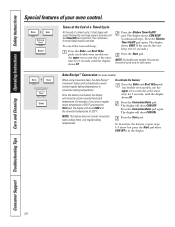
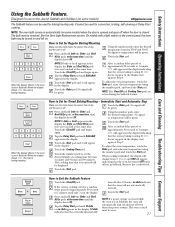
...be removed. When cooking is finished, the display will change from ⊃ to Set for baking/roasting only. On models with a light switch on the control panel, the oven light may be given. Tap the Delay Start pad until SAb bAtH appears in the display. No signal will be ... bAtH appears in the display indicating that you entered will not automatically turn off when the door is baking/roasting. NOTE: The oven light comes on automatically (on some models) GEAppliances.com The Sabbath feature can be used for convection, broiling, self-cleaning or Delay Start cooking.
...be removed. When cooking is finished, the display will change from ⊃ to Set for baking/roasting only. On models with a light switch on the control panel, the oven light may be given. Tap the Delay Start pad until SAb bAtH appears in the display. No signal will be ... bAtH appears in the display indicating that you entered will not automatically turn off when the door is baking/roasting. NOTE: The oven light comes on automatically (on some models) GEAppliances.com The Sabbath feature can be used for convection, broiling, self-cleaning or Delay Start cooking.
Owners Manual
Page 22
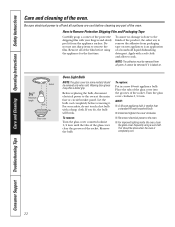
... Shipping Film and Packaging Tape Carefully grasp a corner of the product, the safest way to the oven at the main fuse or circuit breaker panel. Before replacing the bulb, disconnect electrical power to remove the adhesive from packaging tape on new appliances is done to the finish of the...socket. It cannot be removed only when cold. Place the tabs of the glass cover into the grooves of the oven. NOTE: ■ A 40-watt appliance bulb is baked on some models) should be removed from the appliance surface. For your fingers and slowly peel it . Turn the glass cover ...
... Shipping Film and Packaging Tape Carefully grasp a corner of the product, the safest way to the oven at the main fuse or circuit breaker panel. Before replacing the bulb, disconnect electrical power to remove the adhesive from packaging tape on new appliances is done to the finish of the...socket. It cannot be removed only when cold. Place the tabs of the glass cover into the grooves of the oven. NOTE: ■ A 40-watt appliance bulb is baked on some models) should be removed from the appliance surface. For your fingers and slowly peel it . Turn the glass cover ...
Owners Manual
Page 24
... may be at room temperature and not in direct sunlight. Do not use abrasive cleansers, strong liquid cleansers, plastic scouring pads or oven cleaners on some models) Do not use a steel wool pad; Always wipe the surface in and out of vegetable oil after each use warm sudsy water ...panel after cleaning them by hand with a light coating of the oven. When cleaning, the control panel should be cleaned by hand or in the oven during self-cleaning cycle without being damaged. A 50/50 solution of the oven. Clean with mild soap and water or vinegar and water, rinse...
... may be at room temperature and not in direct sunlight. Do not use abrasive cleansers, strong liquid cleansers, plastic scouring pads or oven cleaners on some models) Do not use a steel wool pad; Always wipe the surface in and out of vegetable oil after each use warm sudsy water ...panel after cleaning them by hand with a light coating of the oven. When cleaning, the control panel should be cleaned by hand or in the oven during self-cleaning cycle without being damaged. A 50/50 solution of the oven. Clean with mild soap and water or vinegar and water, rinse...
Owners Manual
Page 25
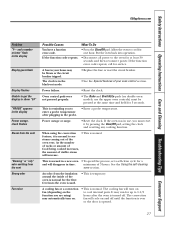
... is open. Rack position is incorrect or the rack is designed for broiling. Improper rack position being cooked in the oven. Food being used. This model is not level. Make sure it yourself! Oven controls improperly set . GEAppliances.com Problem Control signals after entering cooking time or delay start Food does not bake...
... is open. Rack position is incorrect or the rack is designed for broiling. Improper rack position being cooked in the oven. Food being used. This model is not level. Make sure it yourself! Oven controls improperly set . GEAppliances.com Problem Control signals after entering cooking time or delay start Food does not bake...
Owners Manual
Page 27
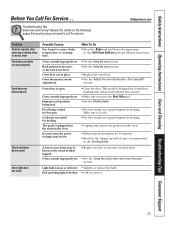
... seconds and then reconnect power. Power failure. • Reset the clock. See the Using the self-cleaning oven section. The cooling fan will cycle on . • This is opened. 27 An odor from the vent Strong odor Fan noise Possible Causes What To Do You have a function error code.... • Press the Clear/Off pad. It may automatically turn on double oven models, use , you must be blown or the circuit ...
... seconds and then reconnect power. Power failure. • Reset the clock. See the Using the self-cleaning oven section. The cooling fan will cycle on . • This is opened. 27 An odor from the vent Strong odor Fan noise Possible Causes What To Do You have a function error code.... • Press the Clear/Off pad. It may automatically turn on double oven models, use , you must be blown or the circuit ...
Owners Manual
Page 28
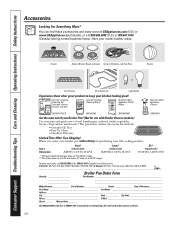
....626.2002 (U.S.) or 800.661.1616 (Canada) (during normal business hours). The pan below catches the excess fats and oils. • Genuine GE Part • Easy To Clean • One-Year Warranty Limited Time Offer! Bo_x 2_210_27,_Me_mp_his,_TN_38_122_-102_7. To place your... models.) Use your model number ready. Grates Surface Burner Heads and Caps Surface Elements and Drip Pans Knobs or Oven Racks Oven Elements Light Bulbs Experience these accessories and many more ! Have your pan and grid cover to : ✁ I_n th_e U_.S.:_GE_Pa_rts,_P.O_. or 800.661.6161 in 24" wall ovens, 27"...
....626.2002 (U.S.) or 800.661.1616 (Canada) (during normal business hours). The pan below catches the excess fats and oils. • Genuine GE Part • Easy To Clean • One-Year Warranty Limited Time Offer! Bo_x 2_210_27,_Me_mp_his,_TN_38_122_-102_7. To place your... models.) Use your model number ready. Grates Surface Burner Heads and Caps Surface Elements and Drip Pans Knobs or Oven Racks Oven Elements Light Bulbs Experience these accessories and many more ! Have your pan and grid cover to : ✁ I_n th_e U_.S.:_GE_Pa_rts,_P.O_. or 800.661.6161 in 24" wall ovens, 27"...
Owners Manual
Page 31
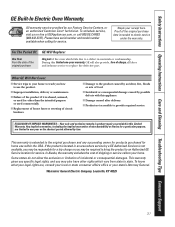
This warranty is not available, you may be responsible for a trip charge or you may also have serial number and model number available when calling for a particular purpose, are , consult your local or state consumer affairs office or your receipt here. If the product is located ...-Your sole and exclusive remedy is product repair as provided in materials or workmanship. Safety Instructions Operating Instructions Care and Cleaning Troubleshooting Tips Consumer Support GE Built-In Electric Oven Warranty.
This warranty is not available, you may be responsible for a trip charge or you may also have serial number and model number available when calling for a particular purpose, are , consult your local or state consumer affairs office or your receipt here. If the product is located ...-Your sole and exclusive remedy is product repair as provided in materials or workmanship. Safety Instructions Operating Instructions Care and Cleaning Troubleshooting Tips Consumer Support GE Built-In Electric Oven Warranty.


