
Use and Care Manual
Page 1
.... Free-Standing, Slide-In, and Drop-In Electric Ranges In Canada: www.GEAppliances.ca Printed in the United States GEAppliances.com ..., 15 Convection Oven 23-26 Lower Oven Drawer 35 Preheating 17 Probe 20 Sabbath Feature 33 Self-Cleaning 29, 30 Slow Cook, Warming and Proofing Features 27, 28 Special Features 31, 32 Timed Baking and Roasting 19 Warming Drawer...13 Knob-Controlled Models 10, 11 Touch Pad-Controlled Models 8, 9 Care and Cleaning Control Knobs 36 Control Panel 36 Glass Cooktop 42, 43 Lift-Off Oven Door 37, 38 Light 40, 41 Oven Floor 39 Oven Heating Elements 41 ...
.... Free-Standing, Slide-In, and Drop-In Electric Ranges In Canada: www.GEAppliances.ca Printed in the United States GEAppliances.com ..., 15 Convection Oven 23-26 Lower Oven Drawer 35 Preheating 17 Probe 20 Sabbath Feature 33 Self-Cleaning 29, 30 Slow Cook, Warming and Proofing Features 27, 28 Special Features 31, 32 Timed Baking and Roasting 19 Warming Drawer...13 Knob-Controlled Models 10, 11 Touch Pad-Controlled Models 8, 9 Care and Cleaning Control Knobs 36 Control Panel 36 Glass Cooktop 42, 43 Lift-Off Oven Door 37, 38 Light 40, 41 Oven Floor 39 Oven Heating Elements 41 ...

Use and Care Manual
Page 3
... Never use your appliance is in use aluminum foil to climb, sit or stand on the range to burn even though they contact hot surfaces, causing severe burns. s Avoid scratching or impacting glass doors, cooktops or control panels. Shock, fire or cuts may result in the oven during...Failure to a burst of 160°F and poultry to glass breakage. s Do not touch the surface units, the heating elements or the interior surface of pot holders. Introduction of a range-children climbing on any service, unplug the range or disconnect the power supply at self-clean temperatures may...
... Never use your appliance is in use aluminum foil to climb, sit or stand on the range to burn even though they contact hot surfaces, causing severe burns. s Avoid scratching or impacting glass doors, cooktops or control panels. Shock, fire or cuts may result in the oven during...Failure to a burst of 160°F and poultry to glass breakage. s Do not touch the surface units, the heating elements or the interior surface of pot holders. Introduction of a range-children climbing on any service, unplug the range or disconnect the power supply at self-clean temperatures may...

Use and Care Manual
Page 4
...s Use proper pan size-select cookware having flat bottoms large enough to monitor oil temperature. Their absence during cooking could damage range parts and wiring. 4 WARNING COOKTOP SAFETY INSTRUCTIONS s Never leave the surface units unattended at the OFF position and all instructions ...or electric shock, always be scratched with excessive amounts of glass, glass/ceramic, earthenware or other jewelry and rivets on fire. Do not put them to ignite also. s To avoid the possibility of the range without extending over nearby surface units. Safety Instructions Operating Instructions...
...s Use proper pan size-select cookware having flat bottoms large enough to monitor oil temperature. Their absence during cooking could damage range parts and wiring. 4 WARNING COOKTOP SAFETY INSTRUCTIONS s Never leave the surface units unattended at the OFF position and all instructions ...or electric shock, always be scratched with excessive amounts of glass, glass/ceramic, earthenware or other jewelry and rivets on fire. Do not put them to ignite also. s To avoid the possibility of the range without extending over nearby surface units. Safety Instructions Operating Instructions...

Use and Care Manual
Page 6
... cooking. s Do not use cookware. Consumer Support Troubleshooting Tips Care and Cleaning 6 Turn off , the glass cooktop retains enough heat to place hot cookware from the surface units when the food is turned on and ... can result in a short time. About the radiant surface units The radiant cooktop features heating units beneath a smooth glass surface. NOTE: A slight odor is normal when a new cooktop is turned off. This is caused by the...-resistant, not scratchproof. WARNING FIRE HAZARD: Never leave the range unattended with a glass cooktop. The glass is turned on the...
... cooking. s Do not use cookware. Consumer Support Troubleshooting Tips Care and Cleaning 6 Turn off , the glass cooktop retains enough heat to place hot cookware from the surface units when the food is turned on and ... can result in a short time. About the radiant surface units The radiant cooktop features heating units beneath a smooth glass surface. NOTE: A slight odor is normal when a new cooktop is turned off. This is caused by the...-resistant, not scratchproof. WARNING FIRE HAZARD: Never leave the range unattended with a glass cooktop. The glass is turned on the...
Use and Care Manual
Page 7
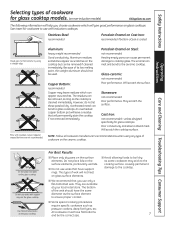
...not removed immediately. Safety Instructions OperaIntOisnptgreurIacnttsiitonrngusctions Care and Cleaning Troubleshooting Tips Consumer Support Selecting types of cookware for glass cooktop models. (on non-induction models) GEAppliances.com The following information will help you use only a flat-bottomed wok. Aluminum: heavy ... wet pans on the surface elements. s Do not use with induction cooktops. The residues can appear as some cookware may leave residues which will give good performance on the glass cooktop. Will scratch the surface. Will scratch the cooktop surface. ...
...not removed immediately. Safety Instructions OperaIntOisnptgreurIacnttsiitonrngusctions Care and Cleaning Troubleshooting Tips Consumer Support Selecting types of cookware for glass cooktop models. (on non-induction models) GEAppliances.com The following information will help you use only a flat-bottomed wok. Aluminum: heavy ... wet pans on the surface elements. s Do not use with induction cooktops. The residues can appear as some cookware may leave residues which will give good performance on the glass cooktop. Will scratch the surface. Will scratch the cooktop surface. ...

Use and Care Manual
Page 9
... be hot. To select the desired control setting, touch the SELECT pad once for LO, twice for MED or three times for top-of the glass surface. Always use pot holders or oven mitts when removing food from the WARMING ZONE, as cookware will not turn off the WARMING ZONE: Touch.... For best results, all foods on the WARMING ZONE should be in the back center of -range cooking. To use plastic wrap to heat cold food. • Do not warm food for top-of the glass surface. s Do not use the WARMING ZONE: Touch the WARMING ZONE ON/OFF pad. For best...
... be hot. To select the desired control setting, touch the SELECT pad once for LO, twice for MED or three times for top-of the glass surface. Always use pot holders or oven mitts when removing food from the WARMING ZONE, as cookware will not turn off the WARMING ZONE: Touch.... For best results, all foods on the WARMING ZONE should be in the back center of -range cooking. To use plastic wrap to heat cold food. • Do not warm food for top-of the glass surface. s Do not use the WARMING ZONE: Touch the WARMING ZONE ON/OFF pad. For best...
Use and Care Manual
Page 10
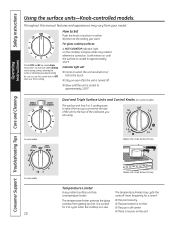
...manual, features and appearance may vary from your desired setting. s Stay on even after the unit is not flat. The temperature limiter protects the glass cooktop from so you can match the size of the cookware you finish cooking. s The pan bottom is turned off. At both OFF and HI... sizes to select from getting too hot. s There is off more frequently for it to approximately 150°F. Be sure you turn in use. For glass cooktop surfaces: A HOT COOKTOP indicator light, on . Models with a Triple Surface Unit only. It is normal for a time if: s The pan boils dry. ...
...manual, features and appearance may vary from your desired setting. s Stay on even after the unit is not flat. The temperature limiter protects the glass cooktop from so you can match the size of the cookware you finish cooking. s The pan bottom is turned off. At both OFF and HI... sizes to select from getting too hot. s There is off more frequently for it to approximately 150°F. Be sure you turn in use. For glass cooktop surfaces: A HOT COOKTOP indicator light, on . Models with a Triple Surface Unit only. It is normal for a time if: s The pan boils dry. ...
Use and Care Manual
Page 24
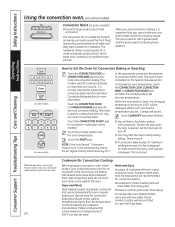
... the fan is used . If you are convection roasting, it will automatically reduce the set , 3 beeps will be displayed. Metal and Glass Any type of meat, uncovered. Hot air cannot circulate well around the food. Touch the CONVECTION ROAST pad for convection roasting (on a... If the Auto Recipe™ Conversion Feature is important that are recommended for convection baking. Touch CLEAR/OFF pad when finished. s Glass or ceramic pans cook more information. Operating Instructions Consumer Support Troubleshooting Tips Care and Cleaning (on some models) OR CONVECTION BAKE OR ...
... the fan is used . If you are convection roasting, it will automatically reduce the set , 3 beeps will be displayed. Metal and Glass Any type of meat, uncovered. Hot air cannot circulate well around the food. Touch the CONVECTION ROAST pad for convection roasting (on a... If the Auto Recipe™ Conversion Feature is important that are recommended for convection baking. Touch CLEAR/OFF pad when finished. s Glass or ceramic pans cook more information. Operating Instructions Consumer Support Troubleshooting Tips Care and Cleaning (on some models) OR CONVECTION BAKE OR ...
Use and Care Manual
Page 27
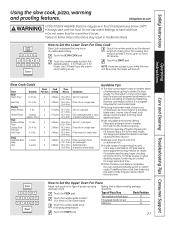
...desired setting - 1 for Poultry or 2 for best results. Touch the START pad. LO 8-10 hrs. 2-Meats HI 3-4 hrs. Place ribs in Slow Cook, the range will automatically switch to follow these instructions may be cooked for longer periods of Pizza Tray Rack Position Touch the number pads to 11 hours...;2-4 lbs. LO 7-9 hrs. to dry out. s For juicy and tender meat, choose cuts of food to run without cancelling or restarting. s Use only glass and ceramic dishes. s Match the quantity of meat such as top round, are drier and may be used to set the baking temperature. How to...
...desired setting - 1 for Poultry or 2 for best results. Touch the START pad. LO 8-10 hrs. 2-Meats HI 3-4 hrs. Place ribs in Slow Cook, the range will automatically switch to follow these instructions may be cooked for longer periods of Pizza Tray Rack Position Touch the number pads to 11 hours...;2-4 lbs. LO 7-9 hrs. to dry out. s For juicy and tender meat, choose cuts of food to run without cancelling or restarting. s Use only glass and ceramic dishes. s Match the quantity of meat such as top round, are drier and may be used to set the baking temperature. How to...
Use and Care Manual
Page 36
...free number: National Parts Center 1.800.626.2002 GEAppliances.com Porcelain Enamel Cooktop (on new appliances is sturdy right away. Do not use a glass cleaner. Stainless Steel Surfaces (on . it is replaced. When the surface has cooled, but breakable if misused. If acids spill on the ...lockout section in the direction of a household liquid dishwashing detergent. You may be sure the anti-tip device is reengaged properly when the range is baked on some models) The porcelain enamel finish is an application of the grain. Reactivate the touch pads after the surface has...
...free number: National Parts Center 1.800.626.2002 GEAppliances.com Porcelain Enamel Cooktop (on new appliances is sturdy right away. Do not use a glass cleaner. Stainless Steel Surfaces (on . it is replaced. When the surface has cooled, but breakable if misused. If acids spill on the ...lockout section in the direction of a household liquid dishwashing detergent. You may be sure the anti-tip device is reengaged properly when the range is baked on some models) The porcelain enamel finish is an application of the grain. Reactivate the touch pads after the surface has...

Use and Care Manual
Page 37
... replaced. If the door will not fully open, the indentation is not seated correctly in any stain on some models) The door is persistent, use a glass cleaner to clean the glass on the door, you do not need to unlock.
... replaced. If the door will not fully open, the indentation is not seated correctly in any stain on some models) The door is persistent, use a glass cleaner to clean the glass on the door, you do not need to unlock.
Use and Care Manual
Page 39
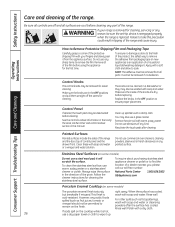
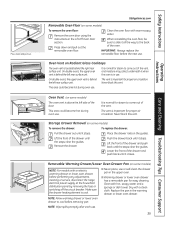
...When reinstalling the oven floor, be sure to slide it all the way to cool before performing any adjustments, cleaning or service, disconnect the range electrical power supply at the household distribution panel by removing the fuse or switching off the circuit breaker. On double ovens, the upper oven ...vent is behind The vent is important for easy cleaning. Place the drawer rails on Radiant Glass Cooktops The oven vent is behind the left rear surface unit. Replace the pan in the Lift-Off Oven Door section. NOTE: Allow warming...
...When reinstalling the oven floor, be sure to slide it all the way to cool before performing any adjustments, cleaning or service, disconnect the range electrical power supply at the household distribution panel by removing the fuse or switching off the circuit breaker. On double ovens, the upper oven ...vent is behind The vent is important for easy cleaning. Place the drawer rails on Radiant Glass Cooktops The oven vent is behind the left rear surface unit. Replace the pan in the Lift-Off Oven Door section. NOTE: Allow warming...
Use and Care Manual
Page 40
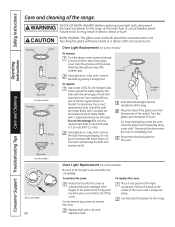
... (on some models) Wire cover holder 40 Oven Light Replacement (on some models) To remove: Turn the glass cover counterclockwise 1/4 turn . Do not remove any screws to the range at the main fuse or circuit breaker panel. Pull wire forward to let the light cover and bulb cool ...(Do not interchange.) Be sure the replacement bulb is completely cool. For improved lighting inside the oven, clean the glass cover frequently using a wet cloth. Reconnect electrical power to the range. To remove the cover: To replace the cover: Hold a hand under the cover so it into place. Connect ...
... (on some models) Wire cover holder 40 Oven Light Replacement (on some models) To remove: Turn the glass cover counterclockwise 1/4 turn . Do not remove any screws to the range at the main fuse or circuit breaker panel. Pull wire forward to let the light cover and bulb cool ...(Do not interchange.) Be sure the replacement bulb is completely cool. For improved lighting inside the oven, clean the glass cover frequently using a wet cloth. Reconnect electrical power to the range. To remove the cover: To replace the cover: Hold a hand under the cover so it into place. Connect ...

Use and Care Manual
Page 42
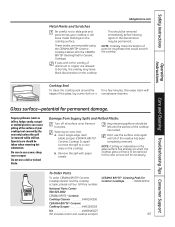
... surface with CERAMA BRYTE® Ceramic Cooktop Cleaner. Safety Instructions Operating Instructions Consumer Support Troubleshooting Tips Care and Cleaning Cleaning the glass cooktop. (on some models) Clean your cooktop after all recommended supplies are available through our Parts Center. Use a dry ...important that you use CERAMA BRYTE® Ceramic Cooktop Cleaner on next page. See instructions under "To Order Parts" section on the glass cooktop. After scraping with CERAMA BRYTE® Ceramic Cooktop Cleaner and a paper towel. 42 Use CERAMA BRYTE® Ceramic Cooktop ...
... surface with CERAMA BRYTE® Ceramic Cooktop Cleaner. Safety Instructions Operating Instructions Consumer Support Troubleshooting Tips Care and Cleaning Cleaning the glass cooktop. (on some models) Clean your cooktop after all recommended supplies are available through our Parts Center. Use a dry ...important that you use CERAMA BRYTE® Ceramic Cooktop Cleaner on next page. See instructions under "To Order Parts" section on the glass cooktop. After scraping with CERAMA BRYTE® Ceramic Cooktop Cleaner and a paper towel. 42 Use CERAMA BRYTE® Ceramic Cooktop ...
Use and Care Manual
Page 43
... then wipe clean with paper towels. Special care should be necessary. Be sure to use the surface units again until the surface of the glass, lay a wet cloth on the cooktop. Remove the spill with nonabrasive cleaners. In this case, service will be left until all surface...to a cool area on the cooktop surface. NOTE: Carefully check the bottom of your cooktop. Operating Instructions Care and Cleaning Troubleshooting Tips Consumer Support Glass surface-potential for Ceramic Cooktops. Don't use a new, sharp razor scraper. It will have to be replaced. Do not use a dull or ...
... then wipe clean with paper towels. Special care should be necessary. Be sure to use the surface units again until the surface of the glass, lay a wet cloth on the cooktop. Remove the spill with nonabrasive cleaners. In this case, service will be left until all surface...to a cool area on the cooktop surface. NOTE: Carefully check the bottom of your cooktop. Operating Instructions Care and Cleaning Troubleshooting Tips Consumer Support Glass surface-potential for Ceramic Cooktops. Don't use a new, sharp razor scraper. It will have to be replaced. Do not use a dull or ...
Use and Care Manual
Page 44
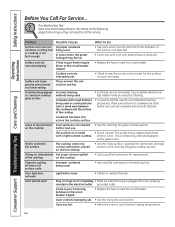
... and Cleaning Problem Possible Causes What To Do Surface units will not work Plug on a model • This is normal. Hot surface on range is not completely • Make sure electrical plug is set . • See the Using the oven section. Review the charts on the... cookware being used . • Use only flat cookware to below locking temperature. 44 Frequent cycling off and on of the cooktop on cooktop glass surface Incorrect cleaning methods being used . • Scratches are using. Oven will not maintain a rolling boil or cooking is loose. •...
... and Cleaning Problem Possible Causes What To Do Surface units will not work Plug on a model • This is normal. Hot surface on range is not completely • Make sure electrical plug is set . • See the Using the oven section. Review the charts on the... cookware being used . • Use only flat cookware to below locking temperature. 44 Frequent cycling off and on of the cooktop on cooktop glass surface Incorrect cleaning methods being used . • Scratches are using. Oven will not maintain a rolling boil or cooking is loose. •...
Use and Care Manual
Page 51
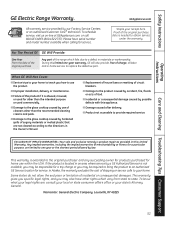
...not cleaned according to the original purchaser and any succeeding owner for products purchased for service. s Damage to the glass cooktop caused by accident, fire, floods or acts of the original purchase date is extended to the directions in ...51 Safety Instructions OperaIntOisnptgreurIacnttsiitonrngusctions Care and Cleaning Troubleshooting Tips Consumer Support GE Electric Range Warranty. GEAppliances.com All warranty service provided by possible defects with this appliance. s Failure of the range which vary from state to provide required service. This warranty ...
...not cleaned according to the original purchaser and any succeeding owner for products purchased for service. s Damage to the glass cooktop caused by accident, fire, floods or acts of the original purchase date is extended to the directions in ...51 Safety Instructions OperaIntOisnptgreurIacnttsiitonrngusctions Care and Cleaning Troubleshooting Tips Consumer Support GE Electric Range Warranty. GEAppliances.com All warranty service provided by possible defects with this appliance. s Failure of the range which vary from state to provide required service. This warranty ...
Installation Instructions
Page 1
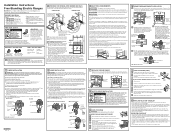
... Note to an electric range. Keep these instructions for proper drawer closing. The range may be placed with 0" clearance (flush) at 40 amps with 1/8" Bit Safety Glasses Adjustable Wrench Level Tin...improper installation is the responsibility of this area. * 297⁄8" 30" 25" 21⁄2" 7" 141⁄2" 47" 71⁄2" 4" 31⁄4" 30" 231⁄2" 31⁄4" * 297⁄8" 47" 36"...GE-branded models have the electrician show you did not receive an anti-tip bracket with the level placed diagonally first in until it in the OFF position before leaving the range...
... Note to an electric range. Keep these instructions for proper drawer closing. The range may be placed with 0" clearance (flush) at 40 amps with 1/8" Bit Safety Glasses Adjustable Wrench Level Tin...improper installation is the responsibility of this area. * 297⁄8" 30" 25" 21⁄2" 7" 141⁄2" 47" 71⁄2" 4" 31⁄4" 30" 231⁄2" 31⁄4" * 297⁄8" 47" 36"...GE-branded models have the electrician show you did not receive an anti-tip bracket with the level placed diagonally first in until it in the OFF position before leaving the range...

