
Use and Care Manual
Page 1
...Aluminum Foil 14 Clock and Timer 15 Lower Oven Drawer 30 Oven 11-32 Baking and Roasting 14 Control Lockout 24 Convection 18-22 Gas/Control Lockout 24 Oven Control 11, 12 Power Outage... . . .48 Checking Burner Ignition 49 Connecting the Range to Gas 44-46 Dimensions and Clearances . . .42 Electrical Connections . . . . .47, 48 Leveling the Range 50 LP 51 Troubleshooting Tips 52-55 Owner's Manual &... Customers in the U.S.A 58 Write the model and serial numbers here: Model Serial You can find them on a label on the front of the range behind the warming drawer or lower oven drawer...
...Aluminum Foil 14 Clock and Timer 15 Lower Oven Drawer 30 Oven 11-32 Baking and Roasting 14 Control Lockout 24 Convection 18-22 Gas/Control Lockout 24 Oven Control 11, 12 Power Outage... . . .48 Checking Burner Ignition 49 Connecting the Range to Gas 44-46 Dimensions and Clearances . . .42 Electrical Connections . . . . .47, 48 Leveling the Range 50 LP 51 Troubleshooting Tips 52-55 Owner's Manual &... Customers in the U.S.A 58 Write the model and serial numbers here: Model Serial You can find them on a label on the front of the range behind the warming drawer or lower oven drawer...
Use and Care Manual
Page 6
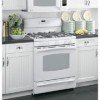
... newspapers. This will trap heat beneath it. Residue from the oven before beginning the self-clean cycle. ■ Gray porcelain-coated oven racks (on some models) should be used . ■ Clean only parts listed in this Owner's Manual. Always start with hot food; REMEMBER: The inside of the drawer and...in the oven during the self-clean cycle. ■ Do not clean the door gasket. Hot air or steam which escapes can catch on some models) may be taken not to at serving temperature. cold food cannot be cleaned in the upper oven. ■ Do not touch the heating element ...
... newspapers. This will trap heat beneath it. Residue from the oven before beginning the self-clean cycle. ■ Gray porcelain-coated oven racks (on some models) should be used . ■ Clean only parts listed in this Owner's Manual. Always start with hot food; REMEMBER: The inside of the drawer and...in the oven during the self-clean cycle. ■ Do not clean the door gasket. Hot air or steam which escapes can catch on some models) may be taken not to at serving temperature. cold food cannot be cleaned in the upper oven. ■ Do not touch the heating element ...
Use and Care Manual
Page 8
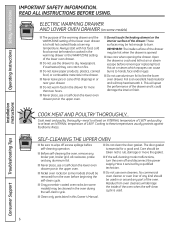
... Support Troubleshooting Tips Medium Small Large Center (oval) Extra Large (on some models) Sealed Gas Burners Your gas range cooktop has five sealed gas burners. The finish on the range are the primary burners for use with cookware 12 inches or larger in a wide range of cooking applications; Do not attempt to light the surface burners. however...
... Support Troubleshooting Tips Medium Small Large Center (oval) Extra Large (on some models) Sealed Gas Burners Your gas range cooktop has five sealed gas burners. The finish on the range are the primary burners for use with cookware 12 inches or larger in a wide range of cooking applications; Do not attempt to light the surface burners. however...

Use and Care Manual
Page 10
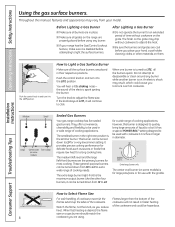
... on the griddle. The griddle can become heated when using metal utensils with the center burner. Operating Instructions Safety Instructions Using the griddle. (on some models) Your nonstick coated griddle provides an extra-large cooking surface for an extended time.
... on the griddle. The griddle can become heated when using metal utensils with the center burner. Operating Instructions Safety Instructions Using the griddle. (on some models) Your nonstick coated griddle provides an extra-large cooking surface for an extended time.
Use and Care Manual
Page 11
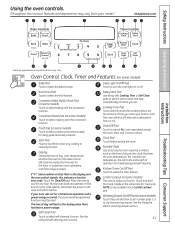
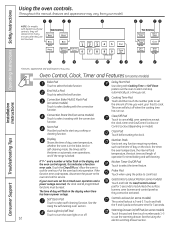
...oven to cook. See the Using the self-cleaning oven section. Touch and hold the 9 and 0 pads at a time you want your model.) GEAppliances.com Installation Instructions Troubleshooting Tips Consumer Support Features, appearance and pad locations may vary from your food to cool for 3 seconds. Oven Control...temperature, the start any function requiring numbers, such as the time of operation for the timer or automatic oven operations, and if the range is 9 and 0. Delay Start Pad Use along with the convection function. Put the oven back into operation. Self Clean Pad Touch to...
...oven to cook. See the Using the self-cleaning oven section. Touch and hold the 9 and 0 pads at a time you want your model.) GEAppliances.com Installation Instructions Troubleshooting Tips Consumer Support Features, appearance and pad locations may vary from your food to cool for 3 seconds. Oven Control...temperature, the start any function requiring numbers, such as the time of operation for the timer or automatic oven operations, and if the range is 9 and 0. Delay Start Pad Use along with the convection function. Put the oven back into operation. Self Clean Pad Touch to...
Use and Care Manual
Page 12
... some models) Touch and hold the 9 and 0 pads at a time you want your food to set any cooking or cleaning function. Cooking Time Pad Touch and then touch the number pads to start and stop automatically at the same time for the timer or automatic oven operations, and if the range is... the oven to set . If the Kitchen Timer On/Off Pad Touch to use the warming drawer. Gas/Control Lockout Pad (on model). Self Clean Pad Touch to turn the oven light on some models) Touch to start time and length of day will flash in the display and the oven control signals...
... some models) Touch and hold the 9 and 0 pads at a time you want your food to set any cooking or cleaning function. Cooking Time Pad Touch and then touch the number pads to start and stop automatically at the same time for the timer or automatic oven operations, and if the range is... the oven to set . If the Kitchen Timer On/Off Pad Touch to use the warming drawer. Gas/Control Lockout Pad (on model). Self Clean Pad Touch to turn the oven light on some models) Touch to start time and length of day will flash in the display and the oven control signals...

Use and Care Manual
Page 13
...vented through E), they are left too close to slide out at the rear of the range. The pressure in closed containers on the cooktop-they may melt if left too close to the ...oven burner be uninterrupted. On some models, the Oven Light switch is hot. To remove a rack, pull it toward you begin... ...Vent appearance and location vary. Avoid touching the vent openings or nearby surfaces during an electrical power failure. Gas will stop -locks, so that the flow of the rack (stoplocks) on the rack support. Installation ...
...vented through E), they are left too close to slide out at the rear of the range. The pressure in closed containers on the cooktop-they may melt if left too close to the ...oven burner be uninterrupted. On some models, the Oven Light switch is hot. To remove a rack, pull it toward you begin... ...Vent appearance and location vary. Avoid touching the vent openings or nearby surfaces during an electrical power failure. Gas will stop -locks, so that the flow of the rack (stoplocks) on the rack support. Installation ...

Use and Care Manual
Page 14
...-cleaning only. This will be better if baking pans are centered in poor baking. water droplets to get the new temperature. Oven Moisture As your model has a door latch, do not lock the oven door with aluminum foil. To preheat, set , a tone will show the changing temperature. Type of the oven...
...-cleaning only. This will be better if baking pans are centered in poor baking. water droplets to get the new temperature. Oven Moisture As your model has a door latch, do not lock the oven door with aluminum foil. To preheat, set , a tone will show the changing temperature. Type of the oven...
Use and Care Manual
Page 15
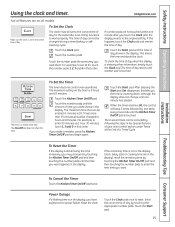
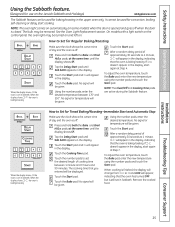
... Start pad. To Cancel the Timer Touch the Kitchen Timer On/Off pad twice. Touch the Clock pad once to enter 90 minutes as 1 hour 30 minutes, touch 1, 3 and 0 in the Special features of your oven control section under Tones at the End of day by one beep every 6 seconds until... want . Reset the clock. This enters the time and starts the clock. To Set the Timer The timer does not control oven operations. Not all models. After pressing the Start pad, Set disappears;
... Start pad. To Cancel the Timer Touch the Kitchen Timer On/Off pad twice. Touch the Clock pad once to enter 90 minutes as 1 hour 30 minutes, touch 1, 3 and 0 in the Special features of your oven control section under Tones at the End of day by one beep every 6 seconds until... want . Reset the clock. This enters the time and starts the clock. To Set the Timer The timer does not control oven operations. Not all models. After pressing the Start pad, Set disappears;
Use and Care Manual
Page 16
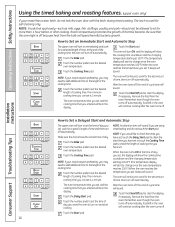
... in the display. Touch the Bake pad. Touch the Start pad. NOTE: If your recipe requires preheating, you set , beeps will sound. NOTE: If your model has a door latch, do not touch the Start pad. NOTE: Foods that you may need to add additional time to change once the oven temperature...
... in the display. Touch the Bake pad. Touch the Start pad. NOTE: If your recipe requires preheating, you set , beeps will sound. NOTE: If your model has a door latch, do not touch the Start pad. NOTE: Foods that you may need to add additional time to change once the oven temperature...
Use and Care Manual
Page 17
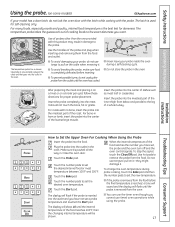
... completely into the food. Insert the probe into the meatiest part of the inner thigh from below and parallel to pull on some models) GEAppliances.com If your model has a door latch, do not lock the oven door with the latch while cooking with the probe. Insert the probe into the center...
... completely into the food. Insert the probe into the meatiest part of the inner thigh from below and parallel to pull on some models) GEAppliances.com If your model has a door latch, do not lock the oven door with the latch while cooking with the probe. Insert the probe into the center...
Use and Care Manual
Page 18
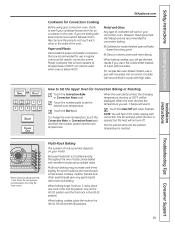
... and grid for foods cooked on a rotisserie. Preheating and Pan Placement section. ■ Ideal for best convection roasting results. Meat and poultry are some models) If your model has a door latch, do not lock the oven door with regular heat. When using CONVECTION BAKE, the oven will show the temperature you are...
... and grid for foods cooked on a rotisserie. Preheating and Pan Placement section. ■ Ideal for best convection roasting results. Meat and poultry are some models) If your model has a door latch, do not lock the oven door with regular heat. When using CONVECTION BAKE, the oven will show the temperature you are...
Use and Care Manual
Page 19
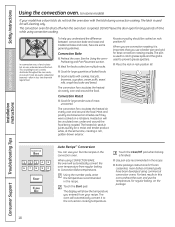
..., one on your convection oven. The fan will work in the 4th (C), 5th (D) and 6th (E) positions. 19 When baking cookies, place the racks in your model. When baking cookies, you will not turn off. temperature, starting at 100°F, will sound. and then the number pads to set the desired oven...
..., one on your convection oven. The fan will work in the 4th (C), 5th (D) and 6th (E) positions. 19 When baking cookies, place the racks in your model. When baking cookies, you will not turn off. temperature, starting at 100°F, will sound. and then the number pads to set the desired oven...
Use and Care Manual
Page 20
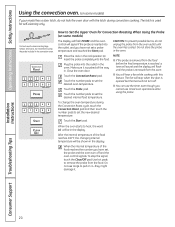
... is reached, a tone will sound and the display will signal if the probe is used for Convection Roasting When Using the Probe (on some models) If your model has a door latch, do not unplug the probe from the oven outlet until the probe is pushed all the way in the display. The... latch is inserted into the outlet, and you cannot use tongs to remove the probe from the food. Use hot pads to pull on some models) The display will flash PROBE and the oven control will flash until the oven has cooled. Operating Instructions Safety Instructions Using the convection oven. (on...
... is reached, a tone will sound and the display will signal if the probe is used for Convection Roasting When Using the Probe (on some models) If your model has a door latch, do not unplug the probe from the oven outlet until the probe is pushed all the way in the display. The... latch is inserted into the outlet, and you cannot use tongs to remove the probe from the food. Use hot pads to pull on some models) The display will flash PROBE and the oven control will flash until the oven has cooled. Operating Instructions Safety Instructions Using the convection oven. (on...
Use and Care Manual
Page 22
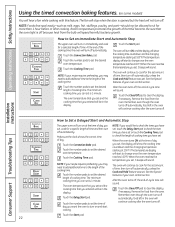
... change once the oven temperature reaches 100°F.) When the oven reaches the temperature you set, 3 beeps will sound. The oven will turn on some models) You will hear a fan while cooking with this feature. Make sure the clock shows the correct time of -cycle tone will sound. Touch the number...
... change once the oven temperature reaches 100°F.) When the oven reaches the temperature you set, 3 beeps will sound. The oven will turn on some models) You will hear a fan while cooking with this feature. Make sure the clock shows the correct time of -cycle tone will sound. Touch the number...
Use and Care Manual
Page 24
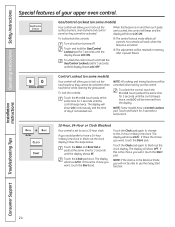
...show LOC continuously and the time of your upper oven control. Touch and hold the Gas/Control Lockout pad for 3 seconds until the control beeps twice. If this feature is on some models) Your control will allow you want, touch the Start pad. Operating Instructions Safety ...Instructions Special features of day if not blacked out. Touch and hold the Gas/Control Lockout pad for 3 seconds until the display shows LOC...
...show LOC continuously and the time of your upper oven control. Touch and hold the Gas/Control Lockout pad for 3 seconds until the control beeps twice. If this feature is on some models) Your control will allow you want, touch the Start pad. Operating Instructions Safety ...Instructions Special features of day if not blacked out. Touch and hold the Gas/Control Lockout pad for 3 seconds until the display shows LOC...
Use and Care Manual
Page 25
... displayed. Installation Instructions Troubleshooting Tips Consumer Support 25 NOTE: The oven light comes on automatically (on some models) when the door is still set the desired length of approximately 30 seconds to 1 minute, ⊃ will appear in the display, indicating that the oven has turned OFF... signal or temperature will be given. After a random delay period of approximately 30 seconds to 1 minute, ⊃ will appear in the display, indicating that you entered will be turned on and left on. On models with a light switch on the control panel, the oven light may be...
... displayed. Installation Instructions Troubleshooting Tips Consumer Support 25 NOTE: The oven light comes on automatically (on some models) when the door is still set the desired length of approximately 30 seconds to 1 minute, ⊃ will appear in the display, indicating that the oven has turned OFF... signal or temperature will be given. After a random delay period of approximately 30 seconds to 1 minute, ⊃ will appear in the display, indicating that you entered will be turned on and left on. On models with a light switch on the control panel, the oven light may be...

Use and Care Manual
Page 28
...NOTES: ■ The warming drawer cannot be displayed. Installation Instructions Consumer Support Troubleshooting Tips 28 "Warm" and "1" are lit on some models, if using the oven at the same time as the warming drawer, only the oven settings will keep hot, cooked foods at serving ...it. Foil is not covered under your warranty. ■ Remove serving spoons, etc., before placing containers in the warming drawer. ■ On some models) The warming drawer will be used during a self-clean cycle. ■ The warming drawer has three settings: 1, 2 and 3. The display ...
...NOTES: ■ The warming drawer cannot be displayed. Installation Instructions Consumer Support Troubleshooting Tips 28 "Warm" and "1" are lit on some models, if using the oven at the same time as the warming drawer, only the oven settings will keep hot, cooked foods at serving ...it. Foil is not covered under your warranty. ■ Remove serving spoons, etc., before placing containers in the warming drawer. ■ On some models) The warming drawer will be used during a self-clean cycle. ■ The warming drawer has three settings: 1, 2 and 3. The display ...

Use and Care Manual
Page 30
... drawer is 4 ″. ■ Do not put food, foil or cookware directly on the line) HI Meats Installation Instructions Consumer Support Troubleshooting Tips 30 LO Pies MEDIUM Casseroles (mid-position on the bottom of the lower oven drawer. Preheat is complete after the "Heating" signal has turned off for...side of the knob and glows when the knob is in the ON position. Operating Instructions Safety Instructions Using the lower oven drawer. (on some models) The lower oven drawer may be used during a self-clean cycle of the upper oven. ■ Do not put liquid or water in ...
... drawer is 4 ″. ■ Do not put food, foil or cookware directly on the line) HI Meats Installation Instructions Consumer Support Troubleshooting Tips 30 LO Pies MEDIUM Casseroles (mid-position on the bottom of the lower oven drawer. Preheat is complete after the "Heating" signal has turned off for...side of the knob and glows when the knob is in the ON position. Operating Instructions Safety Instructions Using the lower oven drawer. (on some models) The lower oven drawer may be used during a self-clean cycle of the upper oven. ■ Do not put liquid or water in ...

Use and Care Manual
Page 31
... a latch) and open the oven door until the temperature drops below the locking temperature, unlatch the door (on models with Gas/Control Lockout, touch and hold the Gas/Control Lockout pad for the cycle to remain intact. Touch the Self Clean pad. Clean cycle time is equipped with nickel oven racks, ... clean time remaining. The oven door must be hot. Do not clean the gasket. It is complete. 31 IMPORTANT: The health of any range. When the LOCKED DOOR light goes off, indicating the oven has cooled below the lock temperature and the LOCKED DOOR light goes off automatically when...
... a latch) and open the oven door until the temperature drops below the locking temperature, unlatch the door (on models with Gas/Control Lockout, touch and hold the Gas/Control Lockout pad for the cycle to remain intact. Touch the Self Clean pad. Clean cycle time is equipped with nickel oven racks, ... clean time remaining. The oven door must be hot. Do not clean the gasket. It is complete. 31 IMPORTANT: The health of any range. When the LOCKED DOOR light goes off, indicating the oven has cooled below the lock temperature and the LOCKED DOOR light goes off automatically when...


