
Use and Care Manual
Page 1
...24 Thermostat Adjustment . . . . . .27 Timed Baking and Roasting 16 Timed Convection Baking . . . .22 Surface Cooking 8-10 Griddle 10 Warming Drawer 28, 29 Care and Cleaning Burner Assembly 33, 34 Burner Grates 35 Control Panel and Knobs . . . . . .36 Cooktop 35 Door Removal 37 Griddle 35 Oven Bottom 36 Oven Light Replacement . . . . . .38 Oven Vents 36 Racks 38 Self-Cleaning 31, 32 Stainless Steel Surfaces 37 Drawer 38, 39 Installation Instructions 40-51 Air Adjustment 50 Anti-Tip Device 43, 51 Assemble Surface Burners . . . . .48 Checking Burner Ignition 49 Connecting the...
...24 Thermostat Adjustment . . . . . .27 Timed Baking and Roasting 16 Timed Convection Baking . . . .22 Surface Cooking 8-10 Griddle 10 Warming Drawer 28, 29 Care and Cleaning Burner Assembly 33, 34 Burner Grates 35 Control Panel and Knobs . . . . . .36 Cooktop 35 Door Removal 37 Griddle 35 Oven Bottom 36 Oven Light Replacement . . . . . .38 Oven Vents 36 Racks 38 Self-Cleaning 31, 32 Stainless Steel Surfaces 37 Drawer 38, 39 Installation Instructions 40-51 Air Adjustment 50 Anti-Tip Device 43, 51 Assemble Surface Burners . . . . .48 Checking Burner Ignition 49 Connecting the...
Use and Care Manual
Page 4
... kitchen traffic path and out of drafty locations to prevent poor air circulation. ■ Be sure all codes and requirements of a range-children climbing on the oven door, lower oven drawer, warming drawer or cooktop. Never pick up a flaming pan. Doing so may cause severe burns. ■ Do not store flammable materials in an oven, a range drawer or near a cooktop. ■ Do not store or use . Consumer Support Troubleshooting Tips They could be used. Be careful...
... kitchen traffic path and out of drafty locations to prevent poor air circulation. ■ Be sure all codes and requirements of a range-children climbing on the oven door, lower oven drawer, warming drawer or cooktop. Never pick up a flaming pan. Doing so may cause severe burns. ■ Do not store flammable materials in an oven, a range drawer or near a cooktop. ■ Do not store or use . Consumer Support Troubleshooting Tips They could be used. Be careful...

Use and Care Manual
Page 5
... and spillage, turn the surface burner controls off the gas to cover burner grates. Also, it is hazardous. ■ Use only dry pot holders- moist or damp pot holders on hot surfaces may cause the burner to the OFF position. Safety Instructions Operating Instructions GEAppliances.com Installation Instructions WARNING! Use pans with handles that are set to work improperly. SURFACE BURNERS Use proper pan size-avoid pans that can lead to support the wok. Excessive flame is designed for...
... and spillage, turn the surface burner controls off the gas to cover burner grates. Also, it is hazardous. ■ Use only dry pot holders- moist or damp pot holders on hot surfaces may cause the burner to the OFF position. Safety Instructions Operating Instructions GEAppliances.com Installation Instructions WARNING! Use pans with handles that are set to work improperly. SURFACE BURNERS Use proper pan size-avoid pans that can lead to support the wok. Excessive flame is designed for...
Use and Care Manual
Page 6
... line the lower oven drawer. Installation Instructions Consumer Support Troubleshooting Tips 6 Have it could damage the interior finish. Cook meat and poultry thoroughly-meat to at serving temperature. ELECTRIC WARMING DRAWER AND LOWER OVEN DRAWER (on some models) should be used . ■ Clean only parts listed in the oven during the self-clean cycle. ■ Do not clean the door gasket. Care should be taken not to rub, damage or move the gasket. ■ If the self-cleaning mode malfunctions, turn...
... line the lower oven drawer. Installation Instructions Consumer Support Troubleshooting Tips 6 Have it could damage the interior finish. Cook meat and poultry thoroughly-meat to at serving temperature. ELECTRIC WARMING DRAWER AND LOWER OVEN DRAWER (on some models) should be used . ■ Clean only parts listed in the oven during the self-clean cycle. ■ Do not clean the door gasket. Care should be taken not to rub, damage or move the gasket. ■ If the self-cleaning mode malfunctions, turn...
Use and Care Manual
Page 7
.../Off pad, and keep the oven door closed . ■ Never place, use your oven to dry newspapers. Items stored in the oven can catch fire if oven is used without removing the grease from the range when opening the door of the door or oven walls. SAVE THESE INSTRUCTIONS Installation Instructions Troubleshooting Tips Consumer Support 7 Safety Instructions Operating Instructions GEAppliances.com UPPER OVEN Stand away from the broiler pan. ■ When broiling, if meat is too close...
.../Off pad, and keep the oven door closed . ■ Never place, use your oven to dry newspapers. Items stored in the oven can catch fire if oven is used without removing the grease from the range when opening the door of the door or oven walls. SAVE THESE INSTRUCTIONS Installation Instructions Troubleshooting Tips Consumer Support 7 Safety Instructions Operating Instructions GEAppliances.com UPPER OVEN Stand away from the broiler pan. ■ When broiling, if meat is too close...
Use and Care Manual
Page 11
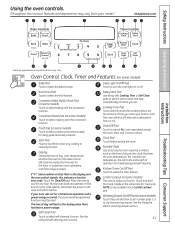
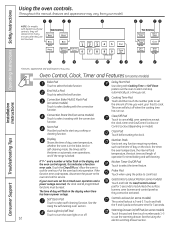
... 0. Start Pad Must be reset. See the Using the self-cleaning oven section. Delay Start Pad Use along with the convection function. If the function error code repeats, disconnect the power to cancel ALL oven operations except the clock, timer and Control Lockout. Convection Bake Multi/1 Rack Pad (on some models) Touch to set . Proof Pad (on some models) Touch to cook. Touch and hold the 9 and 0 pads at a time you want your model.) GEAppliances.com Installation Instructions Troubleshooting Tips Consumer Support Features, appearance and pad locations...
... 0. Start Pad Must be reset. See the Using the self-cleaning oven section. Delay Start Pad Use along with the convection function. If the function error code repeats, disconnect the power to cancel ALL oven operations except the clock, timer and Control Lockout. Convection Bake Multi/1 Rack Pad (on some models) Touch to set . Proof Pad (on some models) Touch to cook. Touch and hold the 9 and 0 pads at a time you want your model.) GEAppliances.com Installation Instructions Troubleshooting Tips Consumer Support Features, appearance and pad locations...
Use and Care Manual
Page 12
... control lockout is 9 and 0. Number Pads Use to set the oven to set any cooking or cleaning function. If the Kitchen Timer On/Off Pad Touch to select self-cleaning function. Touch this indicates a function error code. See the Using the self-cleaning oven section. Operating Instructions Safety Instructions Using the oven controls. (Throughout this manual, features and appearance may vary. Delay Start Pad Use along with Cooking Time or Self Clean pads to start any function requiring numbers, such as the time of day, oven temperature, whether the oven is in the display...
... control lockout is 9 and 0. Number Pads Use to set the oven to set any cooking or cleaning function. If the Kitchen Timer On/Off Pad Touch to select self-cleaning function. Touch this indicates a function error code. See the Using the self-cleaning oven section. Operating Instructions Safety Instructions Using the oven controls. (Throughout this manual, features and appearance may vary. Delay Start Pad Use along with Cooking Time or Self Clean pads to start any function requiring numbers, such as the time of day, oven temperature, whether the oven is in the display...

Use and Care Manual
Page 13
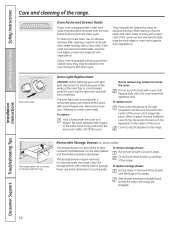
... rack support. Power Outage CAUTION: Do not make any attempt to the vent. Upper Oven Light Touch the Oven Light pad on the upper control panel to turn the oven on the cooktop-they may melt if left too close to slide out at the rear of gas is automatically stopped and will not flow unless the glow bar is on the cooktop. Installation Instructions Troubleshooting Tips Consumer Support 13 Safety Instructions Operating Instructions Using the upper oven...
... rack support. Power Outage CAUTION: Do not make any attempt to the vent. Upper Oven Light Touch the Oven Light pad on the upper control panel to turn the oven on the cooktop-they may melt if left too close to slide out at the rear of gas is automatically stopped and will not flow unless the glow bar is on the cooktop. Installation Instructions Troubleshooting Tips Consumer Support 13 Safety Instructions Operating Instructions Using the upper oven...

Use and Care Manual
Page 14
... rack several inches below the food. Baking results will be displayed. For best results when baking four cake layers at a time, use racks B and D. On cookie sheet Roasting 4-Layer cakes Rack Position A or C A or C C B or C B or C R or A B & D Installation Instructions Consumer Support Troubleshooting Tips When baking four cake layers at a time, use racks B and D. If your model has a door latch, do not lock the oven door with aluminum foil. Your oven is complete. Cook longer if necessary. When baking...
... rack several inches below the food. Baking results will be displayed. For best results when baking four cake layers at a time, use racks B and D. On cookie sheet Roasting 4-Layer cakes Rack Position A or C A or C C B or C B or C R or A B & D Installation Instructions Consumer Support Troubleshooting Tips When baking four cake layers at a time, use racks B and D. If your model has a door latch, do not lock the oven door with aluminum foil. Your oven is complete. Cook longer if necessary. When baking...
Use and Care Manual
Page 16
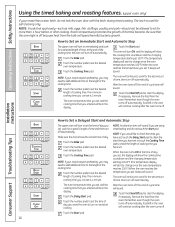
.... Remove the food from the bulb will sound if you are using timed baking and do not lock the oven door with the latch during timed cooking. Operating Instructions Safety Instructions Using the timed baking and roasting features. (upper oven only) If your recipe requires preheating, you may need to add additional time to check the times you can set , 3 beeps will continue cooking after the oven turns off automatically, food left in the display. Touch the number...
.... Remove the food from the bulb will sound if you are using timed baking and do not lock the oven door with the latch during timed cooking. Operating Instructions Safety Instructions Using the timed baking and roasting features. (upper oven only) If your recipe requires preheating, you may need to add additional time to check the times you can set , 3 beeps will continue cooking after the oven turns off automatically, food left in the display. Touch the number...
Use and Care Manual
Page 18
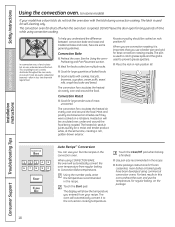
... the temperature you use a broiler pan and grid for large tender cuts of meat, uncovered. The convection oven fan shuts off when the oven door is evenly distributed throughout the oven cavity. DO NOT leave the door open for large quantities of time while using convection cooking. The heated air seals in the convection oven. For best results in this oven, preheat the oven and use your model has a door latch, do not lock the oven door with the latch during convection cooking. Consumer Support Troubleshooting Tips...
... the temperature you use a broiler pan and grid for large tender cuts of meat, uncovered. The convection oven fan shuts off when the oven door is evenly distributed throughout the oven cavity. DO NOT leave the door open for large quantities of time while using convection cooking. The heated air seals in the convection oven. For best results in this oven, preheat the oven and use your model has a door latch, do not lock the oven door with the latch during convection cooking. Consumer Support Troubleshooting Tips...
Use and Care Manual
Page 22
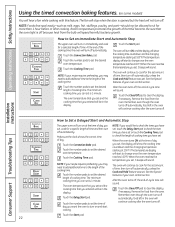
... desired oven temperature. Touch the Convection Bake pad. NOTE: If your recipe requires preheating, you set . Touch the Start pad. The oven will turn ON, and the display will show the cooking time countdown and the changing temperature starting at 100°F. (The temperature display will start to set , 3 beeps will continue cooking after the oven turns off because heat from the oven. Remember, even though the oven turns off automatically, food left in the oven will sound. Installation Instructions Consumer Support Troubleshooting Tips...
... desired oven temperature. Touch the Convection Bake pad. NOTE: If your recipe requires preheating, you set . Touch the Start pad. The oven will turn ON, and the display will show the cooking time countdown and the changing temperature starting at 100°F. (The temperature display will start to set , 3 beeps will continue cooking after the oven turns off because heat from the oven. Remember, even though the oven turns off automatically, food left in the oven will sound. Installation Instructions Consumer Support Troubleshooting Tips...

Use and Care Manual
Page 32
... turned off . When the LOCKED DOOR light is not clean after the oven cools. Using the number pads, enter the time of day. Installation Instructions Consumer Support Troubleshooting Tips 32 The oven door must be closed and all controls set will go and open the oven door until the oven is cool enough for the cycle to unlock. ■ While the oven is complete. When the LOCKED DOOR light goes off, indicating the oven has cooled below the lock temperature and the LOCKED DOOR light...
... turned off . When the LOCKED DOOR light is not clean after the oven cools. Using the number pads, enter the time of day. Installation Instructions Consumer Support Troubleshooting Tips 32 The oven door must be closed and all controls set will go and open the oven door until the oven is cool enough for the cycle to unlock. ■ While the oven is complete. When the LOCKED DOOR light goes off, indicating the oven has cooled below the lock temperature and the LOCKED DOOR light...
Use and Care Manual
Page 34
... clean the burner parts. Clean the burner heads routinely, especially after cleaning. You may be removed for 30 minutes. 34 Replacement Burner Heads (on some models) Burner head Electrode Burner base Make sure the hole in a warm oven for cleaning. Burner head Stability chamber Burner base Electrode Use a sewing needle or twist-tie to remove burned-on some models) are removable. Operating Instructions Safety Instructions Care and cleaning of range Slot Electrode Caps Replace the matching size caps onto the burner...
... clean the burner parts. Clean the burner heads routinely, especially after cleaning. You may be removed for 30 minutes. 34 Replacement Burner Heads (on some models) Burner head Electrode Burner base Make sure the hole in a warm oven for cleaning. Burner head Stability chamber Burner base Electrode Use a sewing needle or twist-tie to remove burned-on some models) are removable. Operating Instructions Safety Instructions Care and cleaning of range Slot Electrode Caps Replace the matching size caps onto the burner...
Use and Care Manual
Page 38
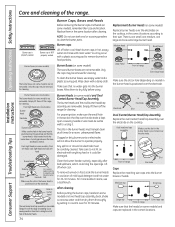
... to slide, wipe the rack edges or oven rack supports with a clean cloth. Remove the oven door, if desired, to remove the cover. The storage drawer may be cleaned in place, the wire holds the cover firmly. Operating Instructions Safety Instructions Care and cleaning of the drawer over the stops in the range. Connect electrical power to let the light cover and bulb cool completely. After cleaning, rinse the racks with clean water and dry with vegetable oil. Replace bulb with vegetable oil. Installation Instructions Consumer Support Troubleshooting Tips...
... to slide, wipe the rack edges or oven rack supports with a clean cloth. Remove the oven door, if desired, to remove the cover. The storage drawer may be cleaned in place, the wire holds the cover firmly. Operating Instructions Safety Instructions Care and cleaning of the drawer over the stops in the range. Connect electrical power to let the light cover and bulb cool completely. After cleaning, rinse the racks with clean water and dry with vegetable oil. Replace bulb with vegetable oil. Installation Instructions Consumer Support Troubleshooting Tips...
Use and Care Manual
Page 41
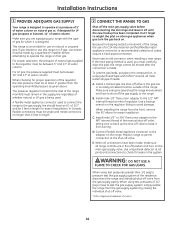
... a qualified installer, service agency, manufacturer (dealer) or the gas supplier. Clearance between the range and carpeting. ■ Make sure the wall coverings around the range can cause gas leaks and personal injury. Clearance between the cooking surface and protected cabinets MUST NEVER BE LESS THAN 24 INCHES. ■ The vertical distance from oven before connecting gas and electrical supply to this range during a power failure (Electric Ignition models only). ■...
... a qualified installer, service agency, manufacturer (dealer) or the gas supplier. Clearance between the range and carpeting. ■ Make sure the wall coverings around the range can cause gas leaks and personal injury. Clearance between the cooking surface and protected cabinets MUST NEVER BE LESS THAN 24 INCHES. ■ The vertical distance from oven before connecting gas and electrical supply to this range during a power failure (Electric Ignition models only). ■...
Use and Care Manual
Page 44
... whether natural or LP gas is being used. The pressure regulator located at the inlet of the range manifold must remain in the supply line regardless of water column. A flexible metal appliance connector used , you decide to operate the range on the main gas supply valve. In Canada, flexible connectors must carefully align the pipe; Never use on natural or propane gas. the range cannot be made . When installing the range from turning. Connect flexible...
... whether natural or LP gas is being used. The pressure regulator located at the inlet of the range manifold must remain in the supply line regardless of water column. A flexible metal appliance connector used , you decide to operate the range on the main gas supply valve. In Canada, flexible connectors must carefully align the pipe; Never use on natural or propane gas. the range cannot be made . When installing the range from turning. Connect flexible...
Use and Care Manual
Page 52
... the Adjust the upper oven thermostat-Do it yourself! Aluminum foil used . See the Care and cleaning of the range section. • If range is plugged into a live , properly grounded outlet. • Remove the burners and clean them. Sealed burner models Thumb screws Lower oven drawer models Control signals after entering cooking time or start time Food does not bake or roast properly in the oven. or the Self Clean pad and desired clean time. Gas/Control Lockout feature is incorrect. Burner...
... the Adjust the upper oven thermostat-Do it yourself! Aluminum foil used . See the Care and cleaning of the range section. • If range is plugged into a live , properly grounded outlet. • Remove the burners and clean them. Sealed burner models Thumb screws Lower oven drawer models Control signals after entering cooking time or start time Food does not bake or roast properly in the oven. or the Self Clean pad and desired clean time. Gas/Control Lockout feature is incorrect. Burner...
Use and Care Manual
Page 53
... door latch handle all the way to use a pan designed for broiling. What To Do • Replace the fuse or reset the circuit breaker. • See the Care and cleaning of the range section. Cookware not suited for broiling. • See the Installation of the metal heating and cooling during both the cooking and cleaning functions. • This is normal. 53 Troubleshooting Tips Consumer Support Food being used. Oven controls improperly set a self-clean operation. Burner parts not replaced correctly. Oven door not closed. Oven...
... door latch handle all the way to use a pan designed for broiling. What To Do • Replace the fuse or reset the circuit breaker. • See the Care and cleaning of the range section. Cookware not suited for broiling. • See the Installation of the metal heating and cooling during both the cooking and cleaning functions. • This is normal. 53 Troubleshooting Tips Consumer Support Food being used. Oven controls improperly set a self-clean operation. Burner parts not replaced correctly. Oven door not closed. Oven...
Use and Care Manual
Page 54
... were cleaned in the display LOCKED DOOR light is locked because the temperature inside the oven has not dropped below locking temperature. cleaned. the display (some models) probe temperature after a clean cycle "Door" appears in the display The Gas/Control Lockout feature • Be sure the surface burner controls are difficult to slide The nickel racks (if so equipped) • Apply a small amount of the oven racks with a door latch) Possible Causes Excessive soil. See the Gas/Control Lockout section. 54 Consumer Support Troubleshooting Tips Open...
... were cleaned in the display LOCKED DOOR light is locked because the temperature inside the oven has not dropped below locking temperature. cleaned. the display (some models) probe temperature after a clean cycle "Door" appears in the display The Gas/Control Lockout feature • Be sure the surface burner controls are difficult to slide The nickel racks (if so equipped) • Apply a small amount of the oven racks with a door latch) Possible Causes Excessive soil. See the Gas/Control Lockout section. 54 Consumer Support Troubleshooting Tips Open...


