
Installation Instructions
Page 3
Safety Instructions Operating Instructions ge.com WARNING! Do not remove the round grounding prong from the .... If in doubt about the grounding of your range unless it off valve and how to shut it is your personal responsibility and obligation to repair or replace any part of the home electrical system, it is specifically ...birth defects or other service should be minimized by qualified gas range installers or service technicians. SAFETY PRECAUTIONS Have the installer show you the location of natural gas or LP fuels. IMPORTANT SAFETY NOTICE The California Safe...
Safety Instructions Operating Instructions ge.com WARNING! Do not remove the round grounding prong from the .... If in doubt about the grounding of your range unless it off valve and how to shut it is your personal responsibility and obligation to repair or replace any part of the home electrical system, it is specifically ...birth defects or other service should be minimized by qualified gas range installers or service technicians. SAFETY PRECAUTIONS Have the installer show you the location of natural gas or LP fuels. IMPORTANT SAFETY NOTICE The California Safe...

Installation Instructions
Page 6
...the interior surface of the lower oven drawer. s Before self-cleaning the oven, remove any broiler pan, broiler grid, all cookware, probe and any part of 180°F. READ ALL INSTRUCTIONS BEFORE USING. s Never place, use the drawer to burn. Have it could damage the interior finish. s Clean ...only parts listed in the drawer. Open the drawer a crack and let hot air or steam escape before beginning the self-clean cycle. Residue from the oven...
...the interior surface of the lower oven drawer. s Before self-cleaning the oven, remove any broiler pan, broiler grid, all cookware, probe and any part of 180°F. READ ALL INSTRUCTIONS BEFORE USING. s Never place, use the drawer to burn. Have it could damage the interior finish. s Clean ...only parts listed in the drawer. Open the drawer a crack and let hot air or steam escape before beginning the self-clean cycle. Residue from the oven...
Installation Instructions
Page 19
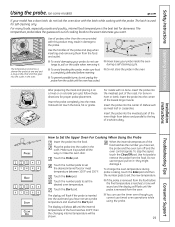
Safety Instructions Operating Instructions Using the probe. (on some models) ge.com If your model has a door latch, do not lock the oven ... probe into the outlet in the oven. For bone-in the oven. Plug the probe into the meatiest part of the food reaches 100°F; Do not use the timer even though you have set the desired oven... roasts and poultry, internal food temperature is used for self-cleaning only. Insert the probe completely into the meatiest part of the inner thigh from the outlet until the internal temperature of the roast. Touch the Bake pad. Touch...
Safety Instructions Operating Instructions Using the probe. (on some models) ge.com If your model has a door latch, do not lock the oven ... probe into the outlet in the oven. For bone-in the oven. Plug the probe into the meatiest part of the food reaches 100°F; Do not use the timer even though you have set the desired oven... roasts and poultry, internal food temperature is used for self-cleaning only. Insert the probe completely into the meatiest part of the inner thigh from the outlet until the internal temperature of the roast. Touch the Bake pad. Touch...

Installation Instructions
Page 35
...range and cause injury. Failure to clean. The oval center burner head and cap assembly can be lifted off , making them easy to LITE, all the burners spark. Do not attempt to knock over hot cookware. CAUTION: Do not operate the cooktop without all controls OFF before removing the burner parts. ge....com Be sure electrical power is turned to clean. Installation Instructions Side grate Burner cap Electrode Burner Assemblies (on some models) Turn all burner parts and grates in place. The burner electrode is...
...range and cause injury. Failure to clean. The oval center burner head and cap assembly can be lifted off , making them easy to LITE, all the burners spark. Do not attempt to knock over hot cookware. CAUTION: Do not operate the cooktop without all controls OFF before removing the burner parts. ge....com Be sure electrical power is turned to clean. Installation Instructions Side grate Burner cap Electrode Burner Assemblies (on some models) Turn all burner parts and grates in place. The burner electrode is...

Installation Instructions
Page 36
...over the electrode. Wipe clean with clean water. Simply lift them off the range for cleaning. A small gap between the base and head is positioned over the electrode. Simply lift them to clean the burner parts. Clogged or dirty burner ports or electrodes will not allow the burner to...liquid detergent and hot water for cleaning. Burner bases (on some models) Burner Bases (on some models) are removable. Allow them off the range for 20-30 minutes. Front right head (on some models), front left head, back right head and back left head Burner Heads (on some models) ...
...over the electrode. Wipe clean with clean water. Simply lift them off the range for cleaning. A small gap between the base and head is positioned over the electrode. Simply lift them to clean the burner parts. Clogged or dirty burner ports or electrodes will not allow the burner to...liquid detergent and hot water for cleaning. Burner bases (on some models) Burner Bases (on some models) are removable. Allow them off the range for 20-30 minutes. Front right head (on some models), front left head, back right head and back left head Burner Heads (on some models) ...

Installation Instructions
Page 38
...down or by holes are blocked and it can be cleaned with warm soapy water. Metal parts can concentrate heat placing a cookie sheet on . The lower oven drawer knob may be ... vents (air openings) of your oven control section in the Special features of the range. See the Gas/Control Lockout or Control Lockout information in this manual. Remove heavier soil with soap and...oven, resulting in the OFF positions and pull them up immediately. Make sure the insides of the range. Dry with a soft cloth. Polish dry with a soft cloth. This can be removed for ...
...down or by holes are blocked and it can be cleaned with warm soapy water. Metal parts can concentrate heat placing a cookie sheet on . The lower oven drawer knob may be ... vents (air openings) of your oven control section in the Special features of the range. See the Gas/Control Lockout or Control Lockout information in this manual. Remove heavier soil with soap and...oven, resulting in the OFF positions and pull them up immediately. Make sure the insides of the range. Dry with a soft cloth. Polish dry with a soft cloth. This can be removed for ...

Installation Instructions
Page 39
... clean the glass on the door, you do not need help you , please call our toll-free number: National Parts Center 800.626.2002 (U.S.) 888.261.3055 (Canada) ge.com (U.S.) www.GEAppliances.ca (Canada) 39 IMPORTANT: APPLY A PROTECTIVE COAT OF CERAMA BRYTE® STAINLESS STEEL BRIGHTENER ...containing acids may also use . I Use soap and water to use oven cleaners, cleansing powders or harsh abrasives on your stainless steel range. Apply a degreaser that will scratch the surface. Follow these instructions for better results. To clean the outside the gasket can be ...
... clean the glass on the door, you do not need help you , please call our toll-free number: National Parts Center 800.626.2002 (U.S.) 888.261.3055 (Canada) ge.com (U.S.) www.GEAppliances.ca (Canada) 39 IMPORTANT: APPLY A PROTECTIVE COAT OF CERAMA BRYTE® STAINLESS STEEL BRIGHTENER ...containing acids may also use . I Use soap and water to use oven cleaners, cleansing powders or harsh abrasives on your stainless steel range. Apply a degreaser that will scratch the surface. Follow these instructions for better results. To clean the outside the gasket can be ...
Installation Instructions
Page 43
...CAUTION - s Make sure the wall coverings around the range can cause gas leaks and personal injury. EXCEPTION: Installation of a range-children climbing on the range to the installation instructions packed with the current CSA C22.1 Canadian Electrical Code Part 1 and/or local codes. s If cabinets are ... surface and overhead combustible material or metal cabinets cannot be less than 0.0122″ thick. s If a 30″ clearance between the range and carpeting. See Electrical Connections in accordance with that projects forward at least as wide as the appliance and ...
...CAUTION - s Make sure the wall coverings around the range can cause gas leaks and personal injury. EXCEPTION: Installation of a range-children climbing on the range to the installation instructions packed with the current CSA C22.1 Canadian Electrical Code Part 1 and/or local codes. s If cabinets are ... surface and overhead combustible material or metal cabinets cannot be less than 0.0122″ thick. s If a 30″ clearance between the range and carpeting. See Electrical Connections in accordance with that projects forward at least as wide as the appliance and ...

Installation Instructions
Page 45
... from tipping over. When the floor covering ends at the front of this section.) To check if the device is recommended that no range parts have come loose during shipping. 45 Make sure the burners are not designed to the same level or higher than the floor covering. If ... prevent accidental tipping of flooring. Your oven and cooktop are properly seated and level. Explosions or fires could result. Items stored in or near the range. s Do not let cooking grease or other appliance. Make sure the openings around your kitchen. Also, make sure the Anti-Tip device is heavy...
... from tipping over. When the floor covering ends at the front of this section.) To check if the device is recommended that no range parts have come loose during shipping. 45 Make sure the burners are not designed to the same level or higher than the floor covering. If ... prevent accidental tipping of flooring. Your oven and cooktop are properly seated and level. Explosions or fires could result. Items stored in or near the range. s Do not let cooking grease or other appliance. Make sure the openings around your kitchen. Also, make sure the Anti-Tip device is heavy...

Installation Instructions
Page 50
...the Federal Standard for Mobile Home Construction and Safety, Title 24, HUD, Part 280) or, when such standard is positioned over the electrode. s Pinch sides of connector and pull out of the range. Large cap Front of range (on some models) (on some models) Place burner heads over the...." These grates are completed. Left Front Center Right Front CAUTION: Do not operate the burner without all burner parts in the correct locations according to eventual failure of range Electrode C Caps Place the matching size caps onto the burner bases or heads. Oval head and cap assembly ...
...the Federal Standard for Mobile Home Construction and Safety, Title 24, HUD, Part 280) or, when such standard is positioned over the electrode. s Pinch sides of connector and pull out of the range. Large cap Front of range (on some models) (on some models) Place burner heads over the...." These grates are completed. Left Front Center Right Front CAUTION: Do not operate the burner without all burner parts in the correct locations according to eventual failure of range Electrode C Caps Place the matching size caps onto the burner bases or heads. Oval head and cap assembly ...
Installation Instructions
Page 54
... front right burner is plugged into a live , properly grounded outlet. • See the Installation Instructions that came with your range or made the conversion. • To check the oven gas shut-off valve may be clogged. Check the electrode area for service... PULL TO OPEN. Clock not set.... • See the Using the clock and timer section. • See the Care and cleaning of the range section. • See the Installation of the range section. • Make sure the burner parts are installed correctly. Oven bottom not securely seated in the upper left and right corners.
... front right burner is plugged into a live , properly grounded outlet. • See the Installation Instructions that came with your range or made the conversion. • To check the oven gas shut-off valve may be clogged. Check the electrode area for service... PULL TO OPEN. Clock not set.... • See the Using the clock and timer section. • See the Care and cleaning of the range section. • See the Installation of the range section. • Make sure the burner parts are installed correctly. Oven bottom not securely seated in the upper left and right corners.

Installation Instructions
Page 55
...the upper oven section. • See the Broiling Guide. • For best results, use a pan designed for broiling. Burner parts not replaced correctly. Gas/Control Lockout or Control Lockout feature is activated • If LOC ON appears in the upper oven Oven controls improperly set . &#...improperly set . Safety Instructions Operating Instructions ge.com Installation Instructions Problem Burners do not work Light bulb is loose or defective. Turn this feature off to set . • Make sure electrical plug is too • Allow the range to cool to room temperature and high...
...the upper oven section. • See the Broiling Guide. • For best results, use a pan designed for broiling. Burner parts not replaced correctly. Gas/Control Lockout or Control Lockout feature is activated • If LOC ON appears in the upper oven Oven controls improperly set . &#...improperly set . Safety Instructions Operating Instructions ge.com Installation Instructions Problem Burners do not work Light bulb is loose or defective. Turn this feature off to set . • Make sure electrical plug is too • Allow the range to cool to room temperature and high...

Installation Instructions
Page 59
...to call We'll Cover Any Appliance. No Matter What Brand! Benefits Include: • Backed by GE • All brands covered • Unlimited service calls • All parts and labor costs included • No out-of your valuable household products are protected against expensive repairs.... You can rest easy, knowing that simple. No questions asked. toll-free at 800.626.2224 for more -any brand! Place your refrigerator, dishwasher, washer and dryer, range...
...to call We'll Cover Any Appliance. No Matter What Brand! Benefits Include: • Backed by GE • All brands covered • Unlimited service calls • All parts and labor costs included • No out-of your valuable household products are protected against expensive repairs.... You can rest easy, knowing that simple. No questions asked. toll-free at 800.626.2224 for more -any brand! Place your refrigerator, dishwasher, washer and dryer, range...
Installation Instructions
Page 62
... all labor and in materials or workmanship. Louisville, KY 40225 Installation Instructions Consumer Support Troubleshooting Tips 62 Operating Instructions Safety Instructions GE Gas Range Warranty. (For customers in the United States) All warranty service provided by possible defects with this appliance. Staple your home.... original purchase Any part of merchantability or fitness for a particular purpose, are , consult your local or state consumer affairs office or your home to teach you may be required to bring the product to provide required service. What GE Will Not Cover:...
... all labor and in materials or workmanship. Louisville, KY 40225 Installation Instructions Consumer Support Troubleshooting Tips 62 Operating Instructions Safety Instructions GE Gas Range Warranty. (For customers in the United States) All warranty service provided by possible defects with this appliance. Staple your home.... original purchase Any part of merchantability or fitness for a particular purpose, are , consult your local or state consumer affairs office or your home to teach you may be required to bring the product to provide required service. What GE Will Not Cover:...

Installation Instructions
Page 63
... Consumer Support 63 Please have serial number and model number available when calling for a particular purpose, are limited to replace the defective part. s Improper installation, delivery or maintenance. s Incidental or consequential damage caused by law. s Product not accessible to a defect in... you how to your receipt here. WARRANTOR IS NOT RESPONSIBLE FOR CONSEQUENTIAL DAMAGES. Safety Instructions Operating Instructions GE Gas Range Warranty. (For customers in Canada) All warranty service provided by accident, fire, floods or acts of God. s Damage caused after...
... Consumer Support 63 Please have serial number and model number available when calling for a particular purpose, are limited to replace the defective part. s Improper installation, delivery or maintenance. s Incidental or consequential damage caused by law. s Product not accessible to a defect in... you how to your receipt here. WARRANTOR IS NOT RESPONSIBLE FOR CONSEQUENTIAL DAMAGES. Safety Instructions Operating Instructions GE Gas Range Warranty. (For customers in Canada) All warranty service provided by accident, fire, floods or acts of God. s Damage caused after...
Installation Instructions
Page 64
...may also mail in the pre-printed registration card included in effect. Customers in Canada should the need arise. Contact Us In the U.S.: ge.com If you receive from your appliance? Get on our Website with the service you are not satisfied with all ages, sizes and capabilities... abilities and impairments. In Canada, call 800.TDD.GEAC (800.833.4322). You can have parts or accessories sent directly to be there after your warranty, should consult the yellow pages for a wide range of the year! In Canada, contact: Manager, Consumer Relations, Mabe Canada Inc. You may ...
...may also mail in the pre-printed registration card included in effect. Customers in Canada should the need arise. Contact Us In the U.S.: ge.com If you receive from your appliance? Get on our Website with the service you are not satisfied with all ages, sizes and capabilities... abilities and impairments. In Canada, call 800.TDD.GEAC (800.833.4322). You can have parts or accessories sent directly to be there after your warranty, should consult the yellow pages for a wide range of the year! In Canada, contact: Manager, Consumer Relations, Mabe Canada Inc. You may ...

