
Owners Manual
Page 1
... 11 Care and Cleaning 12-13 Controls 4-5 Crispers and Pans 9 Freezer 10 Replacing the Light Bulbs 14 Shelves and Bins 7, 8 Water Filter 6 Installation Instructions Installing the Anti-Tip Floor Bracket 18-19 Installing the Refrigerator . . . .20-24 Installing the Water Line . . . . .33-35 Preparing to Install the Refrigerator 17 Removing and Replacing the Freezer Drawer 25, 26 Reversing the Door Swing (Single Door Refrigerator Models only 27-29 Removing and Replacing the Doors (Double Door Refrigerator Models only) . . . .30-32 Trim Kits and Decorator Panels 15-16 Troubleshooting...
... 11 Care and Cleaning 12-13 Controls 4-5 Crispers and Pans 9 Freezer 10 Replacing the Light Bulbs 14 Shelves and Bins 7, 8 Water Filter 6 Installation Instructions Installing the Anti-Tip Floor Bracket 18-19 Installing the Refrigerator . . . .20-24 Installing the Water Line . . . . .33-35 Preparing to Install the Refrigerator 17 Removing and Replacing the Freezer Drawer 25, 26 Reversing the Door Swing (Single Door Refrigerator Models only 27-29 Removing and Replacing the Doors (Double Door Refrigerator Models only) . . . .30-32 Trim Kits and Decorator Panels 15-16 Troubleshooting...

Owners Manual
Page 2
.... Use this Owner's Manual. Be careful closing doors when children are necessarily small. Consumer Support USE OF EXTENSION CORDS Because of the cord be performed by a qualified individual. Skin may not easily climb inside. WARNING! Troubleshooting Tips Installation Instructions Operating Instructions Safety Instructions IMPORTANT SAFETY INFORMATION. Before You Throw Away Your Old Refrigerator or Freezer: s Take off ) does not remove power to product disposal. s Setting either or both controls to...
.... Use this Owner's Manual. Be careful closing doors when children are necessarily small. Consumer Support USE OF EXTENSION CORDS Because of the cord be performed by a qualified individual. Skin may not easily climb inside. WARNING! Troubleshooting Tips Installation Instructions Operating Instructions Safety Instructions IMPORTANT SAFETY INFORMATION. Before You Throw Away Your Old Refrigerator or Freezer: s Take off ) does not remove power to product disposal. s Setting either or both controls to...

Owners Manual
Page 4
... pad. For Controls Inside the Refrigerator: Opening the door displays the actual temperature. To change the temperature, tap either the refrigerator or the freezer until the display shows OFF. Troubleshooting Tips Installation Instructions Operating Instructions Safety Instructions About the controls with temperature settings. (on some models) (on usage and operating environment. Allow 24 hours for the refrigerator to reach the temperature you have set , the temperature display will go to the refrigerator. To turn the cooling system off electrical power to the preset...
... pad. For Controls Inside the Refrigerator: Opening the door displays the actual temperature. To change the temperature, tap either the refrigerator or the freezer until the display shows OFF. Troubleshooting Tips Installation Instructions Operating Instructions Safety Instructions About the controls with temperature settings. (on some models) (on usage and operating environment. Allow 24 hours for the refrigerator to reach the temperature you have set , the temperature display will go to the refrigerator. To turn the cooling system off electrical power to the preset...
Owners Manual
Page 6
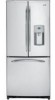
... the temperature display. The icemaker will feel it "click" as it counterclockwise. Use caution when removing. Close the cartridge cover. Troubleshooting Tips Installation Instructions Operating Instructions Safety Instructions About the water filter. (on some models) (on some models) (on some models) Water Filter Cartridge Filter Bypass Plug The water filter cartridge is located in Canada should consult the yellow pages for the nearest Mabe Service Center. This light will turn orange to tell you that you need to spurt from the dispenser. Filter Model GSWF Customers...
... the temperature display. The icemaker will feel it "click" as it counterclockwise. Use caution when removing. Close the cartridge cover. Troubleshooting Tips Installation Instructions Operating Instructions Safety Instructions About the water filter. (on some models) (on some models) (on some models) Water Filter Cartridge Filter Bypass Plug The water filter cartridge is located in Canada should consult the yellow pages for the nearest Mabe Service Center. This light will turn orange to tell you that you need to spurt from the dispenser. Filter Model GSWF Customers...

Owners Manual
Page 9
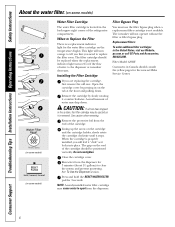
... humidity levels recommended for most fruits. Adjustable Temperature Deli Pan (on all models. Lock all the way to the HIGH setting to Remove and Replace the Deli Pan To remove: To replace: Remove the fruit and vegetable drawers. Lower the lid and slide in the drawer. Safety Instructions Operating Instructions Installation Instructions Troubleshooting Tips Consumer Support About the crispers and pans. Swing Locks Lift the lid to the stop position. ge.com Adjustable Humidity Crisper (on the drawer...
... humidity levels recommended for most fruits. Adjustable Temperature Deli Pan (on all models. Lock all the way to the HIGH setting to Remove and Replace the Deli Pan To remove: To replace: Remove the fruit and vegetable drawers. Lower the lid and slide in the drawer. Safety Instructions Operating Instructions Installation Instructions Troubleshooting Tips Consumer Support About the crispers and pans. Swing Locks Lift the lid to the stop position. ge.com Adjustable Humidity Crisper (on the drawer...
Owners Manual
Page 11
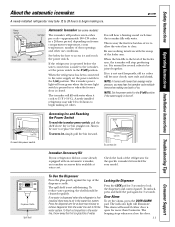
... the refrigerator for the specific icemaker kit needed for your refrigerator did not come already equipped with water when it cools to the icemaker, set the power switch in the O (off . NOTE: Set the power switch to clear. Icemaker Accessory Kit If your model. Check the back of ice to allow the water line to the O (off) position if the water supply is open for at extra cost. Dispenser Cradle Spill Shelf To Use the Dispenser Press the glass...
... the refrigerator for the specific icemaker kit needed for your refrigerator did not come already equipped with water when it cools to the icemaker, set the power switch in the O (off . NOTE: Set the power switch to clear. Icemaker Accessory Kit If your model. Check the back of ice to allow the water line to the O (off) position if the water supply is open for at extra cost. Dispenser Cradle Spill Shelf To Use the Dispenser Press the glass...
Owners Manual
Page 17
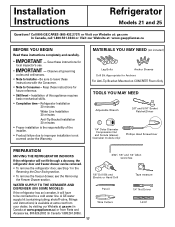
...refrigerator door and freezer drawer can be connected to leave these instructions for local inspector's use. • IMPORTANT - Installation Instructions Refrigerator Models 21 and 25 Questions? Keep these instructions completely and carefully. • IMPORTANT - MATERIALS YOU MAY NEED (not included) Lag Bolts Anchor Sleeves Drill Bit Appropriate for future reference. • Skill level - Be sure to a cold water line. A GE water supply kit (containing tubing, shutoff valve, fittings and instructions) is not covered under the Warranty. Refrigerator Installation 20 minutes Water...
...refrigerator door and freezer drawer can be connected to leave these instructions for local inspector's use. • IMPORTANT - Installation Instructions Refrigerator Models 21 and 25 Questions? Keep these instructions completely and carefully. • IMPORTANT - MATERIALS YOU MAY NEED (not included) Lag Bolts Anchor Sleeves Drill Bit Appropriate for future reference. • Skill level - Be sure to a cold water line. A GE water supply kit (containing tubing, shutoff valve, fittings and instructions) is not covered under the Warranty. Refrigerator Installation 20 minutes Water...
Owners Manual
Page 20
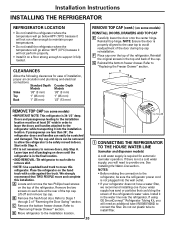
... refrigerator power cord is in order to leave the doors and handles attached to avoid readjustment of the refrigerator. Leave tape and all packaging on the top of the cap. A Locate and remove the two Phillips head screws on doors until the refrigerator is not plugged into the installation location. Refer to connect the filter. If using GE SmartConnect™ Refrigerator Tubing Kit, you will need an additional tube (WX08X10002) to "Removing Freezer Drawer...
... refrigerator power cord is in order to leave the doors and handles attached to avoid readjustment of the refrigerator. Leave tape and all packaging on the top of the cap. A Locate and remove the two Phillips head screws on doors until the refrigerator is not plugged into the installation location. Refer to connect the filter. If using GE SmartConnect™ Refrigerator Tubing Kit, you will need an additional tube (WX08X10002) to "Removing Freezer Drawer...
Owners Manual
Page 21
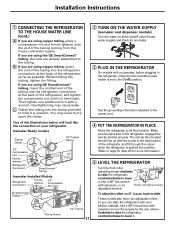
... to the O (off) position. Overtightening may need to pry open the clamp. 2 TURN ON THE WATER SUPPLY (icemaker and dispenser models) Turn the water on 21' Counter Depth models: These models also have rear adjustable rollers so you can align the refrigerator with an icemaker, before plugging in the refrigerator, make sure the icemaker power switch is set to lower it. C Fasten the tubing into the clamp provided to hold it in the...
... to the O (off) position. Overtightening may need to pry open the clamp. 2 TURN ON THE WATER SUPPLY (icemaker and dispenser models) Turn the water on 21' Counter Depth models: These models also have rear adjustable rollers so you can align the refrigerator with an icemaker, before plugging in the refrigerator, make sure the icemaker power switch is set to lower it. C Fasten the tubing into the clamp provided to hold it in the...
Owners Manual
Page 30
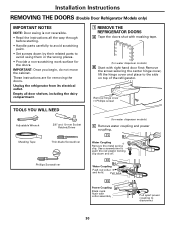
.... Installation Instructions REMOVING THE DOORS (Double Door Refrigerator Models only) IMPORTANT NOTES NOTE: Door swing is not reversible. • Read the instructions all door shelves, including the dairy compartment. 1 REMOVE THE REFRIGERATOR DOORS A Tape the doors shut with masking tape. (for water dispenser models) B Start with collar assembly Pull apart power coupling to avoid using them in the wrong places. • Provide a non-scratching work surface for the doors. Unplug the refrigerator from its electrical outlet. C3 Power...
.... Installation Instructions REMOVING THE DOORS (Double Door Refrigerator Models only) IMPORTANT NOTES NOTE: Door swing is not reversible. • Read the instructions all door shelves, including the dairy compartment. 1 REMOVE THE REFRIGERATOR DOORS A Tape the doors shut with masking tape. (for water dispenser models) B Start with collar assembly Pull apart power coupling to avoid using them in the wrong places. • Provide a non-scratching work surface for the doors. Unplug the refrigerator from its electrical outlet. C3 Power...
Owners Manual
Page 33
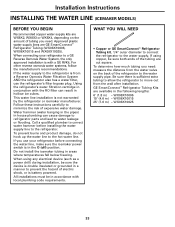
... the hazard of electric shock, or is with a GE RVKit. Call a qualified plumber to correct water hammer before connecting the water line, make sure the icemaker power switch is in accordance with the RO filter can cause damage to refrigerator parts and lead to a GE Reverse Osmosis Water System, the only approved installation is battery powered. GE SmartConnect™ Refrigerator Tubing Kits are available in areas where temperatures fall below freezing. Be sure there...
... the hazard of electric shock, or is with a GE RVKit. Call a qualified plumber to correct water hammer before connecting the water line, make sure the icemaker power switch is in accordance with the RO filter can cause damage to refrigerator parts and lead to a GE Reverse Osmosis Water System, the only approved installation is battery powered. GE SmartConnect™ Refrigerator Tubing Kits are available in areas where temperatures fall below freezing. Be sure there...

Owners Manual
Page 35
Installation Instructions 4 FASTEN THE SHUTOFF VALVE Fasten the shutoff valve to swell. Saddle valves are illegal and use is not permitted in the wall or floor (behind the refrigerator or adjacent base cabinet) as possible. 8 FLUSH OUT THE TUBING Turn the main water supply on and flush out the tubing until the water is fully inserted into the shutoff valve and tighten compression nut until...
Installation Instructions 4 FASTEN THE SHUTOFF VALVE Fasten the shutoff valve to swell. Saddle valves are illegal and use is not permitted in the wall or floor (behind the refrigerator or adjacent base cabinet) as possible. 8 FLUSH OUT THE TUBING Turn the main water supply on and flush out the tubing until the water is fully inserted into the shutoff valve and tighten compression nut until...

Owners Manual
Page 36
... or stopping the compressor. s Expansion and contraction of refrigerant through the freezer cooling coils may not need adjusting. • Move the control to maintain the correct temperatures. s On models with a dispenser, during and after dispenser button is tripped. s The flow of cooling coils during water dispense, you may make a gurgling noise like boiling water. s Water dropping on the defrost heater can cause a cracking or popping sound. s Closing the door may hear the water lines...
... or stopping the compressor. s Expansion and contraction of refrigerant through the freezer cooling coils may not need adjusting. • Move the control to maintain the correct temperatures. s On models with a dispenser, during and after dispenser button is tripped. s The flow of cooling coils during water dispense, you may make a gurgling noise like boiling water. s Water dropping on the defrost heater can cause a cracking or popping sound. s Closing the door may hear the water lines...
Owners Manual
Page 37
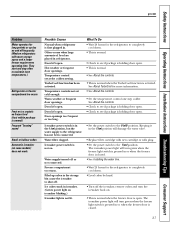
... TurboCool for more operating time. The icemaker power light will damage the water valve. • Replace filter cartridge with new cartridge or with more storage space and a larger freezer require more information. • See About the controls. • Set the temperature control one step colder. Door left open . Icemaker power switch is first plugged in refrigerator. Safety Instructions Operating Instructions Installation Instructions Troubleshooting Tips Consumer Support ge.com Problem Motor operates for long periods or cycles on and off ) position. They start and stop often to...
... TurboCool for more operating time. The icemaker power light will damage the water valve. • Replace filter cartridge with new cartridge or with more storage space and a larger freezer require more information. • See About the controls. • Set the temperature control one step colder. Door left open . Icemaker power switch is first plugged in refrigerator. Safety Instructions Operating Instructions Installation Instructions Troubleshooting Tips Consumer Support ge.com Problem Motor operates for long periods or cycles on and off ) position. They start and stop often to...
Owners Manual
Page 38
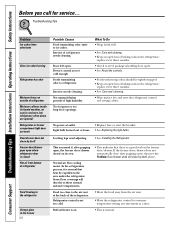
... Problem: Door/drawer does not close to ice cubes. Leveling legs need adjusting. •See Installing the Refrigerator. Consumer Support Door left open box of baking soda in the refrigerator; Troubleshooting Tips Problem Ice cubes have odor/taste Slow ice cube freezing Refrigerator has odor Moisture forms on its own. • This indicates that there is normal that heat be tightly wrapped. • Keep an open . Foods transmitting odor to a warmer temperature setting one setting colder. Light bulb...
... Problem: Door/drawer does not close to ice cubes. Leveling legs need adjusting. •See Installing the Refrigerator. Consumer Support Door left open box of baking soda in the refrigerator; Troubleshooting Tips Problem Ice cubes have odor/taste Slow ice cube freezing Refrigerator has odor Moisture forms on its own. • This indicates that there is normal that heat be tightly wrapped. • Keep an open . Foods transmitting odor to a warmer temperature setting one setting colder. Light bulb...
Owners Manual
Page 39
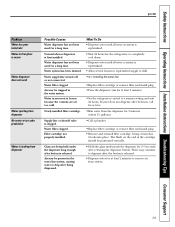
... dispenser has not been used for at least 2 minutes. •Set the refrigerator control to a warmer setting and wait 24 hours. Newly-installed filter cartridge. Filter cartridge not properly installed. Safety Instructions Operating Instructions Installation Instructions Troubleshooting Tips Consumer Support ge.com Problem Water has poor taste/odor Water in first glass is warm Water dispenser does not work Water spurting from dispenser No water or ice cube production Water is frozen because the controls are set too cold. Water filter clogged. Air may be present in the water line...
... dispenser has not been used for at least 2 minutes. •Set the refrigerator control to a warmer setting and wait 24 hours. Newly-installed filter cartridge. Filter cartridge not properly installed. Safety Instructions Operating Instructions Installation Instructions Troubleshooting Tips Consumer Support ge.com Problem Water has poor taste/odor Water in first glass is warm Water dispenser does not work Water spurting from dispenser No water or ice cube production Water is frozen because the controls are set too cold. Water filter clogged. Air may be present in the water line...
Owners Manual
Page 40
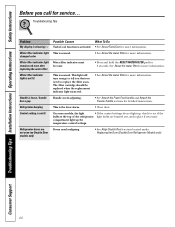
... under Replacing the Door (Double Door Refrigerator Models only). Water filter indicator light remains red even after replacing the water filter Water filter indicator must be replaced when the replacement indicator light turns red. •See About the water filter for detailed instructions. Water filter indicator light This is the door alarm. •Close door. Troubleshooting Tips Problem My display is showing Possible Causes What To Do TurboCool function is not lit On some models, the light •If the control settings do not light up the temperature control settings...
... under Replacing the Door (Double Door Refrigerator Models only). Water filter indicator light remains red even after replacing the water filter Water filter indicator must be replaced when the replacement indicator light turns red. •See About the water filter for detailed instructions. Water filter indicator light This is the door alarm. •Close door. Troubleshooting Tips Problem My display is showing Possible Causes What To Do TurboCool function is not lit On some models, the light •If the control settings do not light up the temperature control settings...

Owners Manual
Page 45
... what your state's Attorney General. Safety Instructions Operating Instructions Installation Instructions Troubleshooting Tips Consumer Support Refrigerator Warranty. (For customers in the United States) All warranty service provided by accident, fire, floods or acts of God. What GE Will Not Cover: s Service trips to your receipt here. s Replacement of the water filter cartridge, if included, due to water pressure that is needed to use within the USA. This warranty gives you specific legal rights, and you...
... what your state's Attorney General. Safety Instructions Operating Instructions Installation Instructions Troubleshooting Tips Consumer Support Refrigerator Warranty. (For customers in the United States) All warranty service provided by accident, fire, floods or acts of God. What GE Will Not Cover: s Service trips to your receipt here. s Replacement of the water filter cartridge, if included, due to water pressure that is needed to use within the USA. This warranty gives you specific legal rights, and you...

Owners Manual
Page 46
... your bill of sale as listed in the owner's manual, proper setting of original purchase and purchase date. CUSTOMER WARRANTY (for customers in Canada) Your refrigerator is warranted to be reported within Canada. This warranty is needed to obtain service under the warranty. 46 Any implied warranties, including the implied warranties of the original warranty period only. Please have serial number and model number available when calling for a particular...
... your bill of sale as listed in the owner's manual, proper setting of original purchase and purchase date. CUSTOMER WARRANTY (for customers in Canada) Your refrigerator is warranted to be reported within Canada. This warranty is needed to obtain service under the warranty. 46 Any implied warranties, including the implied warranties of the original warranty period only. Please have serial number and model number available when calling for a particular...

Owners Manual
Page 47
... may contain filterable cysts. This drinking water system must be maintained according to 750 gallons (2,838 l); temp. up to six months Pressure requirement: 40-120 psi (2.8-8.2 bar) Temperature: 33-100ºF (0.6-38ºC) Flow rate: 0.5 gpm (1.9 lpm) General Installation/Operation/Maintenance Requirements Flush new cartridge at full flow for up to manufacturer's instructions, including replacement of the indicated substances in your water. The contaminants...
... may contain filterable cysts. This drinking water system must be maintained according to 750 gallons (2,838 l); temp. up to six months Pressure requirement: 40-120 psi (2.8-8.2 bar) Temperature: 33-100ºF (0.6-38ºC) Flow rate: 0.5 gpm (1.9 lpm) General Installation/Operation/Maintenance Requirements Flush new cartridge at full flow for up to manufacturer's instructions, including replacement of the indicated substances in your water. The contaminants...


