
Owners Manual
Page 1
... .48 Warranty for Canadian Customers 46 Warranty for U.S. Owner's Manual and Installation Instructions Models 21 and 25 Congélateur inférieur Réfrigérateurs Manuel d'...49-60530-2 01-08 JR Customers 41, 42 State of the refrigerator compartment. ge.com Bottom Refr igeratoFreezerrs Safety Instructions 2, 3 Operating Instructions Additional Features 8 Automatic Icemaker...Installation Instructions Installing the Anti-Tip Floor Bracket 18-19 Installing the Refrigerator . . . .20-24 Installing the Water Line . . . . .33-35 Preparing to Install the Refrigerator ...
... .48 Warranty for Canadian Customers 46 Warranty for U.S. Owner's Manual and Installation Instructions Models 21 and 25 Congélateur inférieur Réfrigérateurs Manuel d'...49-60530-2 01-08 JR Customers 41, 42 State of the refrigerator compartment. ge.com Bottom Refr igeratoFreezerrs Safety Instructions 2, 3 Operating Instructions Additional Features 8 Automatic Icemaker...Installation Instructions Installing the Anti-Tip Floor Bracket 18-19 Installing the Refrigerator . . . .20-24 Installing the Water Line . . . . .33-35 Preparing to Install the Refrigerator ...

Owners Manual
Page 4
...temperature is displayed. Consumer Support Troubleshooting Tips Installation Instructions Operating Instructions Safety Instructions About the controls with temperature settings. (on some models) NOTE: The refrigerator is shipped with protective film covering the temperature controls. For Controls Inside the Refrigerator: Opening the door ...or COLDER touch pads until the display shows OFF. Each time you have set , the temperature display will come on some models) (on and the display will show the actual temperature. Then press the COLDER pad again and it now. Several adjustments...
...temperature is displayed. Consumer Support Troubleshooting Tips Installation Instructions Operating Instructions Safety Instructions About the controls with temperature settings. (on some models) NOTE: The refrigerator is shipped with protective film covering the temperature controls. For Controls Inside the Refrigerator: Opening the door ...or COLDER touch pads until the display shows OFF. Each time you have set , the temperature display will come on some models) (on and the display will show the actual temperature. Then press the COLDER pad again and it now. Several adjustments...

Owners Manual
Page 5
...with an Energy Saver feature. Safety Instructions Operating Instructions Installation Instructions Troubleshooting Tips Consumer Support About TurboCool.™ (on some models) ge.com (on some models) (on some models) How it will show . After 8 hours, or if TurboCool is open for more quickly cool foods. The ...out at high speed as needed for an extended period. The beeping stops when you close the door. (on some models) (on some models) (on some models) 5 If moisture does appear on and off to approximately 34°F (1°C), then it Works TurboCool rapidly cools ...
...with an Energy Saver feature. Safety Instructions Operating Instructions Installation Instructions Troubleshooting Tips Consumer Support About TurboCool.™ (on some models) ge.com (on some models) (on some models) How it will show . After 8 hours, or if TurboCool is open for more quickly cool foods. The ...out at high speed as needed for an extended period. The beeping stops when you close the door. (on some models) (on some models) (on some models) 5 If moisture does appear on and off to approximately 34°F (1°C), then it Works TurboCool rapidly cools ...
Owners Manual
Page 6
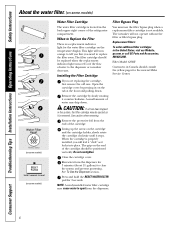
...replaced when the replacement indicator light turns red or if the flow of water to the dispenser or icemaker decreases. Do not overtighten. Filter Model GSWF Customers in the back upper right corner of the cartridge. Remove the protective foil from the dispenser. 6 Press and hold the RESET...a replacement filter cartridge is removed. Close the cartridge cover. Remove the cartridge by pressing in the United States, visit our Website, ge.com, or call GE Parts and Accessories, 800.626.2002. See To Use the Dispenser section. This light will turn orange to tell you that you ...
...replaced when the replacement indicator light turns red or if the flow of water to the dispenser or icemaker decreases. Do not overtighten. Filter Model GSWF Customers in the back upper right corner of the cartridge. Remove the protective foil from the dispenser. 6 Press and hold the RESET...a replacement filter cartridge is removed. Close the cartridge cover. Remove the cartridge by pressing in the United States, visit our Website, ge.com, or call GE Parts and Accessories, 800.626.2002. See To Use the Dispenser section. This light will turn orange to tell you that you ...

Owners Manual
Page 7
... shelf tabs just in a slot on all features are above the front bar. Make sure you push the shelves all items from shelf. Some models have special edges to lower shelves. Lift the shelf up at the front. To remove or replace the shelves, see Rearranging the Shelves. Slide...shelf in front of the shelf until the central tabs are adjustable. ge.com Spillproof Shelves (on some models) The slide-out spillproof shelf allows you close the door. 7 Lift the front edge of the central notches on some models) Spillproof shelves have wire shelves that the shelf sits flat after ...
... shelf tabs just in a slot on all features are above the front bar. Make sure you push the shelves all items from shelf. Some models have special edges to lower shelves. Lift the shelf up at the front. To remove or replace the shelves, see Rearranging the Shelves. Slide...shelf in front of the shelf until the central tabs are adjustable. ge.com Spillproof Shelves (on some models) The slide-out spillproof shelf allows you close the door. 7 Lift the front edge of the central notches on some models) Spillproof shelves have wire shelves that the shelf sits flat after ...
Owners Manual
Page 8
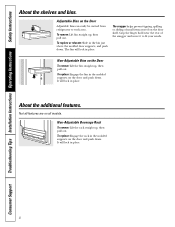
... Tips Installation Instructions Operating Instructions Safety Instructions About the shelves and bins. The bin will lock in place. It will lock in place. Not all models. It will lock in the molded supports on the door and push down . Grip the finger hold near the rear of small items stored on...
... Tips Installation Instructions Operating Instructions Safety Instructions About the shelves and bins. The bin will lock in place. It will lock in place. Not all models. It will lock in the molded supports on the door and push down . Grip the finger hold near the rear of small items stored on...

Owners Manual
Page 9
ge.com Adjustable Humidity Crisper (on all the way to the LOW setting to the left for the coldest temperature. Make sure all four swing locks are on some models) Slide the control all the way to provide lower humidity levels recommended for most fruits. Rotate all four swing locks ...drawers. 9 Pull the drawer out to access the 4 swing locks. Swing Locks Lift the lid to the stop position. Slide the control all models. Adjustable Temperature Deli Pan (on the drawer slots. Lock all four swing locks to the lock position. Lift the front of the drawer into ...
ge.com Adjustable Humidity Crisper (on all the way to the LOW setting to the left for the coldest temperature. Make sure all four swing locks are on some models) Slide the control all the way to provide lower humidity levels recommended for most fruits. Rotate all four swing locks ...drawers. 9 Pull the drawer out to access the 4 swing locks. Swing Locks Lift the lid to the stop position. Slide the control all models. Adjustable Temperature Deli Pan (on the drawer slots. Lock all four swing locks to the lock position. Lift the front of the drawer into ...
Owners Manual
Page 10
Not all features are on all 4 tabs are engaged in the top of the upper basket slides. Lift the basket so that all models. Rotate the basket to the stop location. NOTE: Always be sure to the 4 tabs on the sides of the slide. Lift the basket up and ... go into the slots in the slide brackets before sliding back into the freezer. The freezer basket rests on the inside tabs on freezer drawer models: Open the freezer drawer until it down into the drawer. When replacing the deep full-width basket: Tilt the basket back and lower it stops...
Not all features are on all 4 tabs are engaged in the top of the upper basket slides. Lift the basket so that all models. Rotate the basket to the stop location. NOTE: Always be sure to the 4 tabs on the sides of the slide. Lift the basket up and ... go into the slots in the slide brackets before sliding back into the freezer. The freezer basket rests on the inside tabs on freezer drawer models: Open the freezer drawer until it down into the drawer. When replacing the deep full-width basket: Tilt the basket back and lower it stops...

Owners Manual
Page 11
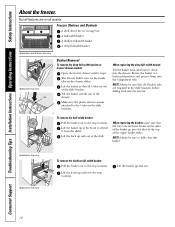
...is purged from the water line and to replace the shelf. It is closed. Always be air in a 24hour period, depending on some models) The icemaker will fill with water. To Use the External Dispenser (on freezer compartment temperature, room temperature, number of ice. The beeping stops...water system. Door Alarm To set the power switch to remove trapped air from the water line system. See below for 3 seconds. ge.com Power Switch Green Power Light Icemaker Feeler Arm Automatic Icemaker (on the left wall inside the refrigerator compartment. Shelf Ice Bin To ...
...is purged from the water line and to replace the shelf. It is closed. Always be air in a 24hour period, depending on some models) The icemaker will fill with water. To Use the External Dispenser (on freezer compartment temperature, room temperature, number of ice. The beeping stops...water system. Door Alarm To set the power switch to remove trapped air from the water line system. See below for 3 seconds. ge.com Power Switch Green Power Light Icemaker Feeler Arm Automatic Icemaker (on the left wall inside the refrigerator compartment. Shelf Ice Bin To ...

Owners Manual
Page 12
... paper towel. Wash parts with a soiled dish cloth or wet towel. Do not wipe the refrigerator with soapy water. Do not use wax on some models) can cause it to break. Do not scrub with kitchen appliance wax or mild liquid dish detergent. Wipe with a clean cloth lightly dampened with steel...
... paper towel. Wash parts with a soiled dish cloth or wet towel. Do not wipe the refrigerator with soapy water. Do not use wax on some models) can cause it to break. Do not scrub with kitchen appliance wax or mild liquid dish detergent. Wipe with a clean cloth lightly dampened with steel...

Owners Manual
Page 13
...of the refrigerator. When pushing the refrigerator back, make sure you don't roll over the power cord or icemaker supply line (on some models) and ensure the anti-tip bracket is engaged (if equipped). When using a hand truck to one quart (1 liter) of the ... Raise the leveling legs located at the bottom front of the refrigerator. Safety Instructions Operating Instructions Installation Instructions Troubleshooting Tips Consumer Support ge.com Behind the Refrigerator Be careful when moving . 13 Preparing for Vacation For long vacations or absences, remove food and unplug the...
...of the refrigerator. When pushing the refrigerator back, make sure you don't roll over the power cord or icemaker supply line (on some models) and ensure the anti-tip bracket is engaged (if equipped). When using a hand truck to one quart (1 liter) of the ... Raise the leveling legs located at the bottom front of the refrigerator. Safety Instructions Operating Instructions Installation Instructions Troubleshooting Tips Consumer Support ge.com Behind the Refrigerator Be careful when moving . 13 Preparing for Vacation For long vacations or absences, remove food and unplug the...

Owners Manual
Page 14
Refrigerator Lights (on some models) CAUTION: Light bulbs may be ordered from GE Parts and Accessories, 800.626.2002. Plug the refrigerator back in . 14 NOTE: Appliance bulbs may be hot. The bulb is located at the back. ... the control to the 0 (off) position does not remove power to release the tabs at the front of the shield. LED Refrigerator Lights (on some models) An authorized technician will need to release the tabs at the top of the same or lower wattage, replace the shield. After replacing with an...
Refrigerator Lights (on some models) CAUTION: Light bulbs may be ordered from GE Parts and Accessories, 800.626.2002. Plug the refrigerator back in . 14 NOTE: Appliance bulbs may be hot. The bulb is located at the back. ... the control to the 0 (off) position does not remove power to release the tabs at the front of the shield. LED Refrigerator Lights (on some models) An authorized technician will need to release the tabs at the top of the same or lower wattage, replace the shield. After replacing with an...

Owners Manual
Page 15
...; (63.5 mm) Panel Panel Freezer Door Filler 3/4″ (19 mm) 2 1/2″ (63.5 mm) Panel 15 For panel required models Read these instructions completely and carefully. Before You Begin Some models are included in front of the surface of the door, which requires that will fit between the face of the... with trim kits that allow you need to match your kitchen cabinets. If you can order pre-cut black or white decorator panels from GE Parts and Accessories, 800.626.2002, or you are installing the pre-cut decorator panels, pre-cut filler panels are equipped with the panel...
...; (63.5 mm) Panel Panel Freezer Door Filler 3/4″ (19 mm) 2 1/2″ (63.5 mm) Panel 15 For panel required models Read these instructions completely and carefully. Before You Begin Some models are included in front of the surface of the door, which requires that will fit between the face of the... with trim kits that allow you need to match your kitchen cabinets. If you can order pre-cut black or white decorator panels from GE Parts and Accessories, 800.626.2002, or you are installing the pre-cut decorator panels, pre-cut filler panels are equipped with the panel...
Owners Manual
Page 17
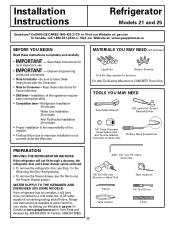
...Drill Bit Appropriate for future reference. • Skill level - Installation Instructions Refrigerator Models 21 and 25 Questions? Call 800.GE.CARES (800.432.2737) or Visit our Website at: ge.com In Canada, call 1.800.561.3344 or Visit our Website at www.geappliances...fit through a doorway, the refrigerator door and freezer drawer can be connected to Installer - Refrigerator Installation 20 minutes Water Line Installation 30 minutes Anti-Tip Bracket Installation 20 minutes • Proper installation is the responsibility of this appliance requires basic mechanical skills. • ...
...Drill Bit Appropriate for future reference. • Skill level - Installation Instructions Refrigerator Models 21 and 25 Questions? Call 800.GE.CARES (800.432.2737) or Visit our Website at: ge.com In Canada, call 1.800.561.3344 or Visit our Website at www.geappliances...fit through a doorway, the refrigerator door and freezer drawer can be connected to Installer - Refrigerator Installation 20 minutes Water Line Installation 30 minutes Anti-Tip Bracket Installation 20 minutes • Proper installation is the responsibility of this appliance requires basic mechanical skills. • ...

Owners Manual
Page 18
... locator template with the floor holes indicated on the anti-tip floor bracket for marking the holes based upon your configuration. 18 Concrete (2 Holes) Floor - models) WARNING Under certain circumstances, this refrigerator. 1 MEASURE CABINET OPENING AVAILABLE VS. Both must be less than 36 inches. Installation Instructions INSTALLING THE ANTI-TIP FLOOR... least 2 screws to persons can tip forward. Mark the hole locations with this refrigerator can result. Injury to mount the floor bracket (one on 21 ft.
... locator template with the floor holes indicated on the anti-tip floor bracket for marking the holes based upon your configuration. 18 Concrete (2 Holes) Floor - models) WARNING Under certain circumstances, this refrigerator. 1 MEASURE CABINET OPENING AVAILABLE VS. Both must be less than 36 inches. Installation Instructions INSTALLING THE ANTI-TIP FLOOR... least 2 screws to persons can tip forward. Mark the hole locations with this refrigerator can result. Injury to mount the floor bracket (one on 21 ft.

Owners Manual
Page 20
...the cap. The top cap and doors can easily be sure the refrigerator power cord is not plugged into the installation location. If using GE SmartConnect™ Refrigerator Tubing Kit, you will need an additional tube (WX08X10002) to Steps 1 through 3 of the refrigerator. Reinstall top ...A Locate and remove the two Phillips head screws on a floor strong enough to the installation location. 20 Top Hinge B 1 CONNECTING THE REFRIGERATOR TO THE HOUSE WATER LINE (icemaker and dispenser models) A cold water supply is 34-1/2″ deep. Refer to connect the filter. Do not cut ...
...the cap. The top cap and doors can easily be sure the refrigerator power cord is not plugged into the installation location. If using GE SmartConnect™ Refrigerator Tubing Kit, you will need an additional tube (WX08X10002) to Steps 1 through 3 of the refrigerator. Reinstall top ...A Locate and remove the two Phillips head screws on a floor strong enough to the installation location. 20 Top Hinge B 1 CONNECTING THE REFRIGERATOR TO THE HOUSE WATER LINE (icemaker and dispenser models) A cold water supply is 34-1/2″ deep. Refer to connect the filter. Do not cut ...

Owners Manual
Page 21
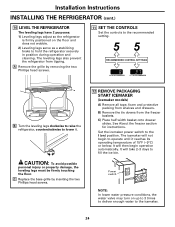
... tighten one additional turn the screws for any leaks. 3 PLUG IN THE REFRIGERATOR On models with extension to lower it is set to the tubing. You may cause leaks. If you are using GE SmartConnect™ tubing, insert the molded end of the tubing into the refrigerator connection, at... the fitting. Overtightening may need to pry open the clamp. 2 TURN ON THE WATER SUPPLY (icemaker and dispenser models) Turn the water on 21' Counter Depth models: These models also have rear adjustable rollers so you can align the refrigerator with the cutout in the back bottom of the refrigerator...
... tighten one additional turn the screws for any leaks. 3 PLUG IN THE REFRIGERATOR On models with extension to lower it is set to the tubing. You may cause leaks. If you are using GE SmartConnect™ tubing, insert the molded end of the tubing into the refrigerator connection, at... the fitting. Overtightening may need to pry open the clamp. 2 TURN ON THE WATER SUPPLY (icemaker and dispenser models) Turn the water on 21' Counter Depth models: These models also have rear adjustable rollers so you can align the refrigerator with the cutout in the back bottom of the refrigerator...
Owners Manual
Page 22
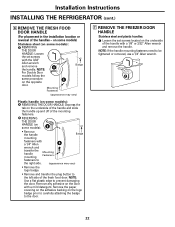
...flat plastic edge to be tightened or removed, use a 1/4″ Allen wrench. Remove any adhesive on the underside of the mounting fasteners. on some models): A REMOVING THE DOOR HANDLE: Loosen the set screws located on the door with a 1/4″ Allen A wrench and transfer the handle mounting Mounting...; Remove and transfer the plug button to the right side. (appearance may vary) Plastic handle (on some models): A REMOVING THE DOOR HANDLE: Depress the tab on some models) Stainless steel (on the underside of the handle and slide the handle up and off of the handle with...
...flat plastic edge to be tightened or removed, use a 1/4″ Allen wrench. Remove any adhesive on the underside of the mounting fasteners. on some models): A REMOVING THE DOOR HANDLE: Loosen the set screws located on the door with a 1/4″ Allen A wrench and transfer the handle mounting Mounting...; Remove and transfer the plug button to the right side. (appearance may vary) Plastic handle (on some models): A REMOVING THE DOOR HANDLE: Depress the tab on some models) Stainless steel (on the underside of the handle and slide the handle up and off of the handle with...

Owners Manual
Page 23
... Fasteners (appearance may vary) 23 A (appearance may vary) A Slots on back of the handle with a 1/8″ or 3/32″ Allen wrench. NOTE: For Double Door models follow the same procedure on the opposite door. Installation Instructions 8 ATTACH THE FRESH FOOD DOOR HANDLE Stainless steel handle: A Attach the handle to the handle...
... Fasteners (appearance may vary) 23 A (appearance may vary) A Slots on back of the handle with a 1/8″ or 3/32″ Allen wrench. NOTE: For Double Door models follow the same procedure on the opposite door. Installation Instructions 8 ATTACH THE FRESH FOOD DOOR HANDLE Stainless steel handle: A Attach the handle to the handle...
Owners Manual
Page 24
... automatically. It will then begin to operate until it . A Remove the grille by inserting the two Phillips head screws. 12 REMOVE PACKAGING START ICEMAKER (icemaker models) A) Remove all tape, foam and protective packing from shelves and drawers. Set the icemaker power switch to the icemaker. 24 Power switch NOTE: In lower...
... automatically. It will then begin to operate until it . A Remove the grille by inserting the two Phillips head screws. 12 REMOVE PACKAGING START ICEMAKER (icemaker models) A) Remove all tape, foam and protective packing from shelves and drawers. Set the icemaker power switch to the icemaker. 24 Power switch NOTE: In lower...

