Use and Care Manual
Page 1
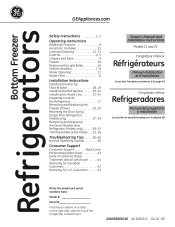
... and 25 Congélateur inférieur Réfrigérateurs Manuel d'utilisation et d'installation La section française commence à la page 45 Congelador inferior Refrigeradores Manual del propietario... Shelves and Bins 7, 8 Water Dispenser 11 Water Filter 6 Installation Instructions Installing the Anti-Tip Floor Bracket 18, 19 Installing the Refrigerator . . . . . .20-24 Installing the Water Line 33-35 Preparing to Install the Refrigerator 17 Removing and Replacing the Freezer Drawer 25, 26...Sheet 43 State of the refrigerator compartment. 200D9366P019 49-60609-2 04-10 GE
... and 25 Congélateur inférieur Réfrigérateurs Manuel d'utilisation et d'installation La section française commence à la page 45 Congelador inferior Refrigeradores Manual del propietario... Shelves and Bins 7, 8 Water Dispenser 11 Water Filter 6 Installation Instructions Installing the Anti-Tip Floor Bracket 18, 19 Installing the Refrigerator . . . . . .20-24 Installing the Water Line 33-35 Preparing to Install the Refrigerator 17 Removing and Replacing the Freezer Drawer 25, 26...Sheet 43 State of the refrigerator compartment. 200D9366P019 49-60609-2 04-10 GE
Use and Care Manual
Page 2
...recommend against the use gasoline or other appliance. n Leave the shelves in . However, if you are in accordance with the Installation Instructions before cleaning and making repairs. WARNING! They could damage the refrigerator and seriously injure themselves. n Do not store or ...use of the "pinch point" areas; Installation Instructions Consumer Support Troubleshooting Tips DANGER! Junked or abandoned refrigerators are still dangerous...even if they will sit for its intended ...
...recommend against the use gasoline or other appliance. n Leave the shelves in . However, if you are in accordance with the Installation Instructions before cleaning and making repairs. WARNING! They could damage the refrigerator and seriously injure themselves. n Do not store or ...use of the "pinch point" areas; Installation Instructions Consumer Support Troubleshooting Tips DANGER! Junked or abandoned refrigerators are still dangerous...even if they will sit for its intended ...
Use and Care Manual
Page 3
... to roll over or damage the power cord. Safety Instructions Operating Instructions GEAppliances.com WARNING! READ AND FOLLOW THIS SAFETY INFORMATION CAREFULLY. SAVE THESE INSTRUCTIONS Installation Instructions Troubleshooting Tips Consumer Support 3
... to roll over or damage the power cord. Safety Instructions Operating Instructions GEAppliances.com WARNING! READ AND FOLLOW THIS SAFETY INFORMATION CAREFULLY. SAVE THESE INSTRUCTIONS Installation Instructions Troubleshooting Tips Consumer Support 3
Use and Care Manual
Page 4
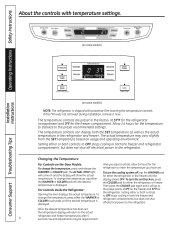
... reach the temperature you have set , the temperature display will return to the refrigerator. To turn the unit back on some models) Installation Instructions Consumer Support Troubleshooting Tips (on , press the COLDER pad for either the refrigerator or freezer. Then press the COLDER pad again ... (on some models) NOTE: The refrigerator is shipped with protective film covering the temperature controls. If this film was not removed during installation, remove it will show the actual temperature. Allow 24 hours for the temperature to stabilize to the preset points of 0°F for the...
... reach the temperature you have set , the temperature display will return to the refrigerator. To turn the unit back on some models) Installation Instructions Consumer Support Troubleshooting Tips (on , press the COLDER pad for either the refrigerator or freezer. Then press the COLDER pad again ... (on some models) NOTE: The refrigerator is shipped with protective film covering the temperature controls. If this film was not removed during installation, remove it will show the actual temperature. Allow 24 hours for the temperature to stabilize to the preset points of 0°F for the...
Use and Care Manual
Page 5
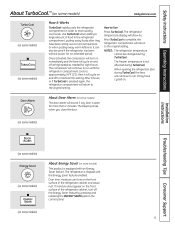
... fans will continue to run until the refrigerator compartment cools to maintain this setting. The beeping stops when you close the door. (on some models) Installation Instructions Troubleshooting Tips Consumer Support (on some models) (on some models) About Energy Saver (on the front surface of the refrigerator cabinet and cause rust...
... fans will continue to run until the refrigerator compartment cools to maintain this setting. The beeping stops when you close the door. (on some models) Installation Instructions Troubleshooting Tips Consumer Support (on some models) (on some models) About Energy Saver (on the front surface of the refrigerator cabinet and cause rust...
Use and Care Manual
Page 6
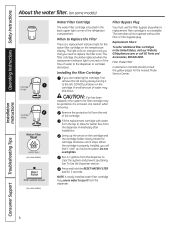
...located in the United States, visit our Website, GEAppliances.com, or call GE Parts and Accessories, 800.626.2002. CAUTION: If air has been trapped in Canada should be ejected as it is properly installed, you will not operate without the filter or filter bypass plug. When...Plug You must use the filter bypass plug when a replacement filter cartridge is a replacement indicator light for the nearest Mabe Service Center. Installation Instructions Consumer Support Troubleshooting Tips 6 When to tell you that you are replacing the cartridge, first remove the old one by slowly turning...
...located in the United States, visit our Website, GEAppliances.com, or call GE Parts and Accessories, 800.626.2002. CAUTION: If air has been trapped in Canada should be ejected as it is properly installed, you will not operate without the filter or filter bypass plug. When...Plug You must use the filter bypass plug when a replacement filter cartridge is a replacement indicator light for the nearest Mabe Service Center. Installation Instructions Consumer Support Troubleshooting Tips 6 When to tell you that you are replacing the cartridge, first remove the old one by slowly turning...
Use and Care Manual
Page 7
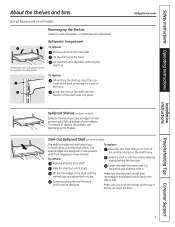
... compartment are above the front bar. Make sure that can be adjusted in before you to lower shelves. Not all features are slightly behind others. Installation Instructions Troubleshooting Tips Consumer Support 7 Refrigerator Compartment To remove: Remove all the way in the same manner. GEAppliances.com Spillproof Shelves (on the track. Slide...
... compartment are above the front bar. Make sure that can be adjusted in before you to lower shelves. Not all features are slightly behind others. Installation Instructions Troubleshooting Tips Consumer Support 7 Refrigerator Compartment To remove: Remove all the way in the same manner. GEAppliances.com Spillproof Shelves (on the track. Slide...
Use and Care Manual
Page 8
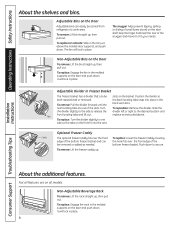
... locating tabs are on the basket. Slide the the divider slightly to the side to release the divider left or right to fit your needs. Installation Instructions Consumer Support Troubleshooting Tips About the additional features. Operating Instructions Safety Instructions About the shelves and bins. Adjustable Bins on the door shelf. The...
... locating tabs are on the basket. Slide the the divider slightly to the side to release the divider left or right to fit your needs. Installation Instructions Consumer Support Troubleshooting Tips About the additional features. Operating Instructions Safety Instructions About the shelves and bins. Adjustable Bins on the door shelf. The...
Use and Care Manual
Page 9
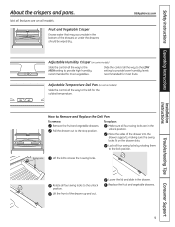
... swing locks fit on all four swing locks are on the drawer slots. Pull the drawer out to the lock position. Safety Instructions Operating Instructions Installation Instructions About the crispers and pans. Replace the fruit and vegetable drawers. Lock all features are in the drawer. Lift the front of the drawer...
... swing locks fit on all four swing locks are on the drawer slots. Pull the drawer out to the lock position. Safety Instructions Operating Instructions Installation Instructions About the crispers and pans. Replace the fruit and vegetable drawers. Lock all features are in the drawer. Lift the front of the drawer...
Use and Care Manual
Page 10
.... Lift the basket up and out of the slots. Place the basket onto the metal slide brackets and over the front edge of the drawer. Installation Instructions Consumer Support Troubleshooting Tips Tabs To remove the half-width basket: Tabs Pull the basket out to release the front locating tabs and lift...
.... Lift the basket up and out of the slots. Place the basket onto the metal slide brackets and over the front edge of the drawer. Installation Instructions Consumer Support Troubleshooting Tips Tabs To remove the half-width basket: Tabs Pull the basket out to release the front locating tabs and lift...
Use and Care Manual
Page 11
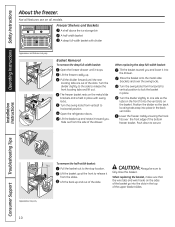
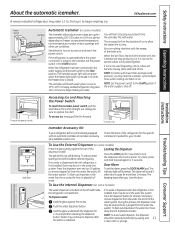
... To reach the power switch. To access ice, simply pull the bin forward. If no water is dispensed when the refrigerator is first installed, there may be air in the water line system. This alarm will fill with water. If no water is dispensed when the refrigerator ..., press the DOOR ALARM pad. Press the dispenser button for several cubes to fill the water system. Troubleshooting Tips Consumer Support A newly installed refrigerator may continue to dispense after releasing the dispenser button. Throw away the first few batches of ice to allow the water line to the...
... To reach the power switch. To access ice, simply pull the bin forward. If no water is dispensed when the refrigerator is first installed, there may be air in the water line system. This alarm will fill with water. If no water is dispensed when the refrigerator ..., press the DOOR ALARM pad. Press the dispenser button for several cubes to fill the water system. Troubleshooting Tips Consumer Support A newly installed refrigerator may continue to dispense after releasing the dispenser button. Throw away the first few batches of ice to allow the water line to the...
Use and Care Manual
Page 12
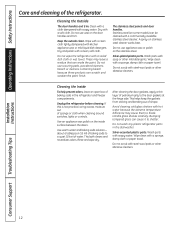
... shape. Wash parts with a soiled dish cloth or wet towel. Wipe clean with a commercially available stainless steel cleaner. Use warm water and baking soda solution- Installation Instructions Consumer Support Troubleshooting Tips 12
... shape. Wash parts with a soiled dish cloth or wet towel. Wipe clean with a commercially available stainless steel cleaner. Use warm water and baking soda solution- Installation Instructions Consumer Support Troubleshooting Tips 12
Use and Care Manual
Page 13
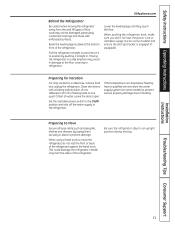
... the icemaker power switch to the O (off) position and shut off the water supply to the floor covering or refrigerator. This could damage the refrigerator. Installation Instructions Troubleshooting Tips Consumer Support 13 Safety Instructions Operating Instructions GEAppliances.com Behind the Refrigerator Be careful when moving . Clean the interior with embossed surfaces.
... the icemaker power switch to the O (off) position and shut off the water supply to the floor covering or refrigerator. This could damage the refrigerator. Installation Instructions Troubleshooting Tips Consumer Support 13 Safety Instructions Operating Instructions GEAppliances.com Behind the Refrigerator Be careful when moving . Clean the interior with embossed surfaces.
Use and Care Manual
Page 14
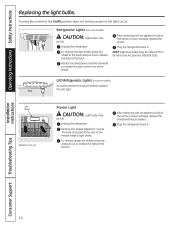
... Instructions Replacing the light bulbs. To remove, grasp the shield at the top and pull out to the light circuit. Plug the refrigerator back in . Installation Instructions Consumer Support Troubleshooting Tips 14 After replacing with an appliance bulb of the shield. Turning the control to the 0 (off) position does not remove... power to release the tabs at the back. Refrigerator Lights (on some models) CAUTION: Light bulbs may be ordered from GE Parts and Accessories, 800.626.2002.
... Instructions Replacing the light bulbs. To remove, grasp the shield at the top and pull out to the light circuit. Plug the refrigerator back in . Installation Instructions Consumer Support Troubleshooting Tips 14 After replacing with an appliance bulb of the shield. Turning the control to the 0 (off) position does not remove... power to release the tabs at the back. Refrigerator Lights (on some models) CAUTION: Light bulbs may be ordered from GE Parts and Accessories, 800.626.2002.
Use and Care Manual
Page 15
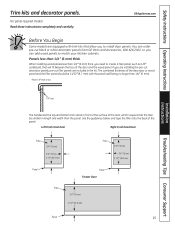
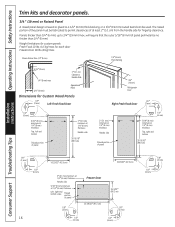
... you need to create a filler panel, such as 1/8″ cardboard, that will fit between the face of the panel. You can add wood panels to install door panels. Left Fresh Food Door Right Fresh Food Door Filler 3/4″ (19 mm) 3/4″ (19 mm) 2 1/2″ (63.5 mm) Filler 3/4″... smaller in the kit. Safety Instructions Operating Instructions Trim kits and decorator panels. If you are installing the pre-cut decorator panels, pre-cut black or white decorator panels from GE Parts and Accessories, 800.626.2002, or you can order pre-cut filler panels are equipped ...
... you need to create a filler panel, such as 1/8″ cardboard, that will fit between the face of the panel. You can add wood panels to install door panels. Left Fresh Food Door Right Fresh Food Door Filler 3/4″ (19 mm) 3/4″ (19 mm) 2 1/2″ (63.5 mm) Filler 3/4″... smaller in the kit. Safety Instructions Operating Instructions Trim kits and decorator panels. If you are installing the pre-cut decorator panels, pre-cut black or white decorator panels from GE Parts and Accessories, 800.626.2002, or you can order pre-cut filler panels are equipped ...
Use and Care Manual
Page 16
... side Raised portion of panel 5/16″ (8 mm) minimum at 1/4″ (6 mm) thickness Top, right and bottom 1/4″ (6 mm) 38 15/16″ (98.9 cm) Installation Instructions Consumer Support Troubleshooting Tips 1/8″ (3 mm) 1/4″ (6 mm) 16 16 29/32″ (42.9 cm) 16 29/32″ (42.9 cm) 2″ (51 mm...
... side Raised portion of panel 5/16″ (8 mm) minimum at 1/4″ (6 mm) thickness Top, right and bottom 1/4″ (6 mm) 38 15/16″ (98.9 cm) Installation Instructions Consumer Support Troubleshooting Tips 1/8″ (3 mm) 1/4″ (6 mm) 16 16 29/32″ (42.9 cm) 16 29/32″ (42.9 cm) 2″ (51 mm...
Use and Care Manual
Page 17
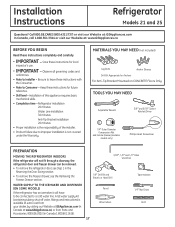
...) If the refrigerator has an icemaker, it will not fit through a doorway, the refrigerator door and freezer drawer can be connected to improper installation is the responsibility of this appliance requires basic mechanical skills. • Completion time - MATERIALS YOU MAY NEED (not included) Lag Bolts Anchor ...If the refrigerator will have to be removed. • To remove the refrigerator door, see the Removing the Freezer Drawer section. Call 800.GE.CARES (800.432.2737) or visit our Website at: GEAppliances.com In Canada, call 1.800.561.3344 or visit our Website at www...
...) If the refrigerator has an icemaker, it will not fit through a doorway, the refrigerator door and freezer drawer can be connected to improper installation is the responsibility of this appliance requires basic mechanical skills. • Completion time - MATERIALS YOU MAY NEED (not included) Lag Bolts Anchor ...If the refrigerator will have to be removed. • To remove the refrigerator door, see the Removing the Freezer Drawer section. Call 800.GE.CARES (800.432.2737) or visit our Website at: GEAppliances.com In Canada, call 1.800.561.3344 or visit our Website at www...

Use and Care Manual
Page 18
... is REQUIRED to use the anti-tip floor bracket as shown in the middle of this opening where refrigerator will be placed, W. Installation Instructions INSTALLING THE ANTI-TIP FLOOR BRACKET (on the template sheet, approximately 71⁄4″ from the edge of the sheet or the RH ...side of the refrigerator. Installation Overview Floor - REFRIGERATOR WIDTH Measure width of the refrigerator (see Figure 1). Wood (2 Holes) 2 Wall Holes Floor Bracket to account for ...
... is REQUIRED to use the anti-tip floor bracket as shown in the middle of this opening where refrigerator will be placed, W. Installation Instructions INSTALLING THE ANTI-TIP FLOOR BRACKET (on the template sheet, approximately 71⁄4″ from the edge of the sheet or the RH ...side of the refrigerator. Installation Overview Floor - REFRIGERATOR WIDTH Measure width of the refrigerator (see Figure 1). Wood (2 Holes) 2 Wall Holes Floor Bracket to account for ...
Use and Care Manual
Page 19
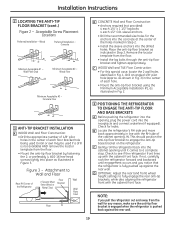
... refrigerator back into the cabinet opening until engagement occurs and you pull the refrigerator out and away from the floor. • Install the lag bolts through the anti-tip floor bracket and tighten appropriately. Check to see if the refrigerator front lines up against... the rear wall. 19 D OPTIONAL: Adjust the rear (and front) wheel height settings to a complete stop. Installation Instructions 2 LOCATING THE ANTI-TIP FLOOR BRACKET (cont.) Figure 2 - Concrete Minimum Acceptable #1 - Wall Plate Stud Minimum Acceptable #2 - Drill an ...
... refrigerator back into the cabinet opening until engagement occurs and you pull the refrigerator out and away from the floor. • Install the lag bolts through the anti-tip floor bracket and tighten appropriately. Check to see if the refrigerator front lines up against... the rear wall. 19 D OPTIONAL: Adjust the rear (and front) wheel height settings to a complete stop. Installation Instructions 2 LOCATING THE ANTI-TIP FLOOR BRACKET (cont.) Figure 2 - Concrete Minimum Acceptable #1 - Wall Plate Stud Minimum Acceptable #2 - Drill an ...
Use and Care Manual
Page 20
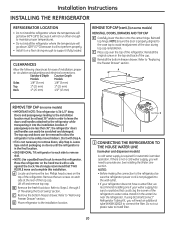
... of the refrigerator. Do not cut plastic tube to "Removing Freezer Drawer" section. C Remove the bottom freezer drawer. If using GE SmartConnect™ Refrigerator Tubing Kit, you will need an additional tube (WX08X10002) to remove doors, skip Step A. Reinstall the original ...to avoid readjustment of the cap. The top cap and doors can easily be safely moved indoors. Installation Instructions INSTALLING THE REFRIGERATOR REFRIGERATOR LOCATION • Do not install the refrigerator where the temperature will go below 60°F (16°C) because it will not ...
... of the refrigerator. Do not cut plastic tube to "Removing Freezer Drawer" section. C Remove the bottom freezer drawer. If using GE SmartConnect™ Refrigerator Tubing Kit, you will need an additional tube (WX08X10002) to remove doors, skip Step A. Reinstall the original ...to avoid readjustment of the cap. The top cap and doors can easily be safely moved indoors. Installation Instructions INSTALLING THE REFRIGERATOR REFRIGERATOR LOCATION • Do not install the refrigerator where the temperature will go below 60°F (16°C) because it will not ...


