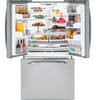
Use and Care Manual
Page 1
... Dispenser 11 Water Filter 6 Installation Instructions Installing the Anti-Tip Floor Bracket 18, 19 Installing the Refrigerator . . . . . .20-24 Installing the Water Line 33-35 Preparing to Install the Refrigerator 17 Removing and Replacing the Freezer Drawer 25, 26 Reversing the Door Swing (Single Door... Refrigerator Models only 27-29 Removing and Replacing the Doors (Double Door Refrigerator Models only 30-32 Trim Kits and Decorator Panels . . . .15, 16 Troubleshooting Tips . . . . . .36-40 Normal...
... Dispenser 11 Water Filter 6 Installation Instructions Installing the Anti-Tip Floor Bracket 18, 19 Installing the Refrigerator . . . . . .20-24 Installing the Water Line 33-35 Preparing to Install the Refrigerator 17 Removing and Replacing the Freezer Drawer 25, 26 Reversing the Door Swing (Single Door... Refrigerator Models only 27-29 Removing and Replacing the Doors (Double Door Refrigerator Models only 30-32 Trim Kits and Decorator Panels . . . .15, 16 Troubleshooting Tips . . . . . .36-40 Normal...
Use and Care Manual
Page 2
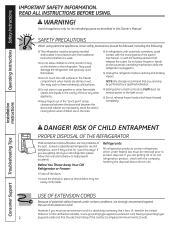
... Do not store or use gasoline or other appliance. n Setting either or both controls to the light circuit. Junked or abandoned refrigerators are in this or any servicing be removed prior to product disposal. USE OF EXTENSION CORDS Because of potential safety hazards under federal... of an extension cord. Do not place fingers or hands on the shelves in . They could damage the refrigerator and seriously injure themselves. WARNING! n In refrigerators with automatic icemakers, avoid contact with the company handling the disposal about what to climb, stand or hang on...
... Do not store or use gasoline or other appliance. n Setting either or both controls to the light circuit. Junked or abandoned refrigerators are in this or any servicing be removed prior to product disposal. USE OF EXTENSION CORDS Because of potential safety hazards under federal... of an extension cord. Do not place fingers or hands on the shelves in . They could damage the refrigerator and seriously injure themselves. WARNING! n In refrigerators with automatic icemakers, avoid contact with the company handling the disposal about what to climb, stand or hang on...
Use and Care Manual
Page 3
... 2-prong wall outlet is encountered, it replaced with a standard 3-prong (grounding) wall outlet to make sure the outlet is your refrigerator by a qualified electrician to minimize the possibility of electric shock hazard from overheated wires. This provides the best performance and also prevents ...overloading house wiring circuits which has a voltage rating that matches the rating plate. When moving the refrigerator away from the wall, be properly grounded. The power cord of this appliance is equipped with a 3prong (grounding) plug which mates...
... 2-prong wall outlet is encountered, it replaced with a standard 3-prong (grounding) wall outlet to make sure the outlet is your refrigerator by a qualified electrician to minimize the possibility of electric shock hazard from overheated wires. This provides the best performance and also prevents ...overloading house wiring circuits which has a voltage rating that matches the rating plate. When moving the refrigerator away from the wall, be properly grounded. The power cord of this appliance is equipped with a 3prong (grounding) plug which mates...
Use and Care Manual
Page 4
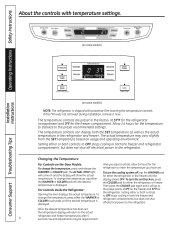
... To turn the unit back on some models) Installation Instructions Consumer Support Troubleshooting Tips (on , press the COLDER pad for the refrigerator. Then press the COLDER pad again and it now. Operating Instructions Safety Instructions About the controls with protective film covering the temperature ... may vary slightly from the SET temperature based on usage and operating environment. The temperature controls can display both the freezer and refrigerator compartments, but does not shut off , tap the WARMER pad for either the WARMER or COLDER pad until the display shows ...
... To turn the unit back on some models) Installation Instructions Consumer Support Troubleshooting Tips (on , press the COLDER pad for the refrigerator. Then press the COLDER pad again and it now. Operating Instructions Safety Instructions About the controls with protective film covering the temperature ... may vary slightly from the SET temperature based on usage and operating environment. The temperature controls can display both the freezer and refrigerator compartments, but does not shut off , tap the WARMER pad for either the WARMER or COLDER pad until the display shows ...
Use and Care Manual
Page 5
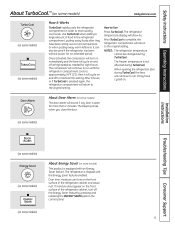
... equipped with the Energy Saver feature enabled. It can form on the front surface of food to the refrigerator compartment, putting away foods after they have been sitting out at high speed as needed for more quickly cool foods. Over time, moisture can....™ (on some models) GEAppliances.com (on some models) (on some models) How It Works TurboCool rapidly cools the refrigerator compartment in order to more than 2 minutes. Use TurboCool when adding a large amount of the refrigerator cabinet and cause rust. Once activated, the compressor will continue to run until the...
... equipped with the Energy Saver feature enabled. It can form on the front surface of food to the refrigerator compartment, putting away foods after they have been sitting out at high speed as needed for more quickly cool foods. Over time, moisture can....™ (on some models) GEAppliances.com (on some models) (on some models) How It Works TurboCool rapidly cools the refrigerator compartment in order to more than 2 minutes. Use TurboCool when adding a large amount of the refrigerator cabinet and cause rust. Once activated, the compressor will continue to run until the...
Use and Care Manual
Page 6
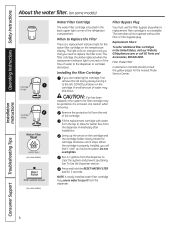
Installing the Filter Cartridge If you need to replace the filter soon. A small amount of the refrigerator compartment. CAUTION: If air has been trapped in the back upper right corner of water may cause water to spurt from the dispenser to allow ... the nearest Mabe Service Center. When the cartridge is removed. Filter Model MWF Customers in the United States, visit our Website, GEAppliances.com, or call GE Parts and Accessories, 800.626.2002. Operating Instructions Safety Instructions About the water filter. (on some models) Cartridge Holder Cartridge Holder (on some models) (on...
Installing the Filter Cartridge If you need to replace the filter soon. A small amount of the refrigerator compartment. CAUTION: If air has been trapped in the back upper right corner of water may cause water to spurt from the dispenser to allow ... the nearest Mabe Service Center. When the cartridge is removed. Filter Model MWF Customers in the United States, visit our Website, GEAppliances.com, or call GE Parts and Accessories, 800.626.2002. Operating Instructions Safety Instructions About the water filter. (on some models) Cartridge Holder Cartridge Holder (on some models) (on...
Use and Care Manual
Page 7
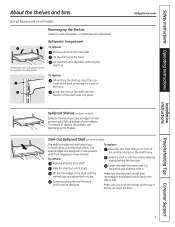
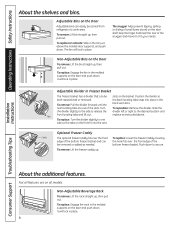
... are on some models) Spillproof shelves have wire shelves that the shelf sits flat after reinstallation and doesn't move freely from dripping to side. Refrigerator Compartment To remove: Remove all items from the shelf. To replace: While tilting the shelf up, insert the top hook at the front.... To remove: Remove all items from shelf. Slide the shelf in before you close the door. Make sure that can be adjusted in the refrigerator compartment are above the front bar. Rearranging the Shelves Shelves in the same manner. To remove or replace the shelves, see Rearranging the Shelves...
... are on some models) Spillproof shelves have wire shelves that the shelf sits flat after reinstallation and doesn't move freely from dripping to side. Refrigerator Compartment To remove: Remove all items from the shelf. To replace: While tilting the shelf up, insert the top hook at the front.... To remove: Remove all items from shelf. Slide the shelf in before you close the door. Make sure that can be adjusted in the refrigerator compartment are above the front bar. Rearranging the Shelves Shelves in the same manner. To remove or replace the shelves, see Rearranging the Shelves...
Use and Care Manual
Page 8
... the vent Optional Freezer Caddy Caddy The optional freezer caddy fits over the front edge of the bottom freezer basket and can be carried from refrigerator to fit your needs. Non-Adjustable Beverage Rack To remove: Lift the rack straight up , then pull out. Grip the finger hold near the rear...
... the vent Optional Freezer Caddy Caddy The optional freezer caddy fits over the front edge of the bottom freezer basket and can be carried from refrigerator to fit your needs. Non-Adjustable Beverage Rack To remove: Lift the rack straight up , then pull out. Grip the finger hold near the rear...
Use and Care Manual
Page 10
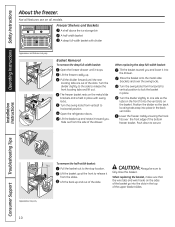
... full-width basket: Open the freezer drawer until the rear locating tabs are on the metal slide brackets and is held in place. Open the refrigerator doors. Place the basket onto the metal slide brackets and over the front edge of the upper basket slides. Freezer Shelves and Baskets A shelf above...
... full-width basket: Open the freezer drawer until the rear locating tabs are on the metal slide brackets and is held in place. Open the refrigerator doors. Place the basket onto the metal slide brackets and over the front edge of the upper basket slides. Freezer Shelves and Baskets A shelf above...
Use and Care Manual
Page 11
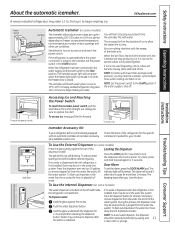
... to 15°F (-10°C). Hold the glass underneath the dispenser for at extra cost. Throw away the first few batches of the refrigerator for the specific icemaker kit needed for more than -average water pressure, you close the door. To access ice, simply pull the bin ...to fill the water system. During this process, the dispenser noise may hear the icemaker cycle multiple times when making ice. If the refrigerator is operated before the water connection is purged from the water line and to access ice and reach the power switch. Safety Instructions ...
... to 15°F (-10°C). Hold the glass underneath the dispenser for at extra cost. Throw away the first few batches of the refrigerator for the specific icemaker kit needed for more than -average water pressure, you close the door. To access ice, simply pull the bin ...to fill the water system. During this process, the dispenser noise may hear the icemaker cycle multiple times when making ice. If the refrigerator is operated before the water connection is purged from the water line and to access ice and reach the power switch. Safety Instructions ...
Use and Care Manual
Page 12
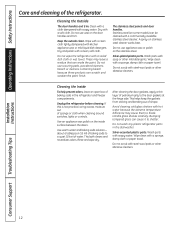
...liter) of water. Wipe clean with a soiled dish cloth or wet towel. Unplug the refrigerator before cleaning. If this is not practical, wring excess moisture out of the refrigerator. Use an appliance wax polish on stainless steel cleaner works best. Use warm water and baking...wax or mild liquid dish detergent. Dry and polish with soap or other abrasive cleaners. Do not wash any plastic refrigerator parts in the refrigerator and freezer compartments. Handle glass shelves carefully. Installation Instructions Consumer Support Troubleshooting Tips 12 Wash parts with a clean, soft...
...liter) of water. Wipe clean with a soiled dish cloth or wet towel. Unplug the refrigerator before cleaning. If this is not practical, wring excess moisture out of the refrigerator. Use an appliance wax polish on stainless steel cleaner works best. Use warm water and baking...wax or mild liquid dish detergent. Dry and polish with soap or other abrasive cleaners. Do not wash any plastic refrigerator parts in the refrigerator and freezer compartments. Handle glass shelves carefully. Installation Instructions Consumer Support Troubleshooting Tips 12 Wash parts with a clean, soft...
Use and Care Manual
Page 13
... property damage due to position by taping them securely in . Raise the leveling legs located at the bottom front of water. When pushing the refrigerator back, make sure you don't roll over the power cord or icemaker supply line (on some models) and ensure the anti-tip bracket is... engaged (if equipped). Preparing for Vacation For long vacations or absences, remove food and unplug the refrigerator. When using a hand truck to prevent damage. Leave the doors open. Preparing to Move Secure all loose items such as base grille, shelves and...
... property damage due to position by taping them securely in . Raise the leveling legs located at the bottom front of water. When pushing the refrigerator back, make sure you don't roll over the power cord or icemaker supply line (on some models) and ensure the anti-tip bracket is... engaged (if equipped). Preparing for Vacation For long vacations or absences, remove food and unplug the refrigerator. When using a hand truck to prevent damage. Leave the doors open. Preparing to Move Secure all loose items such as base grille, shelves and...
Use and Care Manual
Page 14
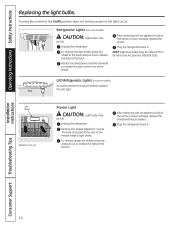
..., grasp the shield at the top and pull out to replace the LED light. Plug the refrigerator back in . Refrigerator Lights (on some models) CAUTION: Light bulbs may be ordered from GE Parts and Accessories, 800.626.2002. NOTE: Appliance bulbs may be hot. Remove the freezer basket... for access. After replacing with an appliance bulb of the shield. Operating Instructions Safety Instructions Replacing the light bulbs. Plug the refrigerator back in . The bulb...
..., grasp the shield at the top and pull out to replace the LED light. Plug the refrigerator back in . Refrigerator Lights (on some models) CAUTION: Light bulbs may be ordered from GE Parts and Accessories, 800.626.2002. NOTE: Appliance bulbs may be hot. Remove the freezer basket... for access. After replacing with an appliance bulb of the shield. Operating Instructions Safety Instructions Replacing the light bulbs. Plug the refrigerator back in . The bulb...
Use and Care Manual
Page 16
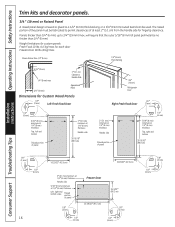
...) max 2″ (5.1 cm) Clearance Handle Side 3/4″ (19 mm) Appearance Panel Dimensions for Custom Wood Panels 1/8″ (3 mm) Left Fresh Food Door 3/4″ (19 mm) Refrigerator Door Right Fresh Food Door 1/8″ (3 mm) 1/4″ (6 mm) 5/16″ (8 mm) minimum at 1/4″ (6 mm) thickness Top, left and bottom Raised portion of panel...
...) max 2″ (5.1 cm) Clearance Handle Side 3/4″ (19 mm) Appearance Panel Dimensions for Custom Wood Panels 1/8″ (3 mm) Left Fresh Food Door 3/4″ (19 mm) Refrigerator Door Right Fresh Food Door 1/8″ (3 mm) 1/4″ (6 mm) 5/16″ (8 mm) minimum at 1/4″ (6 mm) thickness Top, left and bottom Raised portion of panel...
Use and Care Manual
Page 17
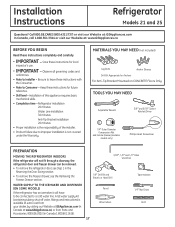
... supply kit (containing tubing, shut-off valve, fittings and instructions) is not covered under the Warranty. Installation Instructions Refrigerator Models 21 and 25 Questions? Call 800.GE.CARES (800.432.2737) or visit our Website at: GEAppliances.com In Canada, call 1.800.561.3344 or visit our Website at www.GEAppliances.ca...
... supply kit (containing tubing, shut-off valve, fittings and instructions) is not covered under the Warranty. Installation Instructions Refrigerator Models 21 and 25 Questions? Call 800.GE.CARES (800.432.2737) or visit our Website at: GEAppliances.com In Canada, call 1.800.561.3344 or visit our Website at www.GEAppliances.ca...

Use and Care Manual
Page 18
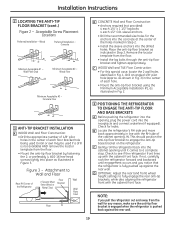
... the anti-tip floor bracket for marking the holes based upon your configuration. 18 Concrete (2 Holes) Floor - Rear Wall W REFRIGERATOR Baseboard Thickness or Countertop Overhang (Whichever Is Greater) Plus Any Desired Clearance RH Side Front 2 LOCATING THE ANTI-TIP FLOOR BRACKET ... and in Step 3. Figure 1 - Injury to Install RH Holes 71⁄4″ Base Bracket on the Refrigerator RH Side of Refrigerator Rear RH Corner of this refrigerator. 1 MEASURE CABINET OPENING AVAILABLE VS. Figure 2 indicates all the acceptable mounting configurations for any countertop overhang, ...
... the anti-tip floor bracket for marking the holes based upon your configuration. 18 Concrete (2 Holes) Floor - Rear Wall W REFRIGERATOR Baseboard Thickness or Countertop Overhang (Whichever Is Greater) Plus Any Desired Clearance RH Side Front 2 LOCATING THE ANTI-TIP FLOOR BRACKET ... and in Step 3. Figure 1 - Injury to Install RH Holes 71⁄4″ Base Bracket on the Refrigerator RH Side of Refrigerator Rear RH Corner of this refrigerator. 1 MEASURE CABINET OPENING AVAILABLE VS. Figure 2 indicates all the acceptable mounting configurations for any countertop overhang, ...
Use and Care Manual
Page 19
...Construction: • Anchors required (not provided): 4 each 1/4" x 1 1/2" lag bolts 4 each 1/2" O.D. NOTE: If you notice that the refrigerator is pushed back against the rear wall. Wall Plate Stud Minimum Acceptable #2 - Remove the locator template from the floor. • Mount the ...the anti-tip floor bracket and tighten appropriately. sleeve anchors • Drill the recommended size holes for leaks. C Gently roll the refrigerator back into the drilled holes. Installation Instructions 2 LOCATING THE ANTI-TIP FLOOR BRACKET (cont.) Figure 2 - D OPTIONAL: Adjust ...
...Construction: • Anchors required (not provided): 4 each 1/4" x 1 1/2" lag bolts 4 each 1/2" O.D. NOTE: If you notice that the refrigerator is pushed back against the rear wall. Wall Plate Stud Minimum Acceptable #2 - Remove the locator template from the floor. • Mount the ...the anti-tip floor bracket and tighten appropriately. sleeve anchors • Drill the recommended size holes for leaks. C Gently roll the refrigerator back into the drilled holes. Installation Instructions 2 LOCATING THE ANTI-TIP FLOOR BRACKET (cont.) Figure 2 - D OPTIONAL: Adjust ...
Use and Care Manual
Page 20
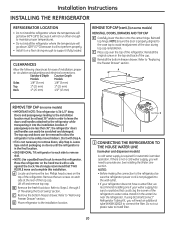
...install filter. 20 The top cap and doors can easily be safely moved indoors. Place the refrigerator on a floor strong enough to Steps 1 through 3 of the cap. If using GE SmartConnect™ Refrigerator Tubing Kit, you will need to each side at least 36″ wide in the top...to "Removing Freezer Drawer" section. B Remove the fresh-food door. If there is in the final location. • SKID REMOVAL: Tilt refrigerator to provide one if your water supply has sand or particles that TWO PEOPLE move this installation. Install it is not plugged into the installation...
...install filter. 20 The top cap and doors can easily be safely moved indoors. Place the refrigerator on a floor strong enough to Steps 1 through 3 of the cap. If using GE SmartConnect™ Refrigerator Tubing Kit, you will need to each side at least 36″ wide in the top...to "Removing Freezer Drawer" section. B Remove the fresh-food door. If there is in the final location. • SKID REMOVAL: Tilt refrigerator to provide one if your water supply has sand or particles that TWO PEOPLE move this installation. Install it is not plugged into the installation...
Use and Care Manual
Page 21
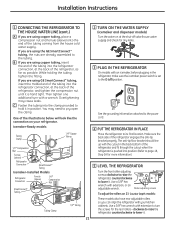
... Make sure the back side of the refrigerator, as far as possible. One of the refrigerator, and tighten the compression nut until it . Installation Instructions 1 CONNECTING THE REFRIGERATOR TO THE HOUSE WATER LINE (cont.) A If you are using the GE SmartConnect™ tubing, the nuts are ... Depth models: These models also have rear adjustable rollers so you are using GE SmartConnect™ tubing, insert the molded end of the tubing into the refrigerator connection, at the back of the refrigerator engages the anti-tip bracket properly. See the grounding information attached to the...
... Make sure the back side of the refrigerator, as far as possible. One of the refrigerator, and tighten the compression nut until it . Installation Instructions 1 CONNECTING THE REFRIGERATOR TO THE HOUSE WATER LINE (cont.) A If you are using the GE SmartConnect™ tubing, the nuts are ... Depth models: These models also have rear adjustable rollers so you are using GE SmartConnect™ tubing, insert the molded end of the tubing into the refrigerator connection, at the back of the refrigerator engages the anti-tip bracket properly. See the grounding information attached to the...

Use and Care Manual
Page 22
Installation Instructions INSTALLING THE REFRIGERATOR (cont.) 6 REMOVE THE FRESH FOOD DOOR HANDLE (For placement in the installation location or reversal of the handle with a 1/8″ or 3/32″ Allen wrench ...
Installation Instructions INSTALLING THE REFRIGERATOR (cont.) 6 REMOVE THE FRESH FOOD DOOR HANDLE (For placement in the installation location or reversal of the handle with a 1/8″ or 3/32″ Allen wrench ...


