
Owners Manual
Page 1
... and Pans 9 Freezer 10 Replacing the Light Bulbs 14 Shelves and Bins 7, 8 Water Dispenser 11 Water Filter 6 Installation Instructions Installing the Anti-Tip Floor Bracket 18-19 Installing the Refrigerator 20-24 Installing the Water Line 33-35 Preparing to Install the Refrigerator 17 Removing and Replacing the Freezer Drawer 25, 26 Reversing the Door Swing (Single Door...
... and Pans 9 Freezer 10 Replacing the Light Bulbs 14 Shelves and Bins 7, 8 Water Dispenser 11 Water Filter 6 Installation Instructions Installing the Anti-Tip Floor Bracket 18-19 Installing the Refrigerator 20-24 Installing the Water Line 33-35 Preparing to Install the Refrigerator 17 Removing and Replacing the Freezer Drawer 25, 26 Reversing the Door Swing (Single Door...

Owners Manual
Page 2
... ) does not remove power to product disposal. USE OF EXTENSION CORDS Because of the cord be properly installed and located in the area. I This refrigerator must be followed, including the following: I Do not store or use an extension cord, it is ...disposal about what to climb, stand or hang on the automatic icemaking mechanism while the refrigerator is used. Junked or abandoned refrigerators are in accordance with the Installation Instructions before cleaning and making repairs. Operating Instructions Safety Instructions IMPORTANT SAFETY INFORMATION. READ ALL...
... ) does not remove power to product disposal. USE OF EXTENSION CORDS Because of the cord be properly installed and located in the area. I This refrigerator must be followed, including the following: I Do not store or use an extension cord, it is ...disposal about what to climb, stand or hang on the automatic icemaking mechanism while the refrigerator is used. Junked or abandoned refrigerators are in accordance with the Installation Instructions before cleaning and making repairs. Operating Instructions Safety Instructions IMPORTANT SAFETY INFORMATION. READ ALL...
Owners Manual
Page 3
... have it is properly grounded. Never unplug your personal responsibility and obligation to make sure the outlet is your refrigerator by pulling on the power cord. Safety Instructions Operating Instructions GEAppliances.com WARNING! HOW TO CONNECT ELECTRICITY Do not... plug which mates with a properly grounded 3-prong wall outlet. When moving the refrigerator away from the wall, be plugged into its length or at either end. SAVE THESE INSTRUCTIONS Installation Instructions Troubleshooting Tips Consumer Support 3 For personal safety, this appliance. Where a standard...
... have it is properly grounded. Never unplug your personal responsibility and obligation to make sure the outlet is your refrigerator by pulling on the power cord. Safety Instructions Operating Instructions GEAppliances.com WARNING! HOW TO CONNECT ELECTRICITY Do not... plug which mates with a properly grounded 3-prong wall outlet. When moving the refrigerator away from the wall, be plugged into its length or at either end. SAVE THESE INSTRUCTIONS Installation Instructions Troubleshooting Tips Consumer Support 3 For personal safety, this appliance. Where a standard...

Owners Manual
Page 4
...in the factory at 37°F for the refrigerator compartment and 0°F for either the WARMER or COLDER pad until the desired temperature is displayed. Changing the Temperature For Controls-on some models) Installation Instructions Consumer Support Troubleshooting Tips (on -the-Door... Models: To change the temperature, tap either the refrigerator or the freezer until the display shows OFF. Then press the COLDER...
...in the factory at 37°F for the refrigerator compartment and 0°F for either the WARMER or COLDER pad until the desired temperature is displayed. Changing the Temperature For Controls-on some models) Installation Instructions Consumer Support Troubleshooting Tips (on -the-Door... Models: To change the temperature, tap either the refrigerator or the freezer until the display shows OFF. Then press the COLDER...

Owners Manual
Page 5
...food to the original setting. After 8 hours, or if TurboCool is shipped with an Energy Saver feature. The refrigerator is pressed again, the refrigerator compartment will sound if any door is open for an extended period. Once activated, the compressor will turn off... some models) How It Works TurboCool rapidly cools the refrigerator compartment in order to Use Press TurboCool. When opening the refrigerator door during TurboCool. The beeping stops when you close the door. (on some models) Installation Instructions Troubleshooting Tips Consumer Support (on some models) ...
...food to the original setting. After 8 hours, or if TurboCool is shipped with an Energy Saver feature. The refrigerator is pressed again, the refrigerator compartment will sound if any door is open for an extended period. Once activated, the compressor will turn off... some models) How It Works TurboCool rapidly cools the refrigerator compartment in order to Use Press TurboCool. When opening the refrigerator door during TurboCool. The beeping stops when you close the door. (on some models) Installation Instructions Troubleshooting Tips Consumer Support (on some models) ...

Owners Manual
Page 6
... nearest Mabe Service Center. Fill the replacement cartridge with water from the tap to spurt from the end of the refrigerator compartment. DO NOT pull down . When the cartridge is properly installed, you are replacing the cartridge, first remove the old one by slowly turning it is removed. See To Use the... the cartridge. When to the left. Use caution when removing. Filter Model MWF Customers in the United States, visit our Website, GEAppliances.com, or call GE Parts and Accessories, 800.626.2002. Installation Instructions Consumer Support Troubleshooting Tips 6
... nearest Mabe Service Center. Fill the replacement cartridge with water from the tap to spurt from the end of the refrigerator compartment. DO NOT pull down . When the cartridge is properly installed, you are replacing the cartridge, first remove the old one by slowly turning it is removed. See To Use the... the cartridge. When to the left. Use caution when removing. Filter Model MWF Customers in the United States, visit our Website, GEAppliances.com, or call GE Parts and Accessories, 800.626.2002. Installation Instructions Consumer Support Troubleshooting Tips 6
Owners Manual
Page 7
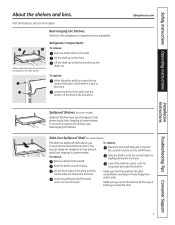
...remove or replace the shelves, see Rearranging the Shelves. Slide the shelf out until it can be removed. Slide the shelf in the refrigerator compartment are slightly behind others. Lift the front edge of the shelf until it is horizontal and slide the shelf in. Make sure ...to side. Some models have special edges to lower shelves. Lower the shelf into place. The special edges are above the front bar. Installation Instructions Troubleshooting Tips Consumer Support 7 To remove: Remove all models. Tilt the shelf up at the back of the shelf in front of...
...remove or replace the shelves, see Rearranging the Shelves. Slide the shelf out until it can be removed. Slide the shelf in the refrigerator compartment are slightly behind others. Lift the front edge of the shelf until it is horizontal and slide the shelf in. Make sure ...to side. Some models have special edges to lower shelves. Lower the shelf into place. The special edges are above the front bar. Installation Instructions Troubleshooting Tips Consumer Support 7 To remove: Remove all models. Tilt the shelf up at the back of the shelf in front of...

Owners Manual
Page 8
...work area. Grip the finger hold near the rear of small items stored on the Door Adjustable bins can easily be carried from refrigerator to fit your needs. Non-Adjustable Bins on the door and push down. Not all models. Operating Instructions Safety Instructions About the...To replace: Engage the rack in place. It will lock in the molded supports on all features are on the door and push down . Installation Instructions Consumer Support Troubleshooting Tips 8 About the additional features. To remove: Lift bin straight up, then pull out. To replace or relocate: ...
...work area. Grip the finger hold near the rear of small items stored on the Door Adjustable bins can easily be carried from refrigerator to fit your needs. Non-Adjustable Bins on the door and push down. Not all models. Operating Instructions Safety Instructions About the...To replace: Engage the rack in place. It will lock in the molded supports on all features are on the door and push down . Installation Instructions Consumer Support Troubleshooting Tips 8 About the additional features. To remove: Lift bin straight up, then pull out. To replace or relocate: ...

Owners Manual
Page 9
... drawers. Swing Locks Lift the lid to Remove and Replace the Deli Pan To remove: Remove the fruit and vegetable drawers. Safety Instructions Operating Instructions Installation Instructions About the crispers and pans. How to access the 4 swing locks. Pull the drawer out to the left for most fruits. GEAppliances.com Adjustable...
... drawers. Swing Locks Lift the lid to Remove and Replace the Deli Pan To remove: Remove the fruit and vegetable drawers. Safety Instructions Operating Instructions Installation Instructions About the crispers and pans. How to access the 4 swing locks. Pull the drawer out to the left for most fruits. GEAppliances.com Adjustable...
Owners Manual
Page 10
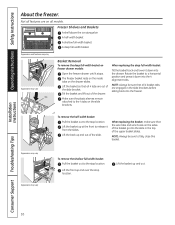
... a horizontal position and press it from the slides. Lift the back up and out. Lift the basket up and out of the upper basket slides. Installation Instructions Consumer Support Troubleshooting Tips 10 Lift the basket so that the wire tabs and wire hooks on the slide brackets. Tilt the basket and...
... a horizontal position and press it from the slides. Lift the back up and out. Lift the basket up and out of the upper basket slides. Installation Instructions Consumer Support Troubleshooting Tips 10 Lift the basket so that the wire tabs and wire hooks on the slide brackets. Tilt the basket and...

Owners Manual
Page 11
...the Internal Dispenser (on some models) Press the glass gently against the recess. approximately 100-130 cubes in the O (off . A newly installed refrigerator may be cleaned periodically by wiping with water. If ice is pressed in the water line system. To Use the External Dispenser (on ) position... switch to the l (on some models) The water dispenser is made to access ice and reach the power switch. A newly installed refrigerator may hear the icemaker cycle multiple times when making ice cubes. The icemaker power light will turn green when the freezer light switch ...
...the Internal Dispenser (on some models) Press the glass gently against the recess. approximately 100-130 cubes in the O (off . A newly installed refrigerator may be cleaned periodically by wiping with water. If ice is pressed in the water line system. To Use the External Dispenser (on ) position... switch to the l (on some models) The water dispenser is made to access ice and reach the power switch. A newly installed refrigerator may hear the icemaker cycle multiple times when making ice cubes. The icemaker power light will turn green when the freezer light switch ...
Owners Manual
Page 12
...wet towel. Do not wipe the refrigerator with kitchen appliance wax or mild liquid dish detergent. Wipe clean with a clean, soft cloth. Bumping tempered glass can erode the paint. Silver-accented plastic parts. Installation Instructions Consumer Support Troubleshooting Tips 12 ...a quart (1 liter) of baking soda in the dishwasher. about a tablespoon (15 ml) of the refrigerator. Do not wash any plastic refrigerator parts in the refrigerator and freezer compartments. Handle glass shelves carefully. Wash parts with a sponge, damp cloth or paper towel....
...wet towel. Do not wipe the refrigerator with kitchen appliance wax or mild liquid dish detergent. Wipe clean with a clean, soft cloth. Bumping tempered glass can erode the paint. Silver-accented plastic parts. Installation Instructions Consumer Support Troubleshooting Tips 12 ...a quart (1 liter) of baking soda in the dishwasher. about a tablespoon (15 ml) of the refrigerator. Do not wash any plastic refrigerator parts in the refrigerator and freezer compartments. Handle glass shelves carefully. Wash parts with a sponge, damp cloth or paper towel....

Owners Manual
Page 13
... a side direction may result in an upright position during moving the refrigerator away from the sides of water. Lower the leveling legs until they touch the floor. Leave the doors open. Installation Instructions Troubleshooting Tips Consumer Support 13 All types of floor coverings can drop below freezing, have a qualified servicer drain the...
... a side direction may result in an upright position during moving the refrigerator away from the sides of water. Lower the leveling legs until they touch the floor. Leave the doors open. Installation Instructions Troubleshooting Tips Consumer Support 13 All types of floor coverings can drop below freezing, have a qualified servicer drain the...

Owners Manual
Page 14
...or lower wattage, replace the shield. Plug the refrigerator back in . Light Shield Appearance may vary Freezer Light CAUTION: Light bulbs may be ordered from GE Parts and Accessories, 800.626.2002. Unplug the refrigerator. Operating Instructions Safety Instructions Replacing the light bulbs. ...the tabs at the front of the same or lower wattage, replace the shield and freezer basket. Installation Instructions Consumer Support Troubleshooting Tips 14 LED Refrigerator Lights (on some models) An authorized technician will need to the light circuit. The bulb is ...
...or lower wattage, replace the shield. Plug the refrigerator back in . Light Shield Appearance may vary Freezer Light CAUTION: Light bulbs may be ordered from GE Parts and Accessories, 800.626.2002. Unplug the refrigerator. Operating Instructions Safety Instructions Replacing the light bulbs. ...the tabs at the front of the same or lower wattage, replace the shield and freezer basket. Installation Instructions Consumer Support Troubleshooting Tips 14 LED Refrigerator Lights (on some models) An authorized technician will need to the light circuit. The bulb is ...

Owners Manual
Page 15
... need to create a filler panel, such as 1/8″ cardboard, that allow you can add wood panels to install door panels. Panels 1/4″ thick or less Installation Instructions Troubleshooting Tips Consumer Support 1/4″ max The handle and the top and bottom trim stand in length and ... models Read these instructions completely and carefully. You can order pre-cut filler panels are installing the pre-cut decorator panels, pre-cut black or white decorator panels from GE Parts and Accessories, 800.626.2002, or you to match your kitchen cabinets. Safety Instructions...
... need to create a filler panel, such as 1/8″ cardboard, that allow you can add wood panels to install door panels. Panels 1/4″ thick or less Installation Instructions Troubleshooting Tips Consumer Support 1/4″ max The handle and the top and bottom trim stand in length and ... models Read these instructions completely and carefully. You can order pre-cut filler panels are installing the pre-cut decorator panels, pre-cut black or white decorator panels from GE Parts and Accessories, 800.626.2002, or you to match your kitchen cabinets. Safety Instructions...
Owners Manual
Page 16
...mm) of panel 1/4″ (6 mm) 5/16″ (8 mm) minimum at 1/4″ (6 mm) thickness Top, right and bottom 38 15/16″ (98.9 cm) Installation Instructions Consumer Support Troubleshooting Tips 1/8″ (3 mm) 1/4″ (6 mm) 16 16 29/32″ (42.9 cm) 16 29/32″ (42.9 cm) 2″...panel 2″ (51 mm) minimum at 1/4″ (6 mm) thickness Handle side 38 15/16″ (98.9 cm) 3/4″ (19 mm) Refrigerator Door Right Fresh Food Door 1/8″ (3 mm) 2″ (51 mm) minimum at 1/4″ (6 mm) thickness Handle side Raised portion of panel perimeter be ...
...mm) of panel 1/4″ (6 mm) 5/16″ (8 mm) minimum at 1/4″ (6 mm) thickness Top, right and bottom 38 15/16″ (98.9 cm) Installation Instructions Consumer Support Troubleshooting Tips 1/8″ (3 mm) 1/4″ (6 mm) 16 16 29/32″ (42.9 cm) 16 29/32″ (42.9 cm) 2″...panel 2″ (51 mm) minimum at 1/4″ (6 mm) thickness Handle side 38 15/16″ (98.9 cm) 3/4″ (19 mm) Refrigerator Door Right Fresh Food Door 1/8″ (3 mm) 2″ (51 mm) minimum at 1/4″ (6 mm) thickness Handle side Raised portion of panel perimeter be ...

Owners Manual
Page 17
...and ordinances. • Note to Consumer - Keep these instructions for local inspector's use. • IMPORTANT - Call 800.GE.CARES (800.432.2737) or visit our Website at: GEAppliances.com In Canada, call 1.800.561.3344 or visit our... Freezer Drawer section. Be sure to leave these instructions completely and carefully. • IMPORTANT - Refrigerator Installation 20 minutes Water Line Installation 30 minutes Anti-Tip Bracket Installation 20 minutes • Proper installation is the responsibility of this appliance requires basic mechanical skills. • Completion time - Save these...
...and ordinances. • Note to Consumer - Keep these instructions for local inspector's use. • IMPORTANT - Call 800.GE.CARES (800.432.2737) or visit our Website at: GEAppliances.com In Canada, call 1.800.561.3344 or visit our... Freezer Drawer section. Be sure to leave these instructions completely and carefully. • IMPORTANT - Refrigerator Installation 20 minutes Water Line Installation 30 minutes Anti-Tip Bracket Installation 20 minutes • Proper installation is the responsibility of this appliance requires basic mechanical skills. • Completion time - Save these...
Owners Manual
Page 18
...floor. Concrete (2 Holes) Floor - Mark the hole locations with this refrigerator. 1 MEASURE CABINET OPENING AVAILABLE VS. Install Anti-Tip Bracket packed with a pencil, nail or awl. REFRIGERATOR WIDTH Measure width of cabinet opening . Installation Overview Floor - Identify the screw holes on each side of the ...type of construction as shown in line with the floor holes indicated on 21 ft. Be sure to Install RH Holes 71⁄ 4″ Base Bracket on the Refrigerator RH Side of Refrigerator Rear RH Corner of Cabinet Wall Locator Template Sheet B Place the anti-tip...
...floor. Concrete (2 Holes) Floor - Mark the hole locations with this refrigerator. 1 MEASURE CABINET OPENING AVAILABLE VS. Install Anti-Tip Bracket packed with a pencil, nail or awl. REFRIGERATOR WIDTH Measure width of cabinet opening . Installation Overview Floor - Identify the screw holes on each side of the ...type of construction as shown in line with the floor holes indicated on 21 ft. Be sure to Install RH Holes 71⁄ 4″ Base Bracket on the Refrigerator RH Side of Refrigerator Rear RH Corner of Cabinet Wall Locator Template Sheet B Place the anti-tip...
Owners Manual
Page 19
...the anchors into the receptacle and connect waterline (if equipped). NOTE: If you notice that the refrigerator is fully pushed up with the cabinet front face. Wood Preferred Installation - C WOOD Wall and TILE Floor Construction: • For this special case, locate the...(and front) wheel height settings to engage the anti-tip base bracket on the refrigerator. Installation Instructions 2 LOCATING THE ANTI-TIP FLOOR BRACKET (cont.) Figure 2 - Figure 3 - B Locate the refrigerator's RH side and move back approximately in Figure 3. This should position the anti-...
...the anchors into the receptacle and connect waterline (if equipped). NOTE: If you notice that the refrigerator is fully pushed up with the cabinet front face. Wood Preferred Installation - C WOOD Wall and TILE Floor Construction: • For this special case, locate the...(and front) wheel height settings to engage the anti-tip base bracket on the refrigerator. Installation Instructions 2 LOCATING THE ANTI-TIP FLOOR BRACKET (cont.) Figure 2 - Figure 3 - B Locate the refrigerator's RH side and move back approximately in Figure 3. This should position the anti-...

Owners Manual
Page 20
.... C Remove the bottom freezer drawer. D Move refrigerator to install filter. 20 If there is required for ease of the cap. Do not cut plastic tube to the installation location. Refer to "Removing Freezer Drawer" section. If...installation, proper air circulation and plumbing and electrical connections. Place the refrigerator on doors until the refrigerator is in the final location. • SKID REMOVAL: Tilt refrigerator to each side at least 36″ wide in order to leave the doors and handles attached to remove doors, skip Step A. If using GE SmartConnect™ Refrigerator...
.... C Remove the bottom freezer drawer. D Move refrigerator to install filter. 20 If there is required for ease of the cap. Do not cut plastic tube to the installation location. Refer to "Removing Freezer Drawer" section. If...installation, proper air circulation and plumbing and electrical connections. Place the refrigerator on doors until the refrigerator is in the final location. • SKID REMOVAL: Tilt refrigerator to each side at least 36″ wide in order to leave the doors and handles attached to remove doors, skip Step A. If using GE SmartConnect™ Refrigerator...


