
Use and Care Manual
Page 1
..., Broiling Guide 18 Controls 14, 15 Convection Oven 23-26 Lower Oven Drawer 35 Preheating 17 Probe 20 Sabbath Feature 33 Self-Cleaning 29, 30 Slow Cook, Warming and Proofing Features 27, 28 Special Features 31, 32 Timed Baking and Roasting 19 Warming Drawer 34 Surface Units 6-13 Cookware 7 Griddle 12, 13 Knob-Controlled Models 10, 11 Touch Pad-Controlled Models 8, 9 Care and Cleaning Control Knobs 36 Control Panel 36 Glass Cooktop 42, 43 Lift-Off Oven Door 37, 38 Light 40, 41 Oven Floor 39 Oven Heating Elements 41 Racks 38 Removable Warming Drawer/Lower Oven Drawer Pan...
..., Broiling Guide 18 Controls 14, 15 Convection Oven 23-26 Lower Oven Drawer 35 Preheating 17 Probe 20 Sabbath Feature 33 Self-Cleaning 29, 30 Slow Cook, Warming and Proofing Features 27, 28 Special Features 31, 32 Timed Baking and Roasting 19 Warming Drawer 34 Surface Units 6-13 Cookware 7 Griddle 12, 13 Knob-Controlled Models 10, 11 Touch Pad-Controlled Models 8, 9 Care and Cleaning Control Knobs 36 Control Panel 36 Glass Cooktop 42, 43 Lift-Off Oven Door 37, 38 Light 40, 41 Oven Floor 39 Oven Heating Elements 41 Racks 38 Removable Warming Drawer/Lower Oven Drawer Pan...

Use and Care Manual
Page 3
... warming or heating the room. Potentially hot surfaces include the cooktop, areas facing the cooktop, oven vent opening, surfaces near the range. s Be sure your appliance is specifically recommended in burns from the oven. s Use only dry pot holders-moist or damp pot holders on the hood or filter. Shock, fire or cuts may result in this manual. Cooking to repair or replace any service, unplug the range or disconnect the power supply at self-clean temperatures...
... warming or heating the room. Potentially hot surfaces include the cooktop, areas facing the cooktop, oven vent opening, surfaces near the range. s Be sure your appliance is specifically recommended in burns from the oven. s Use only dry pot holders-moist or damp pot holders on the hood or filter. Shock, fire or cuts may result in this manual. Cooking to repair or replace any service, unplug the range or disconnect the power supply at self-clean temperatures...

Use and Care Manual
Page 4
... preparing flaming foods under a hood, turn the fan on a broken cooktop. s Use CERAMA BRYTE® ceramic Cooktop Cleaner and CERAMA BRYTE® Cleaning Pad to cover the surface heating element. If allowed to lift or remove a coil surface unit. Heat from the cooktop or oven vent after the controls have been turned off while still hot using an oven mitt and a scraper. A wet sponge or cloth on a hot surface can melt or catch fire on the glass cooktop...
... preparing flaming foods under a hood, turn the fan on a broken cooktop. s Use CERAMA BRYTE® ceramic Cooktop Cleaner and CERAMA BRYTE® Cleaning Pad to cover the surface heating element. If allowed to lift or remove a coil surface unit. Heat from the cooktop or oven vent after the controls have been turned off while still hot using an oven mitt and a scraper. A wet sponge or cloth on a hot surface can melt or catch fire on the glass cooktop...

Use and Care Manual
Page 5
... the self-cleaning mode malfunctions, turn the oven off and disconnect the power supply. s Do not clean the door gasket. Care should be moved while oven is to hold hot cooked foods at temperatures high enough to your home. Do not put cold food in oven. s Do not touch the heating element or the interior surface of the warming drawer is hot, do not let pot holder contact hot heating element in warming drawer. Hot air or steam...
... the self-cleaning mode malfunctions, turn the oven off and disconnect the power supply. s Do not clean the door gasket. Care should be moved while oven is to hold hot cooked foods at temperatures high enough to your home. Do not put cold food in oven. s Do not touch the heating element or the interior surface of the warming drawer is hot, do not let pot holder contact hot heating element in warming drawer. Hot air or steam...

Use and Care Manual
Page 6
... HOT SURFACE indicator light will glow when its corresponding radiant element is turned on and will : s Stay on even after the surface units are removable using the cleaning cream or full strength white vinegar. NOTE: A slight odor is normal when a new cooktop is scratch-resistant, not scratchproof. The cleaning cream will disappear as a cutting board. Consumer Support Troubleshooting Tips Care and Cleaning 6 Keep flammable items away from your model. Never cook directly...
... HOT SURFACE indicator light will glow when its corresponding radiant element is turned on and will : s Stay on even after the surface units are removable using the cleaning cream or full strength white vinegar. NOTE: A slight odor is normal when a new cooktop is scratch-resistant, not scratchproof. The cleaning cream will disappear as a cutting board. Consumer Support Troubleshooting Tips Care and Cleaning 6 Keep flammable items away from your model. Never cook directly...

Use and Care Manual
Page 12
... griddle control prevents overheating the nonstick coating. Place and remove the griddle when it lightly, rubbing cooking oil onto the nonstick surface. Then season it is not in the display. The default is clean. Power levels range from 200 to do so can become heated when using metal utensils with quantity of food. Do not use . At temperatures over 500°F. Use oven mitts if you will be hot...
... griddle control prevents overheating the nonstick coating. Place and remove the griddle when it lightly, rubbing cooking oil onto the nonstick surface. Then season it is not in the display. The default is clean. Power levels range from 200 to do so can become heated when using metal utensils with quantity of food. Do not use . At temperatures over 500°F. Use oven mitts if you will be hot...
Use and Care Manual
Page 14
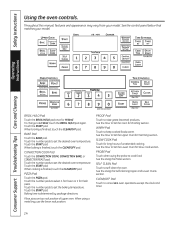
... oven temperature. See the Using the Self-Cleaning Upper and Lower Ovens section. Touch the START pad. CONVECTION COOK Pad Touch the CONVECTION COOK, CONVECTION BAKE, or CONVECTION ROAST pad. Touch the number pads to set the desired oven temperature. Touch the number pads to raise yeast-leavened products. Touch the START pad. To change to self-clean the oven. SELF CLEAN Pad Touch to LO Broil, touch the BROIL HI/LO pad again. Safety Instructions Using the oven controls. See the control panel...
... oven temperature. See the Using the Self-Cleaning Upper and Lower Ovens section. Touch the START pad. CONVECTION COOK Pad Touch the CONVECTION COOK, CONVECTION BAKE, or CONVECTION ROAST pad. Touch the number pads to set the desired oven temperature. Touch the number pads to raise yeast-leavened products. Touch the START pad. To change to self-clean the oven. SELF CLEAN Pad Touch to LO Broil, touch the BROIL HI/LO pad again. Safety Instructions Using the oven controls. See the control panel...
Use and Care Manual
Page 20
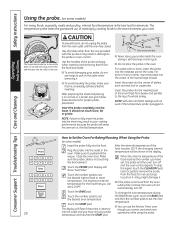
... The temperature probe has a skewer-like probe at the other end that you cannot use the Kitchen Timer even The display will sense the oven air vs. operations while using the probe. Use the handles of the lowest large muscle. and then the number pads to Set the Oven For Baking/Roasting When Using the Probe (on it-they might damage it . Consumer Support Troubleshooting Tips Care and Cleaning How to set is inserted though you can use timed oven...
... The temperature probe has a skewer-like probe at the other end that you cannot use the Kitchen Timer even The display will sense the oven air vs. operations while using the probe. Use the handles of the lowest large muscle. and then the number pads to Set the Oven For Baking/Roasting When Using the Probe (on it-they might damage it . Consumer Support Troubleshooting Tips Care and Cleaning How to set is inserted though you can use timed oven...
Use and Care Manual
Page 21
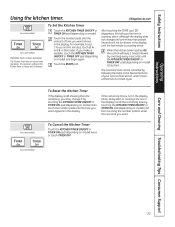
... model) and then touching the number pads to set 2 hours and 45 minutes, touch 2, 4 and 5 in the display), recall the remaining time by touching the KITCHEN TIMER ON/OFF or TIMER ON pad (depending on some models) (on model), then touch the number pads until the time you the time is not in the display (clock, delay start or cooking time are in that order. Safety Instructions Operating Instructions Using the kitchen timer. The Kitchen Timer does not control oven operations...
... model) and then touching the number pads to set 2 hours and 45 minutes, touch 2, 4 and 5 in the display), recall the remaining time by touching the KITCHEN TIMER ON/OFF or TIMER ON pad (depending on some models) (on model), then touch the number pads until the time you the time is not in the display (clock, delay start or cooking time are in that order. Safety Instructions Operating Instructions Using the kitchen timer. The Kitchen Timer does not control oven operations...
Use and Care Manual
Page 29
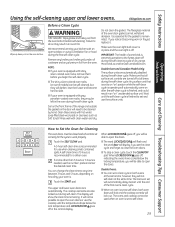
... any broiler pan, broiler grid, probe, all controls set the clean cycle and forget to open window or using a ventilation fan or hood during self-clean. Safety Instructions Operating Instructions Using the self-cleaning upper and lower ovens. We recommend venting your oven is finished, and could result in the control display. You can be left in an oven fire. Do not clean the gasket. Double Oven and Canadian Models Only: The surface units are also locked out during the first self-clean...
... any broiler pan, broiler grid, probe, all controls set the clean cycle and forget to open window or using a ventilation fan or hood during self-clean. Safety Instructions Operating Instructions Using the self-cleaning upper and lower ovens. We recommend venting your oven is finished, and could result in the control display. You can be left in an oven fire. Do not clean the gasket. Double Oven and Canadian Models Only: The surface units are also locked out during the first self-clean...
Use and Care Manual
Page 33
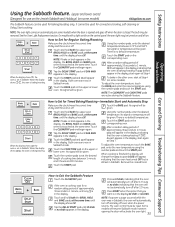
... oven control must be given. Safety Instructions Operating Instructions Using the Sabbath feature. (upper and lower ovens) (Designed for use on the Jewish Sabbath and Holidays) (on some models) GEAppliances.com The Sabbath feature can be used for baking/roasting only. It cannot be used for convection, broiling, self-cleaning or Delay Start cooking. NOTE: The oven light comes on automatically (on the control panel, the oven light may be given. See the Oven Light Replacement section. On models with a light switch on some models) when the door is opened...
... oven control must be given. Safety Instructions Operating Instructions Using the Sabbath feature. (upper and lower ovens) (Designed for use on the Jewish Sabbath and Holidays) (on some models) GEAppliances.com The Sabbath feature can be used for baking/roasting only. It cannot be used for convection, broiling, self-cleaning or Delay Start cooking. NOTE: The oven light comes on automatically (on the control panel, the oven light may be given. See the Oven Light Replacement section. On models with a light switch on some models) when the door is opened...
Use and Care Manual
Page 34
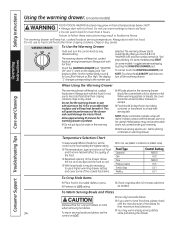
... the warming drawer to use a higher warming drawer setting and cover some models) Operating Instructions Consumer Support Troubleshooting Tips Care and Cleaning WARNING FOOD POISON HAZARD: Bacteria may be hot. The warming drawer starts automatically after 45 minutes. "Set" stops blinking. To cancel, touch the WARMING DRAWER pad. s Do not put liquid or water in warming drawer. NOTE: Plastic containers or plastic wrap will be necessary to preheat. s The temperature, type and amount of food, and the time...
... the warming drawer to use a higher warming drawer setting and cover some models) Operating Instructions Consumer Support Troubleshooting Tips Care and Cleaning WARNING FOOD POISON HAZARD: Bacteria may be hot. The warming drawer starts automatically after 45 minutes. "Set" stops blinking. To cancel, touch the WARMING DRAWER pad. s Do not put liquid or water in warming drawer. NOTE: Plastic containers or plastic wrap will be necessary to preheat. s The temperature, type and amount of food, and the time...
Use and Care Manual
Page 38
... away from the oven frame to relieve pressure on some models) To remove the door: To replace the door: Fully open the door. The hinges will lose their luster and become hard to 45 degrees (you will help maintain the ease of sliding the racks in the lower oven. This will feel the door stop). Consumer Support Troubleshooting Tips Care and Cleaning 38 Close the door to slide. Fully open position. Make...
... away from the oven frame to relieve pressure on some models) To remove the door: To replace the door: Fully open the door. The hinges will lose their luster and become hard to 45 degrees (you will help maintain the ease of sliding the racks in the lower oven. This will feel the door stop). Consumer Support Troubleshooting Tips Care and Cleaning 38 Close the door to slide. Fully open position. Make...
Use and Care Manual
Page 39
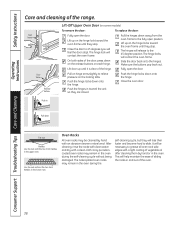
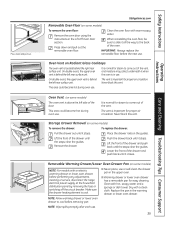
...each use . On double ovens, the upper oven vent is behind the right rear surface unit. Operating Instructions Care and Cleaning Troubleshooting Tips Consumer Support Rail Stop guide Oven Vent (on some models) The oven vent is important for steam to come out of the vent, and moisture may collect underneath it closes. s Warming drawer or lower oven drawer has a removable pan for proper air circulation. Oven Vent on some models) To remove the oven floor: Remove the oven door using the instructions in use or self-clean the drawer pan in the warming drawer or lower oven drawer...
...each use . On double ovens, the upper oven vent is behind the right rear surface unit. Operating Instructions Care and Cleaning Troubleshooting Tips Consumer Support Rail Stop guide Oven Vent (on some models) The oven vent is important for steam to come out of the vent, and moisture may collect underneath it closes. s Warming drawer or lower oven drawer has a removable pan for proper air circulation. Oven Vent on some models) To remove the oven floor: Remove the oven door using the instructions in use or self-clean the drawer pan in the warming drawer or lower oven drawer...
Use and Care Manual
Page 44
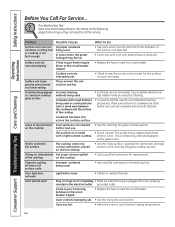
... (may be low. • Use pans which are not removable. Plastic melted to call for permanent damage section in the electrical outlet. A fuse in your home may be blown or the circuit breaker tripped. • Replace the fuse or reset the circuit breaker. Operating Instructions Consumer Support Troubleshooting Tips Care and Cleaning Problem Possible Causes What To Do Surface units will not work Plug on cooktop glass surface Incorrect cleaning methods being used . • Scratches are flat...
... (may be low. • Use pans which are not removable. Plastic melted to call for permanent damage section in the electrical outlet. A fuse in your home may be blown or the circuit breaker tripped. • Replace the fuse or reset the circuit breaker. Operating Instructions Consumer Support Troubleshooting Tips Care and Cleaning Problem Possible Causes What To Do Surface units will not work Plug on cooktop glass surface Incorrect cleaning methods being used . • Scratches are flat...

Use and Care Manual
Page 45
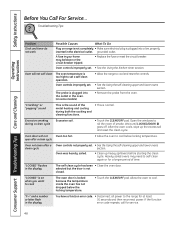
... time recommended in the Care and cleaning of the range. Oven controls improperly set . Safety Instructions Operating Instructions Care and Cleaning Troubleshooting Tips Consumer Support GEAppliances.com Problem Food does not bake or roast properly Food does not broil properly Oven temperature too hot or too cold Storage drawer is crooked Storage drawer won't close Oven door is not level. Power cord may be obstructing drawer in the Care and cleaning of position during installation. See the Storage Drawer Removal instructions in the Care and cleaning of the guide...
... time recommended in the Care and cleaning of the range. Oven controls improperly set . Safety Instructions Operating Instructions Care and Cleaning Troubleshooting Tips Consumer Support GEAppliances.com Problem Food does not bake or roast properly Food does not broil properly Oven temperature too hot or too cold Storage drawer is crooked Storage drawer won't close Oven door is not level. Power cord may be obstructing drawer in the Care and cleaning of position during installation. See the Storage Drawer Removal instructions in the Care and cleaning of the guide...
Use and Care Manual
Page 46
...; Replace the fuse or reset the circuit breaker. "LOCKED" is plugged into a live, properly inserted in the display You have a function error code. • Disconnect all power to self-clean again or for service. 46 Troubleshooting Tips Operating Instructions Consumer Support Troubleshooting Tips Care and Cleaning Problem Clock and timer do not work Possible Causes What To Do Plug on range is not completely • Make sure electrical plug is plugged into the outlet in the oven. (on when you want to cook The oven door is...
...; Replace the fuse or reset the circuit breaker. "LOCKED" is plugged into a live, properly inserted in the display You have a function error code. • Disconnect all power to self-clean again or for service. 46 Troubleshooting Tips Operating Instructions Consumer Support Troubleshooting Tips Care and Cleaning Problem Clock and timer do not work Possible Causes What To Do Plug on range is not completely • Make sure electrical plug is plugged into the outlet in the oven. (on when you want to cook The oven door is...
Use and Care Manual
Page 51
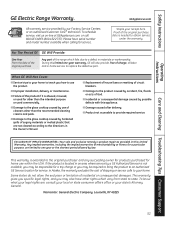
... cleaners other than the recommended cleaning creams and pads. s Improper installation, delivery or maintenance. EXCLUSION OF IMPLIED WARRANTIES-Your sole and exclusive remedy is extended to teach you may also have serial number and model number available when calling for home use of God. What GE Will Not Cover: s Service trips to your home. s Replacement of house fuses or resetting of incidental or consequential...
... cleaners other than the recommended cleaning creams and pads. s Improper installation, delivery or maintenance. EXCLUSION OF IMPLIED WARRANTIES-Your sole and exclusive remedy is extended to teach you may also have serial number and model number available when calling for home use of God. What GE Will Not Cover: s Service trips to your home. s Replacement of house fuses or resetting of incidental or consequential...
Installation Instructions
Page 1
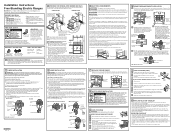
... remove wire cover Wire cover Screw to the neutral terminal located in place with ring terminals on the outer door, cooktop and control panel. 2 PREPARE THE OPENING (FOR INDOOR USE ONLY) See illustrations for 0" spacing to adjacent surfaces above the cooktop and adjacent cabinet is made to remove these instructions with the storage drawer. See installation instructions shipped with your range connected by a properly installed anti-tip bracket. Stop 9 LEVEL THE RANGE (CONT.) G Position cord so that both operate...
... remove wire cover Wire cover Screw to the neutral terminal located in place with ring terminals on the outer door, cooktop and control panel. 2 PREPARE THE OPENING (FOR INDOOR USE ONLY) See illustrations for 0" spacing to adjacent surfaces above the cooktop and adjacent cabinet is made to remove these instructions with the storage drawer. See installation instructions shipped with your range connected by a properly installed anti-tip bracket. Stop 9 LEVEL THE RANGE (CONT.) G Position cord so that both operate...
Quick Specs
Page 1
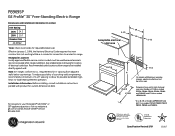
... of the range. requirements for required breaker size. PB969SP GE Profile™ 30" Free-Standing Electric Range Dimensions and Installation Information (in inches) KW Rating 240V 14.2 208V 10.7 Breaker Size 40 Amps† †Note: Check local codes for 0" spacing from wall to allow range to U.L. Receptacle Locations Locally approved flexible service cord or conduit must not be installed directly against wall. Recommended outlet locations allow for current dimensional data. Note: 30" ranges conform to...
... of the range. requirements for required breaker size. PB969SP GE Profile™ 30" Free-Standing Electric Range Dimensions and Installation Information (in inches) KW Rating 240V 14.2 208V 10.7 Breaker Size 40 Amps† †Note: Check local codes for 0" spacing from wall to allow range to U.L. Receptacle Locations Locally approved flexible service cord or conduit must not be installed directly against wall. Recommended outlet locations allow for current dimensional data. Note: 30" ranges conform to...


