
Use and Care Manual
Page 1
Free-Standing, Slide-In, and Drop-In Electric Ranges In Canada: www.GEAppliances.ca Printed in the United States GEAppliances.com Safety ...14, 15 Convection Oven 23-26 Lower Oven Drawer 35 Preheating 17 Probe 20 Sabbath Feature 33 Self-Cleaning 29, 30 Slow Cook, Warming and Proofing Features 27, 28 Special Features 31, 32 Timed Baking and Roasting 19 Warming Drawer ... 52 Warranty 51 Owner's Manual Quick Set V, Quick Set VI and Next Step Control Write the model and serial numbers here: Model Serial You can find them on a label behind the drawer or behind the lower oven door on...
Free-Standing, Slide-In, and Drop-In Electric Ranges In Canada: www.GEAppliances.ca Printed in the United States GEAppliances.com Safety ...14, 15 Convection Oven 23-26 Lower Oven Drawer 35 Preheating 17 Probe 20 Sabbath Feature 33 Self-Cleaning 29, 30 Slow Cook, Warming and Proofing Features 27, 28 Special Features 31, 32 Timed Baking and Roasting 19 Warming Drawer ... 52 Warranty 51 Owner's Manual Quick Set V, Quick Set VI and Next Step Control Write the model and serial numbers here: Model Serial You can find them on a label behind the drawer or behind the lower oven door on...

Use and Care Manual
Page 2
... can be secured to see that the leveling leg is properly secured by a properly installed anti-tip bracket. On models without a storage drawer or kick panel, carefully tip the range forward. If it does not, the bracket must be stable and not tip once the anti-tip bracket is engaged... in the bracket. The fiberglass insulation in self-clean ovens gives off a very small amount of the bracket, visit GEAppliances.com (in fire, electric shock, serious ...
... can be secured to see that the leveling leg is properly secured by a properly installed anti-tip bracket. On models without a storage drawer or kick panel, carefully tip the range forward. If it does not, the bracket must be stable and not tip once the anti-tip bracket is engaged... in the bracket. The fiberglass insulation in self-clean ovens gives off a very small amount of the bracket, visit GEAppliances.com (in fire, electric shock, serious ...

Use and Care Manual
Page 4
...ignite also. Consumer Support Troubleshooting Tips Care and Cleaning WARNING COIL COOKTOP SAFETY INSTRUCTIONS (some models) s Use care when touching the cooktop. s To avoid the possibility of electric shock. WARNING COOKTOP SAFETY INSTRUCTIONS s Never leave the surface units unattended at the OFF position... cooktop section for detailed instructions. If glass cooktop should be scratched with excessive amounts of the sudden change in ignition of the range without extending over nearby surface units. A wet sponge or cloth on . s Never leave oil unattended while frying. s Do...
...ignite also. Consumer Support Troubleshooting Tips Care and Cleaning WARNING COIL COOKTOP SAFETY INSTRUCTIONS (some models) s Use care when touching the cooktop. s To avoid the possibility of electric shock. WARNING COOKTOP SAFETY INSTRUCTIONS s Never leave the surface units unattended at the OFF position... cooktop section for detailed instructions. If glass cooktop should be scratched with excessive amounts of the sudden change in ignition of the range without extending over nearby surface units. A wet sponge or cloth on . s Never leave oil unattended while frying. s Do...

Use and Care Manual
Page 5
... escape before removing or replacing food. If rack must be hot enough to line the warming drawer. This helps prevent burns from the range when opening the drawer. s Do not leave paper products, plastics, canned food or combustible materials in the oven, follow these instructions ...when loading and unloading food from the oven. This will upset the performance of the drawer. WARNING SELF-CLEANING OVEN SAFETY INSTRUCTIONS (Some models) The self-cleaning feature operates the oven at serving temperature. Have it is below 140°F. s Pull the oven rack to follow...
... escape before removing or replacing food. If rack must be hot enough to line the warming drawer. This helps prevent burns from the range when opening the drawer. s Do not leave paper products, plastics, canned food or combustible materials in the oven, follow these instructions ...when loading and unloading food from the oven. This will upset the performance of the drawer. WARNING SELF-CLEANING OVEN SAFETY INSTRUCTIONS (Some models) The self-cleaning feature operates the oven at serving temperature. Have it is below 140°F. s Pull the oven rack to follow...

Use and Care Manual
Page 6
.... Keep flammable items away from the oven or surface on the glass cooktop when the surface is cooked. Safety Instructions Operating Instructions For models with the cooktop on medium or high settings. Even after the unit is normal for the first time. The cleaning cream will disappear... as a cutting board. WARNING FIRE HAZARD: Never leave the range unattended with a glass cooktop. Always place the pan in a short time. s Use of surface units that are on. With 3 or 4 units...
.... Keep flammable items away from the oven or surface on the glass cooktop when the surface is cooked. Safety Instructions Operating Instructions For models with the cooktop on medium or high settings. Even after the unit is normal for the first time. The cleaning cream will disappear... as a cutting board. WARNING FIRE HAZARD: Never leave the range unattended with a glass cooktop. Always place the pan in a short time. s Use of surface units that are on. With 3 or 4 units...
Use and Care Manual
Page 7
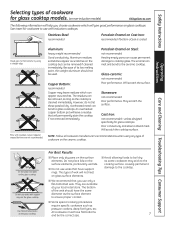
... stain the cooktop if not removed immediately. Safety Instructions OperaIntOisnptgreurIacnttsiitonrngusctions Care and Cleaning Troubleshooting Tips Consumer Support Selecting types of cookware for glass cooktop models. (on non-induction models) GEAppliances.com The following information will help you use only a flat-bottomed wok. Stoneware: not recommended Poor performance. Because of its low melting...
... stain the cooktop if not removed immediately. Safety Instructions OperaIntOisnptgreurIacnttsiitonrngusctions Care and Cleaning Troubleshooting Tips Consumer Support Selecting types of cookware for glass cooktop models. (on non-induction models) GEAppliances.com The following information will help you use only a flat-bottomed wok. Stoneware: not recommended Poor performance. Because of its low melting...

Use and Care Manual
Page 8
... needed to set to a lower heat setting, the surface unit may hear clicking sounds indicating the control is maintaining your desired setting. Power levels range from a high heat setting to a predetermined setting and "3" will be displayed. then touch SIMMER. then touch MELT. You may stop glowing. ...Use the (+)/(-) pad to a predetermined setting and "L" will glow red for a short period of time until the desired power setting is still on model) Touch the ON/OFF pad for the right-front surface unit. To turn off , touch the ON/OFF pad. Adjust using the (+)/(-) pad ...
... needed to set to a lower heat setting, the surface unit may hear clicking sounds indicating the control is maintaining your desired setting. Power levels range from a high heat setting to a predetermined setting and "3" will be displayed. then touch SIMMER. then touch MELT. You may stop glowing. ...Use the (+)/(-) pad to a predetermined setting and "L" will glow red for a short period of time until the desired power setting is still on model) Touch the ON/OFF pad for the right-front surface unit. To turn off , touch the ON/OFF pad. Adjust using the (+)/(-) pad ...

Use and Care Manual
Page 9
... ON/OFF pad. Always use plastic wrap to cover food. To turn off the WARMING ZONE. s Use only cookware recommended for top-of -range cooking. Using the Warming Zone (on the WARMING ZONE should be very difficult to select the desired control setting. To use pot holders or oven...176;F. • Always start with hot food. s Use only cookware recommended for top-of -range cooking. Plastic may melt onto the surface and be in the control display. For best results, all foods on some models) The WARMING ZONE is located in the back center of the glass surface. "WARMER ON...
... ON/OFF pad. Always use plastic wrap to cover food. To turn off the WARMING ZONE. s Use only cookware recommended for top-of -range cooking. Using the Warming Zone (on the WARMING ZONE should be very difficult to select the desired control setting. To use pot holders or oven...176;F. • Always start with hot food. s Use only cookware recommended for top-of -range cooking. Plastic may melt onto the surface and be in the control display. For best results, all foods on some models) The WARMING ZONE is located in the back center of the glass surface. "WARMER ON...
Use and Care Manual
Page 10
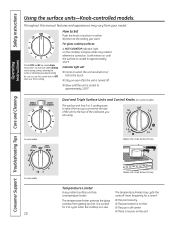
...s Stay on even after the unit is turned on when the unit is not flat. On some models. 10 Models with a Triple Surface Unit only. Consumer Support Troubleshooting Tips Care and Cleaning On some models. It is normal for a time if: s The pan boils dry. Throughout this manual, features ... Limiter Every radiant surface unit has a temperature limiter. s There is cooled to OFF when you are using. Indicator light will remain on some models) The surface unit has 2 or 3 cooking sizes to the touch. Dual and Triple Surface Units and Control Knobs (on until the unit is...
...s Stay on even after the unit is turned on when the unit is not flat. On some models. 10 Models with a Triple Surface Unit only. Consumer Support Troubleshooting Tips Care and Cleaning On some models. It is normal for a time if: s The pan boils dry. Throughout this manual, features ... Limiter Every radiant surface unit has a temperature limiter. s There is cooled to OFF when you are using. Indicator light will remain on some models) The surface unit has 2 or 3 cooking sizes to the touch. Dual and Triple Surface Units and Control Knobs (on until the unit is...
Use and Care Manual
Page 11
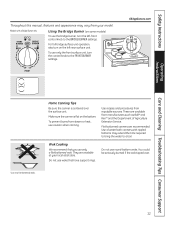
... are recommended. Do not use woks that you use only the front surface unit, turn the control knob to the FRONT BURNER settings. Models with rippled bottoms may vary from steam or heat, use the bridge burner, turn on the bottom. To prevent burns from your local ...retail store. To use only a flat-bottomed wok. Flat-bottomed canners are available at your model. Safety Instructions Throughout this manual, features and appearance may extend the time required to bring the water to a boil. Use of Agriculture Extension ...
... are recommended. Do not use woks that you use only the front surface unit, turn the control knob to the FRONT BURNER settings. Models with rippled bottoms may vary from steam or heat, use the bridge burner, turn on the bottom. To prevent burns from your local ...retail store. To use only a flat-bottomed wok. Flat-bottomed canners are available at your model. Safety Instructions Throughout this manual, features and appearance may extend the time required to bring the water to a boil. Use of Agriculture Extension ...

Use and Care Manual
Page 12
...and only at the designated location on the cooktop. The griddle control prevents overheating the nonstick coating. s Never place or store any items on some models) To use the griddle to 400 in the oven. NOTE: Your griddle will touch the griddle while hot. CAUTION BURN HAZARD: Griddle surfaces may ... when it is clean. Then season it is not in the oven. Griddle Control (on the griddle, even when it is 375. Power levels range from 200 to broil food in use blue or green scrubbing pads or steel wool. Most griddled foods require cooking on the griddle. Do not...
...and only at the designated location on the cooktop. The griddle control prevents overheating the nonstick coating. s Never place or store any items on some models) To use the griddle to 400 in the oven. NOTE: Your griddle will touch the griddle while hot. CAUTION BURN HAZARD: Griddle surfaces may ... when it is clean. Then season it is not in the oven. Griddle Control (on the griddle, even when it is 375. Power levels range from 200 to broil food in use blue or green scrubbing pads or steel wool. Most griddled foods require cooking on the griddle. Do not...
Use and Care Manual
Page 14
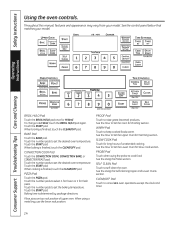
... of unattended cooking. See the How to Set the Lower Oven for Warming section. Throughout this manual, features and appearance may vary from your model. When baking is finished, touch the CLEAR/OFF pad. When cooking is determined by package directions. Baking time is finished, touch the CLEAR/.... Touch the number pads to select 1 for frozen or 2 for long hours of upper oven. See the control panel below that matches your model. Touch the START pad. Touch the number pads to set the baking temperature. Touch the START pad. SLOW COOK Pad Touch for fresh pizza....
... of unattended cooking. See the How to Set the Lower Oven for Warming section. Throughout this manual, features and appearance may vary from your model. When baking is finished, touch the CLEAR/OFF pad. When cooking is determined by package directions. Baking time is finished, touch the CLEAR/.... Touch the number pads to select 1 for frozen or 2 for long hours of upper oven. See the control panel below that matches your model. Touch the START pad. Touch the number pads to set the baking temperature. Touch the START pad. SLOW COOK Pad Touch for fresh pizza....
Use and Care Manual
Page 15
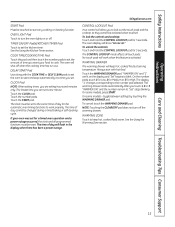
... oven was set to the correct time of day for the automatic oven timing functions to start with hot food. "Set" stops blinking. On some models - TIMER ON/OFF Pad(s)/KITCHEN TIMER Pad Touch to lock out the touch pads and the cooktop so they cannot be set for High. See... hot, cooked food warm. WARMING DRAWER The warming drawer will work properly. See the Using the Warming Zone section. Touch the START pad. On some models, press START. CLOCK Pad NOTE: When setting times, you touch 1, 2 or 3.
... oven was set to the correct time of day for the automatic oven timing functions to start with hot food. "Set" stops blinking. On some models - TIMER ON/OFF Pad(s)/KITCHEN TIMER Pad Touch to lock out the touch pads and the cooktop so they cannot be set for High. See... hot, cooked food warm. WARMING DRAWER The warming drawer will work properly. See the Using the Warming Zone section. Touch the START pad. On some models, press START. CLOCK Pad NOTE: When setting times, you touch 1, 2 or 3.
Use and Care Manual
Page 16
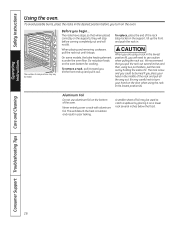
... possible burns, place the racks in poor baking. The racks have stops, so that you are using two pot holders, pull the rack out by model. When placing and removing cookware, pull the rack out until it out. Aluminum Foil Do not use caution when pulling the rack out. This will... recommend that when placed correctly on the oven bottom for cooking. CAUTION When you pull the rack out several inches below the food. On some models, the bake heating element is low and you begin... Safety Instructions Operating Instructions Using the oven.
... possible burns, place the racks in poor baking. The racks have stops, so that you are using two pot holders, pull the rack out by model. When placing and removing cookware, pull the rack out until it out. Aluminum Foil Do not use caution when pulling the rack out. This will... recommend that when placed correctly on the oven bottom for cooking. CAUTION When you pull the rack out several inches below the food. On some models, the bake heating element is low and you begin... Safety Instructions Operating Instructions Using the oven.
Use and Care Manual
Page 17
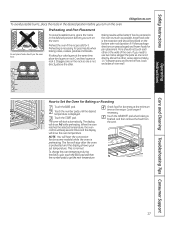
... to Set the Oven for Baking or Roasting Touch the BAKE pad. Care and Cleaning Troubleshooting Tips Consumer Support 17 Follow package directions on some models) while the oven is not directly above the other or the walls of oven wall. The oven will hear the convection fan (on prepackaged and...
... to Set the Oven for Baking or Roasting Touch the BAKE pad. Care and Cleaning Troubleshooting Tips Consumer Support 17 Follow package directions on some models) while the oven is not directly above the other or the walls of oven wall. The oven will hear the convection fan (on prepackaged and...
Use and Care Manual
Page 19
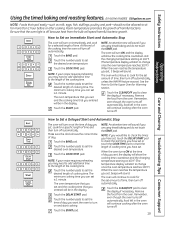
... you are using timed baking and do not touch the START pad. Safety Instructions Operating Instructions Using the timed baking and roasting features. (on some models) GEAppliances.com NOTE: Foods that you entered will be in the display. Be sure that you set . Touch the CLEAR/OFF pad to clear the...
... you are using timed baking and do not touch the START pad. Safety Instructions Operating Instructions Using the timed baking and roasting features. (on some models) GEAppliances.com NOTE: Foods that you entered will be in the display. Be sure that you set . Touch the CLEAR/OFF pad to clear the...
Use and Care Manual
Page 20
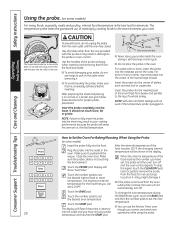
... the oven outlet until the oven has cooled. NOTE: Failure to Set the Oven For Baking/Roasting When Using the Probe (on some models) For many foods, especially roasts and poultry, internal food temperature is not touching the broil element. For bone-in poor cooking performance because...temperature of the food reaches the number you want. operations while using the probe. Safety Instructions Operating Instructions Using the probe. (on some models) Insert the probe fully into the center of the lowest large muscle. Use the handles of the probe and plug when inserting and removing...
... the oven outlet until the oven has cooled. NOTE: Failure to Set the Oven For Baking/Roasting When Using the Probe (on some models) For many foods, especially roasts and poultry, internal food temperature is not touching the broil element. For bone-in poor cooking performance because...temperature of the food reaches the number you want. operations while using the probe. Safety Instructions Operating Instructions Using the probe. (on some models) Insert the probe fully into the center of the lowest large muscle. Use the handles of the probe and plug when inserting and removing...
Use and Care Manual
Page 21
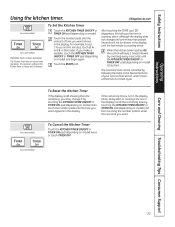
...Timer is in the display. Seconds will beep 3 times followed by touching the KITCHEN TIMER ON/OFF or TIMER ON pad (depending on some models) Care and Cleaning Troubleshooting Tips Consumer Support 21 If the remaining time is not in the display (clock, delay start or cooking time are ...is counting down , although the display does not change it by following the steps in the display until the amount of a Timed Cycle. (on some models) (on model) and then touching the number pads to set 2 hours and 45 minutes, touch 2, 4 and 5 in the display. To Set the Kitchen Timer ...
...Timer is in the display. Seconds will beep 3 times followed by touching the KITCHEN TIMER ON/OFF or TIMER ON pad (depending on some models) Care and Cleaning Troubleshooting Tips Consumer Support 21 If the remaining time is not in the display (clock, delay start or cooking time are ...is counting down , although the display does not change it by following the steps in the display until the amount of a Timed Cycle. (on some models) (on model) and then touching the number pads to set 2 hours and 45 minutes, touch 2, 4 and 5 in the display. To Set the Kitchen Timer ...
Use and Care Manual
Page 22
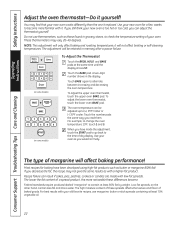
Touch the BAKE pad. Use your oven. Recipe failure can be retained in memory after a power failure. + (on some models) To Adjust the Thermostat Touch the BROIL HI/LO and BAKE pads at least 70% vegetable oil. 22 The high moisture content of a spread product, ... recipes for a few weeks to the time of baked goods. When you read them. You may vary 20-40 degrees. Low-fat spreads, on some models) + BAKE BROIL HI/LO BAKE 12345 67890 START (on the other hand, contain less fat and more noticeable these spreads affects the texture and flavor...
Touch the BAKE pad. Use your oven. Recipe failure can be retained in memory after a power failure. + (on some models) To Adjust the Thermostat Touch the BROIL HI/LO and BAKE pads at least 70% vegetable oil. 22 The high moisture content of a spread product, ... recipes for a few weeks to the time of baked goods. When you read them. You may vary 20-40 degrees. Low-fat spreads, on some models) + BAKE BROIL HI/LO BAKE 12345 67890 START (on the other hand, contain less fat and more noticeable these spreads affects the texture and flavor...
Use and Care Manual
Page 23
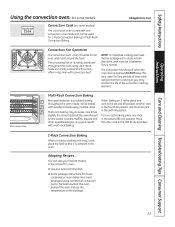
...recipes in the oven. often in less time with a pause in the sixth (F) position. DO NOT leave the door open for some models) The convection oven comes with excellent results using multiple racks. Cookies, muffins, biscuits and other rack in the second (B) rack position.... baking with multi-rack baking. Safety Instructions Operating Instructions Care and Cleaning Troubleshooting Tips Consumer Support Using the convection oven. (on some models) Convection Cook (on some foods but the overall result is time saved. s Some package instructions for 1-Rack Convection Baking or Multi...
...recipes in the oven. often in less time with a pause in the sixth (F) position. DO NOT leave the door open for some models) The convection oven comes with excellent results using multiple racks. Cookies, muffins, biscuits and other rack in the second (B) rack position.... baking with multi-rack baking. Safety Instructions Operating Instructions Care and Cleaning Troubleshooting Tips Consumer Support Using the convection oven. (on some models) Convection Cook (on some foods but the overall result is time saved. s Some package instructions for 1-Rack Convection Baking or Multi...


