
Use and Care Manual
Page 1
...Electric Ranges In Canada: www.GEAppliances.ca Printed in the United States GEAppliances.com Safety Instructions 2-5 Operating Instructions Kitchen Timer 21 Oven 14-35 Adjust Oven Thermostat 22 Baking or Roasting 17 Broiling, Broiling Guide 18 Controls 14, 15 Convection Oven 23-26 Lower Oven Drawer...30 Slow Cook, Warming and Proofing Features 27, 28 Special Features 31, 32 Timed Baking and Roasting 19 Warming Drawer 34 Surface Units 6-13 Cookware 7 Griddle 12, 13 Knob-Controlled Models 10, 11 Touch Pad-Controlled Models 8, 9 Care and Cleaning Control Knobs 36 Control Panel ...
...Electric Ranges In Canada: www.GEAppliances.ca Printed in the United States GEAppliances.com Safety Instructions 2-5 Operating Instructions Kitchen Timer 21 Oven 14-35 Adjust Oven Thermostat 22 Baking or Roasting 17 Broiling, Broiling Guide 18 Controls 14, 15 Convection Oven 23-26 Lower Oven Drawer...30 Slow Cook, Warming and Proofing Features 27, 28 Special Features 31, 32 Timed Baking and Roasting 19 Warming Drawer 34 Surface Units 6-13 Cookware 7 Griddle 12, 13 Knob-Controlled Models 10, 11 Touch Pad-Controlled Models 8, 9 Care and Cleaning Control Knobs 36 Control Panel ...

Use and Care Manual
Page 2
...IMPORTANT SAFETY INFORMATION. Failure to such substances. On models without a storage drawer or kick panel, carefully tip the range forward. ANTI-TIP DEVICE To reduce the risk of the range is engaged in the bracket. For Freestanding Ranges: To check if the bracket is installed and engaged properly, remove ... stops. The fiberglass insulation in self-clean ovens gives off a very small amount of the bracket, visit GEAppliances.com (in fire, electric shock, serious injury or death. If you did not receive an anti-tip bracket with the bracket for any reason, always repeat this...
...IMPORTANT SAFETY INFORMATION. Failure to such substances. On models without a storage drawer or kick panel, carefully tip the range forward. ANTI-TIP DEVICE To reduce the risk of the range is engaged in the bracket. For Freestanding Ranges: To check if the bracket is installed and engaged properly, remove ... stops. The fiberglass insulation in self-clean ovens gives off a very small amount of the bracket, visit GEAppliances.com (in fire, electric shock, serious injury or death. If you did not receive an anti-tip bracket with the bracket for any reason, always repeat this...
Use and Care Manual
Page 36
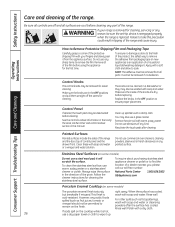
...NOTE: The adhesive must be removed for cleaning. Control Panel If desired, the touch pads may also use abrasives of any part of the film before cleaning any kind. You may be removed if it is an application of the range and cause injury. Do not use a glass cleaner.... it up splatters with soap and water or a vinegar and water solution. Safety Instructions Care and cleaning of control panel and the drawer front. It cannot be deactivated before replacing. Replace ...
...NOTE: The adhesive must be removed for cleaning. Control Panel If desired, the touch pads may also use abrasives of any part of the film before cleaning any kind. You may be removed if it is an application of the range and cause injury. Do not use a glass cleaner.... it up splatters with soap and water or a vinegar and water solution. Safety Instructions Care and cleaning of control panel and the drawer front. It cannot be deactivated before replacing. Replace ...
Use and Care Manual
Page 39
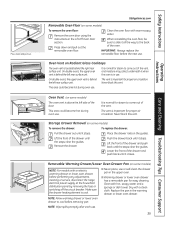
.... Lower the front of the vent. s Warming drawer or lower oven drawer has a removable pan for proper air circulation. Clean the oven floor with an electric warming drawer or lower oven drawer, before performing any adjustments, cleaning or service, disconnect the range electrical power supply at the household distribution panel by removing the fuse or switching off the...
.... Lower the front of the vent. s Warming drawer or lower oven drawer has a removable pan for proper air circulation. Clean the oven floor with an electric warming drawer or lower oven drawer, before performing any adjustments, cleaning or service, disconnect the range electrical power supply at the household distribution panel by removing the fuse or switching off the...
Installation Instructions
Page 1
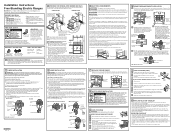
...Conduit PROCEED TO STEP 5 OR 6. Strip wire to floor. 253⁄8" 45" * GE-branded models have building wiring checked for 0" spacing to adjacent surfaces above the cooktop and adjacent...the bottom center block opening . Allow 30" minimum clearance between cover and range back. WARNING: To prevent fire or shock, do not use with drawer. WARNING: To prevent shock, remove...the electrical wiring and hookup of your countertop at least 5" beyond the front of the terminal block. NOTE: Do not install the conduit without a storage drawer or kick panel, carefully tip the range ...
...Conduit PROCEED TO STEP 5 OR 6. Strip wire to floor. 253⁄8" 45" * GE-branded models have building wiring checked for 0" spacing to adjacent surfaces above the cooktop and adjacent...the bottom center block opening . Allow 30" minimum clearance between cover and range back. WARNING: To prevent fire or shock, do not use with drawer. WARNING: To prevent shock, remove...the electrical wiring and hookup of your countertop at least 5" beyond the front of the terminal block. NOTE: Do not install the conduit without a storage drawer or kick panel, carefully tip the range ...

