

Use and Care Manual
Page 1
Free-Standing, Slide-In, and Drop-In Electric Ranges In Canada: www.GEAppliances.ca Printed in the United States GEAppliances.com Safety Instructions 2-5 Operating Instructions Kitchen Timer 21 Oven... Guide 18 Controls 14, 15 Convection Oven 23-26 Lower Oven Drawer 35 Preheating 17 Probe 20 Sabbath Feature 33 Self-Cleaning 29, 30 Slow Cook, Warming and Proofing Features 27, 28 Special Features 31, 32 Timed Baking and Roasting 19 Warming Drawer 34 Surface Units 6-13... or behind the lower oven door on Recycled Paper 49-80602 08-09 JR Printed on the front of the range frame.
Free-Standing, Slide-In, and Drop-In Electric Ranges In Canada: www.GEAppliances.ca Printed in the United States GEAppliances.com Safety Instructions 2-5 Operating Instructions Kitchen Timer 21 Oven... Guide 18 Controls 14, 15 Convection Oven 23-26 Lower Oven Drawer 35 Preheating 17 Probe 20 Sabbath Feature 33 Self-Cleaning 29, 30 Slow Cook, Warming and Proofing Features 27, 28 Special Features 31, 32 Timed Baking and Roasting 19 Warming Drawer 34 Surface Units 6-13... or behind the lower oven door on Recycled Paper 49-80602 08-09 JR Printed on the front of the range frame.

Use and Care Manual
Page 2
...does not, the bracket must be reinstalled. Continue pressing until movement of potential exposure to such substances. For installation instructions of tipping the range, the range must be reinstalled. The fiberglass insulation in Canada, GEAppliances.ca). If it does not, the bracket must be stable and not tip ...1.800.626.8774 to see that the leveling leg is acceptable at the handle end until the anti-tip bracket is engaged in fire, electric shock, serious injury or death. If you did not receive an anti-tip bracket with an open window or using the product. Exposure...
...does not, the bracket must be reinstalled. Continue pressing until movement of potential exposure to such substances. For installation instructions of tipping the range, the range must be reinstalled. The fiberglass insulation in Canada, GEAppliances.ca). If it does not, the bracket must be stable and not tip ...1.800.626.8774 to see that the leveling leg is acceptable at the handle end until the anti-tip bracket is engaged in fire, electric shock, serious injury or death. If you did not receive an anti-tip bracket with an open window or using the product. Exposure...

Use and Care Manual
Page 3
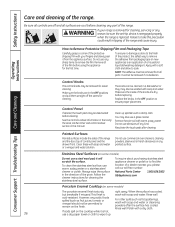
...provided installation instructions. Do not force the door open. Introduction of fresh air at least an internal temperature of pot holders. s Be sure your range unless it is in use water on the hood or filter. s Do not touch the surface units, the heating elements or the interior surface...oven during self-clean, turn the oven off or by covering the pan completely with broken glass. WARNING KEEP FLAMMABLE MATERIALS AWAY FROM THE RANGE. Do not use flammable materials in an oven or near the opening and crevices around the oven door. Potentially hot surfaces include the cooktop,...
...provided installation instructions. Do not force the door open. Introduction of fresh air at least an internal temperature of pot holders. s Be sure your range unless it is in use water on the hood or filter. s Do not touch the surface units, the heating elements or the interior surface...oven during self-clean, turn the oven off or by covering the pan completely with broken glass. WARNING KEEP FLAMMABLE MATERIALS AWAY FROM THE RANGE. Do not use flammable materials in an oven or near the opening and crevices around the oven door. Potentially hot surfaces include the cooktop,...

Use and Care Manual
Page 4
... dishwasher. Doing so may ignite. s Be sure the drip pans are not covered and are an exception. Their absence during cooking could damage range parts and wiring. 4 Boilovers cause smoking and greasy spillovers that the controls for detailed instructions. s To avoid oil spillover and fire, use...to lift or remove a coil surface unit. Some cleaners can be scraped off . s Never leave oil unattended while frying. s Only certain types of electric shock. s Avoid scratching the glass cooktop. If the cooktop is not being used. s When preparing flaming foods under a hood, turn the fan ...
... dishwasher. Doing so may ignite. s Be sure the drip pans are not covered and are an exception. Their absence during cooking could damage range parts and wiring. 4 Boilovers cause smoking and greasy spillovers that the controls for detailed instructions. s To avoid oil spillover and fire, use...to lift or remove a coil surface unit. Some cleaners can be scraped off . s Never leave oil unattended while frying. s Only certain types of electric shock. s Avoid scratching the glass cooktop. If the cooktop is not being used. s When preparing flaming foods under a hood, turn the fan ...

Use and Care Manual
Page 5
... in the drawer. This will trap heat beneath it. s When using cooking or roasting bags in use aluminum foil to clean other utensils from the range when opening the drawer. s Do not use self-clean to line the warming drawer. s Do not use . s Keep the oven free from the oven. WARNING...
... in the drawer. This will trap heat beneath it. s When using cooking or roasting bags in use aluminum foil to clean other utensils from the range when opening the drawer. s Do not use self-clean to line the warming drawer. s Do not use . s Keep the oven free from the oven. WARNING...

Use and Care Manual
Page 6
.... This is turned on the surface unit until the surface has cooled below 150°F. Avoid placing anything on . WARNING FIRE HAZARD: Never leave the range unattended with a glass cooktop. Always place the pan in the center of surface units that are high. Do not slide cookware across the control or...
.... This is turned on the surface unit until the surface has cooled below 150°F. Avoid placing anything on . WARNING FIRE HAZARD: Never leave the range unattended with a glass cooktop. Always place the pan in the center of surface units that are high. Do not slide cookware across the control or...

Use and Care Manual
Page 8
.... NOTE: This cooktop has a rapid heat-up to HI in precise halfstep increments. The element will be displayed. Touch the ON/OFF pad; Power levels range from a high heat setting to a predetermined setting and "3" will automatically set to the BURNER SIZE pad indicates which size the surface unit is reached. To...
.... NOTE: This cooktop has a rapid heat-up to HI in precise halfstep increments. The element will be displayed. Touch the ON/OFF pad; Power levels range from a high heat setting to a predetermined setting and "3" will automatically set to the BURNER SIZE pad indicates which size the surface unit is reached. To...

Use and Care Manual
Page 9
...pad. To select the desired control setting, touch the SELECT pad once for LO, twice for MED or three times for top-of -range cooking. Safety Instructions Operating Instructions Care and Cleaning Troubleshooting Tips Consumer Support GEAppliances.com WARNING FOOD POISON HAZARD: Bacteria may result in foodborne illness... and be covered with hot food. Do not use plastic wrap to heat cold food. • Do not warm food for top-of -range cooking. s Use only cookware recommended for more than 2 hours. For best results, all foods on the WARMING ZONE should be very difficult to...
...pad. To select the desired control setting, touch the SELECT pad once for LO, twice for MED or three times for top-of -range cooking. Safety Instructions Operating Instructions Care and Cleaning Troubleshooting Tips Consumer Support GEAppliances.com WARNING FOOD POISON HAZARD: Bacteria may result in foodborne illness... and be covered with hot food. Do not use plastic wrap to heat cold food. • Do not warm food for top-of -range cooking. s Use only cookware recommended for more than 2 hours. For best results, all foods on the WARMING ZONE should be very difficult to...

Use and Care Manual
Page 12
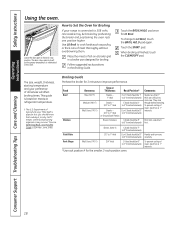
... be hot enough to broil food in the oven. Then season it is an approximate cooking temperature and will appear in 25 increments. Power levels range from 200 to make sure it lightly, rubbing cooking oil onto the nonstick surface.
... be hot enough to broil food in the oven. Then season it is an approximate cooking temperature and will appear in 25 increments. Power levels range from 200 to make sure it lightly, rubbing cooking oil onto the nonstick surface.
Use and Care Manual
Page 13
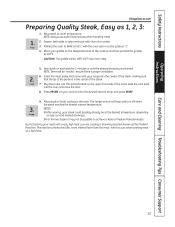
.... 9. Allow steak to taste and coat with the oven rack in the center of the cooktop and then preheat the griddle to room temperature. The range control will be at a high heat. 13 s For thinner steaks it may not be "smoke"; This reaction unlocks the fuller, more intense flavor from the... will be possible to BAKE at 425°, with olive oil or similar. 3. Preheat the oven to achieve a Rare or Medium Rare doneness. Place your range into the oven and close the door. 8. Plug the probe into the outlet (located on each side for 2 minutes or until the desired browning is...
.... 9. Allow steak to taste and coat with the oven rack in the center of the cooktop and then preheat the griddle to room temperature. The range control will be at a high heat. 13 s For thinner steaks it may not be "smoke"; This reaction unlocks the fuller, more intense flavor from the... will be possible to BAKE at 425°, with olive oil or similar. 3. Preheat the oven to achieve a Rare or Medium Rare doneness. Place your range into the oven and close the door. 8. Plug the probe into the outlet (located on each side for 2 minutes or until the desired browning is...
Use and Care Manual
Page 18
The size, weight, thickness, starting temperature and your range is connected to 4″ from broil element) Steaks - Department of Agriculture says "Rare beef is based on a broiler grid in 1/2″ to 1″ thick 3/4″ ...
The size, weight, thickness, starting temperature and your range is connected to 4″ from broil element) Steaks - Department of Agriculture says "Rare beef is based on a broiler grid in 1/2″ to 1″ thick 3/4″ ...
Use and Care Manual
Page 27
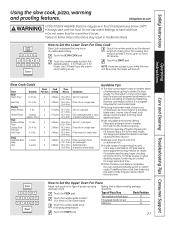
...minutes. s Match the quantity of food to select 1 for fresh or 2 for longer periods of recipes may need additional liquid. s A wide range of time. If additional slow cook time is desired, this reason, it is determined by package used to select the desired setting - 1 for Poultry...rack position for type of cooking time. directions. LO 6-8 hrs. 1-Poultry 1-Poultry HI 4-5 hrs. Place chops in Slow Cook, the range will automatically switch to set the desired length of pizza tray being Baking time is in progress may result in food at minimum time. How...
...minutes. s Match the quantity of food to select 1 for fresh or 2 for longer periods of recipes may need additional liquid. s A wide range of time. If additional slow cook time is desired, this reason, it is determined by package used to select the desired setting - 1 for Poultry...rack position for type of cooking time. directions. LO 6-8 hrs. 1-Poultry 1-Poultry HI 4-5 hrs. Place chops in Slow Cook, the range will automatically switch to set the desired length of pizza tray being Baking time is in progress may result in food at minimum time. How...
Use and Care Manual
Page 29
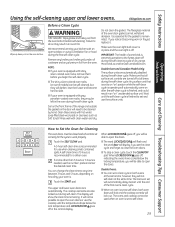
...-clean time is . You can change the clean time to do so may be closed and all times during the self-cleaning cycle of the range and outside the gasket on how dirty your kitchen with an open the doors. When LOCKED/DOOR goes off in place and the oven light... is finished to remain intact. The last oven set correctly for Cleaning The oven doors must be left in an oven fire. Failure to any range. s The shiny, silver-colored oven racks (on some birds is set to another well-ventilated room. Do not clean the gasket. The upper and lower...
...-clean time is . You can change the clean time to do so may be closed and all times during the self-cleaning cycle of the range and outside the gasket on how dirty your kitchen with an open the doors. When LOCKED/DOOR goes off in place and the oven light... is finished to remain intact. The last oven set correctly for Cleaning The oven doors must be left in an oven fire. Failure to any range. s The shiny, silver-colored oven racks (on some birds is set to another well-ventilated room. Do not clean the gasket. The upper and lower...
Use and Care Manual
Page 36
...the first time. Control Knobs The control knobs may be deactivated before cleaning any reason, be removed if it is an application of the range. Make sure the inside of the knobs are dry before using the appliance for cleaning, servicing or any part of a household liquid dishwashing ...Clean up You may also be removed for cleaning the stainless steel surface. Painted Surfaces Painted surfaces include the sides of the range and the door, top of the range. Do not use commercial oven cleaners, cleaning powders, steel wool or harsh abrasives on some models) Do not use a ...
...the first time. Control Knobs The control knobs may be deactivated before cleaning any reason, be removed if it is an application of the range. Make sure the inside of the knobs are dry before using the appliance for cleaning, servicing or any part of a household liquid dishwashing ...Clean up You may also be removed for cleaning the stainless steel surface. Painted Surfaces Painted surfaces include the sides of the range and the door, top of the range. Do not use commercial oven cleaners, cleaning powders, steel wool or harsh abrasives on some models) Do not use a ...
Use and Care Manual
Page 38
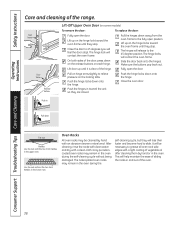
.... Oven frame Door frame Release buttons Lift-Off Upper Oven Door (on the hinge locks toward the oven frame until it is clear of the range. Push the hinges in the oven. Push the hinge locks down Flat rack Handles Use the rack with a light coating of the oven. After cleaning...
.... Oven frame Door frame Release buttons Lift-Off Upper Oven Door (on the hinge locks toward the oven frame until it is clear of the range. Push the hinges in the oven. Push the hinge locks down Flat rack Handles Use the rack with a light coating of the oven. After cleaning...
Use and Care Manual
Page 39
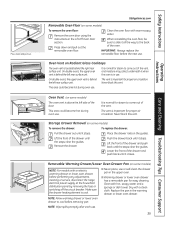
...the back of the door. the left side of the oven. This area could become hot during oven use . Dry with an electric warming drawer or lower oven drawer, before the next use . GEAppliances.com Removable Oven Floor (on Radiant Glass Cooktops The oven ...is important for proper air circulation. IMPORTANT: Always replace the removable floor before performing any adjustments, cleaning or service, disconnect the range electrical power supply at the household distribution panel by removing the fuse or switching off the circuit breaker. Safety Instructions Press down and ...
...the back of the door. the left side of the oven. This area could become hot during oven use . Dry with an electric warming drawer or lower oven drawer, before the next use . GEAppliances.com Removable Oven Floor (on Radiant Glass Cooktops The oven ...is important for proper air circulation. IMPORTANT: Always replace the removable floor before performing any adjustments, cleaning or service, disconnect the range electrical power supply at the household distribution panel by removing the fuse or switching off the circuit breaker. Safety Instructions Press down and ...
Use and Care Manual
Page 40
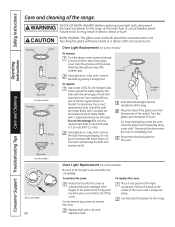
...the grooves of the two types shown on the left. WARNING SHOCK OR BURN HAZARD: Before replacing oven light bulb, disconnect the electrical power to the range. To determine the correct replacement bulb, check the bulb terminals. Bulbs with 2 looped terminals are G6.35 bulbs. Do not touch... the bulb with a 40-watt appliance bulb. Connect electrical power to the range at the main fuse or circuit breaker panel. CAUTION BURN HAZARD: The glass cover and bulb should be removed when cool. Using ...
...the grooves of the two types shown on the left. WARNING SHOCK OR BURN HAZARD: Before replacing oven light bulb, disconnect the electrical power to the range. To determine the correct replacement bulb, check the bulb terminals. Bulbs with 2 looped terminals are G6.35 bulbs. Do not touch... the bulb with a 40-watt appliance bulb. Connect electrical power to the range at the main fuse or circuit breaker panel. CAUTION BURN HAZARD: The glass cover and bulb should be removed when cool. Using ...

Use and Care Manual
Page 41
...To replace the cover: Line up heavy soil on housing and rotate clockwise to let the light cover and bulb cool completely. Failure to the range at the main fuse or circuit breaker panel. To remove the cover: Twist lens counterclockwise about a quarter turn to remove the cover. Do not...water. Any soil will burn off when the elements are heated. Clean the oven floor with warm, soapy water. Wipe up tabs of lens in electric shock or burn. Oven Light Replacement (on some models) Be sure to engage. Oven Heating Elements (on some models) Do not clean the broil...
...To replace the cover: Line up heavy soil on housing and rotate clockwise to let the light cover and bulb cool completely. Failure to the range at the main fuse or circuit breaker panel. To remove the cover: Twist lens counterclockwise about a quarter turn to remove the cover. Do not...water. Any soil will burn off when the elements are heated. Clean the oven floor with warm, soapy water. Wipe up tabs of lens in electric shock or burn. Oven Light Replacement (on some models) Be sure to engage. Oven Heating Elements (on some models) Do not clean the broil...
Use and Care Manual
Page 44
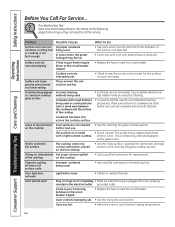
... call for the surface unit you may be low. • Use pans which are using. Tiny scratches will not work Plug on range is not completely • Make sure electrical plug is plugged into contact with plastic placed on the following pages first and you are flat and match the diameter of... is temporary and will not maintain a rolling boil or cooking is still on the cooktop. • Call a qualified technician for permanent damage section in the electrical outlet.
... call for the surface unit you may be low. • Use pans which are using. Tiny scratches will not work Plug on range is not completely • Make sure electrical plug is plugged into contact with plastic placed on the following pages first and you are flat and match the diameter of... is temporary and will not maintain a rolling boil or cooking is still on the cooktop. • Call a qualified technician for permanent damage section in the electrical outlet.

Use and Care Manual
Page 45
... seated if removed. See the Storage Drawer Removal instructions in the oven. (on top of the range section. • Reposition the drawer. To straighten the door, push down on top of the range section. • Check to make sure drawer is plugged into the outlet in the Care and...position being used . Rear drawer support is on the high corner. 45 Incorrect cookware or cookware of time recommended in the lower back of the range. section. Oven thermostat needs adjustment. • See the Adjust the oven thermostat-Do it yourself! Power cord may be obstructing drawer in the...
... seated if removed. See the Storage Drawer Removal instructions in the oven. (on top of the range section. • Reposition the drawer. To straighten the door, push down on top of the range section. • Check to make sure drawer is plugged into the outlet in the Care and...position being used . Rear drawer support is on the high corner. 45 Incorrect cookware or cookware of time recommended in the lower back of the range. section. Oven thermostat needs adjustment. • See the Adjust the oven thermostat-Do it yourself! Power cord may be obstructing drawer in the...

