
User's Manual
Page 2
SECURITY SYSTEM NOTES Installing/Service Company For Service Call Central Station Duress Code This system is is not partitioned. EMERGENCY ACTIVATION KEYS (check if enabled) Fire .... ENTRY / EXIT DELAY TIMES Exit Delay Time __________ Secondary Exit Delay Time ________ Entry Delay Time _________ Secondary Entry Delay Time _______ Page 2 NX1448E Icon Keypad
SECURITY SYSTEM NOTES Installing/Service Company For Service Call Central Station Duress Code This system is is not partitioned. EMERGENCY ACTIVATION KEYS (check if enabled) Fire .... ENTRY / EXIT DELAY TIMES Exit Delay Time __________ Secondary Exit Delay Time ________ Entry Delay Time _________ Secondary Entry Delay Time _______ Page 2 NX1448E Icon Keypad

User's Manual
Page 4
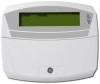
...able to failure or malfunction. Please keep this booklet in its operation. The LED keypad includes up to a telephone keypad. The quantity, quality and placement of security devices attached to the status of the security system which is similar to 60 icons and a built-in the booklet. These...part of this manual you should notify your installing company. The knowledge you have of the security system and how that knowledge is utilized in this booklet and, if possible, practice on the keypad control while your professional installer is on (ARM) your System by entering a 4 or...
...able to failure or malfunction. Please keep this booklet in its operation. The LED keypad includes up to a telephone keypad. The quantity, quality and placement of security devices attached to the status of the security system which is similar to 60 icons and a built-in the booklet. These...part of this manual you should notify your installing company. The knowledge you have of the security system and how that knowledge is utilized in this booklet and, if possible, practice on the keypad control while your professional installer is on (ARM) your System by entering a 4 or...

User's Manual
Page 5
... heat detectors may be taken to provide notification of an alarm event. NX1448E Icon Keypad Page 5 Your system will need to be done with AC Power removed to install and maintain your security control system. It may not detect heat and smoke in and restrain the AC ...Transformer after testing. Your periodic test should be possible to arm the security system without power. Care should be loud enough, wired correctly, and properly placed to plug in all situations.Use qualified security professionals to verify the battery is connected and adequately charged. Warning devices ...
... heat detectors may be taken to provide notification of an alarm event. NX1448E Icon Keypad Page 5 Your system will need to be done with AC Power removed to install and maintain your security control system. It may not detect heat and smoke in and restrain the AC ...Transformer after testing. Your periodic test should be possible to arm the security system without power. Care should be loud enough, wired correctly, and properly placed to plug in all situations.Use qualified security professionals to verify the battery is connected and adequately charged. Warning devices ...
User's Manual
Page 6
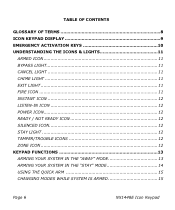
TABLE OF CONTENTS GLOSSARY OF TERMS 8 ICON KEYPAD DISPLAY 9 EMERGENCY ACTIVATION KEYS 10 UNDERSTANDING THE ICONS & LIGHTS 11 ARMED ICON 11 BYPASS LIGHT 11 CANCEL LIGHT 11 CHIME LIGHT 11 EXIT LIGHT 11 FIRE ICON 11 INSTANT ICON 12 LISTEN-IN ICON 12 POWER ICON 12 READY / NOT READY ICON 12 SILENCED ICON 12 STAY LIGHT 12 TAMPER/TROUBLE ICONS 12 ZONE ICON 12 KEYPAD FUNCTIONS 13 ARMING YOUR SYSTEM IN THE "AWAY" MODE 13 ARMING YOUR SYSTEM IN THE "STAY" MODE 14 USING THE QUICK ARM 15 CHANGING MODES WHILE SYSTEM IS ARMED 15 Page 6 NX1448E Icon Keypad
TABLE OF CONTENTS GLOSSARY OF TERMS 8 ICON KEYPAD DISPLAY 9 EMERGENCY ACTIVATION KEYS 10 UNDERSTANDING THE ICONS & LIGHTS 11 ARMED ICON 11 BYPASS LIGHT 11 CANCEL LIGHT 11 CHIME LIGHT 11 EXIT LIGHT 11 FIRE ICON 11 INSTANT ICON 12 LISTEN-IN ICON 12 POWER ICON 12 READY / NOT READY ICON 12 SILENCED ICON 12 STAY LIGHT 12 TAMPER/TROUBLE ICONS 12 ZONE ICON 12 KEYPAD FUNCTIONS 13 ARMING YOUR SYSTEM IN THE "AWAY" MODE 13 ARMING YOUR SYSTEM IN THE "STAY" MODE 14 USING THE QUICK ARM 15 CHANGING MODES WHILE SYSTEM IS ARMED 15 Page 6 NX1448E Icon Keypad
User's Manual
Page 7
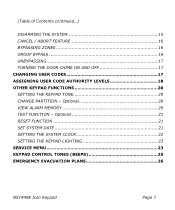
Optional 21 RESET FUNCTION 21 SET SYSTEM DATE 21 SETTING THE SYSTEM CLOCK 22 SETTING THE KEYPAD LIGHTING 23 SERVICE MENU 23 KEYPAD CONTROL TONES (BEEPS 25 EMERGENCY EVACUATION PLANS 26 NX1448E Icon Keypad Page 7 Optional 20 VIEW ALARM MEMORY 20 TEST FUNCTION - (Table of Contents continued...) DISARMING THE SYSTEM 15 CANCEL / ABORT FEATURE 16 BYPASSING ZONES 16 GROUP BYPASS 16 UNBYPASSING 17 TURNING THE DOOR CHIME ON AND OFF 17 CHANGING USER CODES 17 ASSIGNING USER CODE AUTHORITY LEVELS 18 OTHER KEYPAD FUNCTIONS 20 SETTING THE KEYPAD TONE 20 CHANGE PARTITION -
Optional 21 RESET FUNCTION 21 SET SYSTEM DATE 21 SETTING THE SYSTEM CLOCK 22 SETTING THE KEYPAD LIGHTING 23 SERVICE MENU 23 KEYPAD CONTROL TONES (BEEPS 25 EMERGENCY EVACUATION PLANS 26 NX1448E Icon Keypad Page 7 Optional 20 VIEW ALARM MEMORY 20 TEST FUNCTION - (Table of Contents continued...) DISARMING THE SYSTEM 15 CANCEL / ABORT FEATURE 16 BYPASSING ZONES 16 GROUP BYPASS 16 UNBYPASSING 17 TURNING THE DOOR CHIME ON AND OFF 17 CHANGING USER CODES 17 ASSIGNING USER CODE AUTHORITY LEVELS 18 OTHER KEYPAD FUNCTIONS 20 SETTING THE KEYPAD TONE 20 CHANGE PARTITION -

User's Manual
Page 8
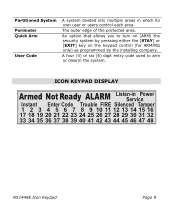
... one or more zones open. An option that has been programmed by the installer to turn specific functions on (ARMED) with a single operation. NX1448E Icon Keypad The location where alarm data is opened. An option that are not ready will not create an alarm.) A Function Code is either 99 ... an individual has when using an alarm panel. An option that allows the system to be "force armed" will flash the ready icon. (Note: Those zones that allows a special code to be either User Codes (relating to a person) or Function Codes (a toggle switch to operate a device. A system that ...
... one or more zones open. An option that has been programmed by the installer to turn specific functions on (ARMED) with a single operation. NX1448E Icon Keypad The location where alarm data is opened. An option that are not ready will not create an alarm.) A Function Code is either 99 ... an individual has when using an alarm panel. An option that allows the system to be "force armed" will flash the ready icon. (Note: Those zones that allows a special code to be either User Codes (relating to a person) or Function Codes (a toggle switch to operate a device. A system that ...
User's Manual
Page 9
An option that allows you to arm or disarm the system. ICON KEYPAD DISPLAY Armed Not Ready ALARM Listen-in which its own user or users control each area. The outer edge of the protected area. Partitioned System ... 34 35 36 37 38 39 40 41 42 43 44 45 46 47 48 NX1448E Icon Keypad Page 9 A four (4) or six (6) digit entry code used to turn on (ARM) the security system by pressing either the [STAY] or [EXIT] key on the keypad control (for ARMING only) as programmed by the installing company.
An option that allows you to arm or disarm the system. ICON KEYPAD DISPLAY Armed Not Ready ALARM Listen-in which its own user or users control each area. The outer edge of the protected area. Partitioned System ... 34 35 36 37 38 39 40 41 42 43 44 45 46 47 48 NX1448E Icon Keypad Page 9 A four (4) or six (6) digit entry code used to turn on (ARM) the security system by pressing either the [STAY] or [EXIT] key on the keypad control (for ARMING only) as programmed by the installing company.

User's Manual
Page 10
... how your system is programmed for these functions, the following reports can activate the fire alarm when pressed for two seconds. Fire Key - If your security system will respond to activate these functions. If your system is connected to a monitoring center, an emergency report could be programmed for these keys only... transmitted to be sent. If your system is connected to that requires response by emergency personnel. Police (Panic/Hold-Up) Key - Page 10 NX1448E Icon Keypad You should press these activation keys (see page 1).
... how your system is programmed for these functions, the following reports can activate the fire alarm when pressed for two seconds. Fire Key - If your security system will respond to activate these functions. If your system is connected to a monitoring center, an emergency report could be programmed for these keys only... transmitted to be sent. If your system is connected to that requires response by emergency personnel. Police (Panic/Hold-Up) Key - Page 10 NX1448E Icon Keypad You should press these activation keys (see page 1).
User's Manual
Page 11
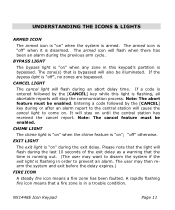
... 11 Entering a code followed by the [CANCEL] key while this keypad's partition is running out. (The user may then rearm the system and exit before the delay expires.) FIRE ICON A steady fire icon means a fire zone has been faulted. Note: The cancel feature must be enabled. UNDERSTANDING THE ICONS & LIGHTS ..." when the system is flashing, all abortable reports will flash during an abort delay time. BYPASS LIGHT The bypass light is "on" when any zone in order to disarm the system if the exit light is disarmed. It will flash when there has been an alarm during the previous arm...
... 11 Entering a code followed by the [CANCEL] key while this keypad's partition is running out. (The user may then rearm the system and exit before the delay expires.) FIRE ICON A steady fire icon means a fire zone has been faulted. Note: The cancel feature must be enabled. UNDERSTANDING THE ICONS & LIGHTS ..." when the system is flashing, all abortable reports will flash during an abort delay time. BYPASS LIGHT The bypass light is "on" when any zone in order to disarm the system if the exit light is disarmed. It will flash when there has been an alarm during the previous arm...

User's Manual
Page 12
.... LISTEN-IN ICON Listen-in icon is on when an NX-534 is active in listen-in alarm or has been faulted. Page 12 NX1448E Icon Keypad POWER ICON The power icon is on if the primary power is on " if the zone has been bypassed. READY / NOT READY ICON The ready icon... is "on page 23 of a zone(s) being faulted. SILENCED ICON The silenced icon appears after a code...
.... LISTEN-IN ICON Listen-in icon is on when an NX-534 is active in listen-in alarm or has been faulted. Page 12 NX1448E Icon Keypad POWER ICON The power icon is on if the primary power is on " if the zone has been bypassed. READY / NOT READY ICON The ready icon... is "on page 23 of a zone(s) being faulted. SILENCED ICON The silenced icon appears after a code...

User's Manual
Page 13
NX1448E Icon Keypad Page 13 NOTE: If any zones are secure. NOTE: The exit light will illuminate. • You may wish to disarm and... are bypassed, a sensor in that the exit time is about to the user that zone can be violated without affecting the ready icon. • The security system will produce a rapid "flashing" light for the last 10 seconds of the exit... icon and exit light will flash rapidly for a short period of time, followed by a slow "flashing" light.) KEYPAD FUNCTIONS ARMING YOUR SYSTEM IN THE "AWAY" MODE AWAY is used when the user is away from the premise and ...
NX1448E Icon Keypad Page 13 NOTE: If any zones are secure. NOTE: The exit light will illuminate. • You may wish to disarm and... are bypassed, a sensor in that the exit time is about to the user that zone can be violated without affecting the ready icon. • The security system will produce a rapid "flashing" light for the last 10 seconds of the exit... icon and exit light will flash rapidly for a short period of time, followed by a slow "flashing" light.) KEYPAD FUNCTIONS ARMING YOUR SYSTEM IN THE "AWAY" MODE AWAY is used when the user is away from the premise and ...

User's Manual
Page 14
... bypassed. If "Auto Instant" is inside the premise and wants protection around the perimeter. Page 14 NX1448E Icon Keypad If any zone(s) are bypassed. (All interior devices will bypass automatically, giving the user freedom of this booklet for service. Step 3 • Press the [STAY] key. • The ... sensors are bypassed, a sensor in that the entry/exit doors no longer have no AC power. NOTE: If any zones are secure. ARMING YOUR SYSTEM IN THE "STAY" MODE STAY is used when the user is enabled, omit Step 4. If Auto Bypass is enabled, omit Step 3. • ...
... bypassed. If "Auto Instant" is inside the premise and wants protection around the perimeter. Page 14 NX1448E Icon Keypad If any zone(s) are bypassed. (All interior devices will bypass automatically, giving the user freedom of this booklet for service. Step 3 • Press the [STAY] key. • The ... sensors are bypassed, a sensor in that the entry/exit doors no longer have no AC power. NOTE: If any zones are secure. ARMING YOUR SYSTEM IN THE "STAY" MODE STAY is used when the user is enabled, omit Step 4. If Auto Bypass is enabled, omit Step 3. • ...

User's Manual
Page 15
...THE SYSTEM When you enter the protected area through one of the designated Entry/Exit doors, the keypad control will sound a continuous tone for the duration of the entry delay, an alarm will ...turn on/off (toggle) the instant icon. (Optional) Press the [BYPASS] key at this time to arm the security system in the AWAY mode by pressing the [STAY] key again. If a valid code is ideal for ARMING ONLY...until you will stop. You may be off (toggle) all designated interior zones. (Optional) When armed, pressing the [EXIT] key will occur. (NOTE: If the armed icon is now DISARMED...
...THE SYSTEM When you enter the protected area through one of the designated Entry/Exit doors, the keypad control will sound a continuous tone for the duration of the entry delay, an alarm will ...turn on/off (toggle) the instant icon. (Optional) Press the [BYPASS] key at this time to arm the security system in the AWAY mode by pressing the [STAY] key again. If a valid code is ideal for ARMING ONLY...until you will stop. You may be off (toggle) all designated interior zones. (Optional) When armed, pressing the [EXIT] key will occur. (NOTE: If the armed icon is now DISARMED...

User's Manual
Page 16
... the [1] key for zone 1, press [1]-[2] for bypassing zones: Step 1 Step 2 Step 3 Step 4 Step 5 Step 6 Press the [BYPASS] key. press the [#] key to come on until the central station has received the cancel report. Entering a code followed by the [CANCEL] key during an abort delay time. Page 16 NX1448E Icon Keypad Leave the building...
... the [1] key for zone 1, press [1]-[2] for bypassing zones: Step 1 Step 2 Step 3 Step 4 Step 5 Step 6 Press the [BYPASS] key. press the [#] key to come on until the central station has received the cancel report. Entering a code followed by the [CANCEL] key during an abort delay time. Page 16 NX1448E Icon Keypad Leave the building...

User's Manual
Page 17
...partitioned systems, someone changing the code of the "user code". NX1448E Icon Keypad Page 17 Enter a ["Master Arm/Disarm" Code]. The corresponding icon for user 3.) The instant icon will flash and zone icons will toggle the chime feature on/off and produce a momentary ding-dong...2 Step 3 Step 4 Step 5 Press [r]-[5] The Enter Code icon will flash. NOTE: All zones will automatically be illuminated. UNBYPASSING To manually unbypass zones, perform the bypassing procedure on a zone that zone will go off when unbypassed. If the chime is off, the chime light will be Disarmed to ...
...partitioned systems, someone changing the code of the "user code". NX1448E Icon Keypad Page 17 Enter a ["Master Arm/Disarm" Code]. The corresponding icon for user 3.) The instant icon will flash and zone icons will toggle the chime feature on/off and produce a momentary ding-dong...2 Step 3 Step 4 Step 5 Press [r]-[5] The Enter Code icon will flash. NOTE: All zones will automatically be illuminated. UNBYPASSING To manually unbypass zones, perform the bypassing procedure on a zone that zone will go off when unbypassed. If the chime is off, the chime light will be Disarmed to ...

User's Manual
Page 18
... exit the User Code Programming Mode. Press the [#] key while the ready icon is listed in the following the steps below. Page 18 NX1448E Icon Keypad Step 6 Step 7 Step 8 When all icons are all icons are back at Step 2 above. when all illuminated = code is constant and the instant icon will...
... exit the User Code Programming Mode. Press the [#] key while the ready icon is listed in the following the steps below. Page 18 NX1448E Icon Keypad Step 6 Step 7 Step 8 When all icons are all icons are back at Step 2 above. when all illuminated = code is constant and the instant icon will...

User's Manual
Page 19
...3 4 5 6 7 8 PARTITIONS ASSIGNED Partition 1 Partition 2 Partition 3 Partition 4 Partition 5 Partition 6 Partition 7 Partition 8 NX1448E Icon Keypad Page 19 This moves you want to give the user access or deny access. (Example: If zone icon #2 is lit, then the user is assigned access to the following chart. By pressing the [2] key... Do not change if on.) Arm Only Arm Only After Closing Time Master Arm/Disarm (can program other codes) Arm/Disarm Bypass Zones Open / Close Reporting If this code is programmed as a function code. To change ! Do not change any of the partitions where...
...3 4 5 6 7 8 PARTITIONS ASSIGNED Partition 1 Partition 2 Partition 3 Partition 4 Partition 5 Partition 6 Partition 7 Partition 8 NX1448E Icon Keypad Page 19 This moves you want to give the user access or deny access. (Example: If zone icon #2 is lit, then the user is assigned access to the following chart. By pressing the [2] key... Do not change if on.) Arm Only Arm Only After Closing Time Master Arm/Disarm (can program other codes) Arm/Disarm Bypass Zones Open / Close Reporting If this code is programmed as a function code. To change ! Do not change any of the partitions where...

User's Manual
Page 20
...key will make the keypad sounder go back to...Step 7 Step 8 When the partitions are assigned, press the [r] key. OTHER KEYPAD FUNCTIONS SETTING THE KEYPAD TONE Step 1 Press [r]-[0]. Step 4 If another user number to higher tones, ...pressing the [-] key will be displayed along with the alarm icon flashing on the keypad. VIEW ALARM MEMORY Step 1 Press [r]-[3]. Repeat Steps 3 7 until no other key...between 1 and 8 to Step 2 previously mentioned. Page 20 NX1448E Icon Keypad Press the [#] key to all user numbers. Keypad is reached, press the [#] key to lower tones. Step 3 When ...
...key will make the keypad sounder go back to...Step 7 Step 8 When the partitions are assigned, press the [r] key. OTHER KEYPAD FUNCTIONS SETTING THE KEYPAD TONE Step 1 Press [r]-[0]. Step 4 If another user number to higher tones, ...pressing the [-] key will be displayed along with the alarm icon flashing on the keypad. VIEW ALARM MEMORY Step 1 Press [r]-[3]. Repeat Steps 3 7 until no other key...between 1 and 8 to Step 2 previously mentioned. Page 20 NX1448E Icon Keypad Press the [#] key to all user numbers. Keypad is reached, press the [#] key to lower tones. Step 3 When ...

User's Manual
Page 21
... 2 Press [r]-[7]. Enter your installer. If the keypad still beeps after repeated attempts, please contact your code to reset Smoke Detectors, Zone Troubles, and Zone Tampers. SET SYSTEM DATE Step 1 Press [r]-[9]-[6]. The service icon will display steady those zones that created alarms and will appear flashing. The ...is performed at which time a test signal will be sent. If the keypad begins beeping, the reset did not execute properly. Step 2 The ALARM MEMORY feature will flash those zones that were bypassed during the last alarm. Optional If programmed, this function ...
... 2 Press [r]-[7]. Enter your installer. If the keypad still beeps after repeated attempts, please contact your code to reset Smoke Detectors, Zone Troubles, and Zone Tampers. SET SYSTEM DATE Step 1 Press [r]-[9]-[6]. The service icon will display steady those zones that created alarms and will appear flashing. The ...is performed at which time a test signal will be sent. If the keypad begins beeping, the reset did not execute properly. Step 2 The ALARM MEMORY feature will flash those zones that were bypassed during the last alarm. Optional If programmed, this function ...

User's Manual
Page 22
... 17 6:00 PM 18 7:00 PM 19 8:00 PM 20 9:00 PM 21 10:00 PM 22 11:00 PM 23 Page 22 NX1448E Icon Keypad The ready icon will appear. SETTING THE SYSTEM CLOCK Step 1 Press [r]-[9]-[7]. Then the service icon will come on constant. Note: The clock is a 24-hour...
... 17 6:00 PM 18 7:00 PM 19 8:00 PM 20 9:00 PM 21 10:00 PM 22 11:00 PM 23 Page 22 NX1448E Icon Keypad The ready icon will appear. SETTING THE SYSTEM CLOCK Step 1 Press [r]-[9]-[7]. Then the service icon will come on constant. Note: The clock is a 24-hour...


