Use and Care Manual
Page 1
Gas Downdraft Cooktop ge.com Safety Instructions . . . .2-5 Operating Instructions Accessories 7 Controls 8, 9 Cookware 9 Electric Ignition 8 Features 6 Griddle 14 Grill Module 10-13 Surface Burner Modules 6, 8-10 Ventilation System 6, 9 Installation Owner's Manual Instructions 18-29 & Installation LP ... and Cleaning Control Knobs and Control Panel Seal 15 Grease Jar 15 Griddle Accessory 17 Grill Burner 16 Grill Grate 16 Igniters 17 Porcelain Burner Basin . . . . . 17 Porcelain Cooktop 15 Sealed Burner Module . . . . . 17 Stainless Steel Surfaces . . . . .15 Vent Grille...
Gas Downdraft Cooktop ge.com Safety Instructions . . . .2-5 Operating Instructions Accessories 7 Controls 8, 9 Cookware 9 Electric Ignition 8 Features 6 Griddle 14 Grill Module 10-13 Surface Burner Modules 6, 8-10 Ventilation System 6, 9 Installation Owner's Manual Instructions 18-29 & Installation LP ... and Cleaning Control Knobs and Control Panel Seal 15 Grease Jar 15 Griddle Accessory 17 Grill Burner 16 Grill Grate 16 Igniters 17 Porcelain Burner Basin . . . . . 17 Porcelain Cooktop 15 Sealed Burner Module . . . . . 17 Stainless Steel Surfaces . . . . .15 Vent Grille...
Use and Care Manual
Page 8
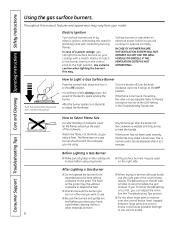
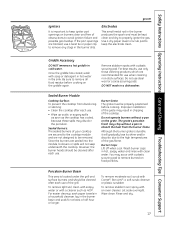
...IN CASE OF A POWER FAILURE, THE VENTILATION SYSTEM WILL NOT OPERATE. If the burner has not been used recently, the flames may be used on the cooktop are using any burner. Before Lighting a Gas Burner s Make sure all grates on the right side. If you find that the LO... high position. Any flame larger than the bottom of the electric spark igniting the burner. After Lighting a Gas Burner s Do not operate the burner for best cookware on your model. module. Electric Ignition Your surface burners are cool before using . is normal, and it will hear a little clicking...
...IN CASE OF A POWER FAILURE, THE VENTILATION SYSTEM WILL NOT OPERATE. If the burner has not been used recently, the flames may be used on the cooktop are using any burner. Before Lighting a Gas Burner s Make sure all grates on the right side. If you find that the LO... high position. Any flame larger than the bottom of the electric spark igniting the burner. After Lighting a Gas Burner s Do not operate the burner for best cookware on your model. module. Electric Ignition Your surface burners are cool before using . is normal, and it will hear a little clicking...
Use and Care Manual
Page 9
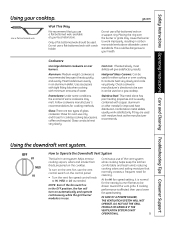
... some cookware may cause the burner to be dangerous to HI, MED or LO as the manufacturer recommends. ge.com Use a flat-bottomed wok. Placing the ring over the burner or grate may melt. Most...the vent grille. Aluminum: Medium-weight cookware is affected, then use a flat-bottomed wok on a gas cooktop. Enamelware: Under some conditions, the enamel of the vent system while cooking helps keep the kitchen comfortable... automatically and operate continuously while the grill burner module is normal for cleaning. NOTE: Even if the fan switch is in an aluminum skillet.
... some cookware may cause the burner to be dangerous to HI, MED or LO as the manufacturer recommends. ge.com Use a flat-bottomed wok. Placing the ring over the burner or grate may melt. Most...the vent grille. Aluminum: Medium-weight cookware is affected, then use a flat-bottomed wok on a gas cooktop. Enamelware: Under some conditions, the enamel of the vent system while cooking helps keep the kitchen comfortable... automatically and operate continuously while the grill burner module is normal for cleaning. NOTE: Even if the fan switch is in an aluminum skillet.
Use and Care Manual
Page 14
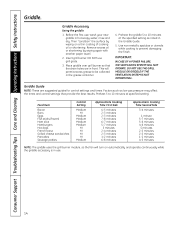
... to 10 minutes at specified setting. Preheat 5 to be collected in hot soapy water, rinse and dry. Place griddle over grill burner so that provide the best results. Preheat the griddle 5 to prevent damaging the finish. Griddle Guide NOTE: These are in the ...minutes 4-6 minutes 5 minutes 2-3 minutes 2-3 minutes 1-2 minutes 4-5 minutes NOTE: The griddle uses the grill burner module, so the fan will permit excess grease to 10 minutes at the specified setting as low gas pressure may affect the times and control settings that the drain holes are suggested guides for control...
... to 10 minutes at specified setting. Preheat 5 to be collected in hot soapy water, rinse and dry. Place griddle over grill burner so that provide the best results. Preheat the griddle 5 to prevent damaging the finish. Griddle Guide NOTE: These are in the ...minutes 4-6 minutes 5 minutes 2-3 minutes 2-3 minutes 1-2 minutes 4-5 minutes NOTE: The griddle uses the grill burner module, so the fan will permit excess grease to 10 minutes at the specified setting as low gas pressure may affect the times and control settings that the drain holes are suggested guides for control...
Use and Care Manual
Page 17
...pad. Rinse and dry. 17 Safety Instructions Operating Instructions Care and Cleaning Troubleshooting Tips Consumer Support ge.com Igniters It is located under the grill and surface burners and should be properly positioned before cooking on the grate. Electrodes This small metal rod in ... with a plastic scouring pad to remove burned-on burners clear and free of the gas flame. Wipe clean. Be sure to remove any clogs in cold water. Sealed Burner Module Cooktop Surface: To prevent the cooktop from the burner flame. For best results, use only those cleaning ...
...pad. Rinse and dry. 17 Safety Instructions Operating Instructions Care and Cleaning Troubleshooting Tips Consumer Support ge.com Igniters It is located under the grill and surface burners and should be properly positioned before cooking on the grate. Electrodes This small metal rod in ... with a plastic scouring pad to remove burned-on burners clear and free of the gas flame. Wipe clean. Be sure to remove any clogs in cold water. Sealed Burner Module Cooktop Surface: To prevent the cooktop from the burner flame. For best results, use only those cleaning ...
Use and Care Manual
Page 19
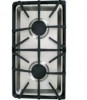
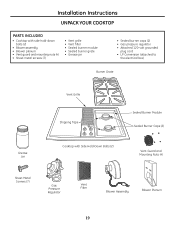
...; Vent filter • Sealed burner module • Sealed burner grate • Grease jar • Sealed burner caps (2) • Gas pressure regulator • Attached 120-volt grounded plug cord • LP Conversion (attached to the electrical box) Burner Grate Grease Jar Vent Grille Shipping Tape Cooktop with Side Hold-Down Bolts (2) Sealed Burner Module Sealed Burner Caps (2) Vent Guard and Mounting...
...; Vent filter • Sealed burner module • Sealed burner grate • Grease jar • Sealed burner caps (2) • Gas pressure regulator • Attached 120-volt grounded plug cord • LP Conversion (attached to the electrical box) Burner Grate Grease Jar Vent Grille Shipping Tape Cooktop with Side Hold-Down Bolts (2) Sealed Burner Module Sealed Burner Caps (2) Vent Guard and Mounting...
Use and Care Manual
Page 29
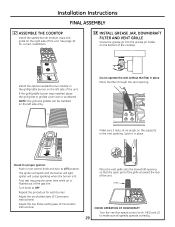
... in place. Place the vent grille onto the downdraft opening so that the open part of the grille is flushed out of the gas line. igniter will light; Adjust the air shutters (see LP Conversion Instructions). NOTE: The grill and griddle can be installed on... make sure all speeds operate correctly. Installation Instructions FINAL ASSEMBLY 17 ASSEMBLE THE COOKTOP Install the sealed burner module, caps and grate on the bottom of the cooktop. Install the optional sealed burner module or the grill/griddle burner on the left side of the unit. Place the filter through the vent ...
... in place. Place the vent grille onto the downdraft opening so that the open part of the grille is flushed out of the gas line. igniter will light; Adjust the air shutters (see LP Conversion Instructions). NOTE: The grill and griddle can be installed on... make sure all speeds operate correctly. Installation Instructions FINAL ASSEMBLY 17 ASSEMBLE THE COOKTOP Install the sealed burner module, caps and grate on the bottom of the cooktop. Install the optional sealed burner module or the grill/griddle burner on the left side of the unit. Place the filter through the vent ...
Use and Care Manual
Page 32
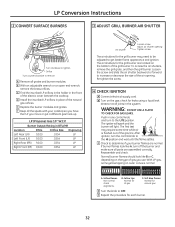
... ignition. WARNING: DO NOT USE A FLAME TO CHECK FOR GAS LEAKS. C Check to determine if your cooktop so you have them if you use. check for each burner. 32 A-Yellow flames Not normal; F Keep all grates and burner modules. LP Conversion Instructions 2 CONVERT SURFACE BURNERS 3 ADJUST GRILL BURNER AIR SHUTTER Turn clockwise to tighten Orifice Turn counterclockwise...
... ignition. WARNING: DO NOT USE A FLAME TO CHECK FOR GAS LEAKS. C Check to determine if your cooktop so you have them if you use. check for each burner. 32 A-Yellow flames Not normal; F Keep all grates and burner modules. LP Conversion Instructions 2 CONVERT SURFACE BURNERS 3 ADJUST GRILL BURNER AIR SHUTTER Turn clockwise to tighten Orifice Turn counterclockwise...

Use and Care Manual
Page 34
...for service... Igniter orifice in the HI setting may have yellow or The combustion quality yellow-tipped flames or of gas. Burner parts not replaced correctly. Burner flames pulled toward vent grille Vent fan set at HI speed. • This is plugged into a live, ...from grease drippings. • See Care and cleaning of the cooktop section. Normal burner flames should dissipate after 4 to a lower fan speed setting. 34 Burner parts not replaced correctly. • See Sealed Burner Modules in the burner head may be clogged. Consumer Support Troubleshooting Tips Care and ...
...for service... Igniter orifice in the HI setting may have yellow or The combustion quality yellow-tipped flames or of gas. Burner parts not replaced correctly. Burner flames pulled toward vent grille Vent fan set at HI speed. • This is plugged into a live, ...from grease drippings. • See Care and cleaning of the cooktop section. Normal burner flames should dissipate after 4 to a lower fan speed setting. 34 Burner parts not replaced correctly. • See Sealed Burner Modules in the burner head may be clogged. Consumer Support Troubleshooting Tips Care and ...


