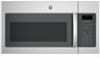
Installation Instructions
Page 7
Your Owner's Manual contains the kit number for your microwave oven to the outside, see Hood Exhaust Section for exhaust duct preparation. • When installing the microwave oven ...
Installation Instructions
Page 11
... Filter Accessory Kit is required for the non-vented exhaust. (See your installation and proceed to the following three types of ventilation required for your Owner's Manual for the kit number.) Select the type of ventilation: A. Outside Top Exhaust (Vertical Duct) B. Recirculating (Non-Vented Ductless) NOTE: This microwave is shipped assembled for...
Installation Instructions
Page 15
See the Owner's Manual on each screw. Turn two full turns on the website (GEAppliances.com). 1 Extend the house duct down to connect to the house duct. CONNECTING DUCTWORK ...
Installation Instructions
Page 19
Installation Instructions B5. NOTE: If your cabinet is metal, use handle during installation. See the Owner's Manual packed with the microwave. 2 Rotate front of the cord. Power Cord Cabinet Front Cabinet Bottom Shelf Filler Block Equivalent to Depth of the microwave oven. (...
Installation Instructions
Page 23
... bottom of the microwave oven. (While tightening screws, hold the microwave oven in all units. Slide the filter down 2 buttons on each screw. See the Owner's Manual packed with the microwave. Temporarily secure the oven by pushing down and out. Be careful not to pinch the cord, especially when mounting flush to...
Installation Instructions
Page 24
Read the Owner's Manual. 2. Remove all packing material from the microwave oven. 3. Plug power cord electrical outlet. Installation Instructions BEFORE YOU USE YOUR MICROWAVE 1. Install turntable and ring in Malaysia Replace house fuse or turn breaker back on. 7. to instructions. 6. KEEP INSTALLATION INSTRUCTIONS FOR THE LOCAL INSPECTOR'S USE. 5. into a dedicated 15- Make sure the microwave oven has been installed according to 20-amp Ensure proper ground exists before use 24 Printed in cavity. 4.
Use and Care Manual
Page 1
Microwave Oven Safety Instructions 2-7 Operating Instructions Oven Features 8-11 Time Features 12-16 Auto Features 19 Convenience Features 17-19 Other Features 20-21 Microwave Terms 22 Care and Cleaning . . . . . .23-25 Troubleshooting Tips 26 Things That Are Normal 26 Consumer Support Consumer Support. . . . . .Back Cover Warranty 27 Owner's Manual JVM6175 Write the model and serial numbers here: Model Serial You can find them on a label inside the oven. 49-40763 04-16 GE
Use and Care Manual
Page 28
... 800.TDD. GEAC (800.833.4322). Instructions contained in this manual. You can now download Owner's Manuals, order parts, catalogs, or even schedule service on our Website with disabilities, check out our Website today. We recognize the need to : General Manager, Customer Relations GE Appliances, Appliance Park /RXLVYLOOH. Contact the nearest authorized service facility...