Use and Care Manual
Page 1
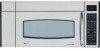
... Write the model and serial numbers here: Model Serial Find these numbers on a label inside the oven. Para consultar una version en español de este manual de instrucciones, visite nuestro sitio de internet ge.com. Microwave Spacemaker Oven ge.com Safety Instructions . . . .2-9 Operating Instructions Auto Features 20 Care and Cleaning 33, 34 Changing the...
... Write the model and serial numbers here: Model Serial Find these numbers on a label inside the oven. Para consultar una version en español de este manual de instrucciones, visite nuestro sitio de internet ge.com. Microwave Spacemaker Oven ge.com Safety Instructions . . . .2-9 Operating Instructions Auto Features 20 Care and Cleaning 33, 34 Changing the...
Use and Care Manual
Page 2
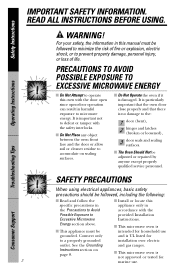
...to prevent property damage, personal injury, or loss of fire or explosion, electric shock, or to provided Installation Excessive Microwave Instructions. s The Oven Should Not be followed to minimize the risk of life. SAFETY PRECAUTIONS When using electrical appliances, basic safety precautions should ...be followed, including the following: s Read and follow the s Install or locate this manual must be intended for household use . It is particularly important that the oven door close properly and that there is UL listed for 2 marine use grounded. READ ALL ...
...to prevent property damage, personal injury, or loss of fire or explosion, electric shock, or to provided Installation Excessive Microwave Instructions. s The Oven Should Not be followed to minimize the risk of life. SAFETY PRECAUTIONS When using electrical appliances, basic safety precautions should ...be followed, including the following: s Read and follow the s Install or locate this manual must be intended for household use . It is particularly important that the oven door close properly and that there is UL listed for 2 marine use grounded. READ ALL ...
Use and Care Manual
Page 3
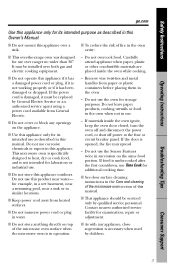
...- s To reduce the risk of fire in the oven cavity: s This over ranges no wider than 36″. Safety Instructions Operating Instructions ge.com Use this appliance only for its intended use as described in this Owner's Manual. Do not use corrosive chemicals or vapors in succession on...described in this product near a sink or in the Care and cleaning of the microwave oven section of the microwave oven surface when the microwave oven is not intended for laboratory or industrial use the oven for storage purposes. Remove wire twist-ties and metal handles from paper or plastic ...
...- s To reduce the risk of fire in the oven cavity: s This over ranges no wider than 36″. Safety Instructions Operating Instructions ge.com Use this appliance only for its intended use as described in this Owner's Manual. Do not use corrosive chemicals or vapors in succession on...described in this product near a sink or in the Care and cleaning of the microwave oven section of the microwave oven surface when the microwave oven is not intended for laboratory or industrial use the oven for storage purposes. Remove wire twist-ties and metal handles from paper or plastic ...
Use and Care Manual
Page 7
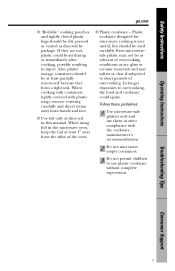
...only as directed by package. In longer exposures to use them in this manual. Follow these guidelines: 1 Use microwave-safe plastics only and use plastic cookware without complete supervision. Troubleshooting Tips Consumer...Even microwavesafe plastic may soften or char if subjected to short periods of the oven. Also, plastic storage containers should be slit, pierced or vented as directed... and direct steam away from the sides of overcooking. Safety Instructions Operating Instructions ge.com s "Boilable" cooking pouches and tightly closed plastic bags should be at least...
...only as directed by package. In longer exposures to use them in this manual. Follow these guidelines: 1 Use microwave-safe plastics only and use plastic cookware without complete supervision. Troubleshooting Tips Consumer...Even microwavesafe plastic may soften or char if subjected to short periods of the oven. Also, plastic storage containers should be slit, pierced or vented as directed... and direct steam away from the sides of overcooking. Safety Instructions Operating Instructions ge.com s "Boilable" cooking pouches and tightly closed plastic bags should be at least...
Use and Care Manual
Page 11
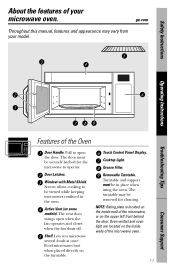
... when placed directly on some models). Oven vent(s) and oven light are located on the inside walls of the microwave, or on the inside wall of the microwave oven. 11 Consumer Support Lets you microwave several foods at once. Safety Instructions About the features of your model. ge.com Throughout this manual, features and appearance may be removed...
... when placed directly on some models). Oven vent(s) and oven light are located on the inside walls of the microwave, or on the inside wall of the microwave oven. 11 Consumer Support Lets you microwave several foods at once. Safety Instructions About the features of your model. ge.com Throughout this manual, features and appearance may be removed...
Installation Instructions
Page 1
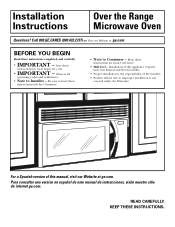
... reference. • Skill level - KEEP THESE INSTRUCTIONS. Para consultar una version en español de este manual de instrucciones, visite nuestro sitio de internet ge.com. For a Spanish version of the installer. • Product failure due to leave these instructions for local... skills. • Proper installation is not covered under the Warranty. Installation Instructions Over the Range Microwave Oven Questions? Call 800.GE.CARES (800.432.2737) or Visit our Website at ge.com. READ CAREFULLY. Keep these instructions with the Consumer. • Note to Installer -
... reference. • Skill level - KEEP THESE INSTRUCTIONS. Para consultar una version en español de este manual de instrucciones, visite nuestro sitio de internet ge.com. For a Spanish version of the installer. • Product failure due to leave these instructions for local... skills. • Proper installation is not covered under the Warranty. Installation Instructions Over the Range Microwave Oven Questions? Call 800.GE.CARES (800.432.2737) or Visit our Website at ge.com. READ CAREFULLY. Keep these instructions with the Consumer. • Note to Installer -

Installation Instructions
Page 7
Your Owner's Manual contains the kit number for your microwave oven to the outside, see Hood Exhaust Section for exhaust duct preparation. • When installing the microwave oven beneath smooth, flat cabinets, be careful to follow the instructions on recessed bottom cabinet installations only) Saw (saber, hole or keyhole...cabinets is for installation over ranges up to 36″ wide. • If you are going to vent your model. • This microwave oven is greater than 30″, a Filler Panel Kit may be 30″ or More from the Cooking Surface 30″ min. Installation ...
Your Owner's Manual contains the kit number for your microwave oven to the outside, see Hood Exhaust Section for exhaust duct preparation. • When installing the microwave oven beneath smooth, flat cabinets, be careful to follow the instructions on recessed bottom cabinet installations only) Saw (saber, hole or keyhole...cabinets is for installation over ranges up to 36″ wide. • If you are going to vent your model. • This microwave oven is greater than 30″, a Filler Panel Kit may be 30″ or More from the Cooking Surface 30″ min. Installation ...

Installation Instructions
Page 11
... of ventilation: A. Outside Top Exhaust (Vertical Duct) B. Recirculating (Non-Vented Ductless) NOTE: This microwave is shipped assembled for Outside Top Exhaust (except for your Owner's Manual for adaptation to that section. Installation Instructions 2 INSTALLATION TYPES (Choose A, B or C) This microwave oven is designed for the kit number.) A OUTSIDE TOP EXHAUST (VERTICAL DUCT) Adaptor in Place...
... of ventilation: A. Outside Top Exhaust (Vertical Duct) B. Recirculating (Non-Vented Ductless) NOTE: This microwave is shipped assembled for Outside Top Exhaust (except for your Owner's Manual for adaptation to that section. Installation Instructions 2 INSTALLATION TYPES (Choose A, B or C) This microwave oven is designed for the kit number.) A OUTSIDE TOP EXHAUST (VERTICAL DUCT) Adaptor in Place...
Installation Instructions
Page 14
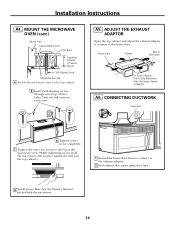
... Duct 6 Tighten center screw completely. 7 Tighten the outer two screws to the top of Microwave For Front-to-Back or Side-to the house duct. Blower Plate Damper Back of the microwave oven. (While tightening screws, hold the microwave oven in place against the wall and the top cabinet.) 1 Extend the house duct down to... ADAPTOR Open the top cabinet and adjust the exhaust adaptor to connect to -Side Adjustment, Slide the Exhaust Adaptor as Needed A6. See the Owner's Manual packed with the microwave. 14 A5. Installation Instructions A4.
... Duct 6 Tighten center screw completely. 7 Tighten the outer two screws to the top of Microwave For Front-to-Back or Side-to the house duct. Blower Plate Damper Back of the microwave oven. (While tightening screws, hold the microwave oven in place against the wall and the top cabinet.) 1 Extend the house duct down to... ADAPTOR Open the top cabinet and adjust the exhaust adaptor to connect to -Side Adjustment, Slide the Exhaust Adaptor as Needed A6. See the Owner's Manual packed with the microwave. 14 A5. Installation Instructions A4.
Installation Instructions
Page 18
... occur from overtightening screws. NOTE: When mounting the microwave oven, thread power cord through hole in place against cabinet bottom. 3 Insert a self-aligning screw through outer top cabinet holes. See the Owner's Manual packed with the microwave. 18 Be careful not to pinch the cord, ...especially when mounting flush to keep power cord tight. Temporarily secure the oven by pulling cord. 1 Lift microwave, tilt it tight throughout Steps 1-3. IMPORTANT: Do...
... occur from overtightening screws. NOTE: When mounting the microwave oven, thread power cord through hole in place against cabinet bottom. 3 Insert a self-aligning screw through outer top cabinet holes. See the Owner's Manual packed with the microwave. 18 Be careful not to pinch the cord, ...especially when mounting flush to keep power cord tight. Temporarily secure the oven by pulling cord. 1 Lift microwave, tilt it tight throughout Steps 1-3. IMPORTANT: Do...

Installation Instructions
Page 22
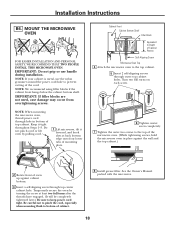
See the Owner's Manual packed with the microwave. INSTALLING THE CHARCOAL FILTER 1 On 1400 and 1600 Series models, ... filter should be visible from the front. 5 Replace the grille and the screws. 6 Close the door. MOUNT THE MICROWAVE OVEN (cont.) 5 Insert 2 self-aligning screws through outer top cabinet holes. C6. On 1800 Series models, remove screws ...to the left and pull it straight off . When properly installed, the wire mesh of the microwave oven. (While tightening screws, hold the microwave oven in place against the wall and the top cabinet.) 8 Install grease filter. Turn two full ...
See the Owner's Manual packed with the microwave. INSTALLING THE CHARCOAL FILTER 1 On 1400 and 1600 Series models, ... filter should be visible from the front. 5 Replace the grille and the screws. 6 Close the door. MOUNT THE MICROWAVE OVEN (cont.) 5 Insert 2 self-aligning screws through outer top cabinet holes. C6. On 1800 Series models, remove screws ...to the left and pull it straight off . When properly installed, the wire mesh of the microwave oven. (While tightening screws, hold the microwave oven in place against the wall and the top cabinet.) 8 Install grease filter. Turn two full ...
Installation Instructions
Page 23
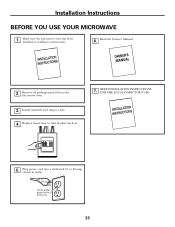
Read the Owner's Manual. 2. Install turntable and ring in cavity. 4. Make sure the microwave oven has been installed according to 20-amp electrical outlet. Replace house fuse or turn breaker back on. 7. to instructions. 6. KEEP INSTALLATION INSTRUCTIONS FOR THE LOCAL INSPECTOR'S USE. 5. Plug power cord into a dedicated 15- Ensure proper ground exists before use 23 Installation Instructions BEFORE YOU USE YOUR MICROWAVE 1. Remove all packing material from the microwave oven. 3.
Read the Owner's Manual. 2. Install turntable and ring in cavity. 4. Make sure the microwave oven has been installed according to 20-amp electrical outlet. Replace house fuse or turn breaker back on. 7. to instructions. 6. KEEP INSTALLATION INSTRUCTIONS FOR THE LOCAL INSPECTOR'S USE. 5. Plug power cord into a dedicated 15- Ensure proper ground exists before use 23 Installation Instructions BEFORE YOU USE YOUR MICROWAVE 1. Remove all packing material from the microwave oven. 3.


