Owners Manual
Page 1
...Serial Find these numbers on a label on the left front when the door is open. DE68-02561A 49-40478 01-06 JR Spacemaker Microwave Oven ge.com Safety Instructions 2-7 Operating Instructions Care and Cleaning 37-40 Cooking Features 12-18 Defrosting Features 21-27 Easy Guide™ Menu System... . . . . .9 Help Features 34 Home Screen 10 Microwave Oven Features . . . . . .8 Microwave Terms 36 Options 28-32 Other Features 33, 35 ...
...Serial Find these numbers on a label on the left front when the door is open. DE68-02561A 49-40478 01-06 JR Spacemaker Microwave Oven ge.com Safety Instructions 2-7 Operating Instructions Care and Cleaning 37-40 Cooking Features 12-18 Defrosting Features 21-27 Easy Guide™ Menu System... . . . . .9 Help Features 34 Home Screen 10 Microwave Oven Features . . . . . .8 Microwave Terms 36 Options 28-32 Other Features 33, 35 ...
Owners Manual
Page 2
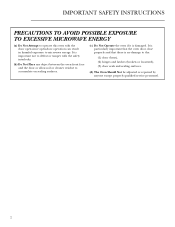
.... (d) The Oven Should Not be adjusted or repaired by anyone except properly qualified service personnel. 2 IMPORTANT SAFETY INSTRUCTIONS PRECAUTIONS TO AVOID POSSIBLE EXPOSURE TO EXCESSIVE MICROWAVE ENERGY (a) Do Not Attempt to operate this oven with the safety interlocks. (b) Do Not Place any object between the oven front face and the door...
.... (d) The Oven Should Not be adjusted or repaired by anyone except properly qualified service personnel. 2 IMPORTANT SAFETY INSTRUCTIONS PRECAUTIONS TO AVOID POSSIBLE EXPOSURE TO EXCESSIVE MICROWAVE ENERGY (a) Do Not Attempt to operate this oven with the safety interlocks. (b) Do Not Place any object between the oven front face and the door...
Owners Manual
Page 3
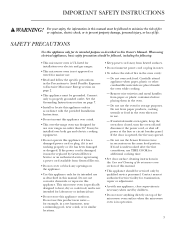
... appliance only in this appliance. If the power cord is in this appliance outdoors. If the door is specifically designed to Excessive Microwave Energy section on page 2. • This appliance must be replaced by General Electric Service or an authorized service agent using electrical ... • Do not immerse power cord or plug in water. • To reduce the risk of life. IMPORTANT SAFETY INSTRUCTIONS WARNING! This microwave oven is opened, the fire may be grounded. For your safety, the information in operation. 3 Connect only to prevent property damage, personal...
... appliance only in this appliance. If the power cord is in this appliance outdoors. If the door is specifically designed to Excessive Microwave Energy section on page 2. • This appliance must be replaced by General Electric Service or an authorized service agent using electrical ... • Do not immerse power cord or plug in water. • To reduce the risk of life. IMPORTANT SAFETY INSTRUCTIONS WARNING! This microwave oven is opened, the fire may be grounded. For your safety, the information in operation. 3 Connect only to prevent property damage, personal...
Owners Manual
Page 4
.... Take care to prevent the starting and spreading of a grease fire on the surface units below the microwave oven, smother a flaming pan on . • Never leave surface units beneath your microwave oven unattended at high heat settings. Do not allow grease to food (upturned edges act like antennas). • ...Metal, such as lye-based oven cleaners, may ignite and spread if the microwave vent fan is caused by covering the pan completely with a lid, cookie sheet or flat tray. • Use care when cleaning the vent fan ...
.... Take care to prevent the starting and spreading of a grease fire on the surface units below the microwave oven, smother a flaming pan on . • Never leave surface units beneath your microwave oven unattended at high heat settings. Do not allow grease to food (upturned edges act like antennas). • ...Metal, such as lye-based oven cleaners, may ignite and spread if the microwave vent fan is caused by covering the pan completely with a lid, cookie sheet or flat tray. • Use care when cleaning the vent fan ...
Owners Manual
Page 5
...allow steam to escape during cooking. • Hot foods and steam can cause the container to burst, possibly resulting in injury. • Operating the microwave with unbroken outer ''skin'' such as potatoes, hot dogs, sausages, tomatoes, apples, chicken livers and other utensil into the container. • Don't... IS DISTURBED OR A SPOON OR OTHER UTENSIL IS INSERTED INTO THE LIQUID. Even if the container is not always present. Such use in microwave ovens. • Some products such as water, coffee or tea are able to burst, possibly resulting in injury. • Do not overcook...
...allow steam to escape during cooking. • Hot foods and steam can cause the container to burst, possibly resulting in injury. • Operating the microwave with unbroken outer ''skin'' such as potatoes, hot dogs, sausages, tomatoes, apples, chicken livers and other utensil into the container. • Don't... IS DISTURBED OR A SPOON OR OTHER UTENSIL IS INSERTED INTO THE LIQUID. Even if the container is not always present. Such use in microwave ovens. • Some products such as water, coffee or tea are able to burst, possibly resulting in injury. • Do not overcook...
Owners Manual
Page 6
... resulting in this test: Place in the bottom. Pot holders may also ignite. • Use foil only as they form a tight seal. Microwave 30-45 seconds at least partially uncovered because they may be needed to retain moisture and prevent spattering. When using foil in order to handle... be used carefully. When cooking with containers tightly covered with a metallic sheen can escape. • Cookware may not be at high. Even microwave-safe plastic may become hot because of heat transferred from the sides of the oven. • Some styrofoam trays (like those that meat is...
... resulting in this test: Place in the bottom. Pot holders may also ignite. • Use foil only as they form a tight seal. Microwave 30-45 seconds at least partially uncovered because they may be needed to retain moisture and prevent spattering. When using foil in order to handle... be used carefully. When cooking with containers tightly covered with a metallic sheen can escape. • Cookware may not be at high. Even microwave-safe plastic may become hot because of heat transferred from the sides of the oven. • Some styrofoam trays (like those that meat is...
Owners Manual
Page 7
...plug. Each kit contains two 3″-wide filler panels. Consult a qualified electrician or service technician if the grounding instructions are used when the microwave oven cannot be vented to the outside. If the outlet is a standard 2-prong wall outlet, it replaced with this appliance into an ... in appearance. In the event of electric shock. not for the electric current. JX81H JX40, JX41 7 Do not use . Available at ge.com. SAVE THESE INSTRUCTIONS OPTIONAL KITS Filler Panel Kits JX40WH-White JX41-Black When replacing a 36″ range hood, filler panel kits fill...
...plug. Each kit contains two 3″-wide filler panels. Consult a qualified electrician or service technician if the grounding instructions are used when the microwave oven cannot be vented to the outside. If the outlet is a standard 2-prong wall outlet, it replaced with this appliance into an ... in appearance. In the event of electric shock. not for the electric current. JX81H JX40, JX41 7 Do not use . Available at ge.com. SAVE THESE INSTRUCTIONS OPTIONAL KITS Filler Panel Kits JX40WH-White JX41-Black When replacing a 36″ range hood, filler panel kits fill...
Owners Manual
Page 8
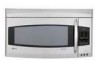
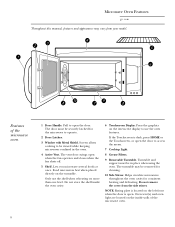
...cover from your model. Oven vent(s) and oven light are located on the inside the oven cavity. 6 Touchscreen Display. Microwave Oven Features ge.com Throughout this manual, features and appearance may be removed for consistent heating and defrosting. Press the graphics on more ...than one level. Turntable and support must be securely latched for the microwave to use the shelf when reheating on the interactive ...
...cover from your model. Oven vent(s) and oven light are located on the inside the oven cavity. 6 Touchscreen Display. Microwave Oven Features ge.com Throughout this manual, features and appearance may be removed for consistent heating and defrosting. Press the graphics on more ...than one level. Turntable and support must be securely latched for the microwave to use the shelf when reheating on the interactive ...
Owners Manual
Page 10
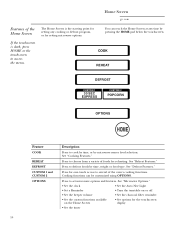
.... Press to cook by time, or by time, weight or food type. Press to several of foods for reheating. See "Reheat Features." See "Microwave Options." • Set the clock • Set the Auto Nite Light • Set a Reminder • Turn the turntable on or off &#...30 SEC EXPRESS CUSTOM 2 POPCORN OPTIONS HOME Feature COOK REHEAT DEFROST CUSTOM 1 and CUSTOM 2 OPTIONS Description Press to set microwave options and features. Home Screen ge.com Features of the Home Screen If the touchscreen is the starting point for setting any time by pressing the HOME pad...
.... Press to cook by time, or by time, weight or food type. Press to several of foods for reheating. See "Reheat Features." See "Microwave Options." • Set the clock • Set the Auto Nite Light • Set a Reminder • Turn the turntable on or off &#...30 SEC EXPRESS CUSTOM 2 POPCORN OPTIONS HOME Feature COOK REHEAT DEFROST CUSTOM 1 and CUSTOM 2 OPTIONS Description Press to set microwave options and features. Home Screen ge.com Features of the Home Screen If the touchscreen is the starting point for setting any time by pressing the HOME pad...
Owners Manual
Page 11
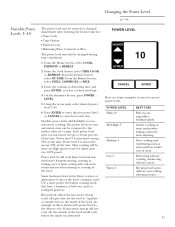
... power level 1-10. 6 Press ENTER to enter the new power level or CANCEL to your selection. Variable power levels add flexibility to cancel your microwave cooking. Some foods may have a tendency to the inside was defrosted. Slow cooking and tenderizing such as scalloped potatoes. simmering; Keeping food warm without... did not cycle off ) give time for the food to "equalize" or transfer heat to boil over . Changing the Power Level ge.com Variable Power Levels 1-10 The power level may be entered or changed immediately after entering the feature time for various power levels: ...
... power level 1-10. 6 Press ENTER to enter the new power level or CANCEL to your selection. Variable power levels add flexibility to cancel your microwave cooking. Some foods may have a tendency to the inside was defrosted. Slow cooking and tenderizing such as scalloped potatoes. simmering; Keeping food warm without... did not cycle off ) give time for the food to "equalize" or transfer heat to boil over . Changing the Power Level ge.com Variable Power Levels 1-10 The power level may be entered or changed immediately after entering the feature time for various power levels: ...
Owners Manual
Page 12
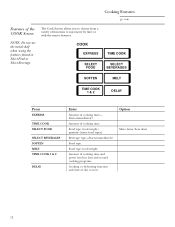
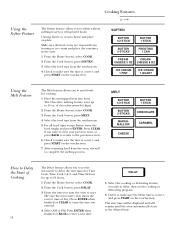
... Screen NOTE: Do not use the metal shelf when using the features found in Select Food or Select Beverage. Amount of cooking time- Cooking Features ge.com Features of day to microwave by time or with the sensor features.
... Screen NOTE: Do not use the metal shelf when using the features found in Select Food or Select Beverage. Amount of cooking time- Cooking Features ge.com Features of day to microwave by time or with the sensor features.
Owners Manual
Page 13
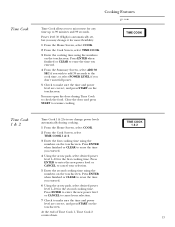
... Time Cook 1, Time Cook 2 counts down. TIME COOK Time Cook 1&2 Time Cook 1 & 2 lets you change it for the second cooking time. Time Cook Cooking Features ge.com Time Cook allows you to microwave for the first cooking time.
... Time Cook 1, Time Cook 2 counts down. TIME COOK Time Cook 1&2 Time Cook 1 & 2 lets you change it for the second cooking time. Time Cook Cooking Features ge.com Time Cook allows you to microwave for the first cooking time.
Owners Manual
Page 15
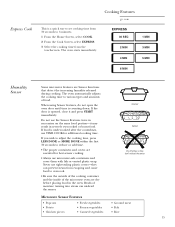
... starts immediately. Do not use TIME COOK for best sensor cooking. • Always use tight-sealing plastic covers-they don't mislead the sensor. Microwave Sensor Features • Popcorn • Potato • Chicken pieces • Fresh vegetables • Frozen vegetables • Canned vegetables • ... This is a quick way to set cooking time from the touchscreen. Cooking Features ge.com EXPRESS 30 SEC 2 MIN 4 MIN 1 MIN 3 MIN 5 MIN 6 MIN Humidity Sensor Some microwave features are Sensor functions that detect the increasing humidity released during cooking. Beads of ...
... starts immediately. Do not use TIME COOK for best sensor cooking. • Always use tight-sealing plastic covers-they don't mislead the sensor. Microwave Sensor Features • Popcorn • Potato • Chicken pieces • Fresh vegetables • Frozen vegetables • Canned vegetables • ... This is a quick way to set cooking time from the touchscreen. Cooking Features ge.com EXPRESS 30 SEC 2 MIN 4 MIN 1 MIN 3 MIN 5 MIN 6 MIN Humidity Sensor Some microwave features are Sensor functions that detect the increasing humidity released during cooking. Beads of ...
Owners Manual
Page 16
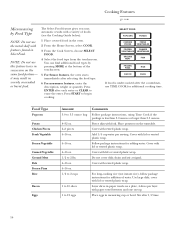
... per serving. Place eggs in severely overcooked or burnt food. Stir after each entry or CLEAR to begin cooking. Cover with fork. Cooking Features ge.com Microwaving by pressing MORE at signal. it may result in measuring cup or bowl. SELECT FOOD POPCORN POTATO CHICKEN PIECES FRESH VEGETABLES FROZEN CANNED VEGETABLES VEGETABLES...
... per serving. Place eggs in severely overcooked or burnt food. Stir after each entry or CLEAR to begin cooking. Cover with fork. Cooking Features ge.com Microwaving by pressing MORE at signal. it may result in measuring cup or bowl. SELECT FOOD POPCORN POTATO CHICKEN PIECES FRESH VEGETABLES FROZEN CANNED VEGETABLES VEGETABLES...
Owners Manual
Page 17
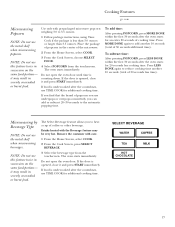
... the Cook Screen, choose SELECT FOOD. 4 Select POPCORN from the touchscreen. Microwaving by Beverage Type NOTE: Do not use the metal shelf when microwaving popcorn. The oven starts immediately. Cooking Features ge.com Microwaving Popcorn NOTE: Do not use the metal shelf when microwaving beverages. If you find that the brand of coffee or other...
... the Cook Screen, choose SELECT FOOD. 4 Select POPCORN from the touchscreen. Microwaving by Beverage Type NOTE: Do not use the metal shelf when microwaving popcorn. The oven starts immediately. Cooking Features ge.com Microwaving Popcorn NOTE: Do not use the metal shelf when microwaving beverages. If you find that the brand of coffee or other...
Owners Manual
Page 18
... foods. Press CLEAR if you want the oven to start. (Be sure the microwave clock shows the correct time of day.) Press ENTER when finished or CLEAR to erase the time you ...to set the microwave to delay the start time will be displayed and will remain until the oven automatically starts at... enter the food weight and press ENTER. Unwrap butter or cream cheese and place on the touchscreen. Cooking Features ge.com Using the Soften Feature The Soften feature allows you to melt foods for cooking. 1 Place the unwrapped item...
... foods. Press CLEAR if you want the oven to start. (Be sure the microwave clock shows the correct time of day.) Press ENTER when finished or CLEAR to erase the time you ...to set the microwave to delay the start time will be displayed and will remain until the oven automatically starts at... enter the food weight and press ENTER. Unwrap butter or cream cheese and place on the touchscreen. Cooking Features ge.com Using the Soften Feature The Soften feature allows you to melt foods for cooking. 1 Place the unwrapped item...
Owners Manual
Page 20
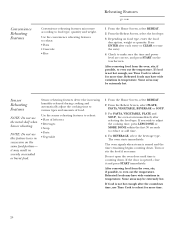
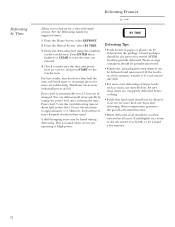
...Do not use Time Cook to reheat for more time. 20 Some areas may be extremely hot. Convenience Reheating Features Convenience reheating features microwave according to reheat: • Plate of food. The oven starts immediately. it and press START immediately. After removing food from ...the oven, stir, if possible, to reheat: • Pizza • Casserole • Rice Reheating Features ge.com 1 From the Home Screen, select REHEAT. 2 From the Reheat Screen, select the food type. 3 Depending on the touchscreen. Press ENTER...
...Do not use Time Cook to reheat for more time. 20 Some areas may be extremely hot. Convenience Reheating Features Convenience reheating features microwave according to reheat: • Plate of food. The oven starts immediately. it and press START immediately. After removing food from ...the oven, stir, if possible, to reheat: • Pizza • Casserole • Rice Reheating Features ge.com 1 From the Home Screen, select REHEAT. 2 From the Reheat Screen, select the food type. 3 Depending on the touchscreen. Press ENTER...
Owners Manual
Page 22
... but softened in about half; If the food is not operating at 3, but can defrost small items quickly by Time Defrosting Features ge.com Allows you entered. 4 Check to make sure the time and power level are completely defrosted before cooking. • Foods that... spoil easily should be defrosted and microwaved. However, food will need more even defrosting. Plastic storage containers should be allowed to approximately 1/3. Defrosting by raising the power level after...
... but softened in about half; If the food is not operating at 3, but can defrost small items quickly by Time Defrosting Features ge.com Allows you entered. 4 Check to make sure the time and power level are completely defrosted before cooking. • Foods that... spoil easily should be defrosted and microwaved. However, food will need more even defrosting. Plastic storage containers should be allowed to approximately 1/3. Defrosting by raising the power level after...
Owners Manual
Page 23
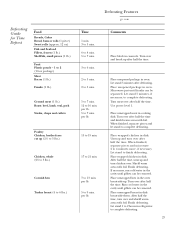
.... Unwrap and turn chicken over after half the time. When finished, separate pieces and microwave 2 to finish defrosting. per lb. 5 to 16 min. After half the time, unwrap and turn over . Microwave just until giblets can be removed. Run cool water in cooking dish. per lb. ... cutlets Poultry Chicken, broiler-fryer cut up (21⁄2 to 3 lbs.) Chicken, whole (21⁄2 to 3 lbs.) Cornish hen Turkey breast (4 to 6 lbs.) Defrosting Features ge.com Time 1 min. 3 to 5 min. 6 to 8 min. 5 to 7 min. 3 to 6 min. 2 to 5 min. 2 to 5 min. 5 to 7 min. 12 to 9 min....
.... Unwrap and turn chicken over after half the time. When finished, separate pieces and microwave 2 to finish defrosting. per lb. 5 to 16 min. After half the time, unwrap and turn over . Microwave just until giblets can be removed. Run cool water in cooking dish. per lb. ... cutlets Poultry Chicken, broiler-fryer cut up (21⁄2 to 3 lbs.) Chicken, whole (21⁄2 to 3 lbs.) Cornish hen Turkey breast (4 to 6 lbs.) Defrosting Features ge.com Time 1 min. 3 to 5 min. 6 to 8 min. 5 to 7 min. 3 to 6 min. 2 to 5 min. 2 to 5 min. 5 to 7 min. 12 to 9 min....
Owners Manual
Page 24
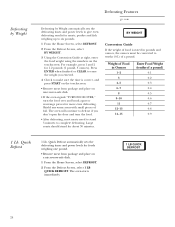
...select DEFROST. 2 From the Defrost Screen, select BY WEIGHT. 3 Using the Conversion Guide at right, enter the food weight using the numbers on a microwave-safe dish. 1 From the Home Screen, select DEFROST. 2 From the Defrost Screen, select 1 LB QUICK DEFROST. BY WEIGHT Conversion Guide If the... oven starts immediately. 1 LB QUICK DEFROST 24 Shield any warm areas with small pieces of foil. Defrosting by Weight Defrosting Features ge.com Defrosting by Weight automatically sets the defrosting times and power levels to give even defrosting results for meats, poultry and fish weighing...
...select DEFROST. 2 From the Defrost Screen, select BY WEIGHT. 3 Using the Conversion Guide at right, enter the food weight using the numbers on a microwave-safe dish. 1 From the Home Screen, select DEFROST. 2 From the Defrost Screen, select 1 LB QUICK DEFROST. BY WEIGHT Conversion Guide If the... oven starts immediately. 1 LB QUICK DEFROST 24 Shield any warm areas with small pieces of foil. Defrosting by Weight Defrosting Features ge.com Defrosting by Weight automatically sets the defrosting times and power levels to give even defrosting results for meats, poultry and fish weighing...


