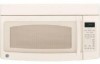
Quick Specs
Page 1
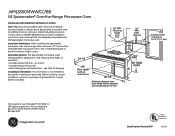
..." duct For answers to your Monogram,® GE Profile™ or GE® appliance questions, visit our website at ge.com or call GE Answer Center® service, 800.626.2000. allow minimum of 2" from bottom of Spacemaker microwave oven to top of range backguard to -follow installation instructions and convenient full-size templates are...
..." duct For answers to your Monogram,® GE Profile™ or GE® appliance questions, visit our website at ge.com or call GE Answer Center® service, 800.626.2000. allow minimum of 2" from bottom of Spacemaker microwave oven to top of range backguard to -follow installation instructions and convenient full-size templates are...
Quick Specs
Page 2
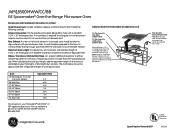
...not use less than their actual physical size. When calculating the total duct length, add the equivalent length of all straight duct sections. For installation between studs, or wall should not exceed 120 equivalent feet. Each kit contains two 3"-wide filler panels. Wall Cap C. 90°...Roof Cap Equivalent Feet 5 ft. 40 ft. 10 ft. 5 ft. 25 ft. 5 ft. 24 ft. JVM1850DMWW/CC/BB GE Spacemaker® Over-the-Range Microwave Oven Dimensions and Installation Information (in the additional width to a section of straight duct which is longer than a 6" diameter duct Rear Exhaust: If a...
...not use less than their actual physical size. When calculating the total duct length, add the equivalent length of all straight duct sections. For installation between studs, or wall should not exceed 120 equivalent feet. Each kit contains two 3"-wide filler panels. Wall Cap C. 90°...Roof Cap Equivalent Feet 5 ft. 40 ft. 10 ft. 5 ft. 25 ft. 5 ft. 24 ft. JVM1850DMWW/CC/BB GE Spacemaker® Over-the-Range Microwave Oven Dimensions and Installation Information (in the additional width to a section of straight duct which is longer than a 6" diameter duct Rear Exhaust: If a...
Use and Care Manual
Page 2
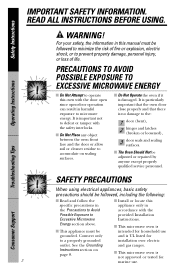
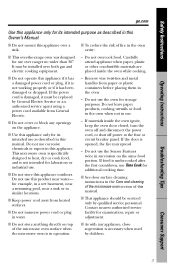
...ALL INSTRUCTIONS BEFORE USING. It is damaged. s Do Not Operate the oven if it is important not to provided Installation Excessive Microwave Instructions. Energy section above. See the Grounding and gas ranges. Consumer Support It is particularly important that the...oven is UL listed for household use . Connect only and is s This appliance must be intended for to a properly grounded installation over electric outlet. Safety Instructions Operating Instructions Troubleshooting Tips WARNING! s This microwave oven is no damage to accumulate on page ...
...ALL INSTRUCTIONS BEFORE USING. It is damaged. s Do Not Operate the oven if it is important not to provided Installation Excessive Microwave Instructions. Energy section above. See the Grounding and gas ranges. Consumer Support It is particularly important that the...oven is UL listed for household use . Connect only and is s This appliance must be intended for to a properly grounded installation over electric outlet. Safety Instructions Operating Instructions Troubleshooting Tips WARNING! s This microwave oven is no damage to accumulate on page ...
Use and Care Manual
Page 3
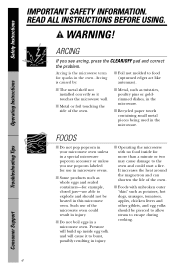
... openings on the same food portion. It may spread. - If food is not working properly or if it must be installed over ranges no wider than 36″. Safety Instructions Operating Instructions ge.com Use this appliance only for its intended use as described in this Owner's Manual. s Do not store this...
... openings on the same food portion. It may spread. - If food is not working properly or if it must be installed over ranges no wider than 36″. Safety Instructions Operating Instructions ge.com Use this appliance only for its intended use as described in this Owner's Manual. s Do not store this...
Use and Care Manual
Page 4
... s Do not pop popcorn in your microwave oven unless in injury. Pressure will build up inside for use of the oven. s The metal shelf not installed correctly so it to escape during cooking. s Metal, such as potatoes, hot dogs, sausages, tomatoes, apples, chicken livers and other giblets, and egg yolks should...
... s Do not pop popcorn in your microwave oven unless in injury. Pressure will build up inside for use of the oven. s The metal shelf not installed correctly so it to escape during cooking. s Metal, such as potatoes, hot dogs, sausages, tomatoes, apples, chicken livers and other giblets, and egg yolks should...

Use and Care Manual
Page 8
... is properly grounded. Do not use an adapter plug with a properly grounded 3-prong wall outlet. If the power cord is properly installed and grounded. If the outlet is a standard 2-prong wall outlet, it replaced with this appliance. Do not under any circumstances cut... grounding reduces the risk of circuit breaker. This appliance is your personal responsibility and obligation to have a qualified electrician or service technician install an outlet near the appliance. Ensure proper ground exists before use of the grounding plug can result in a risk of electric shock....
... is properly grounded. Do not use an adapter plug with a properly grounded 3-prong wall outlet. If the power cord is properly installed and grounded. If the outlet is a standard 2-prong wall outlet, it replaced with this appliance. Do not under any circumstances cut... grounding reduces the risk of circuit breaker. This appliance is your personal responsibility and obligation to have a qualified electrician or service technician install an outlet near the appliance. Ensure proper ground exists before use of the grounding plug can result in a risk of electric shock....
Use and Care Manual
Page 10
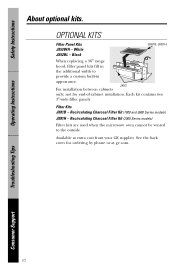
... a custom built-in the additional width to the outside. JX52 For installation between cabinets only; Operating Instructions Troubleshooting Tips Consumer Support 10 OPTIONAL KITS Filler Panel Kits JX52WH - Available at ge.com. Each kit contains two 3″-wide filler panels. Recirculating Charcoal Filter... Kit (1800 and 3600 Series models) JX81H - See the back cover for end-of-cabinet installation. not for ordering by phone or at...
... a custom built-in the additional width to the outside. JX52 For installation between cabinets only; Operating Instructions Troubleshooting Tips Consumer Support 10 OPTIONAL KITS Filler Panel Kits JX52WH - Available at ge.com. Each kit contains two 3″-wide filler panels. Recirculating Charcoal Filter... Kit (1800 and 3600 Series models) JX81H - See the back cover for end-of-cabinet installation. not for ordering by phone or at...
Use and Care Manual
Page 32
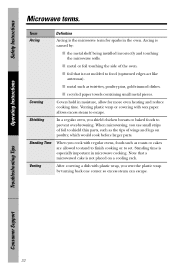
... shield chicken breasts or baked foods to food (upturned edges act like antennas). When microwaving, you vent the plastic wrap by : s the metal shelf being installed incorrectly and touching the microwave walls. Safety Instructions Operating Instructions Microwave terms. Term Definition Arcing Arcing is the microwave term for more even heating and...
... shield chicken breasts or baked foods to food (upturned edges act like antennas). When microwaving, you vent the plastic wrap by : s the metal shelf being installed incorrectly and touching the microwave walls. Safety Instructions Operating Instructions Microwave terms. Term Definition Arcing Arcing is the microwave term for more even heating and...
Use and Care Manual
Page 38
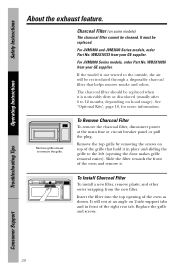
...Remove Charcoal Filter To remove the charcoal filter, disconnect power at an angle on hood usage). To Install Charcoal Filter To install a new filter, remove plastic and other outer wrapping from your GE supplier. It must be cleaned. Remove the top grille by removing the screws on some models) The...Kits", page 10, for more information. Replace the grille and screws. For JVM1800 and JVM3600 Series models, order Part No. WB2X10956 from your GE supplier. If the model is noticeably dirty or discolored (usually after 6 to the outside, the air will rest at the main fuse or ...
...Remove Charcoal Filter To remove the charcoal filter, disconnect power at an angle on hood usage). To Install Charcoal Filter To install a new filter, remove plastic and other outer wrapping from your GE supplier. It must be cleaned. Remove the top grille by removing the screws on some models) The...Kits", page 10, for more information. Replace the grille and screws. For JVM1800 and JVM3600 Series models, order Part No. WB2X10956 from your GE supplier. If the model is noticeably dirty or discolored (usually after 6 to the outside, the air will rest at the main fuse or ...

Use and Care Manual
Page 43
...caused after delivery. Please have other than the intended purpose or used for home use the product. For The Period Of: GE Will Replace: For GE and GE Profile Models: One Year From the date of the original purchase Any part of the product or damage to the product if...warranty excludes the service calls to your home to teach you may be responsible for a trip charge or you how to state. s Improper installation, delivery or maintenance. All warranty service provided by our Factory Service Centers, or an authorized Customer Care® technician. Consumer Support This warranty ...
...caused after delivery. Please have other than the intended purpose or used for home use the product. For The Period Of: GE Will Replace: For GE and GE Profile Models: One Year From the date of the original purchase Any part of the product or damage to the product if...warranty excludes the service calls to your home to teach you may be responsible for a trip charge or you how to state. s Improper installation, delivery or maintenance. All warranty service provided by our Factory Service Centers, or an authorized Customer Care® technician. Consumer Support This warranty ...
Installation Instructions
Page 1
... level - Para consultar una version en español de este manual de instrucciones, visite nuestro sitio de internet ge.com. READ CAREFULLY. Installation Instructions Over the Range Microwave Oven Questions? Be sure to Consumer - Observe all governing codes and ordinances. • Note... to improper installation is the responsibility of this manual, visit our Website at : ge.com BEFORE YOU BEGIN Read these instructions for local inspector's use. • IMPORTANT - KEEP THESE ...
... level - Para consultar una version en español de este manual de instrucciones, visite nuestro sitio de internet ge.com. READ CAREFULLY. Installation Instructions Over the Range Microwave Oven Questions? Be sure to Consumer - Observe all governing codes and ordinances. • Note... to improper installation is the responsibility of this manual, visit our Website at : ge.com BEFORE YOU BEGIN Read these instructions for local inspector's use. • IMPORTANT - KEEP THESE ...

Installation Instructions
Page 2
...Microwave Assembly 20 Adapting Microwave Blower for Recirculation 20, 21 Mount the Microwave Oven ..........21, 22 Installing the Charcoal Filter 22 Before You Use Your Microwave 23 Step-by-step installation guide Placement of Mounting Plate 8-10 Removing the Mounting Plate 8 Finding the Wall Studs 8 Determining... Wall Plate Location 9 Aligning the Wall Plate 10 Installation Types 11-22 A Outside Top Exhaust 12-14 Attach Mounting Plate to Wall 12 Preparation of Top Cabinet 13 Checking for Proper...
...Microwave Assembly 20 Adapting Microwave Blower for Recirculation 20, 21 Mount the Microwave Oven ..........21, 22 Installing the Charcoal Filter 22 Before You Use Your Microwave 23 Step-by-step installation guide Placement of Mounting Plate 8-10 Removing the Mounting Plate 8 Finding the Wall Studs 8 Determining... Wall Plate Location 9 Aligning the Wall Plate 10 Installation Types 11-22 A Outside Top Exhaust 12-14 Attach Mounting Plate to Wall 12 Preparation of Top Cabinet 13 Checking for Proper...

Installation Instructions
Page 3
... TO AVOID SEVERE OR FATAL SHOCK. ELECTRICAL REQUIREMENTS Product rating is properly grounded. to avoid severe or fatal shock injury. Installation Instructions IMPORTANT SAFETY INSTRUCTIONS This product requires a three-prong grounded outlet. The power cord of 113-135 pounds. ampere branch... CIRCUMSTANCES, CUT, DEFORM OR REMOVE ANY OF THE PRONGS FROM THE POWER CORD. The outlet box and supply circuit should be installed by a qualified electrician. If not properly grounded, or if the outlet box does not meet electrical requirements noted (under ELECTRICAL REQUIREMENTS...
... TO AVOID SEVERE OR FATAL SHOCK. ELECTRICAL REQUIREMENTS Product rating is properly grounded. to avoid severe or fatal shock injury. Installation Instructions IMPORTANT SAFETY INSTRUCTIONS This product requires a three-prong grounded outlet. The power cord of 113-135 pounds. ampere branch... CIRCUMSTANCES, CUT, DEFORM OR REMOVE ANY OF THE PRONGS FROM THE POWER CORD. The outlet box and supply circuit should be installed by a qualified electrician. If not properly grounded, or if the outlet box does not meet electrical requirements noted (under ELECTRICAL REQUIREMENTS...
Installation Instructions
Page 4
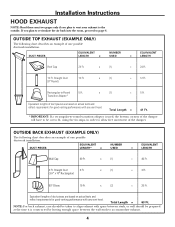
...wall should be cut to fit, using the tin snips, in order to align exhaust with any vent hood. Total Length = 63 Ft. Installation Instructions HOOD EXHAUST NOTE: Read these next two pages only if you plan to recirculate the air back into the room, proceed to page .... If you plan to vent your exhaust to -Round 5 Ft. OUTSIDE BACK EXHAUST (EXAMPLE ONLY) The following chart describes an example of one possible ductwork installation. x (1) = 12 Ft. Straight Duct 3 Ft. (31⁄4″ x 10″ Rectangular) x (1) = 3 Ft. 90° Elbow 10 Ft. DUCT PIECES ...
...wall should be cut to fit, using the tin snips, in order to align exhaust with any vent hood. Total Length = 63 Ft. Installation Instructions HOOD EXHAUST NOTE: Read these next two pages only if you plan to recirculate the air back into the room, proceed to page .... If you plan to vent your exhaust to -Round 5 Ft. OUTSIDE BACK EXHAUST (EXAMPLE ONLY) The following chart describes an example of one possible ductwork installation. x (1) = 12 Ft. Straight Duct 3 Ft. (31⁄4″ x 10″ Rectangular) x (1) = 3 Ft. 90° Elbow 10 Ft. DUCT PIECES ...

Installation Instructions
Page 5
...round transition adaptor is required, a rectangular-to-round transition adaptor must be used , the bottom corners of the damper will have to be installed using the approximate feet of equivalent length of 31⁄4″ x 10″ rectangular or 6″ diameter round duct should not exceed ...140 equivalent feet. Maximum duct length: For satisfactory air movement, the total duct length of straight duct which is blocking the ducts. Installation Instructions NOTE: If you how to calculate total equivalent ductwork length using the most direct route and with as few elbows as possible...
...round transition adaptor is required, a rectangular-to-round transition adaptor must be used , the bottom corners of the damper will have to be installed using the approximate feet of equivalent length of 31⁄4″ x 10″ rectangular or 6″ diameter round duct should not exceed ...140 equivalent feet. Maximum duct length: For satisfactory air movement, the total duct length of straight duct which is blocking the ducts. Installation Instructions NOTE: If you how to calculate total equivalent ductwork length using the most direct route and with as few elbows as possible...
Installation Instructions
Page 6
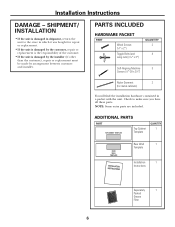
...; If the unit is damaged in a packet with the unit. ADDITIONAL PARTS PART Top Cabinet Template QUANTITY 1 Rear Wall 1 Template Installation 1 Instructions Separately 1 Packed Grease Filter 6 SHIPMENT/ INSTALLATION • If the unit is damaged by the installer (if other than the customer), repair or replacement must be made by arrangement between customer and...
...; If the unit is damaged in a packet with the unit. ADDITIONAL PARTS PART Top Cabinet Template QUANTITY 1 Rear Wall 1 Template Installation 1 Instructions Separately 1 Packed Grease Filter 6 SHIPMENT/ INSTALLATION • If the unit is damaged by the installer (if other than the customer), repair or replacement must be made by arrangement between customer and...

Installation Instructions
Page 7
...template, if necessary) Electric drill with top venting grilles: Do not allow cabinetry or other objects to the outside, see Hood Exhaust Section for installation over ranges up to 36″ wide. • If you are going to vent your microwave oven to block the airflow of obstructions. ... number for your model. • This microwave oven is greater than 30″, a Filler Panel Kit may be used on recessed bottom cabinet installations only) Saw (saber, hole or keyhole) Stud finder or Hammer (optional) Safety goggles Level Duct and masking tape MOUNTING SPACE 161⁄2″...
...template, if necessary) Electric drill with top venting grilles: Do not allow cabinetry or other objects to the outside, see Hood Exhaust Section for installation over ranges up to 36″ wide. • If you are going to vent your microwave oven to block the airflow of obstructions. ... number for your model. • This microwave oven is greater than 30″, a Filler Panel Kit may be used on recessed bottom cabinet installations only) Saw (saber, hole or keyhole) Stud finder or Hammer (optional) Safety goggles Level Duct and masking tape MOUNTING SPACE 161⁄2″...

Installation Instructions
Page 8
... of any adjacent studs should be used as the rear wall template and for mounting. B. You may discard these screws. 8 The center of the studs. Installation Instructions 1 PLACEMENT OF THE MOUNTING PLATE A. OR B. REMOVING THE MICROWAVE OVEN FROM THE CARTON/ REMOVING THE MOUNTING PLATE 1 Remove the...
... of any adjacent studs should be used as the rear wall template and for mounting. B. You may discard these screws. 8 The center of the studs. Installation Instructions 1 PLACEMENT OF THE MOUNTING PLATE A. OR B. REMOVING THE MICROWAVE OVEN FROM THE CARTON/ REMOVING THE MOUNTING PLATE 1 Remove the...

Installation Instructions
Page 9
... line on the back wall an equal distance below the cabinet bottom as the inside depth of the front overhang. 3 For this type of installation with front overhang only, align the mounting tabs with this horizontal line, not touching the cabinet bottom as the Front Overhang Depth 30″.... beneath recessed bottom cabinet with front overhang Mounting Plate with no back or side frame, install the mounting plate down the same distance as the front overhang depth. Remove the decorative trim to install the microwave properly and to Cooktop Your cabinets may have a front overhang only, with Tabs...
... line on the back wall an equal distance below the cabinet bottom as the inside depth of the front overhang. 3 For this type of installation with front overhang only, align the mounting tabs with this horizontal line, not touching the cabinet bottom as the Front Overhang Depth 30″.... beneath recessed bottom cabinet with front overhang Mounting Plate with no back or side frame, install the mounting plate down the same distance as the front overhang depth. Remove the decorative trim to install the microwave properly and to Cooktop Your cabinets may have a front overhang only, with Tabs...
Installation Instructions
Page 10
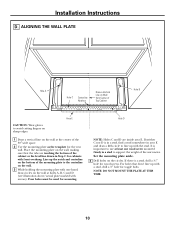
.... 4 Drill holes on sharp edges. NOTE: DO NOT MOUNT THE PLATE AT THIS TIME. 10 It is a stud, drill a 3⁄16″ hole for mounting. Installation Instructions D.
.... 4 Drill holes on sharp edges. NOTE: DO NOT MOUNT THE PLATE AT THIS TIME. 10 It is a stud, drill a 3⁄16″ hole for mounting. Installation Instructions D.


