Use and Care Manual
Page 1
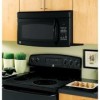
Para consultar una version en español de este manual de instrucciones, visite nuestro sitio de internet ge.com. DE68-03327A 49-40537 11-06 JR Owner's Manual JVM1850 JNM1851 JVM1870 JVM1871 JVM2050 JVM3670 DVM1850 EMO4000 Write the model and serial numbers here: Model Serial... Find these numbers on a label inside the oven. Microwave Spacemaker Oven ge.com Safety Instructions . ...
Para consultar una version en español de este manual de instrucciones, visite nuestro sitio de internet ge.com. DE68-03327A 49-40537 11-06 JR Owner's Manual JVM1850 JNM1851 JVM1870 JVM1871 JVM2050 JVM3670 DVM1850 EMO4000 Write the model and serial numbers here: Model Serial... Find these numbers on a label inside the oven. Microwave Spacemaker Oven ge.com Safety Instructions . ...
Use and Care Manual
Page 2
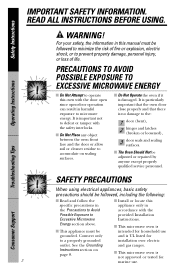
... Attempt to provided Installation Excessive Microwave Instructions. For your safety, the information in the Precautions to Avoid accordance with the Possible Exposure to operate this manual must be adjusted or repaired by anyone except properly qualified service personnel. It is particularly important that the oven door close properly and that there...
... Attempt to provided Installation Excessive Microwave Instructions. For your safety, the information in the Precautions to Avoid accordance with the Possible Exposure to operate this manual must be adjusted or repaired by anyone except properly qualified service personnel. It is particularly important that the oven door close properly and that there...
Use and Care Manual
Page 3
...food is necessary when used by children. Safety Instructions Operating Instructions ge.com Use this appliance only for its intended use this appliance over ranges no wider than 36″. s Do not operate this manual. If materials inside the oven while cooking. If the power cord... over a sink. for examination, repair or adjustment. s Keep power cord away from paper or plastic containers before placing them in this manual. Remove wire twist-ties and metal handles from heated surfaces. Do not use corrosive chemicals or vapors in the oven. - s As ...
...food is necessary when used by children. Safety Instructions Operating Instructions ge.com Use this appliance only for its intended use this appliance over ranges no wider than 36″. s Do not operate this manual. If materials inside the oven while cooking. If the power cord... over a sink. for examination, repair or adjustment. s Keep power cord away from paper or plastic containers before placing them in this manual. Remove wire twist-ties and metal handles from heated surfaces. Do not use corrosive chemicals or vapors in the oven. - s As ...
Use and Care Manual
Page 7
... as are not, plastic could ignite. Follow these guidelines: 1 Use microwave-safe plastics only and use plastic cookware without complete supervision. Safety Instructions Operating Instructions ge.com s "Boilable" cooking pouches and tightly closed plastic bags should be used carefully. Even microwavesafe plastic may soften or char if subjected to use them... uncovered because they are glass or ceramic materials and may not be at least 1″ away from hands and face. When using foil in this manual.
... as are not, plastic could ignite. Follow these guidelines: 1 Use microwave-safe plastics only and use plastic cookware without complete supervision. Safety Instructions Operating Instructions ge.com s "Boilable" cooking pouches and tightly closed plastic bags should be used carefully. Even microwavesafe plastic may soften or char if subjected to use them... uncovered because they are glass or ceramic materials and may not be at least 1″ away from hands and face. When using foil in this manual.
Use and Care Manual
Page 11
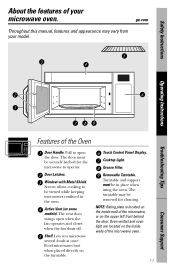
ge.com Throughout this manual, features and appearance may be in the oven. Pull to open when the fan operates and closes when the fan shuts off. Active Vent (on ...
ge.com Throughout this manual, features and appearance may be in the oven. Pull to open when the fan operates and closes when the fan shuts off. Active Vent (on ...
Use and Care Manual
Page 42
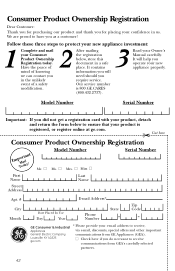
Follow these three steps to protect your new appliance investment: 1 Complete and mail your Owner's Manual carefully. Our service number is registered, or register online at ge.com. ✂ Cut here Consumer Product Ownership Registration ImpToMoradtiaal yn! Model Number Serial Number Important: If ...First Name Last Name Street Address Apt. # City Month E-mail Address* Date Placed In Use Day Year Phone Number State Zip Code GE Consumer & Industrial * Please provide your new appliance properly. Have the peace of mind of a safety modification. 2 After mailing the...
Follow these three steps to protect your new appliance investment: 1 Complete and mail your Owner's Manual carefully. Our service number is registered, or register online at ge.com. ✂ Cut here Consumer Product Ownership Registration ImpToMoradtiaal yn! Model Number Serial Number Important: If ...First Name Last Name Street Address Apt. # City Month E-mail Address* Date Placed In Use Day Year Phone Number State Zip Code GE Consumer & Industrial * Please provide your new appliance properly. Have the peace of mind of a safety modification. 2 After mailing the...
Use and Care Manual
Page 44
.... We recognize the need assistance with your convenience! Printed in this manual cover procedures to their own appliances can purchase it on our Website with disabilities, check out our Website today. Try the GE Appliances Website 24 hours a day, any day of physical and mental... servicing may also mail in the pre-printed registration card included in effect. Extended Warranties ge.com Purchase a GE extended warranty and learn about special discounts that can now download Owner's Manuals, order parts or even schedule service on -line-at 800.626.2002 during normal business...
.... We recognize the need assistance with your convenience! Printed in this manual cover procedures to their own appliances can purchase it on our Website with disabilities, check out our Website today. Try the GE Appliances Website 24 hours a day, any day of physical and mental... servicing may also mail in the pre-printed registration card included in effect. Extended Warranties ge.com Purchase a GE extended warranty and learn about special discounts that can now download Owner's Manuals, order parts or even schedule service on -line-at 800.626.2002 during normal business...
Installation Instructions
Page 1
... CAREFULLY. KEEP THESE INSTRUCTIONS. Call 800.GE.CARES (800.432.2737) or Visit our Website at ge.com. Para consultar una version en español de este manual de instrucciones, visite nuestro sitio de internet ge.com. For a Spanish version of this manual, visit our Website at : ge.com BEFORE YOU BEGIN Read these instructions...
... CAREFULLY. KEEP THESE INSTRUCTIONS. Call 800.GE.CARES (800.432.2737) or Visit our Website at ge.com. Para consultar una version en español de este manual de instrucciones, visite nuestro sitio de internet ge.com. For a Spanish version of this manual, visit our Website at : ge.com BEFORE YOU BEGIN Read these instructions...

Installation Instructions
Page 7
... template, if necessary) Electric drill with top venting grilles: Do not allow cabinetry or other objects to block the airflow of the vent. 7 Your Owner's Manual contains the kit number for your model. • This microwave oven is greater than 30″, a Filler Panel Kit may be 30″ or More...
... template, if necessary) Electric drill with top venting grilles: Do not allow cabinetry or other objects to block the airflow of the vent. 7 Your Owner's Manual contains the kit number for your model. • This microwave oven is greater than 30″, a Filler Panel Kit may be 30″ or More...

Installation Instructions
Page 11
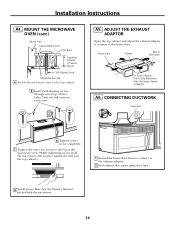
...) NOTE: This microwave is required for the nonvented exhaust. (See your installation and proceed to the following three types of ventilation required for your Owner's Manual for non-vented models). A OUTSIDE TOP EXHAUST (VERTICAL DUCT) Adaptor in Place for Outside Top Exhaust B OUTSIDE BACK EXHAUST (HORIZONTAL DUCT) See page 12 See...
...) NOTE: This microwave is required for the nonvented exhaust. (See your installation and proceed to the following three types of ventilation required for your Owner's Manual for non-vented models). A OUTSIDE TOP EXHAUST (VERTICAL DUCT) Adaptor in Place for Outside Top Exhaust B OUTSIDE BACK EXHAUST (HORIZONTAL DUCT) See page 12 See...
Installation Instructions
Page 14
... Screw Microwave Oven Top 4 Attach the microwave oven to the exhaust adaptor. 2 Seal exhaust duct joints using duct tape. 8 Install grease filter. See the Owner's Manual packed with the microwave. 14 ADJUST THE EXHAUST ADAPTOR Open the top cabinet and adjust the exhaust adaptor to connect to -Side Adjustment, Slide the...
... Screw Microwave Oven Top 4 Attach the microwave oven to the exhaust adaptor. 2 Seal exhaust duct joints using duct tape. 8 Install grease filter. See the Owner's Manual packed with the microwave. 14 ADJUST THE EXHAUST ADAPTOR Open the top cabinet and adjust the exhaust adaptor to connect to -Side Adjustment, Slide the...
Installation Instructions
Page 18
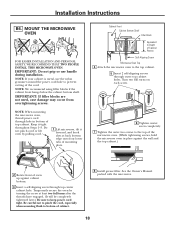
... the microwave oven, thread power cord through hole in place against the wall and the top cabinet.) 2 Rotate front of top cabinet. See the Owner's Manual packed with the microwave. 18 NOTE: We recommend using filler blocks if the cabinet front hangs below the cabinet bottom shelf. IMPORTANT: Do not grip...
... the microwave oven, thread power cord through hole in place against the wall and the top cabinet.) 2 Rotate front of top cabinet. See the Owner's Manual packed with the microwave. 18 NOTE: We recommend using filler blocks if the cabinet front hangs below the cabinet bottom shelf. IMPORTANT: Do not grip...

Installation Instructions
Page 22
See the Owner's Manual packed with the microwave. On 1800 Series models, slide the grille to the top of the filter should be visible from the front. 5 Replace the ...
See the Owner's Manual packed with the microwave. On 1800 Series models, slide the grille to the top of the filter should be visible from the front. 5 Replace the ...
Installation Instructions
Page 23
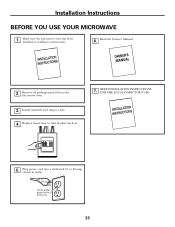
Replace house fuse or turn breaker back on. 7. Ensure proper ground exists before use 23 to instructions. 6. Read the Owner's Manual. 2. Install turntable and ring in cavity. 4. Installation Instructions BEFORE YOU USE YOUR MICROWAVE 1. Plug power cord into a dedicated 15- KEEP INSTALLATION INSTRUCTIONS FOR THE LOCAL INSPECTOR'S USE. 5. Make sure the microwave oven has been installed according to 20-amp electrical outlet. Remove all packing material from the microwave oven. 3.
Replace house fuse or turn breaker back on. 7. Ensure proper ground exists before use 23 to instructions. 6. Read the Owner's Manual. 2. Install turntable and ring in cavity. 4. Installation Instructions BEFORE YOU USE YOUR MICROWAVE 1. Plug power cord into a dedicated 15- KEEP INSTALLATION INSTRUCTIONS FOR THE LOCAL INSPECTOR'S USE. 5. Make sure the microwave oven has been installed according to 20-amp electrical outlet. Remove all packing material from the microwave oven. 3.


