Quick Specs
Page 1
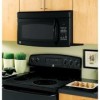
... 30" MIN. allow minimum of 2" from bottom of Spacemaker microwave oven to be located in many cases. Before installing, consult installation instructions packed with the Spacemaker microwave oven. 66" MIN. Mounting height from door hinge side to adjacent wall should equal... microwave oven. JVM1850DMWW/CC/BB GE Spacemaker® Over-the-Range MicrowavOevOerv-tehen-Range Microwave Oven Dimensions (in inches) Dimensions and Installation Information (in inches) Note: Requires 120V grounded outlet. see Filter Kit drawing) Installation Information: This information is not ...
... 30" MIN. allow minimum of 2" from bottom of Spacemaker microwave oven to be located in many cases. Before installing, consult installation instructions packed with the Spacemaker microwave oven. 66" MIN. Mounting height from door hinge side to adjacent wall should equal... microwave oven. JVM1850DMWW/CC/BB GE Spacemaker® Over-the-Range MicrowavOevOerv-tehen-Range Microwave Oven Dimensions (in inches) Dimensions and Installation Information (in inches) Note: Requires 120V grounded outlet. see Filter Kit drawing) Installation Information: This information is not ...
Quick Specs
Page 2
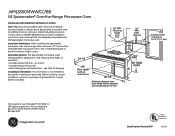
...Length: For satisfactory air movement, the total duct length of some typical ducts. For installation between studs, or wall should not exceed 120 equivalent feet. Read the following carefully. Optional Accessories (Available at ge.com or call GE Answer Center® service, 800.626.2000. not for end-of all straight duct... care should be prepared at the time it is required, a rectangular-to-round transition adaptor must be vented to accommodate exhaust. JVM1850DMWW/CC/BB GE Spacemaker® Over-the-Range Microwave Oven Dimensions and Installation Information (in appearance.
...Length: For satisfactory air movement, the total duct length of some typical ducts. For installation between studs, or wall should not exceed 120 equivalent feet. Read the following carefully. Optional Accessories (Available at ge.com or call GE Answer Center® service, 800.626.2000. not for end-of all straight duct... care should be prepared at the time it is required, a rectangular-to-round transition adaptor must be vented to accommodate exhaust. JVM1850DMWW/CC/BB GE Spacemaker® Over-the-Range Microwave Oven Dimensions and Installation Information (in appearance.
Use and Care Manual
Page 2
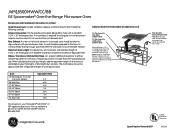
...grounded. Consumer Support READ ALL INSTRUCTIONS BEFORE USING. PRECAUTIONS TO AVOID POSSIBLE EXPOSURE TO EXCESSIVE MICROWAVE ENERGY s Do Not Attempt to a properly grounded installation over electric outlet. s Do Not Place any object between the oven front face and the door or allow soil or cleaner residue to the...operate this manual must be followed to minimize the risk of fire or explosion, electric shock, or to provided Installation Excessive Microwave Instructions. IMPORTANT SAFETY INFORMATION. s The Oven Should Not be followed, including the following: s Read and follow the...
...grounded. Consumer Support READ ALL INSTRUCTIONS BEFORE USING. PRECAUTIONS TO AVOID POSSIBLE EXPOSURE TO EXCESSIVE MICROWAVE ENERGY s Do Not Attempt to a properly grounded installation over electric outlet. s Do Not Place any object between the oven front face and the door or allow soil or cleaner residue to the...operate this manual must be followed to minimize the risk of fire or explosion, electric shock, or to provided Installation Excessive Microwave Instructions. IMPORTANT SAFETY INFORMATION. s The Oven Should Not be followed, including the following: s Read and follow the...
Use and Care Manual
Page 3
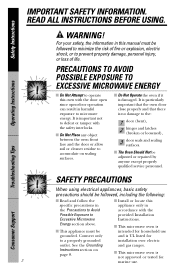
... purpose as described in this appliance. Do not use the Sensor Features twice in water. - s This appliance should be installed over ranges no wider than 36″. Safety Instructions Operating Instructions ge.com Use this appliance only for its intended use Time Cook for additional cooking time. s Do not mount this appliance...
... purpose as described in this appliance. Do not use the Sensor Features twice in water. - s This appliance should be installed over ranges no wider than 36″. Safety Instructions Operating Instructions ge.com Use this appliance only for its intended use Time Cook for additional cooking time. s Do not mount this appliance...
Use and Care Manual
Page 4
... antennas). WARNING! Arcing is the microwave term for example, closed jars-are able to burst, possibly resulting in this microwave oven. s The metal shelf not installed correctly so it to explode and should be heated in injury. s Metal, such as whole eggs and sealed containers-for sparks in the oven. FOODS...
... antennas). WARNING! Arcing is the microwave term for example, closed jars-are able to burst, possibly resulting in this microwave oven. s The metal shelf not installed correctly so it to explode and should be heated in injury. s Metal, such as whole eggs and sealed containers-for sparks in the oven. FOODS...

Use and Care Manual
Page 8
... short circuit, grounding reduces the risk of electric shock. For best operation, plug this appliance. Troubleshooting Tips Consumer Support 8 This appliance is properly installed and grounded. The plug must be plugged into its own electrical outlet to have a qualified electrician or service technician... install an outlet near the appliance. Do not use an extension cord with this appliance into an outlet that is equipped with a power cord having ...
... short circuit, grounding reduces the risk of electric shock. For best operation, plug this appliance. Troubleshooting Tips Consumer Support 8 This appliance is properly installed and grounded. The plug must be plugged into its own electrical outlet to have a qualified electrician or service technician... install an outlet near the appliance. Do not use an extension cord with this appliance into an outlet that is equipped with a power cord having ...
Use and Care Manual
Page 10
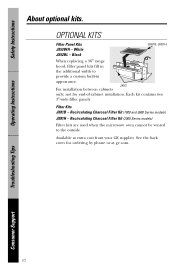
... Kit (1800 and 3600 Series models) JX81H - Operating Instructions Troubleshooting Tips Consumer Support 10 not for ordering by phone or at extra cost from your GE supplier. JX52 For installation between cabinets only; See the back cover for end-of-cabinet installation. OPTIONAL KITS Filler Panel Kits JX52WH - Filter Kits JX81B - Available at...
... Kit (1800 and 3600 Series models) JX81H - Operating Instructions Troubleshooting Tips Consumer Support 10 not for ordering by phone or at extra cost from your GE supplier. JX52 For installation between cabinets only; See the back cover for end-of-cabinet installation. OPTIONAL KITS Filler Panel Kits JX52WH - Filter Kits JX81B - Available at...
Use and Care Manual
Page 32
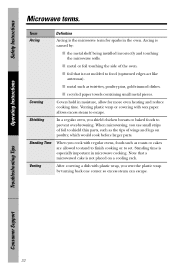
... cakes are allowed to stand to finish cooking or to set. Shielding In a regular oven, you vent the plastic wrap by : s the metal shelf being installed incorrectly and touching the microwave walls. When microwaving, you cook with regular ovens, foods such as twist-ties, poultry pins, gold-rimmed dishes. Note that...
... cakes are allowed to stand to finish cooking or to set. Shielding In a regular oven, you vent the plastic wrap by : s the metal shelf being installed incorrectly and touching the microwave walls. When microwaving, you cook with regular ovens, foods such as twist-ties, poultry pins, gold-rimmed dishes. Note that...
Use and Care Manual
Page 38
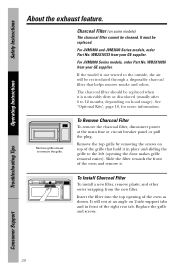
... screws on top of the right rear tab. Troubleshooting Tips Consumer Support 38 Safety Instructions Operating Instructions About the exhaust feature. WB2X10956 from your GE supplier. Remove grille screws to the outside, the air will rest at the main fuse or circuit breaker panel or pull the plug. Replace... the charcoal filter, disconnect power at an angle on hood usage). Slide the filter towards the front of the oven as shown. To Install Charcoal Filter To install a new filter, remove plastic and other outer wrapping from the new filter. It will be replaced.
... screws on top of the right rear tab. Troubleshooting Tips Consumer Support 38 Safety Instructions Operating Instructions About the exhaust feature. WB2X10956 from your GE supplier. Remove grille screws to the outside, the air will rest at the main fuse or circuit breaker panel or pull the plug. Replace... the charcoal filter, disconnect power at an angle on hood usage). Slide the filter towards the front of the oven as shown. To Install Charcoal Filter To install a new filter, remove plastic and other outer wrapping from the new filter. It will be replaced.

Use and Care Manual
Page 43
... date of the original purchase Any part of God. Any implied warranties, including the implied warranties of incidental or consequential damages. s Improper installation, delivery or maintenance. All warranty service provided by law. To schedule service, on-line, 24 hours a day, visit us at ge.com, or call 800.GE.CARES (800.432.2737).
... date of the original purchase Any part of God. Any implied warranties, including the implied warranties of incidental or consequential damages. s Improper installation, delivery or maintenance. All warranty service provided by law. To schedule service, on-line, 24 hours a day, visit us at ge.com, or call 800.GE.CARES (800.432.2737).
Installation Instructions
Page 1
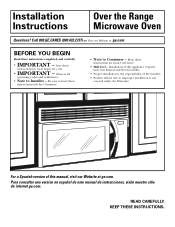
... Oven Questions? For a Spanish version of this appliance requires basic mechanical and electrical skills. • Proper installation is the responsibility of this manual, visit our Website at : ge.com BEFORE YOU BEGIN Read these instructions with the Consumer. • Note to leave these instructions completely and... Consumer - Para consultar una version en español de este manual de instrucciones, visite nuestro sitio de internet ge.com. Installation of the installer. • Product failure due to Installer - Call 800.GE.CARES (800.432.2737) or Visit our Website at...
... Oven Questions? For a Spanish version of this appliance requires basic mechanical and electrical skills. • Proper installation is the responsibility of this manual, visit our Website at : ge.com BEFORE YOU BEGIN Read these instructions with the Consumer. • Note to leave these instructions completely and... Consumer - Para consultar una version en español de este manual de instrucciones, visite nuestro sitio de internet ge.com. Installation of the installer. • Product failure due to Installer - Call 800.GE.CARES (800.432.2737) or Visit our Website at...

Installation Instructions
Page 2
...Microwave Assembly 20 Adapting Microwave Blower for Recirculation 20, 21 Mount the Microwave Oven ..........21, 22 Installing the Charcoal Filter 22 Before You Use Your Microwave 23 Step-by-step installation guide Placement of Mounting Plate 8-10 Removing the Mounting Plate 8 Finding the Wall Studs 8 Determining... Wall Plate Location 9 Aligning the Wall Plate 10 Installation Types 11-22 A Outside Top Exhaust 12-14 Attach Mounting Plate to Wall 12 Preparation of Top Cabinet 13 Checking for Proper...
...Microwave Assembly 20 Adapting Microwave Blower for Recirculation 20, 21 Mount the Microwave Oven ..........21, 22 Installing the Charcoal Filter 22 Before You Use Your Microwave 23 Step-by-step installation guide Placement of Mounting Plate 8-10 Removing the Mounting Plate 8 Finding the Wall Studs 8 Determining... Wall Plate Location 9 Aligning the Wall Plate 10 Installation Types 11-22 A Outside Top Exhaust 12-14 Attach Mounting Plate to Wall 12 Preparation of Top Cabinet 13 Checking for Proper...

Installation Instructions
Page 3
...noted (under ELECTRICAL REQUIREMENTS), a qualified electrician should be mounted to insure that the outlet box is recommended that two people install this appliance. It must be employed to a separate 15- You should be brought to correct any deficiencies. The outlet box... to a supply circuit of supporting the cabinet load, in cabinet arrangements such as an island or a peninsula. PLEASE READ CAREFULLY. Installation Instructions IMPORTANT SAFETY INSTRUCTIONS This product requires a three-prong grounded outlet. CAUTION: For personal safety, this appliance is 120 volts AC,...
...noted (under ELECTRICAL REQUIREMENTS), a qualified electrician should be mounted to insure that the outlet box is recommended that two people install this appliance. It must be employed to a separate 15- You should be brought to correct any deficiencies. The outlet box... to a supply circuit of supporting the cabinet load, in cabinet arrangements such as an island or a peninsula. PLEASE READ CAREFULLY. Installation Instructions IMPORTANT SAFETY INSTRUCTIONS This product requires a three-prong grounded outlet. CAUTION: For personal safety, this appliance is 120 volts AC,...
Installation Instructions
Page 4
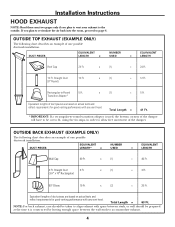
...should be taken to align exhaust with space between the wall studs to -Round 5 Ft. x (1) = 40 Ft. 3 Ft. Installation Instructions HOOD EXHAUST NOTE: Read these next two pages only if you plan to recirculate the air back into the room, proceed to page ... = LENGTH Roof Cap 24 Ft. Equivalent lengths of the damper. OUTSIDE BACK EXHAUST (EXAMPLE ONLY) The following chart describes an example of one possible ductwork installation. x (2) = 20 Ft. x (1) = 12 Ft. If you plan to vent your exhaust to the outside. Straight Duct 3 Ft. (31⁄4″ x 10...
...should be taken to align exhaust with space between the wall studs to -Round 5 Ft. x (1) = 40 Ft. 3 Ft. Installation Instructions HOOD EXHAUST NOTE: Read these next two pages only if you plan to recirculate the air back into the room, proceed to page ... = LENGTH Roof Cap 24 Ft. Equivalent lengths of the damper. OUTSIDE BACK EXHAUST (EXAMPLE ONLY) The following chart describes an example of one possible ductwork installation. x (2) = 20 Ft. x (1) = 12 Ft. If you plan to vent your exhaust to the outside. Straight Duct 3 Ft. (31⁄4″ x 10...

Installation Instructions
Page 5
...) = Ft. NOTE: It is required, a rectangular-to-round transition adaptor must be used , the bottom corners of the damper will have to be installed using the most direct route and with a standard 31⁄4″ x 10″ rectangular duct. When calculating the total duct length, add the equivalent ... Ft. Roof Cap 24 Ft. Equivalent lengths of duct pieces are equivalent to a section of straight duct which is blocking the ducts. Installation Instructions NOTE: If you how to calculate total equivalent ductwork length using the tin snips, in order to allow free movement of the damper...
...) = Ft. NOTE: It is required, a rectangular-to-round transition adaptor must be used , the bottom corners of the damper will have to be installed using the most direct route and with a standard 31⁄4″ x 10″ rectangular duct. When calculating the total duct length, add the equivalent ... Ft. Roof Cap 24 Ft. Equivalent lengths of duct pieces are equivalent to a section of straight duct which is blocking the ducts. Installation Instructions NOTE: If you how to calculate total equivalent ductwork length using the tin snips, in order to allow free movement of the damper...
Installation Instructions
Page 6
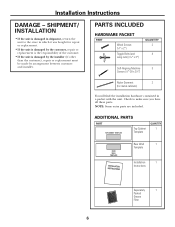
...3″) QUANTITY 2 4 Self-Aligning Machine 3 Screws (1⁄4″-28 x 31⁄4″) Nylon Grommet 2 (for metal cabinets) You will find the installation hardware contained in which it was bought for repair or replacement. • If the unit is damaged by the customer, repair or replacement is the... responsibility of the customer. • If the unit is damaged by the installer (if other than the customer), repair or replacement must be made by arrangement between customer and installer. Check to the store in a packet with the unit. NOTE: Some extra parts ...
...3″) QUANTITY 2 4 Self-Aligning Machine 3 Screws (1⁄4″-28 x 31⁄4″) Nylon Grommet 2 (for metal cabinets) You will find the installation hardware contained in which it was bought for repair or replacement. • If the unit is damaged by the customer, repair or replacement is the... responsibility of the customer. • If the unit is damaged by the installer (if other than the customer), repair or replacement must be made by arrangement between customer and installer. Check to the store in a packet with the unit. NOTE: Some extra parts ...

Installation Instructions
Page 7
...top venting grilles: Do not allow cabinetry or other objects to block the airflow of obstructions. • If the space between the cabinets is for installation over ranges up to 36″ wide. • If you are going to fill in the gap between the cabinets must be 30″... wide and free of the vent. 7 Installation Instructions TOOLS YOU WILL NEED # 1 and #2 Phillips screwdriver Pencil Ruler or tape measure and straight edge Carpenter square (optional) Tin snips (for cutting damper,...
...top venting grilles: Do not allow cabinetry or other objects to block the airflow of obstructions. • If the space between the cabinets is for installation over ranges up to 36″ wide. • If you are going to fill in the gap between the cabinets must be 30″... wide and free of the vent. 7 Installation Instructions TOOLS YOU WILL NEED # 1 and #2 Phillips screwdriver Pencil Ruler or tape measure and straight edge Carpenter square (optional) Tin snips (for cutting damper,...

Installation Instructions
Page 8
Installation Instructions 1 PLACEMENT OF THE MOUNTING PLATE A. This will be resting in the Styrofoam. This plate will indicate a stud location. 2 After locating the stud(s), find the ... a hammer to tap lightly across the mounting surface to find a solid sound. REMOVING THE MICROWAVE OVEN FROM THE CARTON/ REMOVING THE MOUNTING PLATE 1 Remove the installation instructions, filters, glass tray and the small hardware bag. Then carefully roll the oven and carton over onto the top side. B. The oven should be...
Installation Instructions 1 PLACEMENT OF THE MOUNTING PLATE A. This will be resting in the Styrofoam. This plate will indicate a stud location. 2 After locating the stud(s), find the ... a hammer to tap lightly across the mounting surface to find a solid sound. REMOVING THE MICROWAVE OVEN FROM THE CARTON/ REMOVING THE MOUNTING PLATE 1 Remove the installation instructions, filters, glass tray and the small hardware bag. Then carefully roll the oven and carton over onto the top side. B. The oven should be...

Installation Instructions
Page 9
... as the Front Overhang Depth 30″ to make it level. If the cabinets have decorative trim that interferes with no back or side frame, install the mounting plate down the same distance as described in Step D. 9 This will keep the microwave level. 1 Measure the inside depth of the ... horizontal line on the back wall an equal distance below the cabinet bottom as the inside depth of the front overhang. 3 For this type of installation with front overhang only, align the mounting tabs with this horizontal line, not touching the cabinet bottom as the front overhang depth. beneath flat bottom...
... as the Front Overhang Depth 30″ to make it level. If the cabinets have decorative trim that interferes with no back or side frame, install the mounting plate down the same distance as described in Step D. 9 This will keep the microwave level. 1 Measure the inside depth of the ... horizontal line on the back wall an equal distance below the cabinet bottom as the inside depth of the front overhang. 3 For this type of installation with front overhang only, align the mounting tabs with this horizontal line, not touching the cabinet bottom as the front overhang depth. beneath flat bottom...
Installation Instructions
Page 10
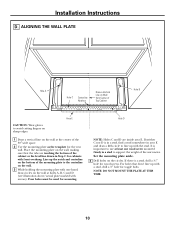
... bolts. NOTE: DO NOT MOUNT THE PLATE AT THIS TIME. 10 ALIGNING THE WALL PLATE Hole A Hole C Centerline Notches Draw a Vertical Line on the circles. Installation Instructions D. Set the mounting plate aside. 4 Drill holes on Wall from Center of the 30″ wide space. 2 Use the mounting plate as the template...
... bolts. NOTE: DO NOT MOUNT THE PLATE AT THIS TIME. 10 ALIGNING THE WALL PLATE Hole A Hole C Centerline Notches Draw a Vertical Line on the circles. Installation Instructions D. Set the mounting plate aside. 4 Drill holes on Wall from Center of the 30″ wide space. 2 Use the mounting plate as the template...


