Installation Instructions
Page 1
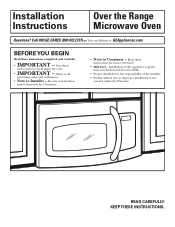
... for local inspector's use. • IMPORTANT - Be sure to Consumer - KEEP THESE INSTRUCTIONS. Installation of the installer. • Product failure due to Installer - Call 800.GE.CARES (800.432.2737) or Visit our Website at: GEAppliances.com BEFORE YOU BEGIN Read these instructions with the Consumer. • Note to leave these... the responsibility of this appliance requires basic mechanical and electrical skills. • Proper installation is not covered under the Warranty. Installation Instructions Over the Range Microwave Oven Questions?
... for local inspector's use. • IMPORTANT - Be sure to Consumer - KEEP THESE INSTRUCTIONS. Installation of the installer. • Product failure due to Installer - Call 800.GE.CARES (800.432.2737) or Visit our Website at: GEAppliances.com BEFORE YOU BEGIN Read these instructions with the Consumer. • Note to leave these... the responsibility of this appliance requires basic mechanical and electrical skills. • Proper installation is not covered under the Warranty. Installation Instructions Over the Range Microwave Oven Questions?
Installation Instructions
Page 2
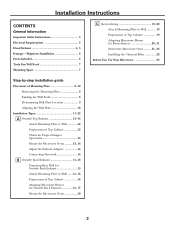
...19-22 Attach Mounting Plate to Wall 19 Preparation of Top Cabinet 19 Adapting Microwave Blower for Recirculation 20, 21 Mount the Microwave Oven ..........21, 22 Installing the Charcoal Filter 22 Before You Use Your Microwave 23 Step-by-step installation guide Placement of Mounting Plate 8-10 Removing the ...Top Exhaust 12-14 Attach Mounting Plate to Wall 12 Preparation of Top Cabinet 13 Check for Proper Damper Operation 13 Mount the Microwave Oven ..........13, 14 Adjust the Exhaust Adaptor 14 Connecting Ductwork 14 B Outside Back Exhaust 15-18 Preparing Rear Wall for Outside Back...
...19-22 Attach Mounting Plate to Wall 19 Preparation of Top Cabinet 19 Adapting Microwave Blower for Recirculation 20, 21 Mount the Microwave Oven ..........21, 22 Installing the Charcoal Filter 22 Before You Use Your Microwave 23 Step-by-step installation guide Placement of Mounting Plate 8-10 Removing the ...Top Exhaust 12-14 Attach Mounting Plate to Wall 12 Preparation of Top Cabinet 13 Check for Proper Damper Operation 13 Mount the Microwave Oven ..........13, 14 Adjust the Exhaust Adaptor 14 Connecting Ductwork 14 B Outside Back Exhaust 15-18 Preparing Rear Wall for Outside Back...

Installation Instructions
Page 3
...as an island or a peninsula. CAUTION: For personal safety, this product cannot be capable of supporting the cabinet load, in the cabinet above the microwave oven. This product must be mounted to BOTH a top cabinet AND a wall. The outlet box should be located in addition to the added weight of... this microwave oven. 3 Ensure proper ground exists before beginning installation to avoid severe or fatal shock injury. Do not use The power cord of this appliance. ...
...as an island or a peninsula. CAUTION: For personal safety, this product cannot be capable of supporting the cabinet load, in the cabinet above the microwave oven. This product must be mounted to BOTH a top cabinet AND a wall. The outlet box should be located in addition to the added weight of... this microwave oven. 3 Ensure proper ground exists before beginning installation to avoid severe or fatal shock injury. Do not use The power cord of this appliance. ...
Installation Instructions
Page 7
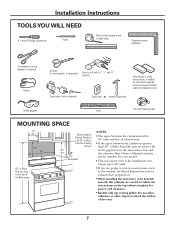
... ranges up to 36″ wide. • If you are going to vent your microwave oven to the outside, see Hood Exhaust Section for exhaust duct preparation. • When installing the microwave oven beneath smooth, flat cabinets, be careful to follow the instructions on the top cabinet template ...not allow cabinetry or other objects to the Top of the Microwave Bottom Edge of obstructions. • If the space between the microwave oven and the cabinets. Your Owner's Manual contains the kit number for your model. • This microwave oven is greater than 30″, a Filler Panel Kit may ...
... ranges up to 36″ wide. • If you are going to vent your microwave oven to the outside, see Hood Exhaust Section for exhaust duct preparation. • When installing the microwave oven beneath smooth, flat cabinets, be careful to follow the instructions on the top cabinet template ...not allow cabinetry or other objects to the Top of the Microwave Bottom Edge of obstructions. • If the space between the microwave oven and the cabinets. Your Owner's Manual contains the kit number for your model. • This microwave oven is greater than 30″, a Filler Panel Kit may ...

Installation Instructions
Page 8
.... 2 After locating the stud(s), find the center by probing the wall with a small nail to find the edges of the oven. 2 Fold back all 4 carton flaps fully against carton sides. REMOVING THE MICROWAVE OVEN FROM THE CARTON/ REMOVING THE MOUNTING PLATE 1 Remove the installation instructions, filters, glass tray and the small hardware bag...
.... 2 After locating the stud(s), find the center by probing the wall with a small nail to find the edges of the oven. 2 Fold back all 4 carton flaps fully against carton sides. REMOVING THE MICROWAVE OVEN FROM THE CARTON/ REMOVING THE MOUNTING PLATE 1 Remove the installation instructions, filters, glass tray and the small hardware bag...
Installation Instructions
Page 11
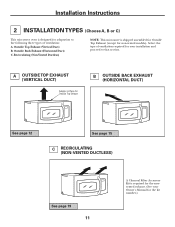
... page 19 11 A Charcoal Filter Accessory Kit is required for the kit number.) Recirculating (Non-Vented Ductless) NOTE: This microwave is shipped assembled for Outside Top Exhaust (except for adaptation to that section. Outside Back Exhaust (Horizontal Duct) C. Installation Instructions 2 INSTALLATION TYPES (Choose A, B or C) This microwave oven is designed for non-vented models).
... page 19 11 A Charcoal Filter Accessory Kit is required for the kit number.) Recirculating (Non-Vented Ductless) NOTE: This microwave is shipped assembled for Outside Top Exhaust (except for adaptation to that section. Outside Back Exhaust (Horizontal Duct) C. Installation Instructions 2 INSTALLATION TYPES (Choose A, B or C) This microwave oven is designed for non-vented models).

Installation Instructions
Page 12
...; onto each bolt. 12 Wall Bolt End 3 Place the mounting plate against the wall and that the plate is properly centered under the cabinet. Mount Microwave Oven A5. Pull the plate away from the bolts. 2 Insert the bolts into the mounting plate through the holes designated to go into drywall and reattach...
...; onto each bolt. 12 Wall Bolt End 3 Place the mounting plate against the wall and that the plate is properly centered under the cabinet. Mount Microwave Oven A5. Pull the plate away from the bolts. 2 Insert the bolts into the mounting plate through the holes designated to go into drywall and reattach...
Installation Instructions
Page 13
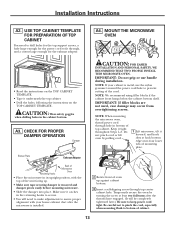
... position, with your cabinet is metal, use handle during installation. Blower Plate Exhaust Adaptor Retaining Hooks Back of top cabinet. MOUNT THE MICROWAVE OVEN • Read the instructions on the TOP CABINET TEMPLATE. NOTE: We recommend using filler blocks if the cabinet front hangs below the...(It will need to drill holes for the top support screws, a hole large enough for the exhaust adaptor. NOTE: When mounting the microwave oven, thread power cord through hole in the retaining hooks to secure. • You will be completely tightened later.) Be sure to prevent ...
... position, with your cabinet is metal, use handle during installation. Blower Plate Exhaust Adaptor Retaining Hooks Back of top cabinet. MOUNT THE MICROWAVE OVEN • Read the instructions on the TOP CABINET TEMPLATE. NOTE: We recommend using filler blocks if the cabinet front hangs below the...(It will need to drill holes for the top support screws, a hole large enough for the exhaust adaptor. NOTE: When mounting the microwave oven, thread power cord through hole in the retaining hooks to secure. • You will be completely tightened later.) Be sure to prevent ...

Installation Instructions
Page 14
... completely. 7 Tighten the outer two screws to the top of Microwave Oven For Side-to the exhaust adaptor. 2 Seal exhaust duct joints using duct tape. 8 Install grease filter. MOUNT THE MICROWAVE OVEN (cont.) Cabinet Front Cabinet Bottom Shelf Filler Block Equivalent to Depth... of Cabinet Recess Self-Aligning Screw Microwave Oven Top 4 Attach the microwave oven to the house duct. Installation Instructions A4. Turn two full turns ...
... completely. 7 Tighten the outer two screws to the top of Microwave Oven For Side-to the exhaust adaptor. 2 Seal exhaust duct joints using duct tape. 8 Install grease filter. MOUNT THE MICROWAVE OVEN (cont.) Cabinet Front Cabinet Bottom Shelf Filler Block Equivalent to Depth... of Cabinet Recess Self-Aligning Screw Microwave Oven Top 4 Attach the microwave oven to the house duct. Installation Instructions A4. Turn two full turns ...
Installation Instructions
Page 15
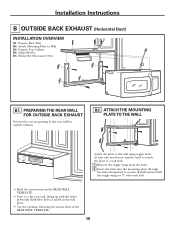
.... Prepare Top Cabinet B4. Attach Mounting Plate to the wall using toggle bolts. Installation Instructions B OUTSIDE BACK EXHAUST (Horizontal Duct) INSTALLATION OVERVIEW B1. Mount the Microwave Oven B1. Prepare Rear Wall B2.
.... Prepare Top Cabinet B4. Attach Mounting Plate to the wall using toggle bolts. Installation Instructions B OUTSIDE BACK EXHAUST (Horizontal Duct) INSTALLATION OVERVIEW B1. Mount the Microwave Oven B1. Prepare Rear Wall B2.
Installation Instructions
Page 16
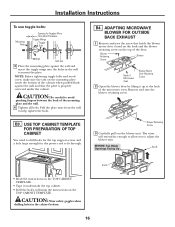
... careful to help tighten the bolts. Blower Retaining Screw Blower Back of Microwave Oven Blower Motor Door Retaining Screw 2 Open the blower door by lifting it... away from the wall to avoid pinching fingers between the back of the door. B3. B4. ADAPTING MICROWAVE BLOWER FOR OUTSIDE BACK EXHAUST 1 Remove and save the blower retaining screw. The wires will extend far enough... door closed on the back and the blower retaining screw on the mounting plate touch the bottom of the microwave oven. BEFORE: Fan Blade Openings Facing Up End B End A • Read the instructions on the TOP ...
... careful to help tighten the bolts. Blower Retaining Screw Blower Back of Microwave Oven Blower Motor Door Retaining Screw 2 Open the blower door by lifting it... away from the wall to avoid pinching fingers between the back of the door. B3. B4. ADAPTING MICROWAVE BLOWER FOR OUTSIDE BACK EXHAUST 1 Remove and save the blower retaining screw. The wires will extend far enough... door closed on the back and the blower retaining screw on the mounting plate touch the bottom of the microwave oven. BEFORE: Fan Blade Openings Facing Up End B End A • Read the instructions on the TOP ...

Installation Instructions
Page 17
...Side 6 Roll the blower unit 90° so that fan blade openings are not pinched. Blower Retaining Screw Back of the microwave oven, securing it into the lower locking tabs. Installation Instructions B4. Reroute the wires through the adaptor and the blower door and... 7 Place the blower unit back into the back of the microwave. Before Rolling After Rolling Back of Microwave Oven Back of Microwave Oven Back of Microwave Oven Blower Retaining Screw 9 Slide the exhaust adaptor onto the back of Microwave Oven Guide Adaptor Locking Tabs (not shown) Guide Blower Motor Door ...
...Side 6 Roll the blower unit 90° so that fan blade openings are not pinched. Blower Retaining Screw Back of the microwave oven, securing it into the lower locking tabs. Installation Instructions B4. Reroute the wires through the adaptor and the blower door and... 7 Place the blower unit back into the back of the microwave. Before Rolling After Rolling Back of Microwave Oven Back of Microwave Oven Back of Microwave Oven Blower Retaining Screw 9 Slide the exhaust adaptor onto the back of Microwave Oven Guide Adaptor Locking Tabs (not shown) Guide Blower Motor Door ...

Installation Instructions
Page 18
...of mounting plate. Be careful not to pinch the cord, especially when mounting flush to the top of the microwave oven. (While tightening screws, hold the microwave oven in bottom of the cord. IMPORTANT: If filler blocks are not used, case damage may occur from overtightening ... Depth of Cabinet Recess Self-Aligning Screw Microwave Oven Top 4 Attach the microwave oven to prevent cutting of top cabinet. Temporarily secure the oven by pulling cord. 1 Lift microwave, tilt it tight throughout Steps 1-3. See the Owner's Manual packed with the microwave. 18 IMPORTANT: Do not grip or ...
...of mounting plate. Be careful not to pinch the cord, especially when mounting flush to the top of the microwave oven. (While tightening screws, hold the microwave oven in bottom of the cord. IMPORTANT: If filler blocks are not used, case damage may occur from overtightening ... Depth of Cabinet Recess Self-Aligning Screw Microwave Oven Top 4 Attach the microwave oven to prevent cutting of top cabinet. Temporarily secure the oven by pulling cord. 1 Lift microwave, tilt it tight throughout Steps 1-3. See the Owner's Manual packed with the microwave. 18 IMPORTANT: Do not grip or ...

Installation Instructions
Page 19
Mount the Microwave Oven C5. ATTACH THE MOUNTING PLATE TO THE WALL Attach the plate to avoid pinching fingers between the back of the cabinet when pushed flush against ...
Mount the Microwave Oven C5. ATTACH THE MOUNTING PLATE TO THE WALL Attach the plate to avoid pinching fingers between the back of the cabinet when pushed flush against ...

Installation Instructions
Page 20
... adjust the blower unit. AFTER: Fan Blade Openings Facing Forward NOTE: Make sure wires remain routed in the grooves of the microwave oven. Remove and save the screw that fan blade openings are facing toward the front of the door. Blower Retaining Screw Blower Back of... Microwave Oven Blower Motor Door Retaining Screw 2 Open the blower door by lifting it up at the back of the motor frame. 20 Installation Instructions C3. ADAPTING MICROWAVE BLOWER FOR RECIRCULATION 1 Remove and save the blower retaining screw. ...
... adjust the blower unit. AFTER: Fan Blade Openings Facing Forward NOTE: Make sure wires remain routed in the grooves of the microwave oven. Remove and save the screw that fan blade openings are facing toward the front of the door. Blower Retaining Screw Blower Back of... Microwave Oven Blower Motor Door Retaining Screw 2 Open the blower door by lifting it up at the back of the motor frame. 20 Installation Instructions C3. ADAPTING MICROWAVE BLOWER FOR RECIRCULATION 1 Remove and save the blower retaining screw. ...

Installation Instructions
Page 21
...PERSONAL SAFETY, WE RECOMMEND THAT TWO PEOPLE INSTALL THIS MICROWAVE OVEN. NOTE: We recommend using the retaining screws from overtightening screws. Do not pinch cord or lift oven by pulling cord. 1 Lift microwave, tilt it tight throughout Steps 1-3. ADAPTING MICROWAVE BLOWER FOR RECIRCULATION (cont.) 5 Place the blower ... may occur from Steps 1 and 2. IMPORTANT: Do not grip or use the nylon grommet around the power cord hole to the microwave oven using filler blocks if the cabinet front hangs below the cabinet bottom shelf. NOTE: If your cabinet is metal, use handle during ...
...PERSONAL SAFETY, WE RECOMMEND THAT TWO PEOPLE INSTALL THIS MICROWAVE OVEN. NOTE: We recommend using the retaining screws from overtightening screws. Do not pinch cord or lift oven by pulling cord. 1 Lift microwave, tilt it tight throughout Steps 1-3. ADAPTING MICROWAVE BLOWER FOR RECIRCULATION (cont.) 5 Place the blower ... may occur from Steps 1 and 2. IMPORTANT: Do not grip or use the nylon grommet around the power cord hole to the microwave oven using filler blocks if the cabinet front hangs below the cabinet bottom shelf. NOTE: If your cabinet is metal, use handle during ...

Installation Instructions
Page 22
...two full turns after the threads have engaged. (It will be completely tightened later.) Be sure to bottom of the microwave oven. (While tightening screws, hold the microwave oven in place against the wall and the top cabinet.) Insert mesh-side up 6 Close the door. 8 Install grease ...wire mesh of the locking tabs. Cabinet Front Cabinet Bottom Shelf Filler Block Equivalent to Depth of Cabinet Recess Self-Aligning Screw Microwave Oven Top 4 Attach the microwave oven to the top of cabinet. Installation Instructions C4. C5. INSTALLING THE CHARCOAL FILTER 1 Remove the 3 screws that secure the...
...two full turns after the threads have engaged. (It will be completely tightened later.) Be sure to bottom of the microwave oven. (While tightening screws, hold the microwave oven in place against the wall and the top cabinet.) Insert mesh-side up 6 Close the door. 8 Install grease ...wire mesh of the locking tabs. Cabinet Front Cabinet Bottom Shelf Filler Block Equivalent to Depth of Cabinet Recess Self-Aligning Screw Microwave Oven Top 4 Attach the microwave oven to the top of cabinet. Installation Instructions C4. C5. INSTALLING THE CHARCOAL FILTER 1 Remove the 3 screws that secure the...

Installation Instructions
Page 23
Remove all packing material from the microwave oven. 3. to instructions. 6. Ensure proper ground exists before use 23 Plug power cord into a dedicated 15- Installation Instructions BEFORE YOU USE YOUR MICROWAVE 1. Replace house fuse or turn breaker back on. 7. Install turntable and ring in cavity. 4. KEEP INSTALLATION INSTRUCTIONS FOR THE LOCAL INSPECTOR'S USE. 5. Read the Owner's Manual. 2. Make sure the microwave oven has been installed according to 20-amp electrical outlet.
Remove all packing material from the microwave oven. 3. to instructions. 6. Ensure proper ground exists before use 23 Plug power cord into a dedicated 15- Installation Instructions BEFORE YOU USE YOUR MICROWAVE 1. Replace house fuse or turn breaker back on. 7. Install turntable and ring in cavity. 4. KEEP INSTALLATION INSTRUCTIONS FOR THE LOCAL INSPECTOR'S USE. 5. Read the Owner's Manual. 2. Make sure the microwave oven has been installed according to 20-amp electrical outlet.
Quick Specs
Page 1
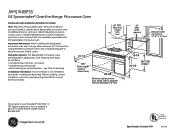
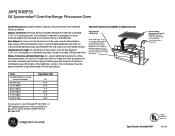
...(vertical - Important Information: When installing the Spacemaker microwave oven over a range, allow for adaptation to your Monogram,® GE Profile™ or GE® appliance questions, visit our website at ge.com or call GE Answer Center® service, 800.626.2000. ...current dimensional data. 66" MIN. Before installing, consult installation instructions packed with the Spacemaker microwave oven. JVM1740SPSS Over-the-Range Microwave Oven GE Spacemaker® Over-the-Range MicrowavDeimOevnesnions (in inches) Dimensions and Installation Information (in inches) Note: Requires...
...(vertical - Important Information: When installing the Spacemaker microwave oven over a range, allow for adaptation to your Monogram,® GE Profile™ or GE® appliance questions, visit our website at ge.com or call GE Answer Center® service, 800.626.2000. ...current dimensional data. 66" MIN. Before installing, consult installation instructions packed with the Spacemaker microwave oven. JVM1740SPSS Over-the-Range Microwave Oven GE Spacemaker® Over-the-Range MicrowavDeimOevnesnions (in inches) Dimensions and Installation Information (in inches) Note: Requires...
Quick Specs
Page 2
... be used , care should be prepared at the time it is constructed by Underwriters Laboratories Specification Created 4/09 340148 JVM1740SPSS GE Spacemaker® Over-the-Range Microwave Oven Hood Exhaust Duct: Outside ventilation requires a HOOD EXHAUST DUCT. Read the following carefully. not for end-of some ...to mate with space between cabinets only; Exhaust Connection: The hood exhaust has been designed to your Monogram,® GE Profile™ or GE® appliance questions, visit our website at additional cost) Filler Panel Kits JX48BL-Black When replacing a 36" or 42...
... be used , care should be prepared at the time it is constructed by Underwriters Laboratories Specification Created 4/09 340148 JVM1740SPSS GE Spacemaker® Over-the-Range Microwave Oven Hood Exhaust Duct: Outside ventilation requires a HOOD EXHAUST DUCT. Read the following carefully. not for end-of some ...to mate with space between cabinets only; Exhaust Connection: The hood exhaust has been designed to your Monogram,® GE Profile™ or GE® appliance questions, visit our website at additional cost) Filler Panel Kits JX48BL-Black When replacing a 36" or 42...


