Installation Instructions
Page 2
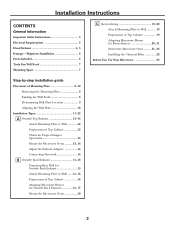
Installation Instructions CONTENTS General information Important Safety Instructions 3 Electrical Requirements 3 Hood Exhaust 4, 5 Damage - Shipment/Installation 6 Parts Included 6 Tools You Will Need 7 Mounting Space 7 C Recirculating 19-22 Attach Mounting Plate to Wall 19 Preparation of Top Cabinet 19 Adapting Microwave Blower for Recirculation 20, 21 Mount the Microwave Oven ..........21, 22 Installing the Charcoal Filter 22 Before You Use Your Microwave 23 Step-by-step installation guide Placement of Mounting Plate 8-10 Removing the Mounting Plate 8 Finding the Wall ...
Installation Instructions CONTENTS General information Important Safety Instructions 3 Electrical Requirements 3 Hood Exhaust 4, 5 Damage - Shipment/Installation 6 Parts Included 6 Tools You Will Need 7 Mounting Space 7 C Recirculating 19-22 Attach Mounting Plate to Wall 19 Preparation of Top Cabinet 19 Adapting Microwave Blower for Recirculation 20, 21 Mount the Microwave Oven ..........21, 22 Installing the Charcoal Filter 22 Before You Use Your Microwave 23 Step-by-step installation guide Placement of Mounting Plate 8-10 Removing the Mounting Plate 8 Finding the Wall ...

Installation Instructions
Page 3
... be located in the cabinet above the microwave oven. The power supply cord and plug should be mounted to a supply circuit of Electric Shock. Ensure proper ground exists before beginning installation to avoid severe or fatal shock. WARNING: Risk of the proper voltage and frequency. Can cause injury or death: Remove house fuse or open circuit breaker before use with a properly grounded three-prong wall receptacle, installed...
... be located in the cabinet above the microwave oven. The power supply cord and plug should be mounted to a supply circuit of Electric Shock. Ensure proper ground exists before beginning installation to avoid severe or fatal shock. WARNING: Risk of the proper voltage and frequency. Can cause injury or death: Remove house fuse or open circuit breaker before use with a properly grounded three-prong wall receptacle, installed...
Installation Instructions
Page 7
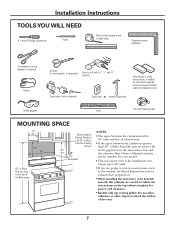
Your Owner's Manual contains the kit number for your model. • This microwave oven is greater than 30″, a Filler Panel Kit may be used to fill in the gap between the cabinets must be 30″ wide and free of the vent. 7 Installation Instructions TOOLS YOU WILL NEED # 1 and #2 Phillips screwdriver Pencil Ruler or tape measure and straight edge Carpenter square (optional) Tin snips (for cutting damper, if...
Your Owner's Manual contains the kit number for your model. • This microwave oven is greater than 30″, a Filler Panel Kit may be used to fill in the gap between the cabinets must be 30″ wide and free of the vent. 7 Installation Instructions TOOLS YOU WILL NEED # 1 and #2 Phillips screwdriver Pencil Ruler or tape measure and straight edge Carpenter square (optional) Tin snips (for cutting damper, if...

Installation Instructions
Page 8
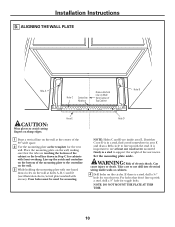
... discard these screws. 8 This plate will indicate a stud location. 2 After locating the stud(s), find the center by probing the wall with a small nail to find the edges of any adjacent studs should be 16″ or 24″ from the mounting plate. The center of the stud. Installation Instructions 1 PLACEMENT OF THE MOUNTING PLATE A. REMOVING THE MICROWAVE OVEN FROM THE CARTON/ REMOVING THE MOUNTING PLATE 1 Remove the installation instructions, filters, glass tray and...
... discard these screws. 8 This plate will indicate a stud location. 2 After locating the stud(s), find the center by probing the wall with a small nail to find the edges of any adjacent studs should be 16″ or 24″ from the mounting plate. The center of the stud. Installation Instructions 1 PLACEMENT OF THE MOUNTING PLATE A. REMOVING THE MICROWAVE OVEN FROM THE CARTON/ REMOVING THE MOUNTING PLATE 1 Remove the installation instructions, filters, glass tray and...
Installation Instructions
Page 10
... not drill into electrical wiring inside walls or cabinets. 4 Drill holes on the wall, making sure that don't line up with one wood screw mounted firmly in a stud to support the weight of electric shock. If there is in a stud, find a stud somewhere in Step C for mounting. NOTE: DO NOT MOUNT THE PLATE AT THIS TIME. 10 WARNING: Risk of the microwave. ALIGNING THE WALL PLATE Hole A Hole...
... not drill into electrical wiring inside walls or cabinets. 4 Drill holes on the wall, making sure that don't line up with one wood screw mounted firmly in a stud to support the weight of electric shock. If there is in a stud, find a stud somewhere in Step C for mounting. NOTE: DO NOT MOUNT THE PLATE AT THIS TIME. 10 WARNING: Risk of the microwave. ALIGNING THE WALL PLATE Hole A Hole...
Installation Instructions
Page 11
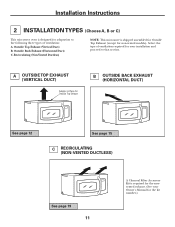
... Owner's Manual for the kit number.) Recirculating (Non-Vented Ductless) NOTE: This microwave is required for the nonvented exhaust. (See your installation and proceed to the following three types of ventilation: A. Outside Back Exhaust (Horizontal Duct) C. A OUTSIDE TOP EXHAUST (VERTICAL DUCT) Adaptor in Place for Outside Top Exhaust B OUTSIDE BACK EXHAUST (HORIZONTAL DUCT) See page 12 See page 15 C RECIRCULATING (NON-VENTED DUCTLESS) See page 19 11 A Charcoal Filter Accessory Kit is shipped assembled...
... Owner's Manual for the kit number.) Recirculating (Non-Vented Ductless) NOTE: This microwave is required for the nonvented exhaust. (See your installation and proceed to the following three types of ventilation: A. Outside Back Exhaust (Horizontal Duct) C. A OUTSIDE TOP EXHAUST (VERTICAL DUCT) Adaptor in Place for Outside Top Exhaust B OUTSIDE BACK EXHAUST (HORIZONTAL DUCT) See page 12 See page 15 C RECIRCULATING (NON-VENTED DUCTLESS) See page 19 11 A Charcoal Filter Accessory Kit is shipped assembled...

Installation Instructions
Page 12
... cabinet. ATTACH THE MOUNTING PLATE TO THE WALL To use toggle bolts: Mounting Plate Spacing for Toggles More Than Wall Thickness Toggle Wings Toggle Bolt Attach the plate to Wall A2. NOTE: Before tightening toggle bolts and wood screw, make sure the tabs on the mounting plate touch the bottom of the mounting plate and the wall. 4 Tighten all bolts. Prepare Top Cabinet A3. Check Damper Operation A4. Installation Instructions A OUTSIDE TOP EXHAUST (Vertical Duct) INSTALLATION...
... cabinet. ATTACH THE MOUNTING PLATE TO THE WALL To use toggle bolts: Mounting Plate Spacing for Toggles More Than Wall Thickness Toggle Wings Toggle Bolt Attach the plate to Wall A2. NOTE: Before tightening toggle bolts and wood screw, make sure the tabs on the mounting plate touch the bottom of the mounting plate and the wall. 4 Tighten all bolts. Prepare Top Cabinet A3. Check Damper Operation A4. Installation Instructions A OUTSIDE TOP EXHAUST (Vertical Duct) INSTALLATION...

Installation Instructions
Page 14
... exhaust duct joints using duct tape. 8 Install grease filter. See the Owner's Manual packed with the microwave. 14 MOUNT THE MICROWAVE OVEN (cont.) Cabinet Front Cabinet Bottom Shelf Filler Block Equivalent to Depth of the microwave oven. (While tightening screws, hold the microwave oven in place against the wall and the top cabinet.) 1 Extend the house duct down to connect to the top cabinet. 5 Insert 2 self-aligning screws through outer top cabinet holes. Installation Instructions A4. Damper Back of Microwave Oven...
... exhaust duct joints using duct tape. 8 Install grease filter. See the Owner's Manual packed with the microwave. 14 MOUNT THE MICROWAVE OVEN (cont.) Cabinet Front Cabinet Bottom Shelf Filler Block Equivalent to Depth of the microwave oven. (While tightening screws, hold the microwave oven in place against the wall and the top cabinet.) 1 Extend the house duct down to connect to the top cabinet. 5 Insert 2 self-aligning screws through outer top cabinet holes. Installation Instructions A4. Damper Back of Microwave Oven...

Installation Instructions
Page 19
... power cord to fit through the holes designated to go into the holes in the cabinet bottom. 19 CAUTION: Be careful to 3⁄4″ onto each bolt. Prepare Top Cabinet C3. Install Charcoal Filter C1. C2. CAUTION: Wear safety goggles when drilling holes in the wall to help tighten the bolts. Mount the Microwave Oven C5. USE TOP CABINET TEMPLATE FOR PREPARATION OF TOP CABINET You need...
... power cord to fit through the holes designated to go into the holes in the cabinet bottom. 19 CAUTION: Be careful to 3⁄4″ onto each bolt. Prepare Top Cabinet C3. Install Charcoal Filter C1. C2. CAUTION: Wear safety goggles when drilling holes in the wall to help tighten the bolts. Mount the Microwave Oven C5. USE TOP CABINET TEMPLATE FOR PREPARATION OF TOP CABINET You need...

Installation Instructions
Page 22
... microwave oven to keep power cord tight. Turn two full turns on each screw. Charcoal Filter 4 Install the charcoal filter. See the Owner's Manual packed with the microwave. 22 Temporarily secure the oven by turning the screw at least two full turns after the threads have engaged. (It will be visible from the top of the microwave oven. 2 Open the door and remove the panel. 3 Push the filter at the bottom until it comes free of cabinet. C5. Installation Instructions...
... microwave oven to keep power cord tight. Turn two full turns on each screw. Charcoal Filter 4 Install the charcoal filter. See the Owner's Manual packed with the microwave. 22 Temporarily secure the oven by turning the screw at least two full turns after the threads have engaged. (It will be visible from the top of the microwave oven. 2 Open the door and remove the panel. 3 Push the filter at the bottom until it comes free of cabinet. C5. Installation Instructions...

Installation Instructions
Page 23
Installation Instructions BEFORE YOU USE YOUR MICROWAVE 1. Make sure the microwave oven has been installed according to 20-amp electrical outlet. Remove all packing material from the microwave oven. 3. Ensure proper ground exists before use 23 Replace house fuse or turn breaker back on. 7. Install turntable and ring in cavity. 4. Read the Owner's Manual. 2. KEEP INSTALLATION INSTRUCTIONS FOR THE LOCAL INSPECTOR'S USE. 5. to instructions. 6. Plug power cord into a dedicated 15-
Installation Instructions BEFORE YOU USE YOUR MICROWAVE 1. Make sure the microwave oven has been installed according to 20-amp electrical outlet. Remove all packing material from the microwave oven. 3. Ensure proper ground exists before use 23 Replace house fuse or turn breaker back on. 7. Install turntable and ring in cavity. 4. Read the Owner's Manual. 2. KEEP INSTALLATION INSTRUCTIONS FOR THE LOCAL INSPECTOR'S USE. 5. to instructions. 6. Plug power cord into a dedicated 15-
Use and Care Manual
Page 4
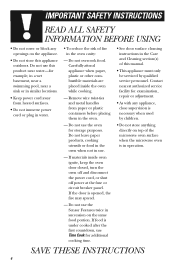
..., cooking utensils or food in the oven when not in the oven. - Remove wire twist-ties and metal handles from heated surfaces. • Do not immerse power cord or plug in water. • To reduce the risk of fire in the Care and Cleaning section(s) of the microwave oven surface when the microwave oven is opened, the fire may spread. - IMPORTANT SAFETY INSTRUCTIONS READ ALL SAFETY INFORMATION BEFORE USING...
..., cooking utensils or food in the oven when not in the oven. - Remove wire twist-ties and metal handles from heated surfaces. • Do not immerse power cord or plug in water. • To reduce the risk of fire in the Care and Cleaning section(s) of the microwave oven surface when the microwave oven is opened, the fire may spread. - IMPORTANT SAFETY INSTRUCTIONS READ ALL SAFETY INFORMATION BEFORE USING...

Use and Care Manual
Page 5
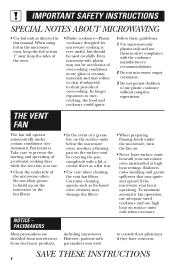
... during cooking. Such use microwave shelf when reheating on more than one level. It increases the heat around the magnetron and can shorten the life of the oven. • Foods with no food inside egg yolk and will cause it touches the • Metal or foil touching the side of the microwave oven could start a fire. FOODS • Do not pop popcorn in your microwave oven unless in a special microwave popcorn...
... during cooking. Such use microwave shelf when reheating on more than one level. It increases the heat around the magnetron and can shorten the life of the oven. • Foods with no food inside egg yolk and will cause it touches the • Metal or foil touching the side of the microwave oven could start a fire. FOODS • Do not pop popcorn in your microwave oven unless in a special microwave popcorn...
Use and Care Manual
Page 8
...-based oven cleaners, may wish • When preparing flaming foods under certain conditions (see Automatic Fan feature). Do not allow grease to prevent the starting and spreading of accidental cooking fires while the vent fan is operating. However, patients with a lid, a cookie sheet or a flat tray. • Use care when cleaning the vent fan filters. IMPORTANT SAFETY INSTRUCTIONS SPECIAL NOTES ABOUT MICROWAVING • Use foil only as directed in use. • Clean the...
...-based oven cleaners, may wish • When preparing flaming foods under certain conditions (see Automatic Fan feature). Do not allow grease to prevent the starting and spreading of accidental cooking fires while the vent fan is operating. However, patients with a lid, a cookie sheet or a flat tray. • Use care when cleaning the vent fan filters. IMPORTANT SAFETY INSTRUCTIONS SPECIAL NOTES ABOUT MICROWAVING • Use foil only as directed in use. • Clean the...
Use and Care Manual
Page 9
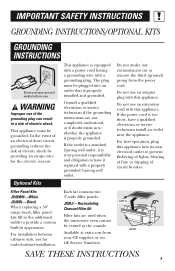
... installed and grounded. Recirculating Charcoal Filter Kit Filter kits are not completely understood, or if doubt exists as to have a qualified electrician or service technician install an outlet near the appliance. If the power cord is properly grounded. Consult a qualified electrician or service technician if the grounding instructions are used when the microwave oven cannot be plugged into its own electrical outlet to the outside. For installation between cabinets...
... installed and grounded. Recirculating Charcoal Filter Kit Filter kits are not completely understood, or if doubt exists as to have a qualified electrician or service technician install an outlet near the appliance. If the power cord is properly grounded. Consult a qualified electrician or service technician if the grounding instructions are used when the microwave oven cannot be plugged into its own electrical outlet to the outside. For installation between cabinets...

Use and Care Manual
Page 16
...Cover with 1/2 cup water. In 1-qt. casserole, place 2 tablespoons water. Peel and cut -side-up after half of time. Cut in husk, use no water; Turn cut into 1 inch cubes. package 5 to 4 min. If corn is in half and remove fibrous membranes. Place in 2-qt. In 11⁄2-qt. Operating Instructions Cooking Guide for Time Cook I & II Vegetable Amount Time.... if corn has been husked, add 1/4 cup water. Place in 2-qt. oblong glass baking dish. In 1-qt. oblong glass baking dish, place squash cut-sidedown. per ear 10-oz. package 5 to 7 min. 4 potatoes 9 to ...
...Cover with 1/2 cup water. In 1-qt. casserole, place 2 tablespoons water. Peel and cut -side-up after half of time. Cut in husk, use no water; Turn cut into 1 inch cubes. package 5 to 4 min. If corn is in half and remove fibrous membranes. Place in 2-qt. In 11⁄2-qt. Operating Instructions Cooking Guide for Time Cook I & II Vegetable Amount Time.... if corn has been husked, add 1/4 cup water. Place in 2-qt. oblong glass baking dish. In 1-qt. oblong glass baking dish, place squash cut-sidedown. per ear 10-oz. package 5 to 7 min. 4 potatoes 9 to ...

Use and Care Manual
Page 33
... bulb by gently turning. Light Bulb Replacement Cooktop Light Replace the burned-out bulb with a 120 volt, 40-watt incandescent bulb (WB36X10003), available from your GE supplier. 1 To replace the bulb(s), first disconnect the power at the main fuse or circuit breaker panel or pull the plug. 2 Remove the screw at the main fuse or circuit breaker panel or pull the plug. 2 To remove the top grille, open the door and remove the 3 screws on the light cover located above the handle. 33 Replace...
... bulb by gently turning. Light Bulb Replacement Cooktop Light Replace the burned-out bulb with a 120 volt, 40-watt incandescent bulb (WB36X10003), available from your GE supplier. 1 To replace the bulb(s), first disconnect the power at the main fuse or circuit breaker panel or pull the plug. 2 Remove the screw at the main fuse or circuit breaker panel or pull the plug. 2 To remove the top grille, open the door and remove the 3 screws on the light cover located above the handle. 33 Replace...

Use and Care Manual
Page 35
... comes free of the right rear tab. Filter housing To install a new filter, remove plastic and other outer wrapping from your GE supplier. Order Part No. See "Optional Kits," page 9, for more information. Slide the filter down and out. It will be recirculated through a disposable charcoal filter that hold the grille in front of the locking tabs. It must be cleaned. Remove the top grille by opening of...
... comes free of the right rear tab. Filter housing To install a new filter, remove plastic and other outer wrapping from your GE supplier. Order Part No. See "Optional Kits," page 9, for more information. Slide the filter down and out. It will be recirculated through a disposable charcoal filter that hold the grille in front of the locking tabs. It must be cleaned. Remove the top grille by opening of...

Use and Care Manual
Page 36
... • Replace fuse or reset circuit breaker. Door not securely closed. • Open the door and close securely. may make the oven floor get warm. • This is operating. "LOCKED" appears The control has been on the into wall outlet. Power surge. • Unplug the microwave oven, then plug it off by pressing the Vent Fan pad after the microwave is off automatically or you will need to heat for...
... • Replace fuse or reset circuit breaker. Door not securely closed. • Open the door and close securely. may make the oven floor get warm. • This is operating. "LOCKED" appears The control has been on the into wall outlet. Power surge. • Unplug the microwave oven, then plug it off by pressing the Vent Fan pad after the microwave is off automatically or you will need to heat for...
Use and Care Manual
Page 40
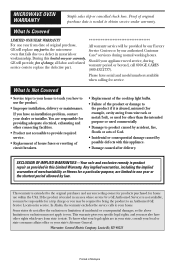
... the product to your state's Attorney General. What Is Not Covered • Service trips to use within the USA. workmanship. This warranty gives you specific legal rights, and you . If the product is located in Malaysia Should your appliance need service, during normal working hours. If you have an installation problem, contact your home to state. MICROWAVE OVEN WARRANTY Staple sales slip or cancelled check...
... the product to your state's Attorney General. What Is Not Covered • Service trips to use within the USA. workmanship. This warranty gives you specific legal rights, and you . If the product is located in Malaysia Should your appliance need service, during normal working hours. If you have an installation problem, contact your home to state. MICROWAVE OVEN WARRANTY Staple sales slip or cancelled check...


