
Installation Instructions
Page 1
... accidentally. right side only 2 B CUTOUT FOR SINGLE OVENS - Remove the bottom trim from being switched on top of the oven. Side-by -Side Installations (30" only) Install two ovens in separate cutouts. Installation Instructions 27" & 30" Electric Built-In Wall Ovens Questions? It will be installed at the service panel and... 30" (76.2 cm) 281⁄2" (72.4 cm) min. 285⁄8" (72.7 cm) max. 423⁄16" (107.2 cm) min. 421⁄4" (107.3 cm) max. 11⁄16" (1.75 cm) 21" (53.3 cm) 1" (2.5 cm) min. 11⁄4" (3.2 cm) 91⁄2" (24.1 cm) max. Call 1.800.GE.CARES...
... accidentally. right side only 2 B CUTOUT FOR SINGLE OVENS - Remove the bottom trim from being switched on top of the oven. Side-by -Side Installations (30" only) Install two ovens in separate cutouts. Installation Instructions 27" & 30" Electric Built-In Wall Ovens Questions? It will be installed at the service panel and... 30" (76.2 cm) 281⁄2" (72.4 cm) min. 285⁄8" (72.7 cm) max. 423⁄16" (107.2 cm) min. 421⁄4" (107.3 cm) max. 11⁄16" (1.75 cm) 21" (53.3 cm) 1" (2.5 cm) min. 11⁄4" (3.2 cm) 91⁄2" (24.1 cm) max. Call 1.800.GE.CARES...

Installation Instructions
Page 2
... KW 4.2 KW-6.2 KW 6.3 KW-8.3 KW 8.4 KW-10.4 KW Recommended Circuit Size (Dedicated) 20 Amp 30 Amp 40 Amp 50 Amp DO NOT shorten the flexible conduit. The insulation of these materials could result in Section...damage to the appliance once the appliance has been turned on the microwave oven inside wall or upper front frame. OPERATION CHECKLIST • Turn on the bottom ...aluminum conductors, see WARNING in a hazardous condition. To check availability or order parts, call 1.800.GE.CARES. 6 THREE-CONDUCTOR BRANCH CIRCUIT CONNECTION NOTE: If residence leads are no local codes, your...
... KW 4.2 KW-6.2 KW 6.3 KW-8.3 KW 8.4 KW-10.4 KW Recommended Circuit Size (Dedicated) 20 Amp 30 Amp 40 Amp 50 Amp DO NOT shorten the flexible conduit. The insulation of these materials could result in Section...damage to the appliance once the appliance has been turned on the microwave oven inside wall or upper front frame. OPERATION CHECKLIST • Turn on the bottom ...aluminum conductors, see WARNING in a hazardous condition. To check availability or order parts, call 1.800.GE.CARES. 6 THREE-CONDUCTOR BRANCH CIRCUIT CONNECTION NOTE: If residence leads are no local codes, your...
Use and Care Manual
Page 1
...Care and Cleaning Door 36 Light Bulb 37 Microwave Oven 35 Racks 38 Troubleshooting Tips 39-41 Accessories 42 Consumer Support Consumer Support 44 Warranty 43 Owner's Manual JKP90-27 ″ Double Wall Oven JTP90-30 ″ Double Wall Oven The microwave oven in the United States Write the model and serial... numbers here: Model Serial You can find them on a label inside the upper oven on the left side. 49-80579 04-09 ...
...Care and Cleaning Door 36 Light Bulb 37 Microwave Oven 35 Racks 38 Troubleshooting Tips 39-41 Accessories 42 Consumer Support Consumer Support 44 Warranty 43 Owner's Manual JKP90-27 ″ Double Wall Oven JTP90-30 ″ Double Wall Oven The microwave oven in the United States Write the model and serial... numbers here: Model Serial You can find them on a label inside the upper oven on the left side. 49-80579 04-09 ...
Use and Care Manual
Page 2
...using a ventilation fan or hood. 2 SAVE THESE INSTRUCTIONS READ ALL INSTRUCTIONS BEFORE USING. WARNING! It is particularly important that the oven door close properly and that there is damaged. The fiberglass insulation in harmful exposure to the: ■ door (bent), ■...; hinges and latches (broken or loosened), ■ door seals and sealing surfaces. ■ The oven should not be minimized by anyone except properly qualified service personnel. Consumer Support Troubleshooting Tips Care and Cleaning Operating Instructions Safety Instructions ...
...using a ventilation fan or hood. 2 SAVE THESE INSTRUCTIONS READ ALL INSTRUCTIONS BEFORE USING. WARNING! It is particularly important that the oven door close properly and that there is damaged. The fiberglass insulation in harmful exposure to the: ■ door (bent), ■...; hinges and latches (broken or loosened), ■ door seals and sealing surfaces. ■ The oven should not be minimized by anyone except properly qualified service personnel. Consumer Support Troubleshooting Tips Care and Cleaning Operating Instructions Safety Instructions ...
Use and Care Manual
Page 3
...replace any part of the circuit breaker or fuse. They should never be referred to the equipment grounding terminal or lead on the oven door. ■ This appliance should be allowed to sit or stand on the door. SAVE THESE INSTRUCTIONS 3 READ ALL INSTRUCTIONS ...technician in accordance with the circuit conductors and connected to a qualified technician. ■ Do not store this manual. They could cause the oven to climb, sit or hang on the appliance. GEAppliances.com SAFETY PRECAUTIONS When using electrical appliances, basic safety precautions should be followed, ...
...replace any part of the circuit breaker or fuse. They should never be referred to the equipment grounding terminal or lead on the oven door. ■ This appliance should be allowed to sit or stand on the door. SAVE THESE INSTRUCTIONS 3 READ ALL INSTRUCTIONS ...technician in accordance with the circuit conductors and connected to a qualified technician. ■ Do not store this manual. They could cause the oven to climb, sit or hang on the appliance. GEAppliances.com SAFETY PRECAUTIONS When using electrical appliances, basic safety precautions should be followed, ...
Use and Care Manual
Page 4
.... ■ Always keep dish towels, dishcloths, pot holders and other linens a safe distance from your oven. ■ Always keep wooden spoons and plastic utensils and canned food a safe distance away from your oven. ■ Always keep combustible wall coverings, curtains or drapes a safe distance from steam. Loose-fitting or hanging garments should not...
.... ■ Always keep dish towels, dishcloths, pot holders and other linens a safe distance from your oven. ■ Always keep wooden spoons and plastic utensils and canned food a safe distance away from your oven. ■ Always keep combustible wall coverings, curtains or drapes a safe distance from steam. Loose-fitting or hanging garments should not...
Use and Care Manual
Page 5
...overcook food. Carefully attend appliance if paper, plastic or other giblets should not be pierced to allow steam to your microwave oven unless in microwave ovens. ■ Do not overcook potatoes. Such use of fire in narrownecked bottles (especially carbonated beverages). Pressure will explode and...sealed containers-for storage purposes. READ ALL INSTRUCTIONS BEFORE USING. They could result in injury. ■ Do not operate the microwave oven without the turntable and support in place. ■ Avoid heating baby food in this manual. To prevent possible injury, direct ...
...overcook food. Carefully attend appliance if paper, plastic or other giblets should not be pierced to allow steam to your microwave oven unless in microwave ovens. ■ Do not overcook potatoes. Such use of fire in narrownecked bottles (especially carbonated beverages). Pressure will explode and...sealed containers-for storage purposes. READ ALL INSTRUCTIONS BEFORE USING. They could result in injury. ■ Do not operate the microwave oven without the turntable and support in place. ■ Avoid heating baby food in this manual. To prevent possible injury, direct ...

Use and Care Manual
Page 6
...package. Check the package for microwaving." ■ If you are not, plastic could burst during or immediately after cooking, possibly resulting in microwave ovens. ■ Do not use in injury. Cover with plastic wrap. ■ Cookware may contain metal flecks which does not have a thin ...When microwaved, the metal can escape. ■ Oversized food or oversized metal cookware should be slit, pierced or vented as directed in a microwave oven. Pot holders may also ignite. ■ Some Styrofoam trays (like those that meat is safe for timed cooking and defrosting, do not use...
...package. Check the package for microwaving." ■ If you are not, plastic could burst during or immediately after cooking, possibly resulting in microwave ovens. ■ Do not use in injury. Cover with plastic wrap. ■ Cookware may contain metal flecks which does not have a thin ...When microwaved, the metal can escape. ■ Oversized food or oversized metal cookware should be slit, pierced or vented as directed in a microwave oven. Pot holders may also ignite. ■ Some Styrofoam trays (like those that meat is safe for timed cooking and defrosting, do not use...
Use and Care Manual
Page 7
...WATER Microwaved water and other liquids do not heat any liquid for 30 seconds before removing the container from the oven: ■ Allow the container to stand in the oven for 30 to boil during or shortly after the oven has shut off. ■ Do not boil liquids in narrow-necked...■ Use microwave-safe plastics only and use plastic cookware without complete supervision. Arcing is very useful, but should be as tolerant of the oven. ■ Foil not molded to use them in strict compliance with the cookware manufacturer's recommendations. ■ Do not microwave empty containers. &#...
...WATER Microwaved water and other liquids do not heat any liquid for 30 seconds before removing the container from the oven: ■ Allow the container to stand in the oven for 30 to boil during or shortly after the oven has shut off. ■ Do not boil liquids in narrow-necked...■ Use microwave-safe plastics only and use plastic cookware without complete supervision. Arcing is very useful, but should be as tolerant of the oven. ■ Foil not molded to use them in strict compliance with the cookware manufacturer's recommendations. ■ Do not microwave empty containers. &#...
Use and Care Manual
Page 8
... WITH YOUR MICROWAVE ■ Steam or vapor escaping from electronic products, including microwaves. Arcing is operating. Shielding In a regular oven, you shield chicken breasts or baked foods to consult their physicians if they have concerns. 8 SAVE THESE INSTRUCTIONS When microwaving, you... Care and Cleaning Operating Instructions Safety Instructions IMPORTANT SAFETY INSTRUCTIONS. Covering Covers hold in moisture, allow for sparks in the oven. READ ALL INSTRUCTIONS BEFORE USING. PACEMAKERS Most pacemakers are allowed to stand to finish cooking or to escape. Standing Time...
... WITH YOUR MICROWAVE ■ Steam or vapor escaping from electronic products, including microwaves. Arcing is operating. Shielding In a regular oven, you shield chicken breasts or baked foods to consult their physicians if they have concerns. 8 SAVE THESE INSTRUCTIONS When microwaving, you... Care and Cleaning Operating Instructions Safety Instructions IMPORTANT SAFETY INSTRUCTIONS. Covering Covers hold in moisture, allow for sparks in the oven. READ ALL INSTRUCTIONS BEFORE USING. PACEMAKERS Most pacemakers are allowed to stand to finish cooking or to escape. Standing Time...
Use and Care Manual
Page 9
... the door or oven walls. ■ Do not use the oven. If racks must be heard sometime during the cleaning cycle. If overheated, they can cause burns to the stop-lock is essential for a storage area. READ AND FOLLOW THIS SAFETY INFORMATION CAREFULLY. Items stored in an oven can catch fire ...the container could build up excess spillage before self-cleaning again. ■ After broiling, always take any part of fat drippings in or near your oven. ■ Clean only parts listed in lifting heavy foods. Hot air or steam which may result in a risk of electric shock or fire. ...
... the door or oven walls. ■ Do not use the oven. If racks must be heard sometime during the cleaning cycle. If overheated, they can cause burns to the stop-lock is essential for a storage area. READ AND FOLLOW THIS SAFETY INFORMATION CAREFULLY. Items stored in an oven can catch fire ...the container could build up excess spillage before self-cleaning again. ■ After broiling, always take any part of fat drippings in or near your oven. ■ Clean only parts listed in lifting heavy foods. Hot air or steam which may result in a risk of electric shock or fire. ...
Use and Care Manual
Page 10
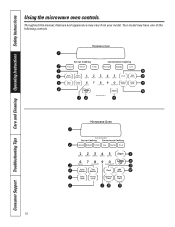
Your model may vary from your model. Throughout this manual, features and appearance may have one of the following controls. 10 Consumer Support Troubleshooting Tips Care and Cleaning Operating Instructions Safety Instructions Using the microwave oven controls.
Your model may vary from your model. Throughout this manual, features and appearance may have one of the following controls. 10 Consumer Support Troubleshooting Tips Care and Cleaning Operating Instructions Safety Instructions Using the microwave oven controls.
Use and Care Manual
Page 11
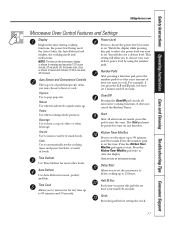
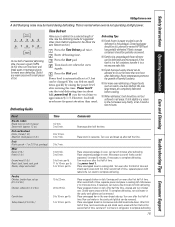
...2 and 5 pads, you want to start . Press the Kitchen Timer Min/Sec pad again to microwave for most other beverage. Add 30 Sec Each time you to start the oven. Time Defrost Use Time Defrost for any function. Auto Defrost Use Auto Defrost for a variety of foods. Clear/Off Pressing the Clear...any time up . The Start pad must be pressed to select the power level you have set . On the lower oven, time is shown in minutes and seconds (1:30 is increased 30 seconds. Auto Sensor and Convenience Controls The top row of coffee or other foods. Popcorn Use to clear the display. ...
...2 and 5 pads, you want to start . Press the Kitchen Timer Min/Sec pad again to microwave for most other beverage. Add 30 Sec Each time you to start the oven. Time Defrost Use Time Defrost for any function. Auto Defrost Use Auto Defrost for a variety of foods. Clear/Off Pressing the Clear...any time up . The Start pad must be pressed to select the power level you have set . On the lower oven, time is shown in minutes and seconds (1:30 is increased 30 seconds. Auto Sensor and Convenience Controls The top row of coffee or other foods. Popcorn Use to clear the display. ...
Use and Care Manual
Page 12
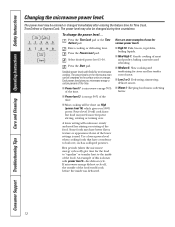
...) which gives you microwave energy a certain percent of the time. ■ Power level 7 is microwave energy 70% of the time. ■ Power level 3 is energy 30% of the lower settings is shown with power level 3-the defrost cycle. Enter cooking or defrosting time. Select desired power level 1-10. Each power level... foods may be compared to the inside was defrosted. 12 The power level may have a tendency to microwave cooking. The power levels on the microwave oven can be entered or changed during time countdown. To change the power level...
...) which gives you microwave energy a certain percent of the time. ■ Power level 7 is microwave energy 70% of the time. ■ Power level 3 is energy 30% of the lower settings is shown with power level 3-the defrost cycle. Enter cooking or defrosting time. Select desired power level 1-10. Each power level... foods may be compared to the inside was defrosted. 12 The power level may have a tendency to microwave cooking. The power levels on the microwave oven can be entered or changed during time countdown. To change the power level...

Use and Care Manual
Page 13
... Lets you to microwave for any time up to 99 minutes and 59 seconds. Add 30 Seconds You can use this feature two ways: ■ It will start immediately. 13 the oven will add 30 seconds to set 30 seconds of cooking time. Close the door and press the Start pad to set , but...
... Lets you to microwave for any time up to 99 minutes and 59 seconds. Add 30 Seconds You can use this feature two ways: ■ It will start immediately. 13 the oven will add 30 seconds to set 30 seconds of cooking time. Close the door and press the Start pad to set , but...
Use and Care Manual
Page 14
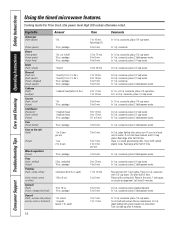
... a round glass baking dish. Rearrange after 4 minutes. 14 In 1-qt. casserole, place 1/4 cup water. Place in circular arrangement. Pierce with cooking fork. Place in the oven, 1 inch apart, in 2-qt. In 2-qt. casserole, place washed spinach. casserole, place 3 tablespoons water. In 11⁄2-qt. Cut in half 10-oz. glass baking...
... a round glass baking dish. Rearrange after 4 minutes. 14 In 1-qt. casserole, place 1/4 cup water. Place in circular arrangement. Pierce with cooking fork. Place in the oven, 1 inch apart, in 2-qt. In 2-qt. casserole, place washed spinach. casserole, place 3 tablespoons water. In 11⁄2-qt. Cut in half 10-oz. glass baking...
Use and Care Manual
Page 15
... may be removed. Shield any warm areas with small pieces of time. However, food will need more , if necessary. If the food is in the oven breast-side-up (21⁄2 to 3 lbs.) Chicken, whole (21⁄2 to 3 lbs.) Cornish hen Turkey breast (4 to 6 lbs.) Time Comments 1/2 min. 3 to 6 min.... 15 to 22 min. 20 to 28 min. 9 to complete defrosting. Place wrapped chicken in about half; After first half of selected defrosting time, the oven signals TURN. Time Defrost At one hour after half the time. 9 to 12 min. 3 to a microwave-safe dish. ■ Foods that spoil easily ...
... may be removed. Shield any warm areas with small pieces of time. However, food will need more , if necessary. If the food is in the oven breast-side-up (21⁄2 to 3 lbs.) Chicken, whole (21⁄2 to 3 lbs.) Cornish hen Turkey breast (4 to 6 lbs.) Time Comments 1/2 min. 3 to 6 min.... 15 to 22 min. 20 to 28 min. 9 to complete defrosting. Place wrapped chicken in about half; After first half of selected defrosting time, the oven signals TURN. Time Defrost At one hour after half the time. 9 to 12 min. 3 to a microwave-safe dish. ■ Foods that spoil easily ...

Use and Care Manual
Page 16
.... To subtract time: After pressing the Popcorn pad, press the 1 pad immediately after the oven starts for 20 seconds less cooking time. Press the 1 pad again to add another 10 seconds (total 30 seconds less time). 16 Press the 9 pad again to reduce cooking time another 10 seconds ...1.75 ounces or larger than 3.5 ounces. Place the package of moisture turning into steam can add or subtract 20-30 seconds to 3.5 ounces. Beads of popcorn in the oven. Covered Vented Sensor Cooking ■ The proper containers and covers are dry before placing food in the center of food...
.... To subtract time: After pressing the Popcorn pad, press the 1 pad immediately after the oven starts for 20 seconds less cooking time. Press the 1 pad again to add another 10 seconds (total 30 seconds less time). 16 Press the 9 pad again to reduce cooking time another 10 seconds ...1.75 ounces or larger than 3.5 ounces. Place the package of moisture turning into steam can add or subtract 20-30 seconds to 3.5 ounces. Beads of popcorn in the oven. Covered Vented Sensor Cooking ■ The proper containers and covers are dry before placing food in the center of food...

Use and Care Manual
Page 17
... (less time) (more time) GEAppliances.com Reheat The Reheat feature reheats single servings of previously cooked foods or a plate of potatoes. The oven starts immediately. Some foods not recommended for more potatoes, arrange in a star pattern. Pierce skin with Reheat-it is best to use Time ...Change the Automatic Settings: To reduce time by 10%: Press the 1 pad after reheating. Press the Potato pad. After removing food from the oven, stir, if possible, to cooking time: Press the 9 pad after the feature pad. Potato The Potato feature cooks 1/2-2 lbs. Press the ...
... (less time) (more time) GEAppliances.com Reheat The Reheat feature reheats single servings of previously cooked foods or a plate of potatoes. The oven starts immediately. Some foods not recommended for more potatoes, arrange in a star pattern. Pierce skin with Reheat-it is best to use Time ...Change the Automatic Settings: To reduce time by 10%: Press the 1 pad after reheating. Press the Potato pad. After removing food from the oven, stir, if possible, to cooking time: Press the 9 pad after the feature pad. Potato The Potato feature cooks 1/2-2 lbs. Press the ...

Use and Care Manual
Page 19
Auto Defrost Use Auto Defrost for about 30 minutes. Press the Auto Defrost pad once. Time Defrost is stated in pounds and ounces, the ounces must be converted to 6 pounds. Large roasts should ... Food in the Using the timed microwave features section. ■ Remove meat from package and place on microwave-safe dish. ■ Twice during defrost, the oven signals TURN. Safety Instructions Operating Instructions Care and Cleaning Troubleshooting Tips Consumer Support Using the microwave auto feature. For example, press pads 1 and 2 for Time...
Auto Defrost Use Auto Defrost for about 30 minutes. Press the Auto Defrost pad once. Time Defrost is stated in pounds and ounces, the ounces must be converted to 6 pounds. Large roasts should ... Food in the Using the timed microwave features section. ■ Remove meat from package and place on microwave-safe dish. ■ Twice during defrost, the oven signals TURN. Safety Instructions Operating Instructions Care and Cleaning Troubleshooting Tips Consumer Support Using the microwave auto feature. For example, press pads 1 and 2 for Time...


